Overview
If you have implemented the Amazon Account Integration, you can use Sellercloud to process Amazon refunds and cancellations. Sellercloud offers Amazon-specific settings and features that allow you to control how you handle such requests. For example, you can automatically send them to Amazon one by one or batch them together. This article lists and describes the available options and takes you step by step through each one.
Amazon RMAs
Customers may submit a return request to exchange or return purchased items. Amazon will automatically authorize the return and send the customer a prepaid shipping label.
Sellercloud can download return reports from Amazon and create RMAs automatically, or you can import them manually.
- If the item in the report is a Kit parent, Sellercloud will only add the components to the RMA.
- The Amazon RMA ID will be saved to the Order Source RMA # field.
- A label tracking number will be added as a Note to the RMA.
- RMAs will only be imported if their status on the report is Approved.
- The resolution will be set to Refund.
- The RMA status will be Open.
Import RMAs Automatically
To import RMAs from Amazon automatically, go to Client Settings and enable Download and process RMA report from Amazon. With this setting enabled, Sellercloud will download and process RMA reports from Amazon on a regular basis and display this information on your orders.
Import RMAs Manually
First, you must download the RMA file from Amazon:
- Log in to your Amazon account.
- Go to Reports > Return Reports.
- Choose the report type, set the date range, and click Request.
- Click Refresh to see the finished report in the grid.
- Click Download to open the XML or TSV format file.
You can also create a scheduled report by selecting Schedule Report Generation.
Next, to import the RMA file into Sellercloud:
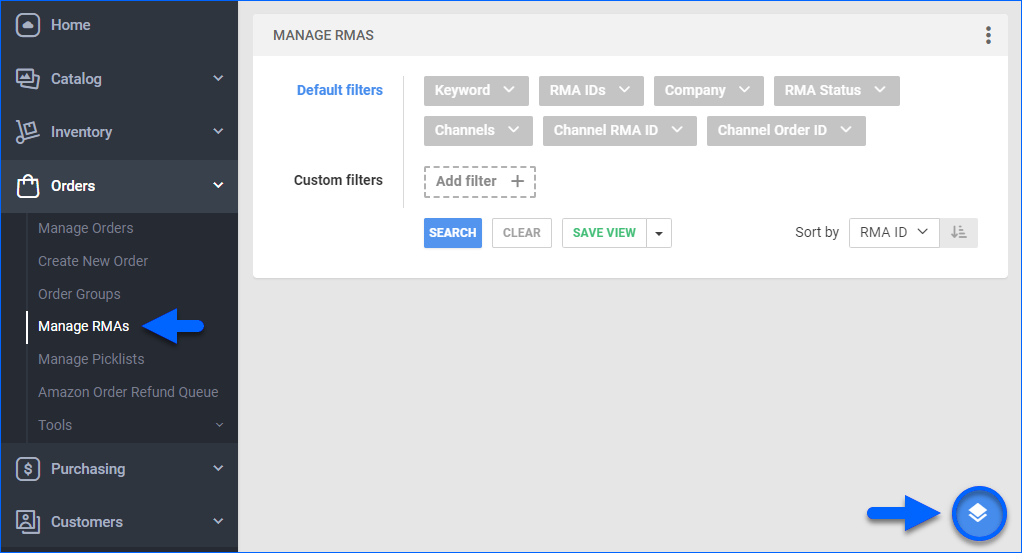
- Go to Orders > Manage RMAs.
- Access the Actions menu at the bottom-right corner of the page and select Import.
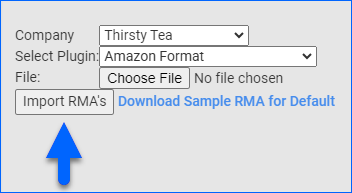
- Click Choose File and select the RMA file you downloaded earlier. The Select Plugin field should be set to Amazon Format.
- Click Import RMAs.
Refund Amazon Orders
If an item is being returned, you should issue a refund from an RMA. Otherwise, you can issue a refund from the order details page.
Follow these steps to refund an Amazon order:
- Open an Order Details Page or an RMA.
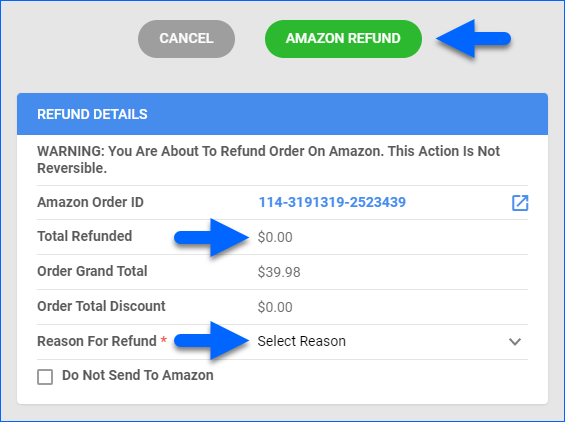
- Click Actions and select Issue Refund.
- Confirm the amount being refunded next to Total Refunded.
- Select a Reason for Refund.
- Click Amazon Refund.
Sellercloud submits this refund information via Amazon’s API and adjusts the payment status of the order. After processing the refund, Amazon refunds the commission. When the Settlement Report with this information is downloaded, this information will be updated in Sellercloud.
Cancel Amazon Orders
Once an order is cancelled, it will not go to Shipbridge for shipping. Even if an order is already in the Shipbridge grid, its status will be checked automatically, and it will be prevented from shipping.
To partially cancel an order, you should first Split the Original Order and then initiate the cancellation process for the selected items.
To cancel an Amazon order:
-
- Go to an Order Details Page.
- Click Actions and select Cancel Order.
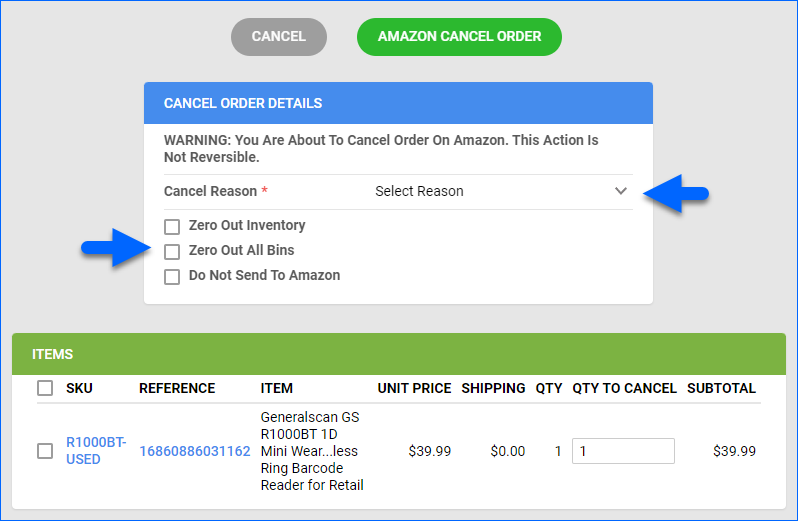
- Enter a Cancel Reason. Optionally, you can also check:
- Click Amazon Cancel Order.
Buyer Cancellation Requests
Amazon buyers can not cancel orders by themselves, but they can initiate cancellation requests. You can see cancellation requests on Seller Central, but it’s best to handle them in Sellercloud. Otherwise, you will also have to mark the order as Cancelled internally in Sellercloud after processing it in Seller Central.
Once a request is submitted, you have up to 2 days to respond. After 2 days, the buyer can contact Amazon directly for a resolution. If the order gets cancelled and/or refunded by Amazon, it will update in Sellercloud when its Amazon Settlement comes in.
To import buyer cancellation requests to Sellercloud, the order report from Amazon must include an indicator that the buyer requested a cancellation. In the Amazon report file, this indicator will appear as is-buyer-requested-cancellation. If you do not have this column enabled in Seller Central, the orders will not update accordingly into Sellercloud. To set this up:
- Log in to Amazon Seller Central.
- Go to Orders > Order Reports > select Add or remove order report columns, or visit this page here.
- Enable the Buyer requested cancel option and click Save Changes. A column with the same name will be included in the order report within your Seller Central account.
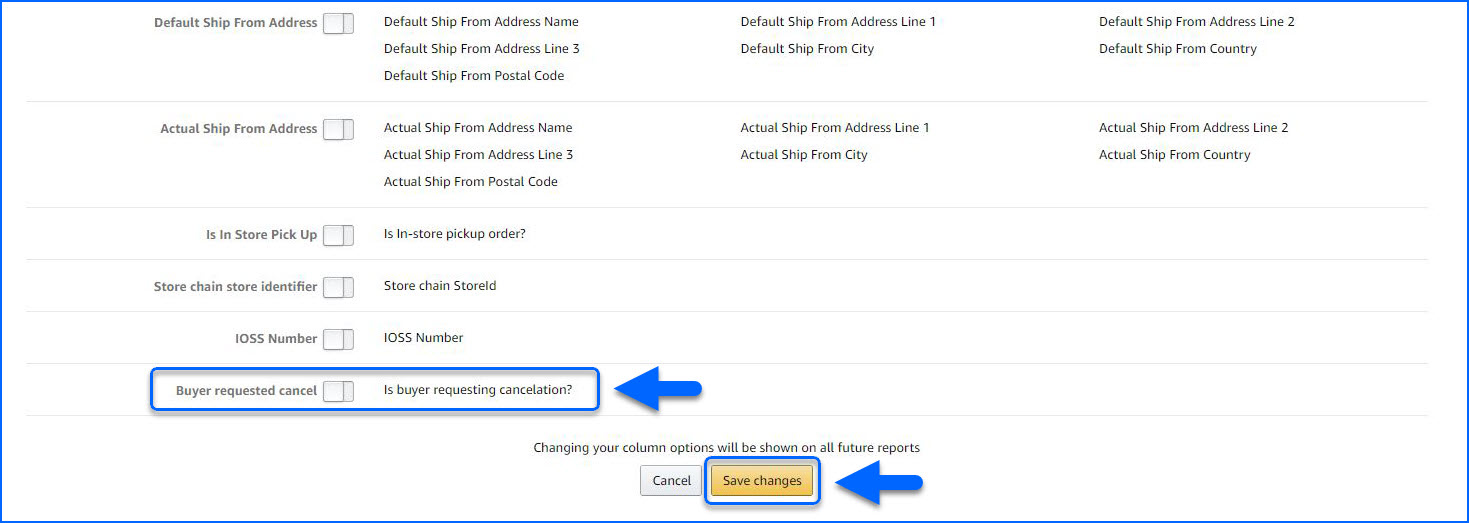
- When Sellercloud downloads and processes the order reports if is-buyer-requested-cancellation = true, Sellercloud will place the order On Hold to prevent shipping while you handle the cancellation request. Sellercloud will update the order with an On Hold status, and add the Cancel Reason to the Order Notes if it meets all the following criteria:
- Shipping Status = Unshipped
- Order Status = In Process
Queue Refunds and Cancellations
Instead of automatically submitting Amazon refund and cancellation requests, you can have them go to a queue for manual processing. For this workflow, go to Client Settings and enable Queue Amazon Order Refunds And Cancellations.
You can also choose to keep submitting refunds and cancellations automatically but still show them in the queue for visibility. For this workflow, enable both the setting above and the sub-setting Queue Amazon Order Refunds And Cancellations – Auto Submit To Amazon.
When manually processing requests from the queue, you can batch multiple refund and cancellation requests together and send them to Amazon in a single document. Batch processing helps prevent throttling, which can happen when you refund or cancel numerous Amazon orders one at a time or push individual item information. Learn how to Post and Update products in bulk to avoid throttling.
To batch-process refund or cancellation requests:
- Go to Orders > Amazon Order Refund Queue.
- Click the Company menu to select a company.
- Click Queue Type and select if you want to see Refund or Cancellation requests.
- Click Search.
- Check the boxes on the left to select cancellation or refund IDs.
- Click the three dots icon at the top right and select Process Cancellation or Process Refund. Alternatively, you can select Reject Request. All selected requests will be sent to Amazon in a single file.

- If you are successful, a message will appear at the bottom of the page with the Document Number and Batch ID.

Client Settings
The following Client Settings affect Amazon refunds and cancellations:
- Download and process RMA report from Amazon – Enable to automatically download and process returns from an Amazon report. After requesting and downloading the returns report, Sellercloud creates an RMA for each order with an active return and updates the RMA with the correct status and tracking number (if available in the report). If you don’t enable this setting, you can still import Amazon RMAs manually.
- Allow to Over Refund Amazon Order – Enable to allow refunds higher than the amount paid by the customer for an order to be issued from Sellercloud.
- Allow To Zero Out Inventory When Cancelling Amazon Order – When canceling an Amazon order, this setting enables the check box Zero Out Inventory. It also sets order items’ Physical Inventory to 0 when canceling with the reason No Stock.
- Do not create RMA for Amazon returnless refunds – Enable to skip creating an RMA for refunds without any returned items.
- Allow to Cancel Amazon order without sending cancel request to Amazon – When canceling an Amazon order, this setting enables a check box Do Not Send To Amazon that allows you to skip sending a cancellation request to Amazon.
- Queue Amazon Order Refunds and Cancellations – Enable to prevent cancellation and refund requests from being submitted to Amazon automatically and have them go to a queue for manual processing.
- Queue Amazon Order Refunds and Cancellations – Auto submit to Amazon – Cancellation and refund requests will appear in the queue but will be processed in batches automatically by Sellercloud.
Overview
With Sellercloud, you can add Amazon refund and cancellation requests into a batch, which you can then send with a single document. This feature helps you prevent throttling, which can happen when you refund or cancel many individual orders or push single item information. Learn how to Bulk Update and List products to avoid throttling.
Prerequisites
To be able to use the feature, you need to:
- Enable the Client Setting Queue Amazon Order Refunds, which prevents automatic cancellation and refund requests to Amazon and sends them to a queue for manual processing.
- Optionally, you can enable the sub-setting Queue Amazon Order Refunds and Cancellations – Auto submit to Amazon. With this setting enabled, the Amazon Order Service will search for any queued refunds or cancellations, and we will automatically send batches to Amazon around every thirty minutes.
Queue Amazon Refunds and Cancellations
Instead of automatically submitting Amazon refund and cancellation requests, you can have them go to a queue for manual processing. For this workflow, go to Client Settings and enable Queue Amazon Order Refunds And Cancellations.
You can also choose to keep submitting refunds and cancellations automatically but still show them in the queue for visibility. For this workflow, enable both the setting above and the sub-setting Queue Amazon Order Refunds And Cancellations – Auto Submit To Amazon.
When manually processing requests from the queue, you can batch multiple refund and cancellation requests together and send them to Amazon in a single document. Batch processing helps prevent throttling, which can happen when you refund or cancel numerous Amazon orders one at a time or push individual item information. Learn how to Post and Update products in bulk to avoid throttling.
To batch-process refund or cancellation requests:
-
- Go to Orders > Amazon Order Refund Queue.
- Click the Company menu to select a company.
- Click Queue Type and select if you want to see Refund or Cancellation requests.
- Check the boxes on the left to select cancellation or refund IDs.
- Click Select Action at the top right and select Process Refund or Process Cancellation. Alternatively, you can select Reject Request.
- Click Go. All selected requests will be sent to Amazon in a single file.
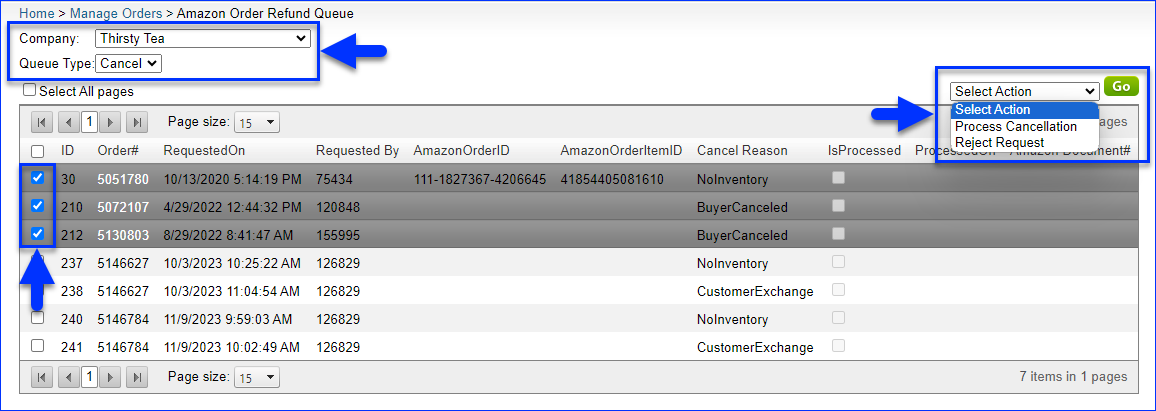
- If processed successfully, you will see a success message at the top of the page, showing the Document Number and Batch ID.

