Overview
Return Merchandise Authorization (RMA) is the recommended workflow for managing order item returns from customers in Sellercloud. RMAs let you track and process returns from the first contact with the customer up until they are received back into your warehouse.
Prerequisites
To start using the RMA workflow, it’s crucial to fulfill certain prerequisites beforehand. You must configure:
- A returns warehouse.
- A returns address.
- Carrier credentials.
For step-by-step instructions on completing the prerequisites for the RMA workflow, see Returns Warehouse Configuration.
Create an RMA
After configuring the return address as described above, you can create RMAs individually or in bulk.
Individually
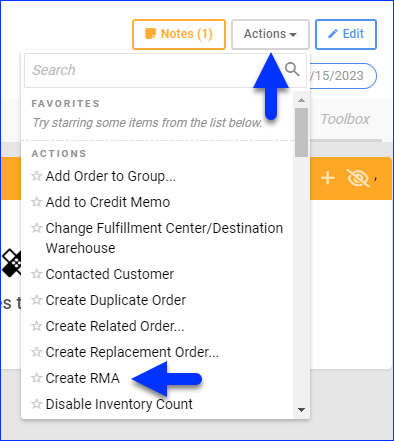
To create an RMA manually:
- Go to an Order Details Page.
- Click Actions and select Create RMA.
- Check the boxes on the left to select items for return.
- Enter a Qty to Return.
- Enter a Reason. You can do this per item or select the Return Reason For All Items.
- Optionally, enter a Description.
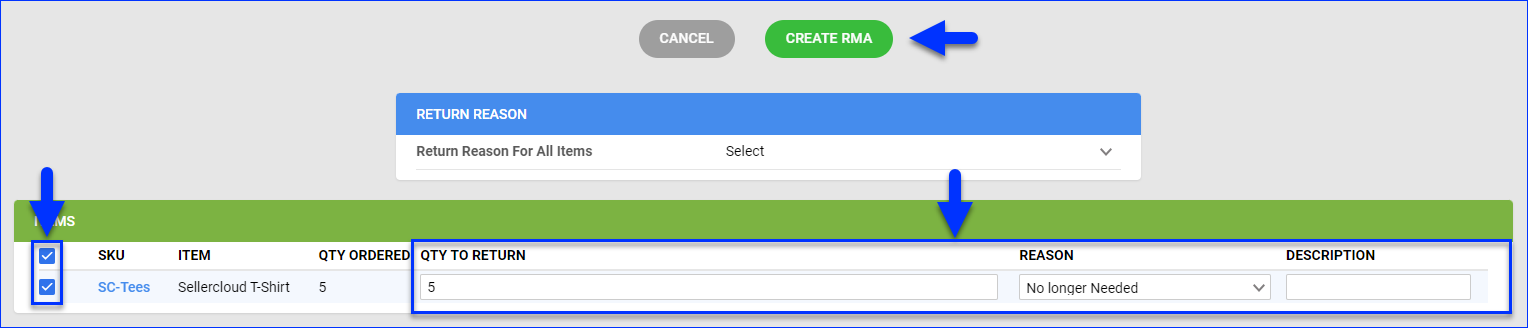
- Click Create RMA.
In Bulk
To create multiple RMAs at once:
- Go to Orders > Manage RMAs.
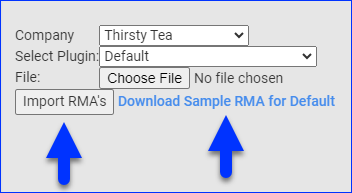
- Click the Actions icon at the bottom-right corner of the page and select Import.

- Click Download Sample RMA for Default to download the template file.
- Update the downloaded template file.
- Click Import RMAs and select the updated file.
Manage RMAs
Sellercloud offers many options when it comes to processing and managing your RMAs. In this section, we’ll review some of the most essential parts of the workflow.
Search RMAs
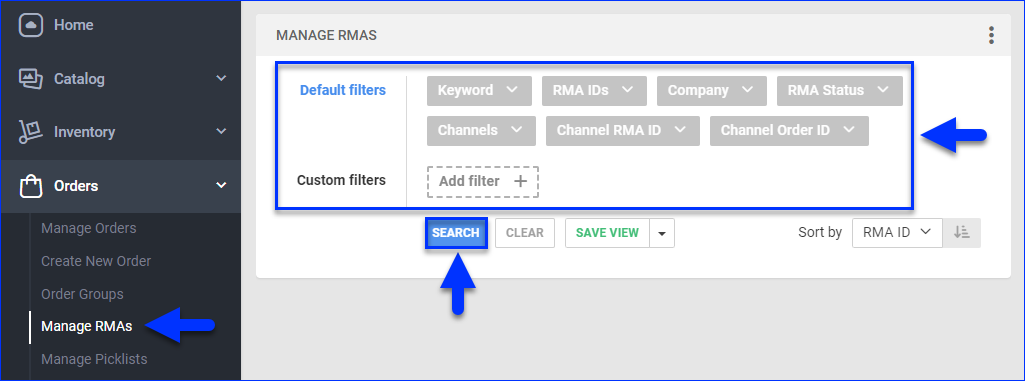
To search for RMAs:
- Go to Orders > Manage RMAs.
- Optionally, set up the Default filters and Custom filters. Some of the most noteworthy filters are:
- RMA IDs – Show only one or more RMAs by their unique ID.
- RMA Status – Show only RMAs with a specific Status.
- RMA Approval Status – Show only RMAs with a specific Approval Status.
- Received Status – Show only RMAs with a specific Receiving Status.
- Replacement Status – Show only RMAs with or without a Replacement.
- Refund Status – Show only RMAs with or without a Refund.
- RMA Note Contains – Show only RMAs with specific text in their Notes.
- Created On – Show only RMAs created within a specific time range.
- SKU – Show only RMAs containing specific SKUs.
- Tracking Number – Show only one or more RMAs by their unique Tracking Number.
- Receiving Warehouse – Show RMAs set to be received in one or more specific warehouses.
- Click Search. Each filter you apply gets highlighted in a different color. If a filter is gray or not displayed at all, it’s not active.
Additionally, you can customize the results grid to display different columns. Click on the three dots menu in the Manage RMAs panel > Customize Columns. There, you can pick up to 13 options such as Status, Channel, Approval Needed, relevant Dates, and more.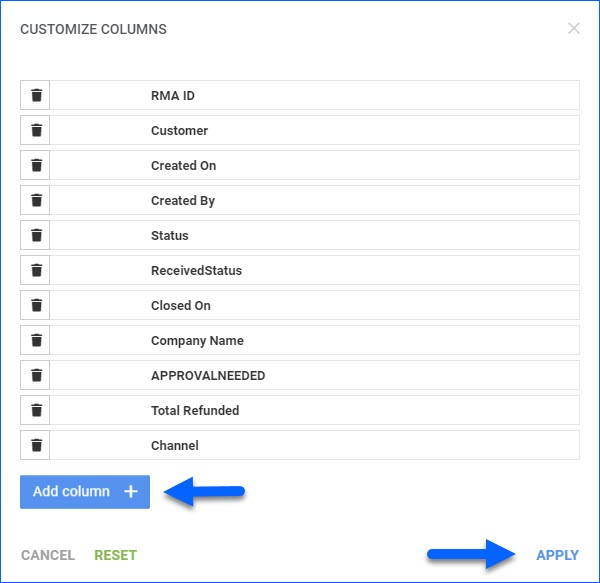
View RMAs
You can view and manage different data associated with each RMA on its RMA Details page. There are a few ways to access the RMA Details page:
- Search for RMAs, then click the RMA’s ID.
- Click the RMA link on top of the associated Order Details Page.
- Use the Global Search bar to search by RMA ID.
- Click an RMA link anywhere else in the Sellercloud UI.
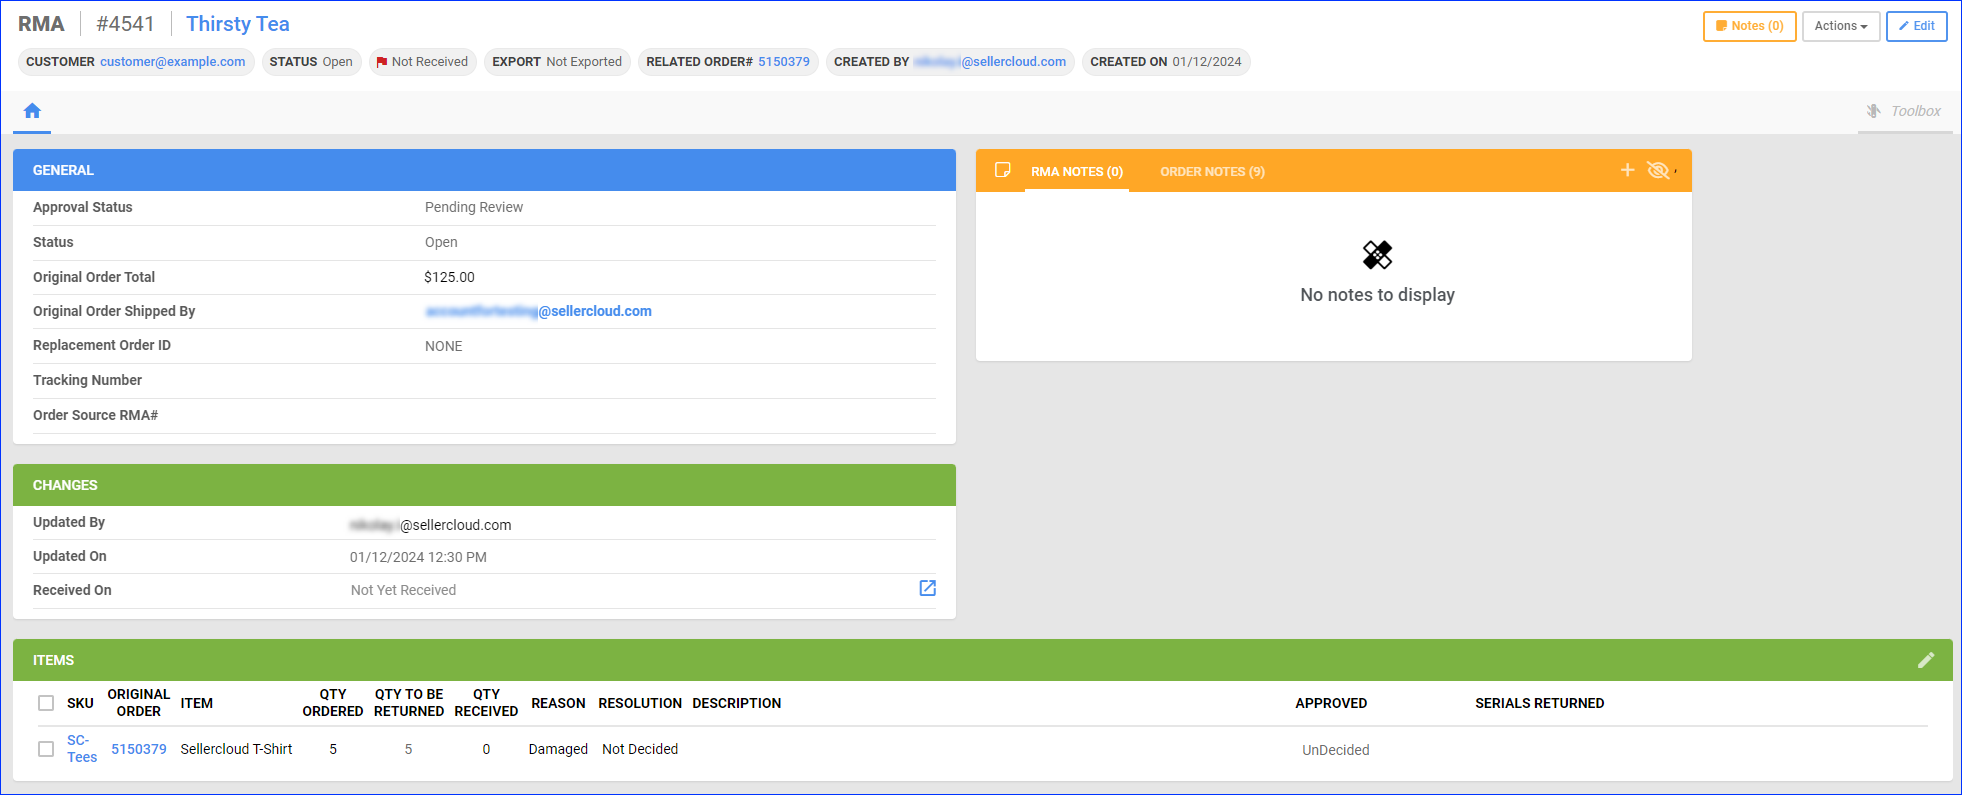
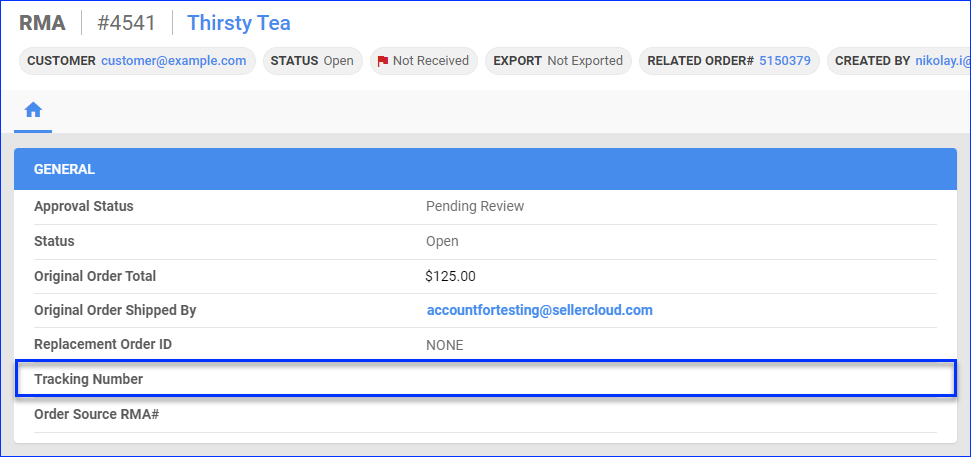
Regardless of which option you use, you will end up on the RMA Details page, which looks like this:
Approve RMAs
To maintain control over which RMAs should be processed, you can also add an approval step to your workflow. This will require someone to review the RMAs and approve them before proceeding.
All RMAs have an approval status by default. However, you can also require approval per item by enabling Enable RMA Item Approval Status in the Client Settings.
To approve RMAs:
- Go to the RMA Details page.
- Click Edit.
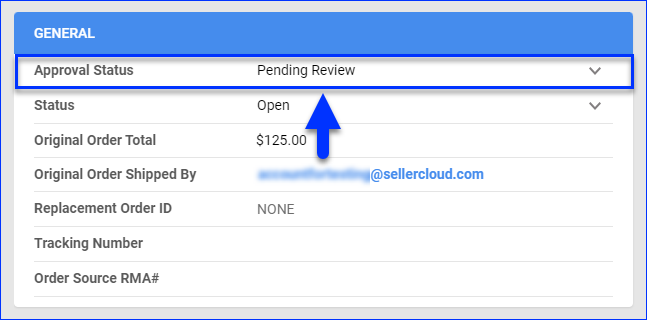
- To approve the entire RMA, update the Approval Status field in the General panel.
- To approve specific items, update the Approved field in the Items panel.

- Click Save.
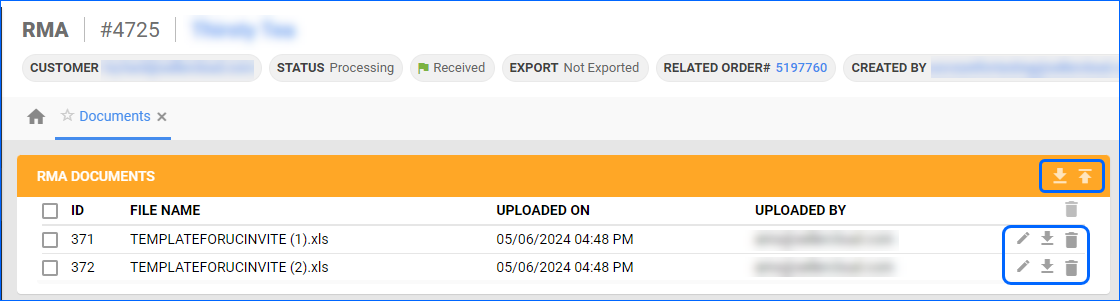
Manage Documents
RMAs in Sellercloud can store documents. You can Upload, View, Edit, Download, and Delete them from the corresponding Toolbox tab.
To upload a document to an RMA:
- Go to the RMA Details page.
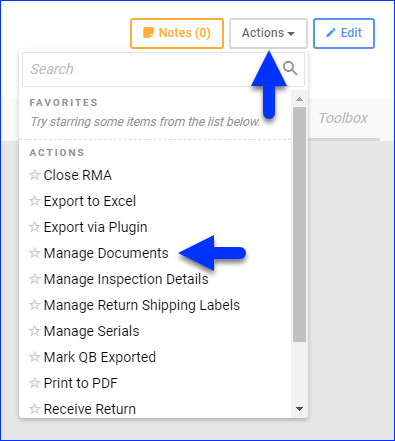
- Click Actions and select Manage Documents or click Documents from the Toolbox.
- Click the Upload New Document icon on the top right of the RMA Documents panel.

- Select the File and click Upload.
Once you have uploaded your documents, they will show up in the grid where you can perform additional actions such as Edit, Delete, Download, and Download All.
Manage Return Labels
You can generate a return label from Sellercloud and email it to the customer.
To generate and send labels:
- Go to the RMA Details page.
- Click Toolbox and select Shipping Labels.
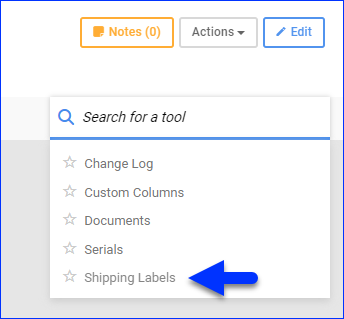
- Click the Create Return Label icon.

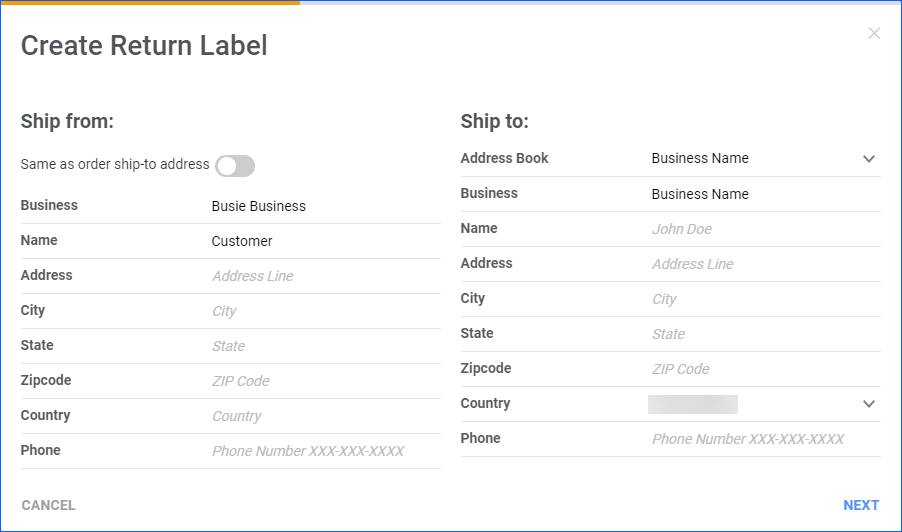
- In the first step of the Create Return Label modal you can populate the Ship from and Ship to addresses, name and business.
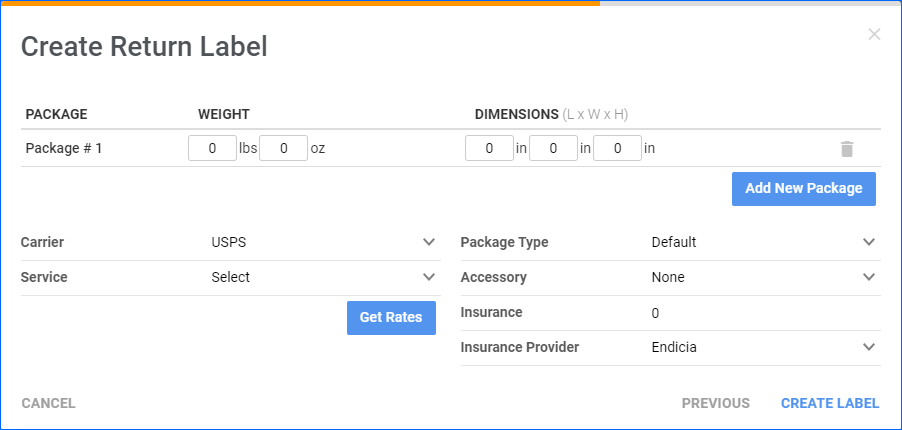
- In the second step of the Create Return Label you can manage packages, dimensions, carriers and insurance.
-
- Package – Ensure the weigh and dimensions of the package are correct. You can create additional packages from the Add New Package button.
A separate Shipping Label will be generated for each package.
- Carrier and Service – Select the shipping carrier and service. You can view and compare shipping rates by clicking on the Get Rates button.
- Package Type – Select the packaging for the return.
- Accessory – Select from None, AdultSignature Required, or Signature Required.
- Insurance – Select the amount that will be insured.
When using USPS as a carrier, you can choose the Insurance Provider between Endicia and UspsOnline.
- Package – Ensure the weigh and dimensions of the package are correct. You can create additional packages from the Add New Package button.
-
- Click Create Label.
- To email a label, select it and click Send Selected Via Email. You can also click the Send All Via Email icon to send all labels.

See RMA Labels Configuration for more information and step-by-step instructions on generating, emailing, and voiding return labels.
Add Tracking
By default, an RMA can only have one tracking number. To add a tracking number manually:
- Go to the RMA Details page.
- Click Edit.
- Enter the Tracking Number in the General tab.
- Click Save.
You can also add multiple tracking numbers to RMAs by enabling the Client Setting Enable Multiple Tracking Numbers For RMA. Then, the Tracking Number field on the RMA Details page will show a link to Manage Multi Tracking.
![]()
Resolve RMAs
You can select a reason and resolution for your RMA even if it’s not received yet.
To resolve an RMA:
- Open the RMA Details page.
- Click Edit.
- In the Items panel, check the boxes on the left to select items.
- Select a Reason.
- Click Set Resolution.


- Select a Resolution and type a Comment.
- Click Set Resolution.
Sometimes, you may have to resolve an RMA by replacing the items. To be able to create Replacement Orders in Sellercloud, go to Client Settings and enable Enable RMA Replacement Order Workflow.
You can process replacement requests faster by automatically creating a replacement order when you set an RMA’s Resolution to Replace. To use this feature, go to Client Settings and enable Auto Create Replacement Order When Setting Resolution To Replace. To automate this process further, you can also enable Put Replacement Order OnHold Until RMA Is Received, which will set the replacement order’s status to On Hold until you Receive the Items.
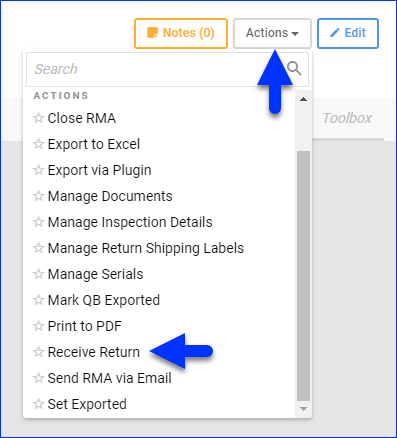
Receive Items
To receive an RMA:
- Go to the RMA Details page.
- Click Actions and select Receive Return.
- Enter the Qty to Receive and select a Warehouse.
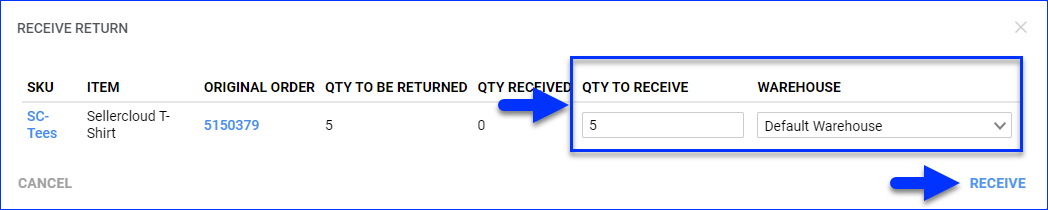
- Click Receive. The inventory movement will be noted as an OrderReturn on the Inventory Movement History. The item cost on the order will automatically update to 0.
You can not delete received items from the RMA.
Close RMAs
There are two ways to close an RMA after resolving it:
- Go to the RMA Details page, click Actions, and select Close RMA.
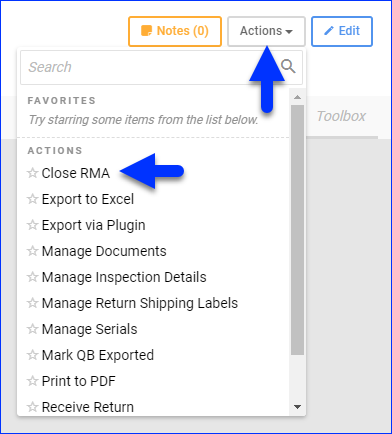
- Enable Auto Close RMA When Resolution Updated in your Client Settings and then Set a Resolution.