Overview
Woot is a daily deals website offering a wide range of products at discounted prices, typically with a focus on consumer electronics, gadgets, home goods, apparel, and other categories. Woot is famous for its special deals and promotions, such as the “Woot of the Day” concept, where they offer a single product at a deeply discounted price for 24 hours.
This integration enables you to seamlessly import Woot orders into Sellercloud and export tracking information regularly, allowing you to keep track of your sales.
The existing Woot plugins are highly customized for individual clients – check with Sellercloud Support for details on each plugin version. If necessary, you can also request additional modifications or other plugins for this integration. Customization rates may apply.
Prerequisites
Contact Sellercloud Support and request to install the Woot plugins on your server.
If you plan to import orders to Sellercloud using files downloaded from the Woot Dropship Portal, ask support to create the Order Custom Column WOOT_PO_NUMBER. Optionally, you can also create a Custom Company Setting Woot Company Id under your default company, which allows you to define the company ID where orders will be created. If this setting is missing, then the scheduled task’s company ID will be used.
Order Import
There are two different plugins that make importing orders from Woot into Sellercloud possible:
- The first plugin allows you to import orders manually using Woot’s distinct file format. You can download it from the Woot Dropship Portal. You need to manually perform the import every time if you choose this option.
- The second plugin allows you to import orders from an Excel file received via email from Woot. With this option, you can create a Scheduled Task to automate the process.
The plugins import orders as:
- Charged
- Wholesale
- Gift Orders
- Customer Woot[companyID]@sellercloud.com
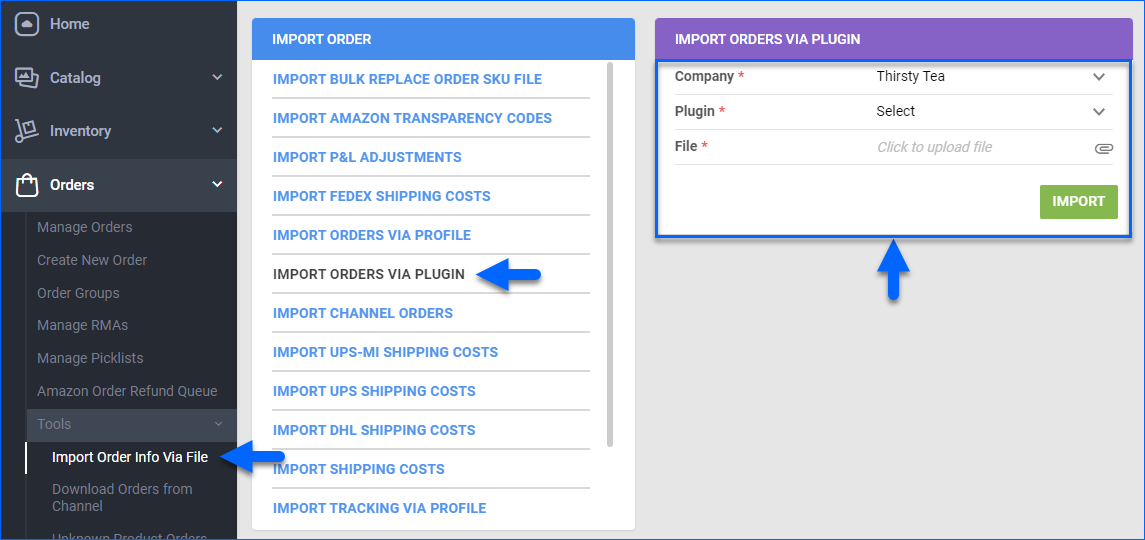
Import Orders Manually
After exporting your Woot orders to a file from the Woot portal, you can import them into Sellercloud. Woot does not offer FTP file sharing, so you must import the file manually.
- Click Orders > Tools > Import Orders Via Plugin.
- Select the Company.
- Select the Woot plugin from the Plugin menu.
- Select the order file from your PC.
- Click Import.
- A Queued Job will be generated. When finished, the orders will be created.
Automate Order Import
To create a Scheduled Task that imports orders:
- Navigate to Settings > Scheduled Tasks > Manage Scheduled Tasks.
- Click the green + icon: Create New Scheduled Task.
- Complete as follows:
- Click Task Type and select Import Orders.
- Set the Task Name.
- Select the Company.
- Select the Start Time.
- Click CREATE.
- The following message appears at the bottom of your screen: “Scheduled task created successfully. Click Here to configure the task details.” – click the link.
- Click the Edit button on the top right.
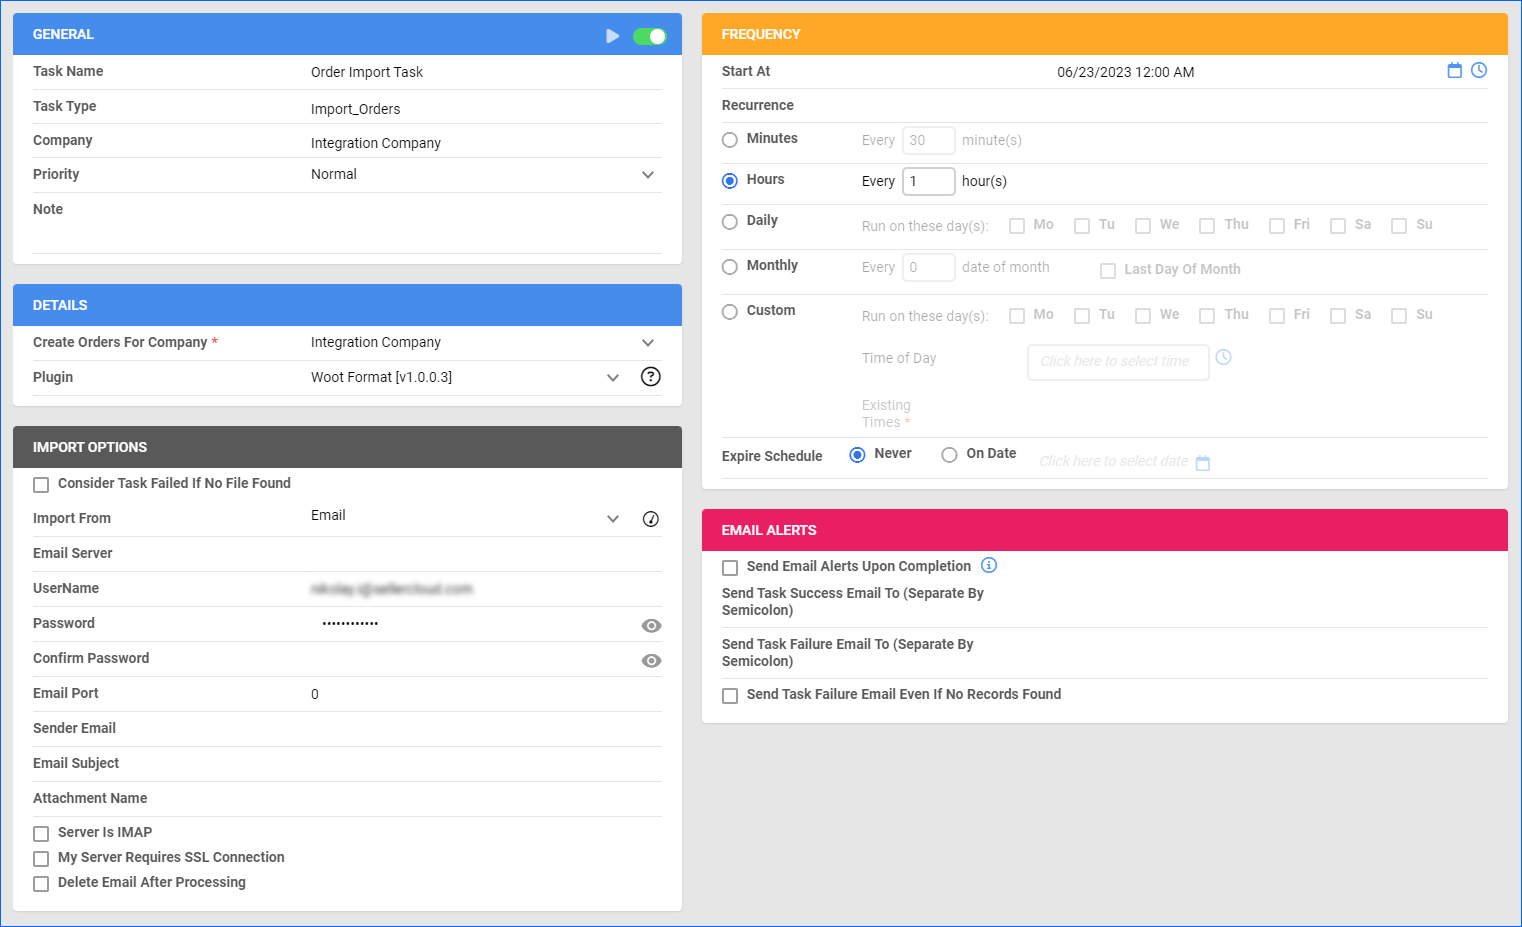
- In the Details section:
- Click Create Orders For Company and select the company designated for this integration.
- Click the Plugin menu and select Woot Format.
- In the Import Options section, set Import From to Email and fill out the fields below.
- In the Frequency section, specify the task frequency. For optimal performance, select a range between thirty minutes and one hour.
- In the General section, click the Enable button.
- Click Save on the top right.
Tracking Export
The tracking export plugin can export shipping confirmation in a Woot-ready format. Woot does not offer FTP file sharing, so you must upload the file manually on Woot.
To generate the tracking file:
- Go to Orders > Manage Orders.
- Find and select orders.
- Click the blue Actions icon on the bottom right and select Export Orders.

- Click Plugin and select the Woot tracking export plugin.
- Click Export.
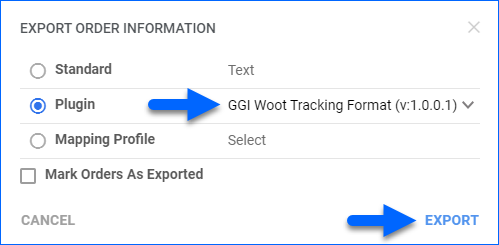
- A Queued Job will be entered in the queue. When completed, download the export file and upload it manually to Woot.
You can also create a Scheduled Task to automatically export Woot orders that have been shipped. Before you move on, create a Saved Search for orders filtered by:
- Company – The company you created for the integration
- Channel – Website
- Ship Date Range – Last 3 Days
- Exported – Not Exported
![]()
Automate Tracking Export
To create a Scheduled Task that exports order tracking:
- Navigate to Settings > Scheduled Tasks > Manage Scheduled Tasks.
- Click the green + icon: Create New Scheduled Task.
- Complete as follows:
- Click Task Type and select Export Orders.
- Set the Task Name.
- Select the Company.
- Select the Start Time.
- Click CREATE.
- The following message appears at the bottom of your screen: “Scheduled task created successfully. Click Here to configure the task details.” – click the link.
- Click the Edit button on the top right.
- In the Details section:
- Click the User ID menu and select your ID.
- Click the Saved Search menu and select the saved search you created earlier.
- Click the Export Via menu and select Woot Tracking Format.
- Check This Is Tracking Export.
- Check Mark Orders As Exported.
- In the Export Options section, set Export To to Email and fill out the fields below. The email(s) you enter here will receive the tracking file.
- In the Frequency section, specify the task frequency. For optimal performance, select a range between thirty minutes and one hour.
- In the General section, click the Enable toggle button.
- Click Save on the top right.
![]()