Overview
Shopify Metadata refers to two types of data. Meta Tags and Meta Fields. Sellercloud’s Shopify Account Integration lets you seamlessly add Meta Fields and Meta Tags to your products.
Shopify Meta Tags, or product tags, are metadata used by external search engines, such as Google. Meta tags can be meta titles, meta descriptions, and meta keywords. Shopify Meta Fields are used to reference products internally within Shopify without the fields appearing on the listing. They add extra data to the products with fields that are not native to Shopify.
Configure Meta Tags
Meta Tags are searchable keywords associated with your product that can help customers find your product through your online store search. Meta tags are uploaded to Shopify when the product is posted. Meta Keywords are the regular tags used by Shopify’s search engine.
You can add meta tags to your products individually or in bulk.
Individually
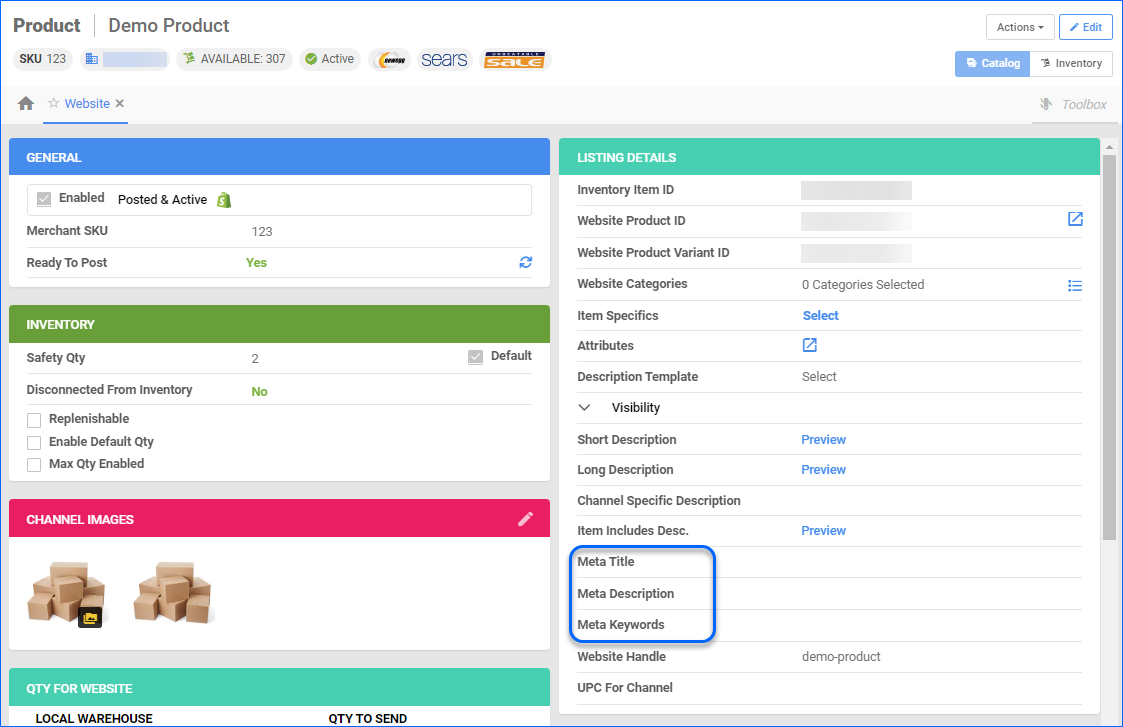
To add Meta Tags to a product, navigate to:
- Catalog > Manage Catalog > Open a Product.
- From the Toolbox, go to Channels > Website Properties.
- In the Listing Details panel, you can add Meta Title, Meta Description, and Meta Keywords.
In Bulk
To update Meta Tags for multiple products, navigate to:
- Catalog > Tools > Import Product Info > Bulk Product Update.
- Generate Template > Create New Template > Next.
- Select one of the available formats TAB Delimited/CSV/Excel > Click Next.
- Add Meta Title, Meta Description, and MetaKeywords Columns to the Template > Click Next and Download the template.
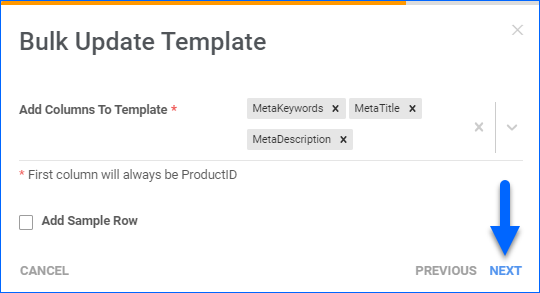
- Once you populate the template, go back to Sellercloud and upload it.

Configure Meta Fields
Meta Fields store additional information about products. They have the following columns available:
- Namespace – A container for organizing metafields. Using namespaces keeps your metafields from clashing with others that share the same name.
- Key – That’s the name of the metafield.
- Kit Meta Field Type – The type of data that the metafield stores.
When configuring the Kit Meta Field type, ensure that both Bound to Table and Bound to Table Column are set to none, and make sure to uncheck Add to Variant Level.
- Value Type – Choose the value type of the data that will be stored. Typically String or Integer.
- Bound to Table
- Bound to Table Column
- Add to Variant Level
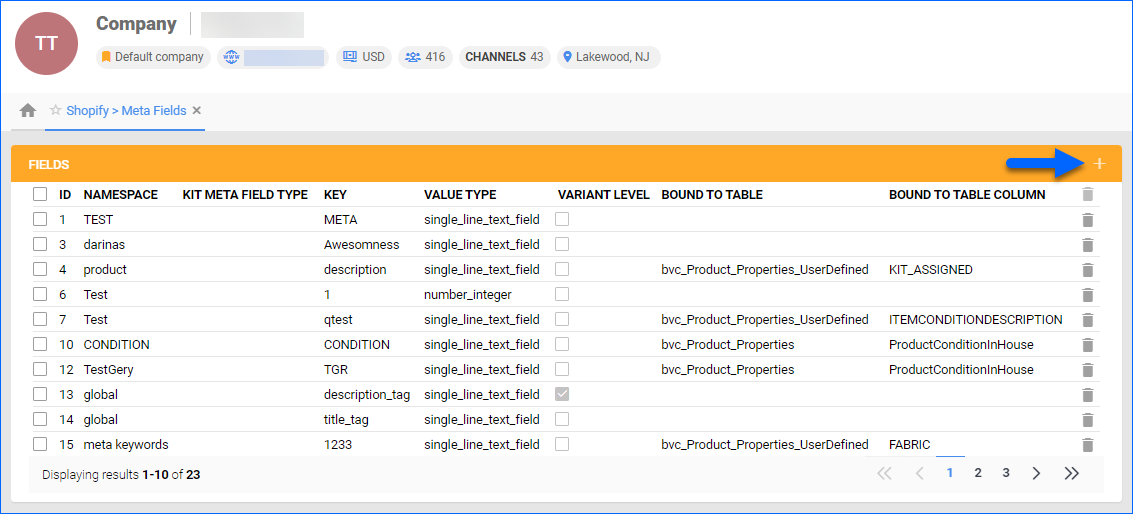
To add Shopify Meta Fields, navigate to:
- Settings > Companies > Manage Companies > Select a Company.
- Toolbox > Sellercloud Integrated Website > Shopify Meta Fields.
- Click the + Icon to add a new field.
- Populate the following fields, mentioned above:
- Namespace
- Key
- Value Type
- Custom Column
- Table
- Table Column
- Click Add.
Manage Meta Fields
Once you configure your Meta Fields under your Company, you must populate their respective values on a product level. This can be done either individually or in bulk.
Individually
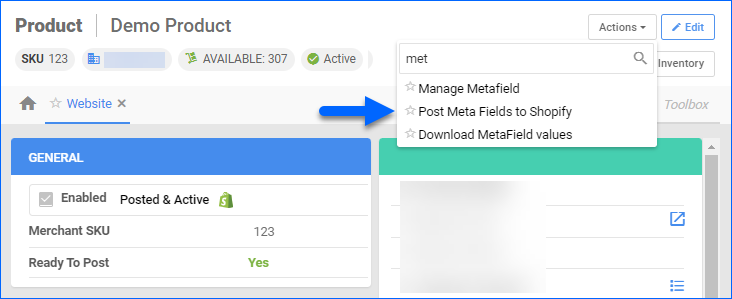
To update Shopify Meta Fields to a product individually, navigate to:
- Catalog > Open a Product.
- Toolbox > Website Properties > Action Menu > Manage Metafields.
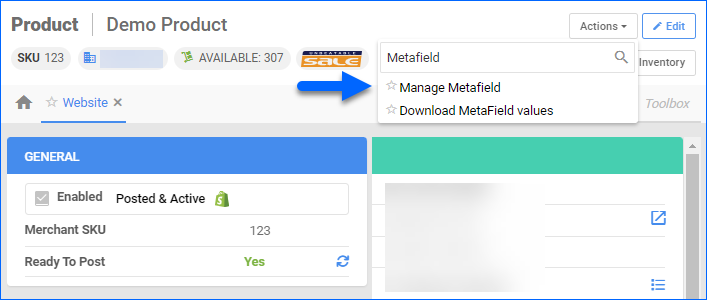
- Set the value for each field and click Save.
In Bulk
To update Meta Fields for multiple products, navigate to:
- Catalog > Tools > Import Product Info > Import Shopify Metafields.
- Download the Template in your desired format and populate the fields:
- ProductID
- MetaFieldID
- Value
- Go back to Sellercloud and Import the newly created template.

Post Meta Fields to Shopify
Once you configure your Meta Fields, you can update your products on Shopify either individually or in bulk.
Two App Settings affect this workflow:
- ShopifyAllowPostingMetaFieldsOnVariationParent – this setting must be enabled to post Meta Fields for Variation Parents.
- Shopify_DoNotDeleteMetaFieldIfNotExistsInSellerCloud – this setting must be disabled to delete Metafields from Shopify if they are not defined in Sellercloud.
Contact Sellercloud Support to ensure that the settings are configured for your server.
Individually
To post Shopify Meta Fields for a product individually, navigate to:
- Catalog > Open a Product.
- Toolbox > Website Properties > Action Menu > Post Meta Fields to Shopify.
In Bulk
To post Shopify Meta Fields for multiple products, navigate to:
- Catalog > Choose your Products.
- Action Menu > Update Meta Fields on Shopify (Including Matrix Child).
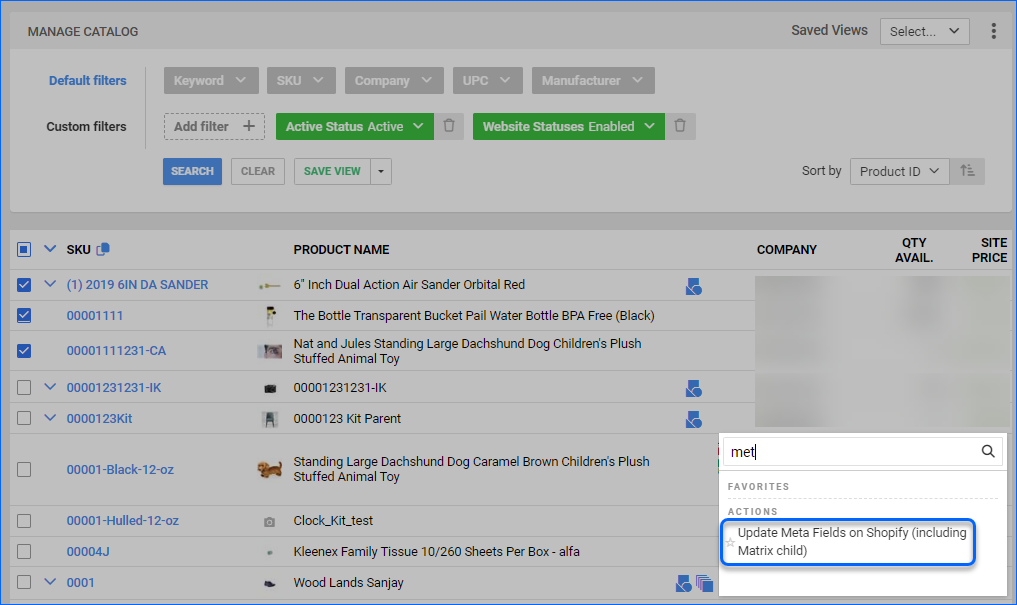
This action will update all child matrices under the parent matrix.