Overview
When you assign Vendor SKUs and Prices to your products, Sellercloud can automatically apply the correct vendor, vendor SKU, and price upon Purchase Order (PO) creation. This helps you accurately track product costs, link products to the right vendors, and reduce manual data entry and errors in your Purchase Order Workflow.
In this article, you will learn how Vendor SKUs and Prices work and how to assign them to your products in Sellercloud.
Set Up Vendor Products
Sellercloud allows you to add multiple vendor item details to a single product, each with its own Vendor SKU and Vendor Price. You can also configure one specific vendor as the Default Vendor. This is particularly useful when you often buy from the same supplier or have a preferred vendor among several options.
Key Terms
- Vendor: Each product in Sellercloud can have multiple Vendors, but only one Default Vendor. This vendor is selected automatically when creating Purchase Orders (POs).
- Vendor SKU: The identifier a vendor uses for a product. Each vendor can have a unique Vendor SKU for the same product. When a product is added to a PO, the Vendor SKU auto-fills based on the selected vendor.
- Vendor Price: The cost the vendor charges for a product. Vendor Prices are automatically applied based on the selected vendor when generating POs. In addition, when a product is added to a PO, the Price entered is automatically saved as the new Vendor Price for the selected vendor.
Assign a Default Vendor
To assign a default vendor to a product:
- Go to the Product Details Page.
- Click Edit.
- In the Purchasing panel, select the Default Vendor and enter the Vendor SKU.
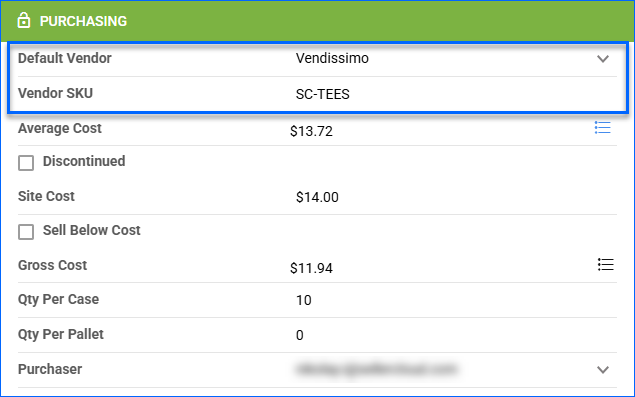
- Click Save.
Assign Vendors Individually
To assign vendor item details individually:
- Go to the Product Details Page.
- Click Toolbox and select Purchasing.
- Click Edit.
- In the Vendor Prices panel, click the Add vendor price icon.

- Select the Vendor and enter the Vendor SKU and Vendor Price.

- Optionally, you can also enter:
- Case price – The total price charged by the vendor for one case of the product.
- Qty/Case – The number of individual units contained in one case.
- Qty – The number of units available in the vendor’s warehouse(s).
- Available – Indicates if the product is available from the vendor.
- Notes – Internal notes regarding this vendor’s offer for the product.
- Click Add and then repeat these steps to add more.
- Click Save.
Assign Vendors In Bulk
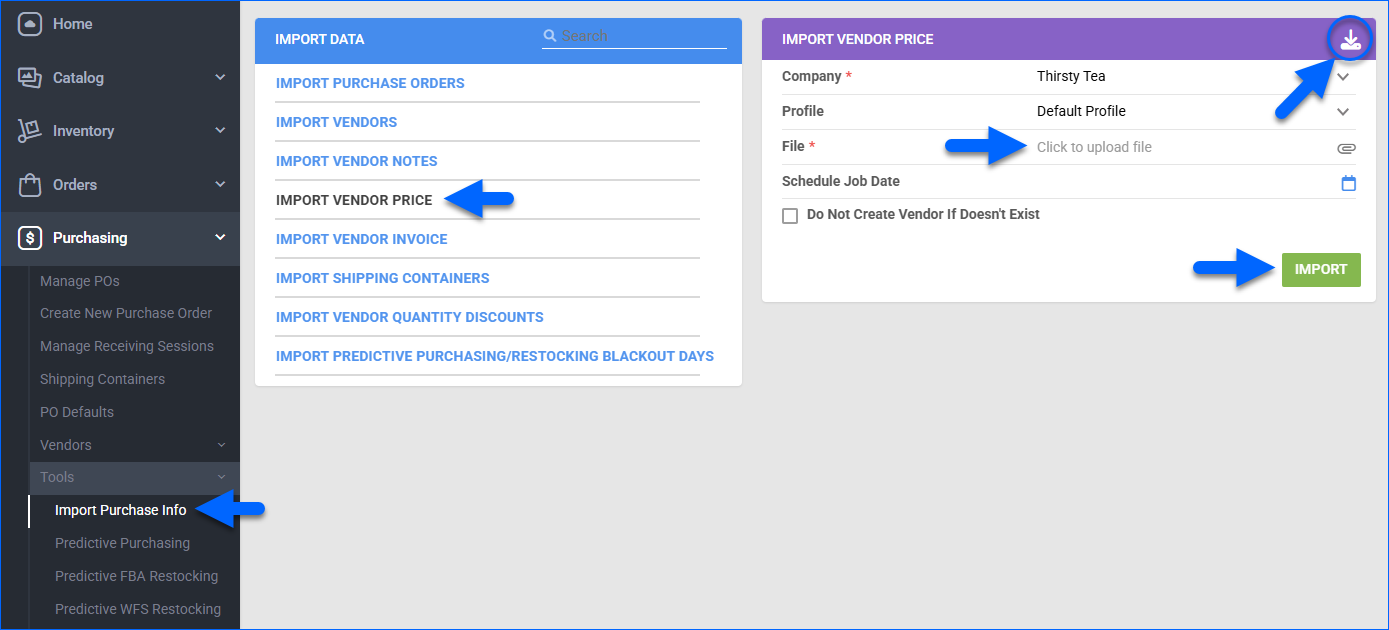
To assign vendor item details in bulk:
- Go to Purchasing > Tools > Import Purchase Info.
- Select Import Vendor Price.
- Click the Download Template icon and select a format. The file gets downloaded to your device.
- Edit the file and enter the vendor details under the following headers:
- ProductID (required) – The product’s SKU.
- Vendor (required) – The name of the vendor. If the vendor does not exist, it will be created, unless you check Do Not Create Vendor If Doesn’t Exist on step 6.
- VendorSKU – The SKU assigned by the vendor to the product.
- VendorPrice – The cost per unit that the vendor charges for the product.
- VendorQty – The number of units available in the vendor’s warehouse(s).
- IsDefaultVendorForProduct – True or False, indicates if this is the product’s Default Vendor.
- PricePerCase – The total price charged by the vendor for one case of the product.
- QtyPerCase – The number of individual units contained in one case.
- IsAvailable – True or False, indicates if the product is available from the vendor.
- VendorPricesNotes – Internal notes regarding this vendor’s offer for the product
- _ACTION_ – Enter _DELETE_ to remove existing Vendor SKU information from Sellercloud.
- Save your file, then back in Sellercloud, click File and select it.
- Optionally, you can also select:
- Company – The company in your Sellercloud account to which this vendor pricing applies.
- Profile – A saved Import Mapping.
- Schedule Job Date – Schedule the import to run at a specific future date/time.
- Do Not Create Vendor If Doesn’t Exist – Skip entries for vendors not already set up in Sellercloud, instead of creating new vendor records automatically.
- Click Import. A Queued Job is created, and you will receive a Notification upon completion.
Manage Vendor Products
After adding your vendors’ associated SKU, price, and other details, you can use these options by going to the Product Details Page > Purchasing tab > Vendor Prices panel:
- Export – Export all of the product’s vendor SKU and price information to a spreadsheet.
- View History – View historical records of associated POs.
- Edit – Update a vendor’s SKU and price details.
- Delete – Delete a vendor’s SKU and price details.

Related Client Settings
The following related Client Settings are available:
- Allow To Edit Vendor SKU On PO Detail Page – Allow the Vendor SKU on the Purchase Order Details Page to be updated.
- Print PO To PDF: Always Print ProductID Instead Of Vendor SKU – When creating a PDF document of the PO, use the product’s standard Sellercloud SKU instead of the Vendor SKU.
- Do Not Update If PO Date Is Less Than Last Vendor Price Date – Prevent older POs with dates earlier than the last date on which you entered the Vendor Price from automatically changing the Vendor Price at the moment they’re created.