Overview
The Shipping API Settings page lets you connect various shipping carriers to your Sellercloud account. While shipping labels for regular orders are typically printed within Sellercloud’s Shipbridge application, you may occasionally need to load and compare rates directly within the Sellercloud UI. Additionally, these credentials are required to generate Return Labels, as well as Track Order Delivery.
Prerequisites
To set up Shipping API in Sellercloud, you must first obtain credentials for the carriers you want to connect:
- Obtain UPS API credentials
- Obtain FedEx API credentials
- Obtain USPS API credentials. If you have Endicia credentials, you can use them instead.
Configure Shipping API
To configure your Shipping API Settings:
- Navigate to Company Settings.
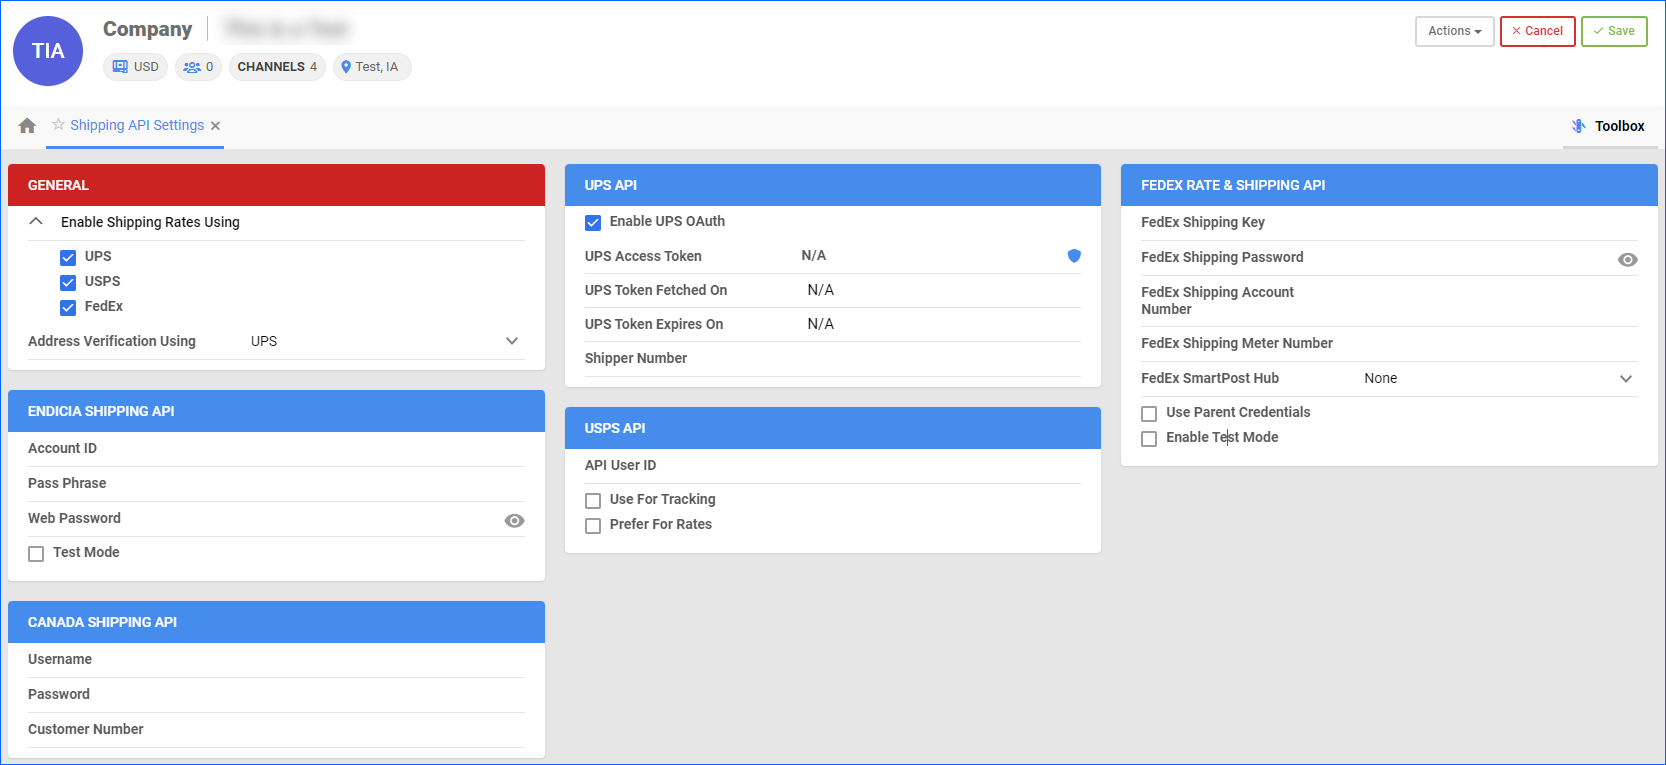
- Go to Toolbox > Shipping > Shipping API Settings > Edit.
- Enter the API credentials for each carrier.
- For UPS, check Enable UPS OAuth to ensure you connect via the OAuth 2.0 model.
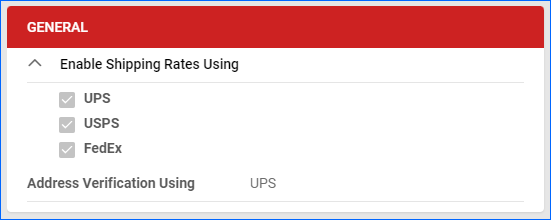
- In the General panel, check the boxes for the desired shipping carriers in the Enable Shipping Rates Using field.
- Optionally, you can pick which carrier you want to use for Address Validation.

- Click Save.
Test Credentials
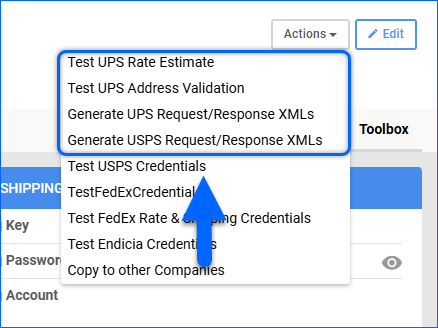
Once you configure our credentials, you can test if the connection is established. Click the Actions menu and:
- For UPS and USPS:
- For USPS: Select Test USPS Credentials.
- For FedEx:
- Click Test Fedex Rate & Shipping Credentials to test the API calls for rate estimates and shipping.
- Select TestFedExCredentials to test the overall connection. If you have registered for FedEx through Shipbridge, you must first check the Use Parent Credentials box in the FedEx Rate & Shipping API panel.
- For Endicia: Select Test Endicia Credentials.
Shipping API Settings Explained
You can configure the following settings on the Shipping API page:
| SETTING | DESCRIPTION |
| GENERAL | |
| Enable Shipping Rates Using | Enable using Shipping Rates from UPS, USPS, and FedEx. |
| Address Verification using | Select which carrier would be used for Shipping Address Validation: UPS or FedEx. |
| ENDICIA SHIPPING API | |
| Account ID | Provided by Endicia. |
| Pass Phrase | |
| Web Password | |
| Test Mode | Controls the Test Mode. This should only be enabled during the initial setup. Uncheck the box to switch to production. |
| CANADA SHIPPING API | |
| Username | Obtain from your Canada Shipping account. |
| Password | |
| Customer Number | |
| UPS API | |
| Enable UPS OAuth | This must be enabled to establish a connection. |
| UPS Access Token | Once you fill in the Shipper Number, click the shield icon to Fetch UPS Access Token. |
| UPS Token Fetched On | This field displays the date and time the latest token was fetched. |
| UPS Token Expires On | This field displays the date and time when the current token will expire. Sellercloud automatically re-fetches a new token. |
| Shipper Number | Provided by UPS. Required to fetch the access token. |
| USPS API | |
| API User ID | Enter the user ID. |
| Use For Tracking | When enabled, Sellercloud will Track Delivery Status via USPS Direct API. When disabled, we will use the Endicia account instead. |
| Prefer For Rates | When enabled and there is a valid API User ID, Sellercloud will query USS directly for shipping rates. When disabled, we will use Endicia instead. |
| FEDEX RATE & SHIPPING API | |
| FedEx Shipping Key | Provided by FedEx. |
| FedEx Shipping Password | |
| FedEx Shipping Account Number | |
| FedEx Shipping Meter Number | |
| FedEx SmartPost Hub | |
| Use Parent Credentials | Enable this to use parent credentials. This is only required if you registered through Shipbridge. |
| Enable Test Mode | Controls the Test Mode. This should only be enabled during the initial setup. Uncheck the box to switch to production. |
Overview
The Shipping API Settings page lets you connect various shipping carriers to your Sellercloud account. While shipping labels for regular orders are typically printed within Sellercloud’s Shipbridge application, you may occasionally need to load and compare rates directly within the Sellercloud UI. Additionally, these credentials are required to generate Return Labels, as well as Track Order Delivery.
Configure Shipping API
To configure Shipping API settings:
- Go to Company Settings > Toolbox > Shipping API > Shipping API Settings.
- Enter the API credentials for each carrier. If you do not have credentials:
- Obtain UPS API credentials
- Obtain FedEx API credentials
- Obtain USPS API credentials. If you have Endicia credentials, you can enter those at the bottom for the API.
For UPS and USPS:
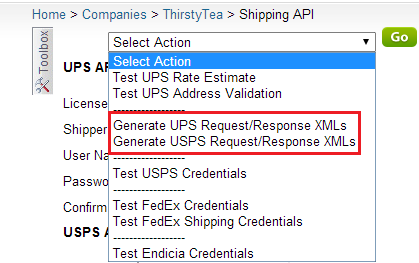
- Generate Request/Response Access XML files from the Action Menu. This is only necessary if you do not have permanent credentials from the carrier.

- For UPS, select the Address Validation radio button and Use Customer Integration Environment (CIE) URL.
- Download the files and email them to the carriers.
Test Credentials
Once you have populated the desired fields for the shipping carrier of your choice, you can test if the connection is established.
Click Select Action, and then:
- For UPS and USPS:
- Select Generate Request/Response Access XMLs.
Note: Again, this is only necessary if you do not have permanent credentials from the carrier. - Select Test UPS Rate Estimate to test the rate estimate or Test UPS Address Validation to check the address.
- Select Generate Request/Response Access XMLs.
- For USPS: Select Test USPS Credentials.
- For FedEx: Select Test Fedex Rate Estimate & Shipping to test the rate and shipping you entered > TestFedExCredentials
- If you are getting an error, check the box Use Parent Credentials. This is required if you registered your credentials through Shipbridge.
- For Endicia: Select Test Endicia Credentials.
Shipping API Settings Explained
You can configure the following settings on the Shipping API page:
| SETTING | DESCRIPTION |
| ENABLE SHIPPING RATES USING | |
| UPS | Enable shipping rates for UPS. |
| USPS | Enable shipping rates for USPS. |
| FedEx | Enable shipping rates for FedEx. |
| ENDICIA SHIPPING API | |
| Account ID | Provided by Endicia. |
| Pass Phrase | |
| Web Password | |
| Test Mode | Controls the Test Mode. This should only be enabled during the initial setup. Uncheck the box to switch to production. |
| CANADA SHIPPING API | |
| Username | Obtain from your Canada Shipping account. |
| Password | |
| Customer Number | |
| UPS API | |
| Enable UPS OAuth | This must be enabled to establish a connection. |
| UPS Access Token | Once you fill in the Shipper Number, click Fetch UPS Access Token. |
| UPS Token Fetched On | This field displays the date and time the latest token was fetched. |
| UPS Token Expires On | This field displays the date and time when the current token will expire. Sellercloud automatically re-fetches a new token. |
| Shipper Number | Provided by UPS. Required to fetch the access token. |
| USPS API | |
| API User ID | Enter the user ID. |
| Use For Tracking | When enabled, Sellercloud will Track Delivery Status via USPS Direct API. When disabled, we will use the Endicia account instead. |
| Prefer For Rates | When enabled and there is a valid API User ID, Sellercloud will query USS directly for shipping rates. When disabled, we will use Endicia instead. |
| FEDEX RATE & SHIPPING API | |
| FedEx Shipping Key | Provided by FedEx. |
| FedEx Shipping Password | |
| FedEx Shipping Account Number | |
| FedEx Shipping Meter Number | |
| FedEx SmartPost Hub | |
| Use Parent Credentials | Enable this to use parent credentials. This is only required if you registered through Shipbridge. |
| Enable Test Mode | Controls the Test Mode. This should only be enabled during the initial setup. Uncheck the box to switch to production. |

