Overview
Address validation helps reduce delivery complications by ensuring the accuracy of shipping destinations and suggesting necessary corrections. It also allows you to estimate the final shipping cost by identifying whether an address is commercial or residential.
There are two types of suggested changes:
- Major Changes – Significant corrections, such as fixing a misspelled street name or incorrect house number.
- Minor Changes – Small adjustments, such as adding a ZIP+4 code or standardizing abbreviations (e.g., changing “Drive” to “DR” or “Lane” to “LN”).
By default, address validation typically includes minor changes and suggestions. You can configure those updates to be applied automatically without a need for manual approval.
Validate Addresses in Shipbridge
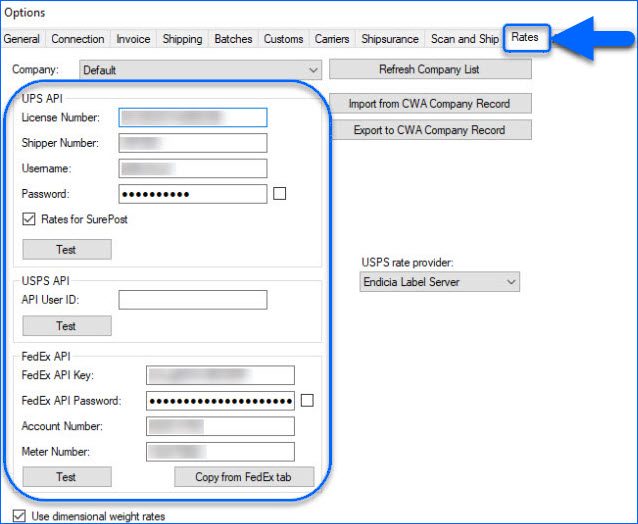
Configure your API credentials under the Rates tab in Shipbridge:
- Go to Menu > Options > Rates tab. For the purpose of validating addresses, you only need to enter one set of carrier credentials; for example, UPS. Shipbridge will request the address validation through the API based on the information you enter on this page, even if the carrier you are using to ship is different. (For rate calculations, you must enter API credentials for all carriers you intend to ship with).
- The dot indicator within the grid shows the address’s status:
- The yellow dot indicates addresses that are not yet verified.
- The red dot indicates addresses that the system is not able to verify.
- The green dot indicates addresses that are successfully verified.
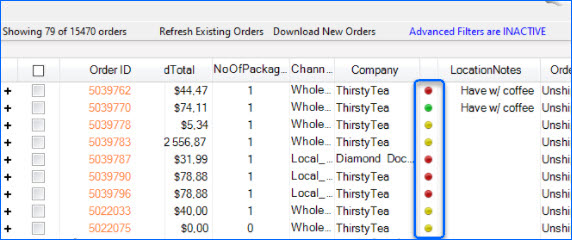
To see the indicator, be sure to enable it by going to Menu > Customize Interface > Unshipped tab. Locate AV Flag in the list and enable it. - Select an order.
- Right-click and select Validate Address in the pop-up menu, or use the Validate Address button in the Ship To address panel at the bottom left.

- Shipbridge will return a suggested address for addresses that do not match the US Postal Service’s database.
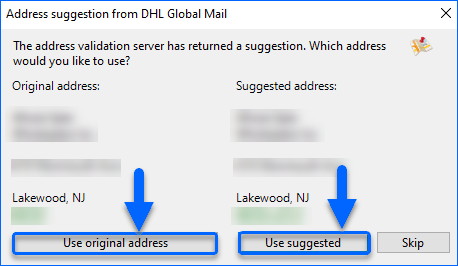
- If you accept it, the address updates and the dot indicator will turn green.
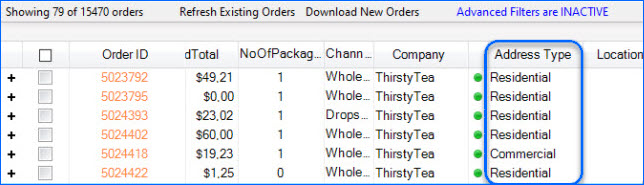
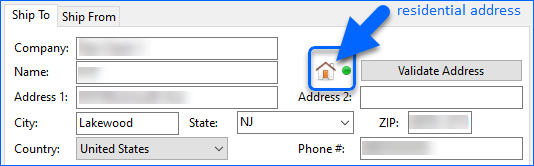
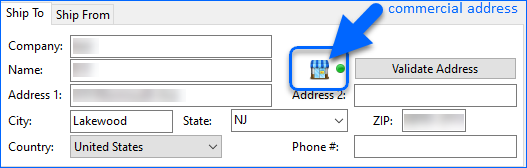
- After address validation, the system will update the address type as Commercial or Residential in the address type column, as well as reflect it accordingly in the icon indicator of the address panel. The address type affects the rate calculator. If the address type is residential, the rate calculator will return higher rates for carriers that charge a higher rate for residential deliveries.
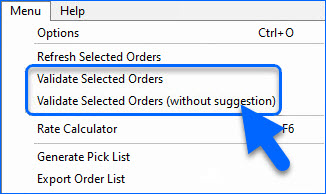
- To validate multiple order addresses in bulk, select the orders and click Validate Selected Orders from the Menu. When using this option, a window will pop up at the first problematic address. You have the option of using the suggestion, skipping the order, or clicking on the + sign and selecting to automatically accept all suggestions or to reject them. There also is an option on the Menu to Validate Selected Orders (without suggestions).
Automate Address Validation in Shipbridge
To configure your Shipbridge settings for automatic address validation:
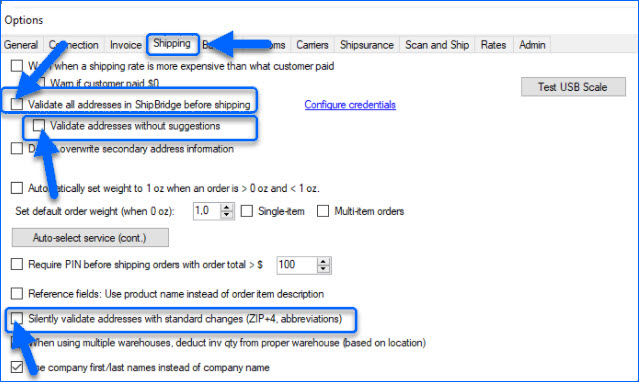
- Go to Menu > Options > Shipping tab.
- Validate all addresses in Shipbridge before shipping – When selected, all addresses will be validated in Shipbridge before shipping.
- Validate address without suggestions – When selected, minor changes will be set to update automatically without requiring you to manually accept the suggestions.
- Silently validate standard changes without suggestions – This will enable the system to make changes automatically, like adding a +4 number to the zip code and abbreviations to the street address, without requiring you to accept the suggestions.
- You can also restrict manual changes to a street address or a zip code in Shipbridge. These settings can be enabled by your Shipbridge Administrator or by Sellercloud Support. When you enable these settings, the address and zip code fields will be grayed out in the address panel.
Validate Addresses in Sellercloud
To manually validate addresses in Sellercloud:
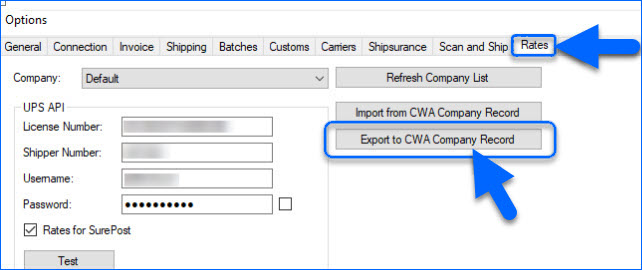
- Configure your Shipping API credentials. In Sellercloud, navigate to Settings > Companies > Manage Companies > Select a company > Toolbox > Shipping API. Enter your API credentials. If you have already configured it in Shipbridge, you can export them to Sellercloud with the Export to CWA button.
- Select the carrier through which you will be validating addresses – UPS or FedEx. Endicia ELS does not provide address validation.
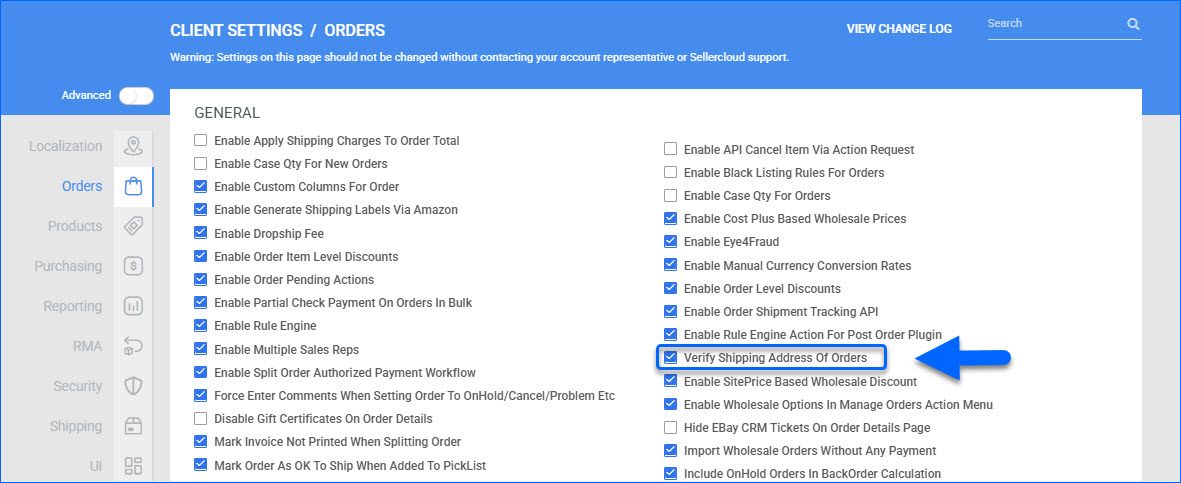
- In Sellercloud > Settings > Client Settings > General Client Settings > Orders > select Verify Shipping address of Orders.
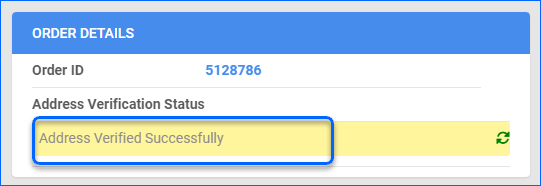
- Open an order. In the status bar, you can see if the address has been verified.
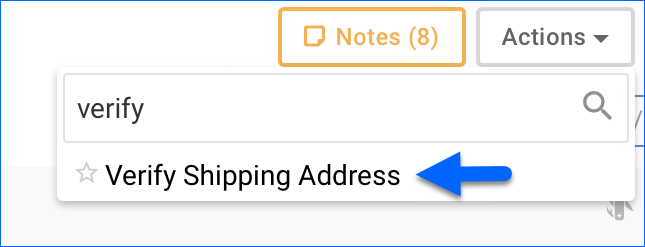
- Open the action menu and click Verify Shipping Address.
 If you are creating a new order, you can enter the address and click the Verify Address icon to open the validation window.
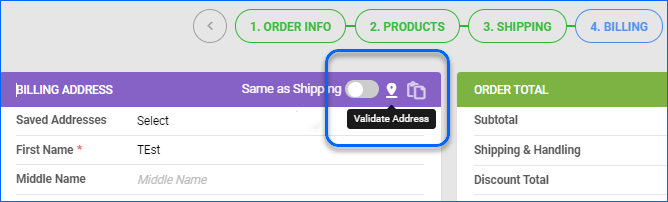
- On the following page, there are two address panels. The first one is the original address that the customer submitted. The second is a Suggested Address whenever one is available. Populate the fields of one of the two given panels. This will update the address on the order and change its status to Verified.

- To verify multiple orders in bulk, select the orders from the Manage Orders page and click Verify Shipping Address from the Action Menu.
Alternatively, you can automate this process using the generic Address Validation Order Export plugin or the OrderAddressVerificationServices.
- The validation process is the same as with a single order, but you can navigate from order to order using the navigation links.
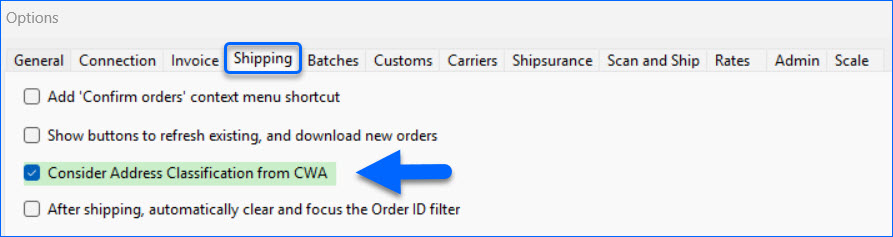
- In Shipbridge, the setting Menu > Options > Shipping > Consider Address Classification from CWA can be enabled to pull this classification automatically.
Automate Address Validation in Sellercloud
You can automate address validation in Sellercloud in one of two ways: through the automated OrderAddressVerificationServices or via plugin. Both methods use the Shipping API Settings configured within your account.
The Address Validation Order Export plugin allows you to verify the Ship To addresses of all exported orders.
- If the address is successfully validated, the plugin adds an order note specifying the carrier used.
- If validation fails, the order is placed On Hold.
To create a Scheduled Task for automatic address validation:
- Open a ticket with Sellercloud Support and request that the Address Validation Order Export plugin be installed on your server.
- Create and configure the Carrier_For_Validation Custom Company Setting on your job’s company profile. It determines the API credentials (UPS or FedEx) the plugin should use.
To successfully verify shipping addresses, you must have valid carrier credentials configured on your company’s Shipping API page.
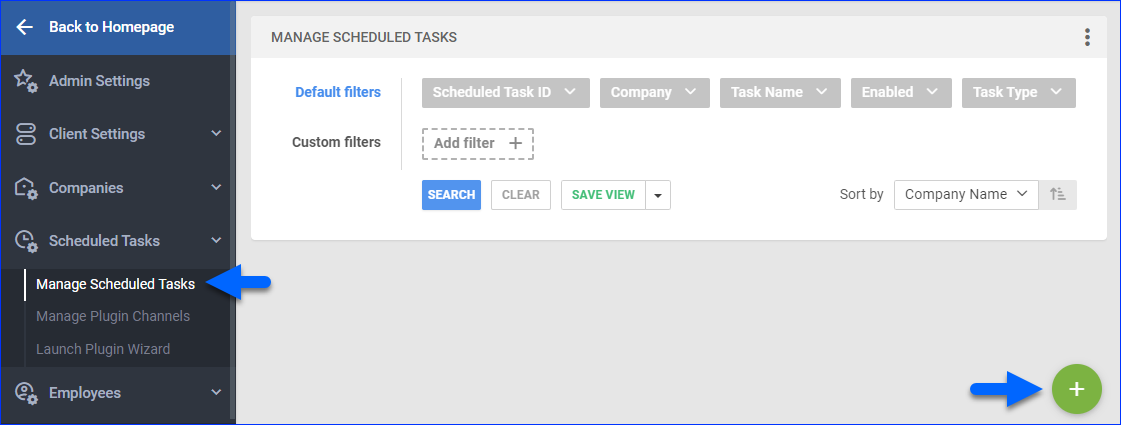
- Next, go to Settings > Scheduled Tasks > Manage Scheduled Tasks.
- Click the green + icon: Create New Scheduled Task.
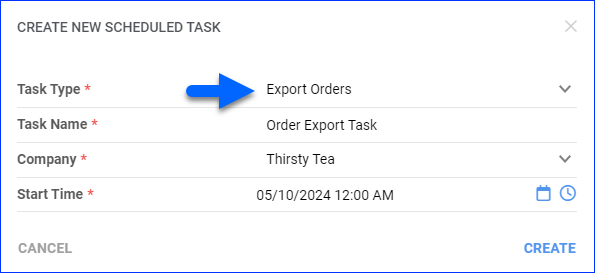
- Complete as follows:
- Click Task Type and select Export Orders.
- Set the Task Name.
- Select the Company.
- Select the Start Time.
- Click CREATE.
- Click the link in the success message at the bottom of the screen to configure the task details.

- Click the Edit button on the top right.
- In the Details section:
- Click the User ID menu and select your username.
- Click the Saved Search menu and select a Saved View created to target specific orders.
- Click the Export Via option and select Address Validation Order Export in the dropdown menu.
- (Optional) Check the Mark Orders As Exported box if you need to track which orders have already been exported. This will change the value of the orders’ Is Exported status to True.
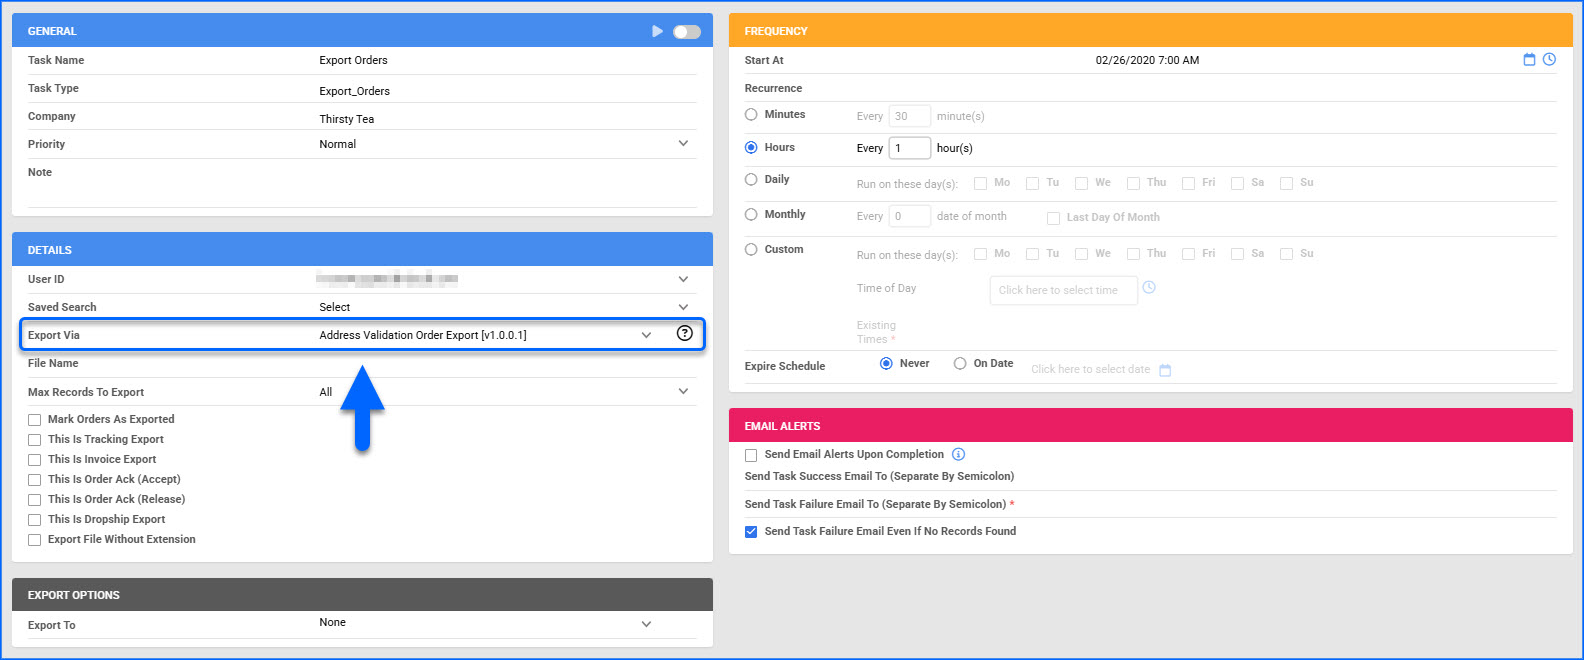
- Configure the Export Options and Frequency per your preference.
- In the General section, click the Enable toggle button.
- Click Save.
For Shipbridge users, it is recommended that you also enable the Consider Address Classification from CWA setting in Menu > Options > Shipping.