Overview
Sellercloud can process multiple jobs at the same time; however, if a job handles large amounts of data, it may impact server performance. You can schedule your Queued jobs to run at a specific time (e.g., at night or off-peak hours), allowing you to maximize server efficiency and to minimize disruptions. This is particularly useful when processing heavy jobs.
A Sellercloud server typically runs a common queue of up to 6 active Jobs, with a maximum of 3 per client. If you are on a shared server, another client’s task can potentially affect the processing time of your own.
Manage Queued Jobs
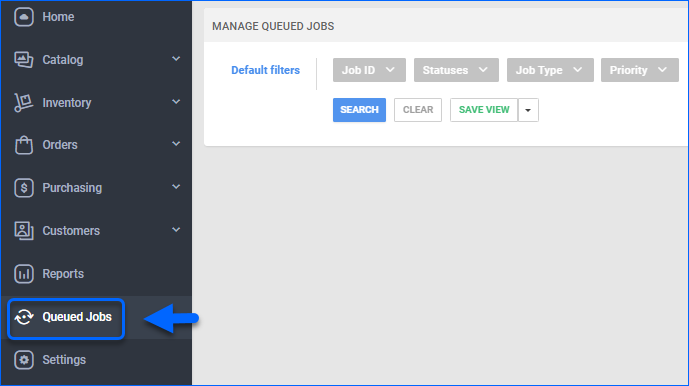
To access your submitted Queued jobs, or to search for a particular one, go to Main Menu > Queued Jobs.
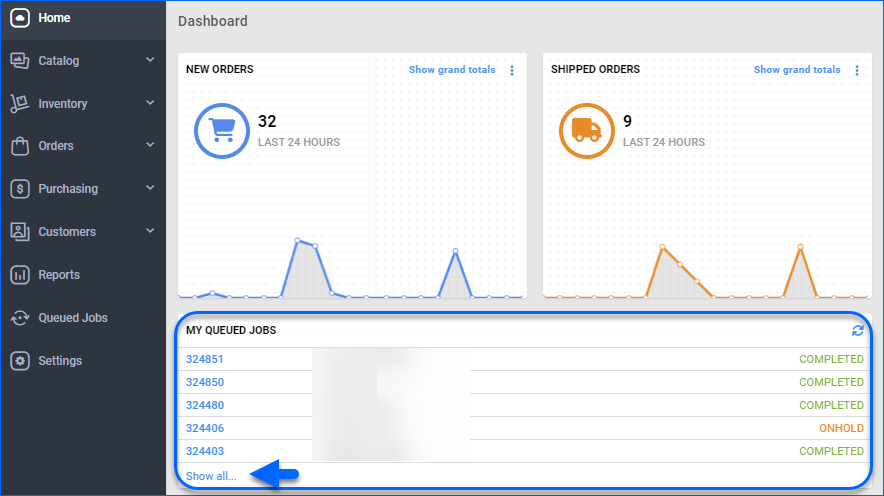
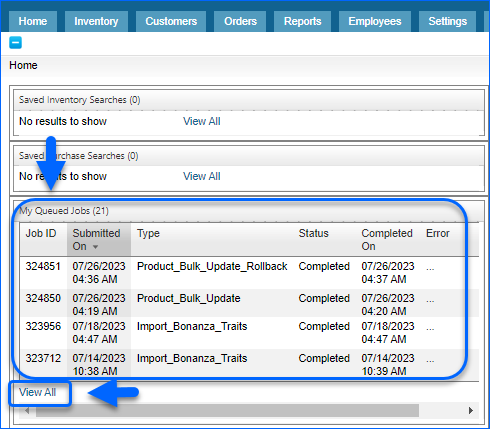
You can also view your recently submitted tasks on your Home Dashboard in a panel labeled My Queued Jobs.
Click Show all… to view all Queued jobs. Select a Job ID, to open a particular job’s page.
General Panel
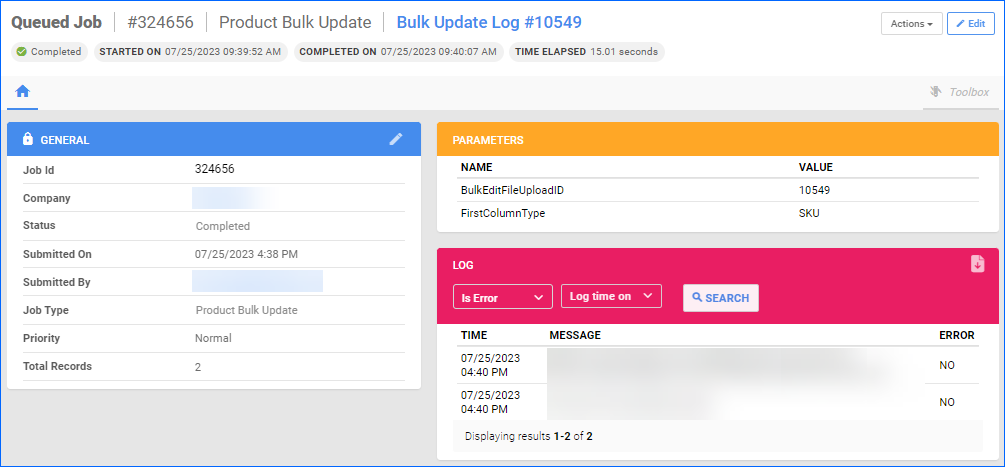
In the General panel you can find your Queued job details:
- Job Id – Unique identification number.
- Company – Displays for which company is the respective job.
- Status – Shows the job processing stage.
- Submitted On – Timestamp of the job submission.
- Submitted By – The name of the submitter.
- Job Type – Indicates the type of the task (e.g., Product Import, Launch on Channel, Export Product Images, etc.)
- Priority – Shows the job level priority.
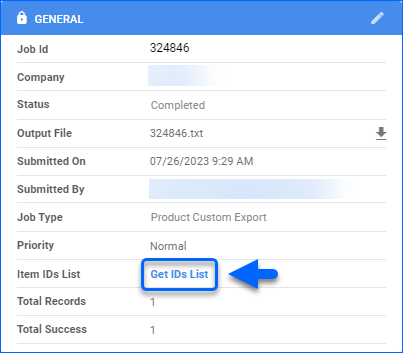
- Item IDs List – Click to display a record of all item IDs affected by job.
- Total Records – Total number of items processed by the job.
Queued Job Status
Each Queued job has its own Status, which indicates the stage of the task:
- Submitted – Upon initial submission, a task has this label.
- Processing – The status appears when the system initiates the queued job.
- Completed – Indicates that a job has finished processing.
- Failed – The system was unable to process the task.
- Cancelled – Displayed on all cancelled jobs.
- Cancelled Service Restarted – Indicates that task has been cancelled unexpectedly and should be restarted.
- Cancelled while Running – If a task is cancelled while running, this status appears.
- On Hold – Suspended tasks will have this status.
- Partial Success – The task has been completed only partially.
Queued Job Priority
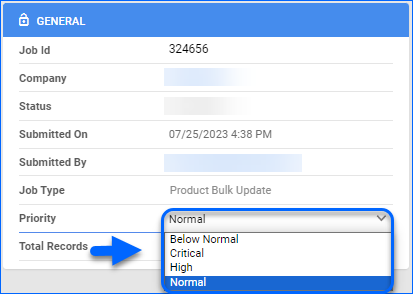
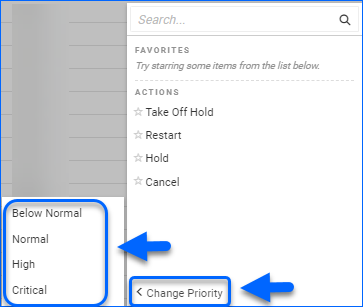
Categorize your Queued job Priority to define the order of execution. There are 4 job Priority levels:
- Below normal – The lowest priority level.
- Normal – A new job automatically gets a Normal Priority.
- High – A job with this level will be prioritized over tasks with levels Below normal or Normal.
- Critical – This is the highest priority level. The Queued job tool will process such tasks as soon as possible.
Job Priority can be set in 2 ways – Individually or in Bulk.
- Individual Priority:
- Go to your Queued job and click Edit.
- In the General Panel, select a Priority from the dropdown menu and Save.
- In Bulk:
- Go to your Manage Queued Jobs page and select the desired tasks.
- Open the Action menu, click Change Priority, and choose the appropriate level.
- A pop-up with a message will ask you to reconfirm your change – click Yes, to proceed.
Get Item IDs List
Usually, a Queued job has an Item IDs List, which contains all items affected by the processed job, such as Orders, Products, and POs. You can access this list by clicking Get IDs List.
A pop-up with the respective IDs appears on your screen.
Bulk Update Log
A Bulk update Queued job records changes to product attributes that are updated with a file import in a Bulk Update Log. To access this log, open the respective Queued job and from its Toolbox select Bulk Update Log.
Here, you can find different job details, such as the task creation configurations, affected SKUs, successful and unsuccessful updates, and more. In the General Details panel you can also:
- Download original file, used for the bulk update.

- Rollback file, so you can revert the processed changes. This action will create another Queued job with the type Product Bulk Update Rollback.

Download Files
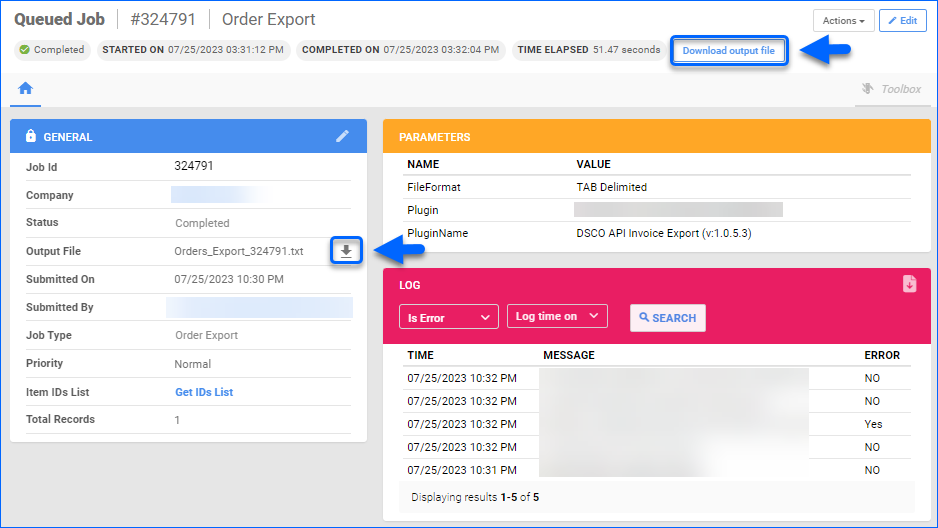
Based on the specific task, some Queued jobs generate output, or input files, which you can easily download:
- Go to the desired Queued Job page.
- In the General panel, find the Output or the Input File field and click the Download File icon or click the Download file button on the top.
Actions
You can execute various Actions on submitted Queued jobs, either individually or in bulk.
Individually
- Put on Hold – To suspend a submitted job. Applicable only for jobs with status Submitted.
- Cancel Job – To revoke a task. Applicable only for jobs with status Submitted.
- Take Off Hold – To reinstate a job. Applicable only for jobs with status Hold.
- Export To Excel – To export task ID and its Log details.
To perform these Actions, navigate to the specific Queued job > Actions menu and select the desired Action.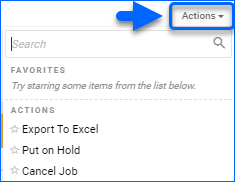
In Bulk
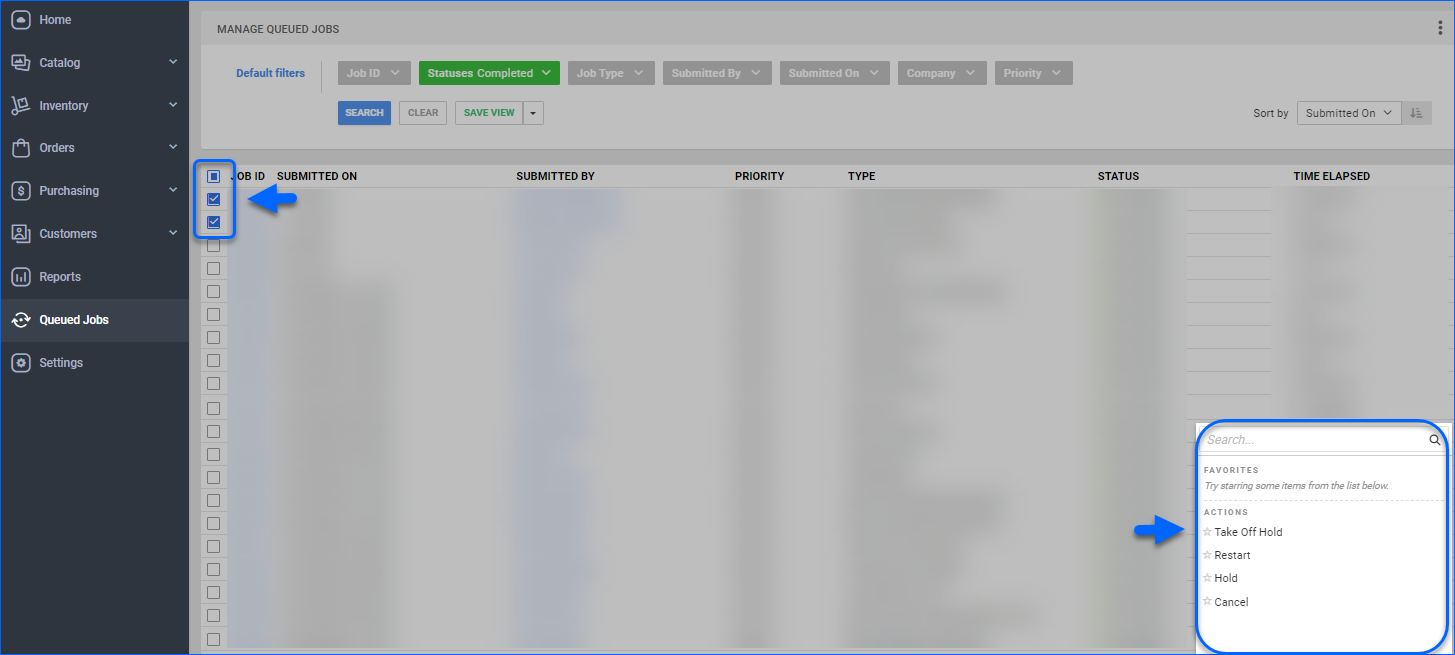
The available In Bulk Actions are:
- Hold – To suspend a submitted job. Applicable only for jobs with status Submitted.
- Take Off Hold – To reinstate a task. Applicable only for jobs with status Hold.
- Cancel – To revoke a task. Applicable only for jobs with status Submitted.
- Restart – To repeat a Queued job.
- Export – Generates and downloads an Excel spreadsheet to your device. The file contains all the column headers you see in the grid, including the optional ones you can select from the Customize Interface modal.
To execute the above Actions:
- Go to the Manage Queued Jobs page and check a job (or several jobs).
- Click the Action icon and select an action from the menu.
- A pop-up with a message that asks you to reconfirm your change will appear – click Yes, to proceed.
Change Log
You can see a history of your Queued job background activities in its Log panel. Every Log activity has Time, Message and Error status.
Use the Search option, to easily find errors and their messages.
To download a Log, click the download icon in the top right corner of the Log panel.
Parameters
Your Queued job Parameters panel displays the specific Values, affected by the job.
The Parameters Names and Values vary based on the Queued job type. Here, you can find information about SKUs, used plugin/profile, FTP credentials, file columns, and more.
Queued Job Emails
Queued jobs have the option to generate and send emails to specific recipients once a job reaches a certain status. You can configure the tool to send notifications for Completed, Failed, and Cancelled Service Restarted queued jobs:
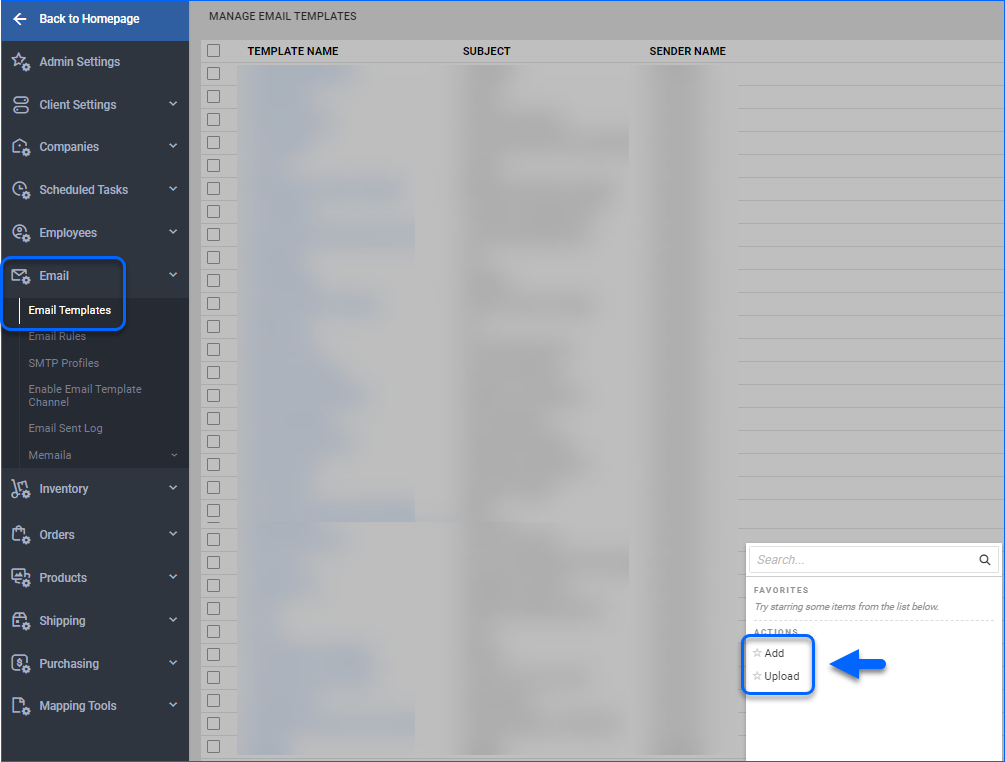
- Go to Settings and navigate to Emails > Email Templates.
- Click Actions and either Add, or Upload separate email templates for Completed, Failed, and Cancelled Service Restarted queued jobs.
- Edit the template text and Placeholders as required and add your SMTP Profile that you’ve configured in advance.
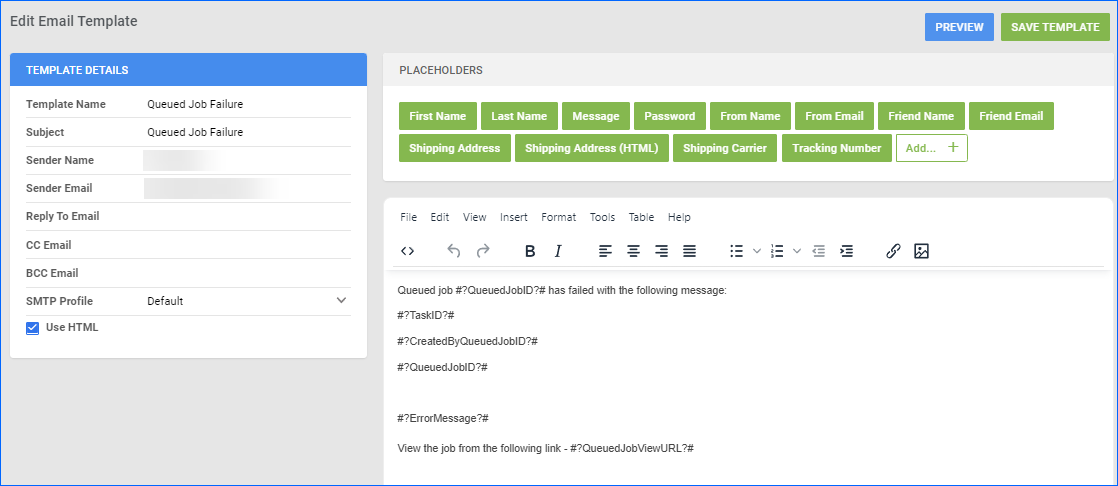
- Click Preview, to display your message.
- Save Template.
- Navigate to your Company Settings Toolbox and search for Email Template Assignment.

- Configure your Email Template Assignment for Completed, Failed, and Cancelled Service Restarted queued jobs and Save.
Trace Log
The Trace Log is a detailed account of each step taken in the process of running the Queued Job. This is especially useful when troubleshooting and helps pinpoint where an error might have occurred. You can review the Trace Log directly in the UI or download it in a TXT format file by clicking the icon in the panel header.
Overview
Sellercloud can process multiple jobs at the same time; however, if a job handles large amounts of data, it may impact server performance. You can schedule your Queued jobs to run at a specific time (e.g., at night or off-peak hours), allowing you to maximize server efficiency and to minimize disruptions. This is particularly useful when processing heavy jobs.
A Sellercloud server typically runs a common queue of up to 6 active Jobs, with a maximum of 3 per client. If you are on a shared server, another client’s task can potentially affect the processing time of your own.
Manage Queued Jobs
To access your submitted Queued jobs, or to search for a particular one:
- Go to Settings > Company Settings > select your company.
- Open your company’s Toolbox > navigate to Queued Jobs.
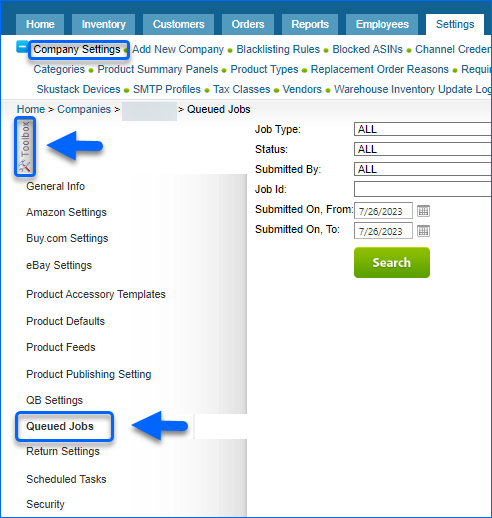
- Select the filters that you are interested in and click Search.
You can also view your recently submitted tasks on your Home Dashboard in a panel labeled My Queued Jobs.
Click View All to show all possible jobs. Select a Job ID, to open the particular Queued job.
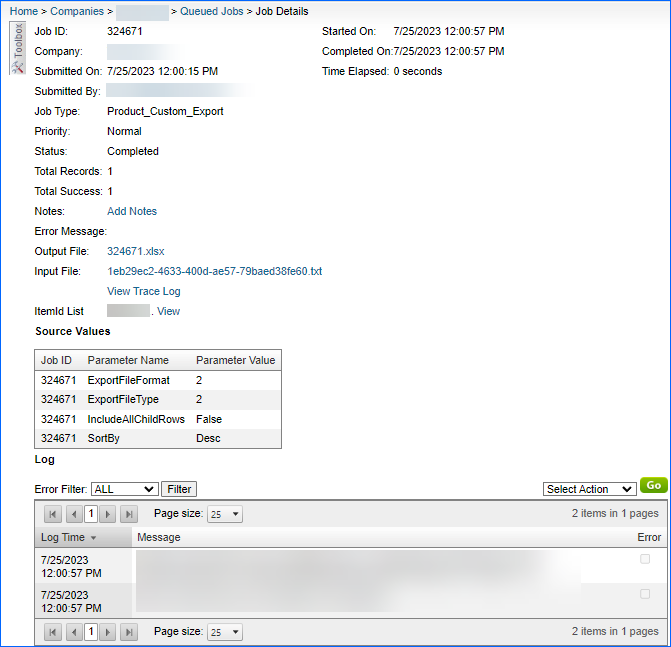
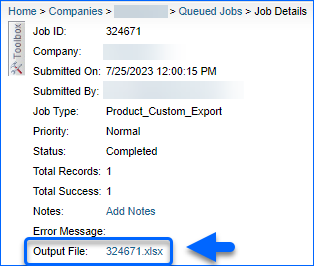
On this page you can find your Queued job details:
- Job Id – Unique identification number.
- Company – Displays for which company is the respective job.
- Submitted On – Timestamp of the job submission.
- Submitted By – The name of the submitter.
- Job Type – Indicates the type of the task (e.g., Product Import, Export Product Images, etc.)
- Priority – Displays job level priority.
- Status – Shows the job processing stage.
- Total Records – Total number of items, affected by the task.
- Notes – Click Add notes to enter custom text.
- Error Message – A field for potential job error messages.
- ItemId List – Click View to display a record of all item IDs, affected by the job.
- Source Values – Here are displayed the Parameters of the particular task.
- View Trace Log – Click to reveal the job’s chronological record of activities and events.
Queued Job Status
Each Queued job has its own Status, which indicates the stage of the task:
- Submitted – Upon initial submission, a task has this label.
- Processing – The status appears when the tool initiates the queued job.
- Completed – Indicates that a job has finished processing.
- Failed – The tool is unable to process the task.
- Cancelled – Displayed on all cancelled jobs.
- Cancelled Service Restarted – Indicates that task has been cancelled unexpectedly and should be restarted.
- Cancelled while Running – If a task is cancelled while running, this status appears.
- On Hold – Suspended tasks will have this status.
- Partial Success – The task has been completed only partially.
Queued Job Priority
Categorize your Queued job Priority to define the order of execution:
- Go to your company’s Queued Jobs page and check the desired jobs.
- Open the Action menu, click Change Priority and set the appropriate Priority:
-
- BelowNormal – The lowest priority level.
- Normal – A new job automatically gets a Normal Priority.
- High – A job with this level will be prioritized over tasks with levels Below normal or Normal.
- Critical – This is the highest priority level. The Queued job tool will process such tasks as soon as possible.
Bulk Update Log
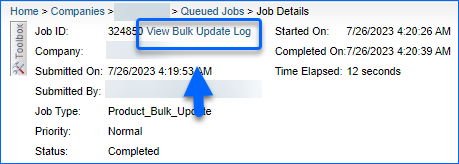
A Bulk update Queued job records changes to product attributes that are updated with a file import in a Bulk Update Log. To access this log, open the respective Queued job and click on View Bulk Update Log.
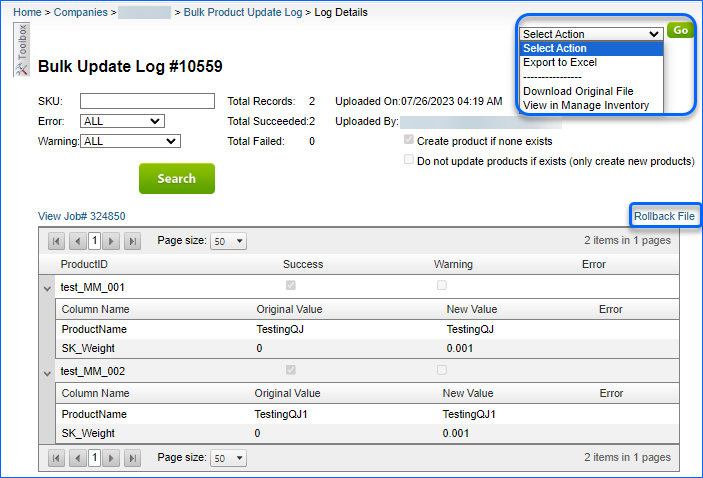
Here you can find different job details, such as the task creation configurations, affected SKUs, successful and unsuccessful updates, and more.
From the Actions dropdown, you can also:
- Download the Original File used for the bulk update.
- Export to Excel to extract the log details.
- View in Manage Inventory to open the affected SKUs.
Click on Rollback File, to revert the processed changes. This action will create another Queued job with the type Product Bulk Update Rollback.
Download Files
Based on the specific task, some Queued jobs generate output, or input files, which you can easily download:
Actions
You can perform several Actions to affect submitted Queued jobs.
- Hold Job – To suspend a submitted job. Applicable only for jobs with status Submitted.
- Queue Job – To reinstate a task. Applicable only for jobs with status Hold.
- Cancel Job – To revoke a task. Applicable only for jobs with status Submitted.
- Restart Job – To repeat a Queued job.
To execute the above Actions:
- Go to the Manage Queued Jobs page and check a job (or several jobs).
- From the Select Action dropdown, choose an action and click Go.

Change Log
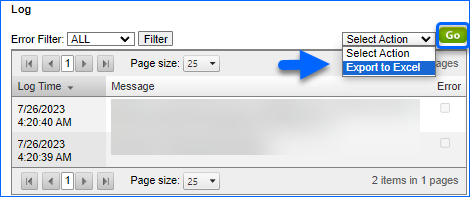
You can see a history of your Queued job background activities in its Log panel. Every Log activity has Log Time, Message and Error status.
Use the Error Filter, to easily find Errors and their Messages.
To download a Log, select Export To Excel from the Action dropdown and click Go.
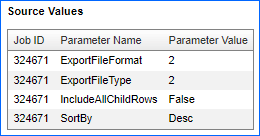
Source Values
Your Queued job Source Values panel displays the specific Parameters, affected by the job.
The Parameters Names and Values vary based on the Queued job type. Here you can find information about SKUs, used plugin ID, plugin name, FTP credentials, file columns, and more.
Queued Jobs Emails
The Queued jobs tool has the option to generate and send emails to specific recipients, once a job reaches a certain status. You can configure the tool to send notifications for Completed, Failed, and Cancelled Service Restarted queued jobs:
-
- Go to Settings and navigate to Email Templates.
- Either Add, or Upload separate email templates for Completed, Failed, and Cancelled Service Restarted queued jobs.

- Edit the template text and Place Holders as required and add your SMTP Profile, that you’ve configured in advance.
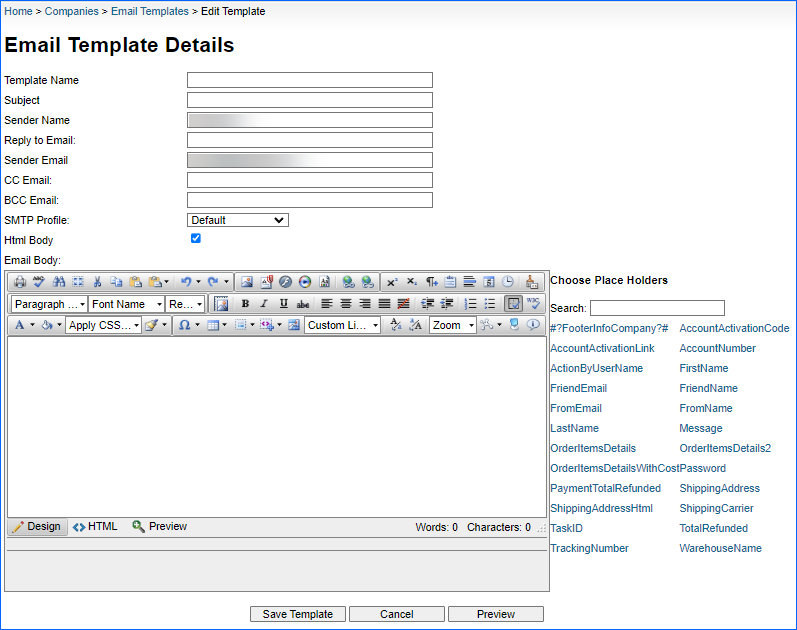
- Click Preview, to display your message.
- Save Template.
- Navigate to your Company Toolbox and search for Email Settings > Email Template Assignment.
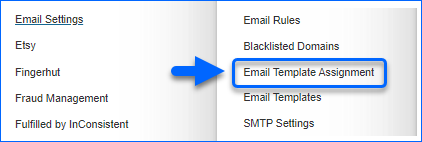
- Configure your Email Template Assignment for Completed, Failed, and Cancelled Service Restarted queued jobs and Save.
