Overview
Avalara is a cloud-based software company that provides tax compliance solutions for businesses of all sizes. Its AvaTax service helps automate transaction tax calculations and the tax filing process. Thus, Avalara helps businesses stay compliant with tax laws and regulations while reducing the time and resources required to manage tax compliance.
Integrating Avalara allows you to send order transactions from your Sellercloud account to Avalara and take your tax management to the next level. This integration works through API, transmitting information between the services using a plugin and a scheduled task.
Prerequisites
Before you can integrate Avalara into Sellercloud, complete the following requirements.
Sellercloud Support
Open a ticket with Sellercloud Support and request that the following plugin be installed on your server:
- Avalara API Bulk Order Export – Exports orders from Sellercloud to Avalara.
Custom Company Settings
Create the following Custom Company Settings:
- AvalaraUserName – Your Avalara account’s login Username.
- AvalaraPassword – Your Avalara account’s login Password.
- AvalaraUseProdAPI – Set to False when using a sandbox account. Set to True when moving to production. The production URL is the same as the sandbox URL without the “sandbox” part.
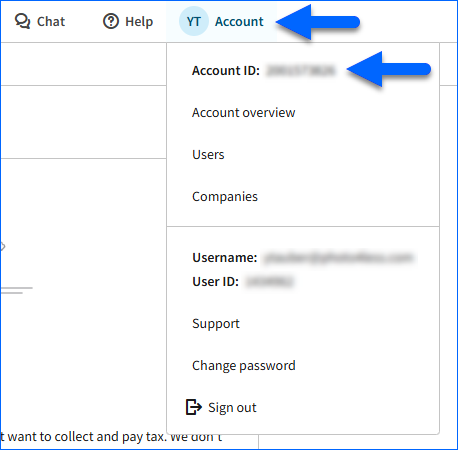
- AvalaraAccountID – Your Avalara Account ID. You can locate it in the Avalara Portal by clicking Account in the top right.
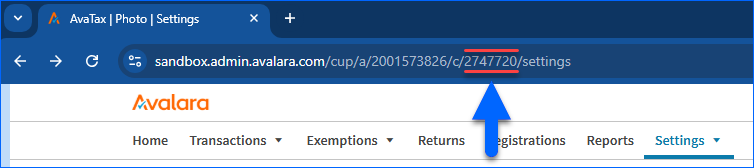
- AvalaraCompanyID – Your Avalara Company ID. It is the bolded part in this example Avalara Portal URL: https://sandbox.admin.avalara.com/cup/a/2001573826/c/2747720/settings.
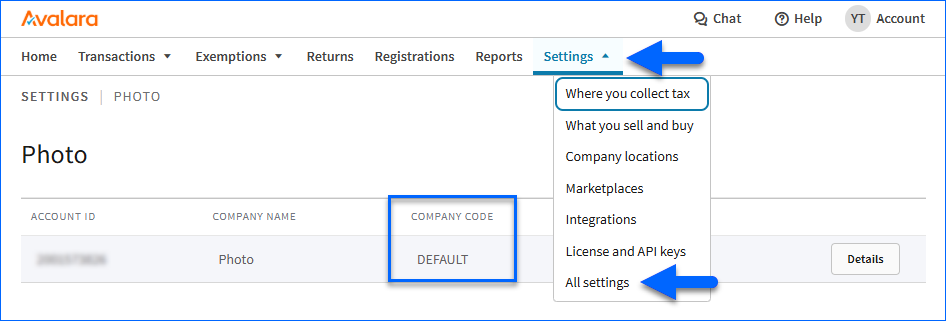
- AvalaraCompanyCode – Your Avalara Company Code. You can locate it in the Avalara portal under Settings > All settings > Company Code.
Custom Product Columns
Create the following Custom Product Column:
- (Optional) AvalaraEntityUseCode – Set the product’s Avalara Entity Use Code. In Avalara, Entity Use Codes represent specific tax exemptions or reduced tax rates based on the product’s use or the buyer’s tax status. Examples include exemptions for manufacturing, resale, or charitable purposes.
Custom Order Columns
Create the following Custom Order Columns:
- AvalaraExported – The plugin sets this column to True after exporting an order to Avalara.
- AvalaraRefundExported – The plugin sets this column to True after exporting a full or partial refund to Avalara.
Order Export
Once you activate the Avalara API Bulk Order Export plugin by following the steps below, it will start regularly exporting orders to Avalara in Comma-Separated Values (CSV) format. When Avalara registers an order export without errors, Sellercloud updates the Queued Job with the ID of the batch export on Avalara.
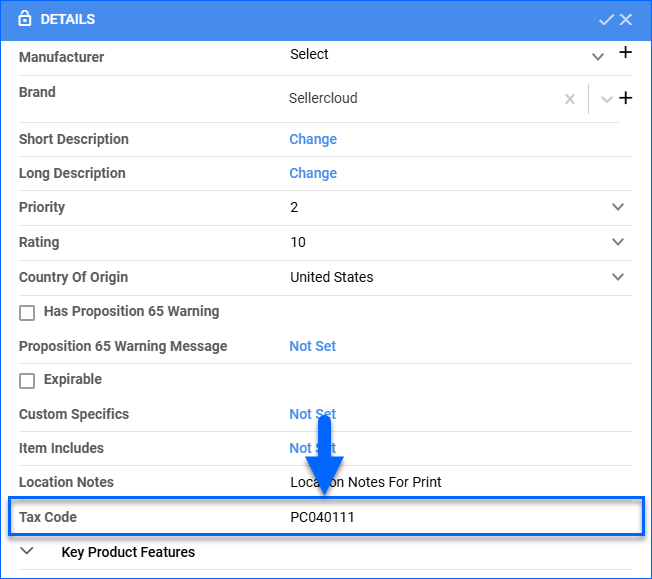
This plugin exports the Amount Paid, Tax, and Marketplace Tax per product. It also sends the product’s Tax Code if you configure it. You can configure the tax code for all your products in bulk by doing a Bulk Product Update with the column header TaxJarProductTaxCode in your upload file. Alternatively, you can configure it per product by enabling the Client Setting Display Tax Code On Product Home Page and then updating the Tax Code field on the Product Details Page.
The plugin processes orders as follows:
- When the plugin exports orders marked as Tax Handled by Channel, it sends Tax: 0.
- When it exports refunded orders, it sends Amount Paid: 0 and Tax: 0.
- When order items are marked as Tax Exempt, it sends that to Avalara.
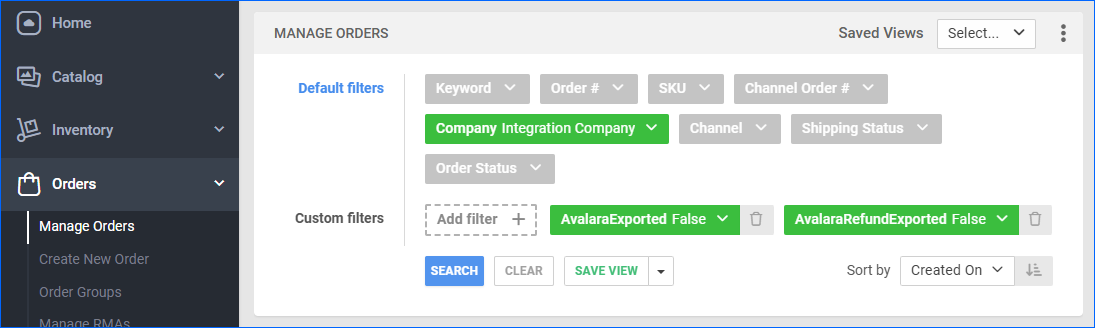
Before you move on, create a Saved Search for orders filtered by:
- Company – The company you created for the integration
- AvalaraExported – False
- AvalaraRefundExported – False
Automate Order Export
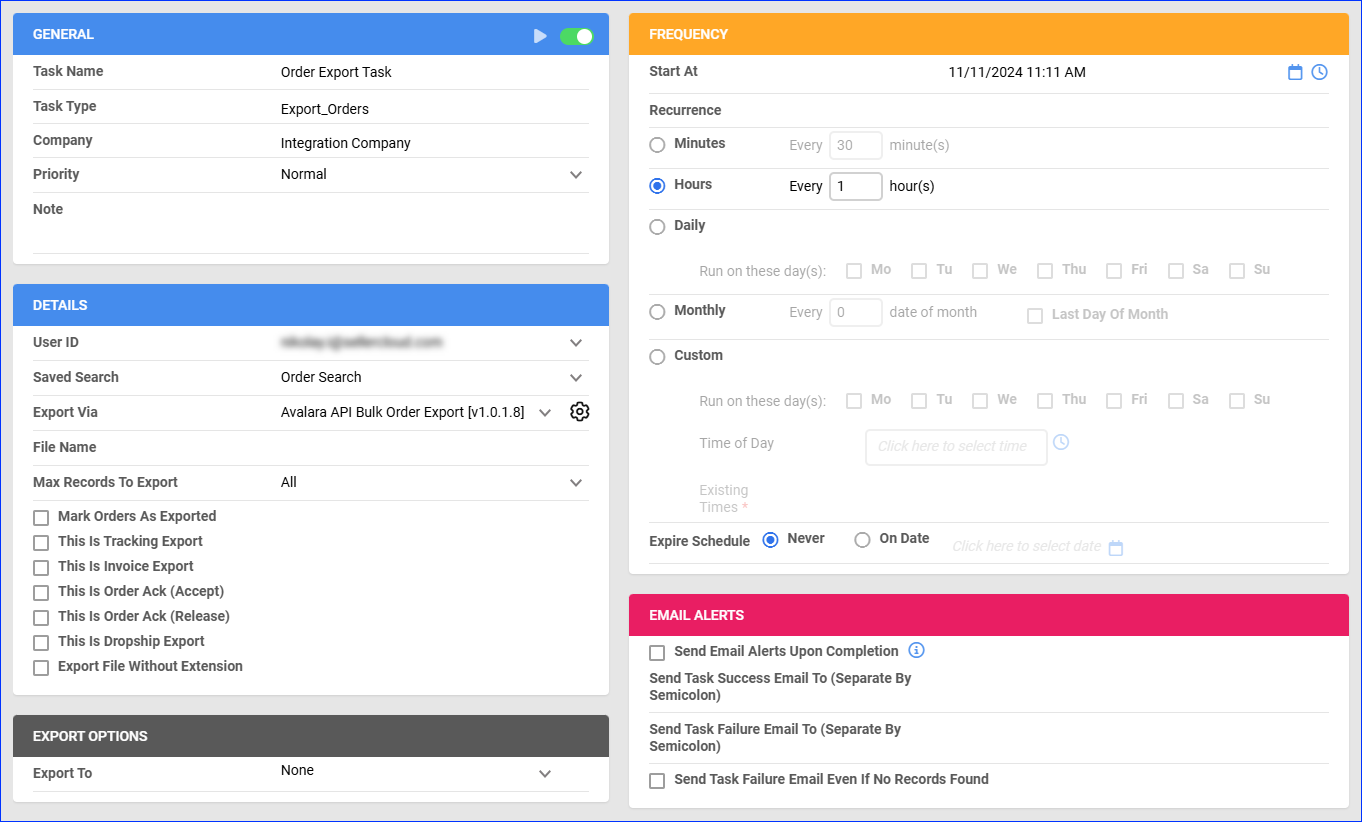
To create a Scheduled Task that regularly exports orders from Sellercloud to Avalara:
- Navigate to Settings > Scheduled Tasks > Manage Scheduled Tasks.
- Click the green + icon: Create New Scheduled Task.
- Complete as follows:
- Click Task Type and select Export Orders.
- Set the Task Name.
- Select the Company.
- Select the Start Time.
- Click CREATE.
- On the Scheduled Task page, click the Edit button at the top right corner.
- In the Details panel:
- Click the User ID menu and select your email.
- Click the Saved Search menu and select the saved search you created earlier.
- Click the Export Via menu and select Avalara API Bulk Order Export.
- In the Export Options panel, leave Export To on None.
- In the Frequency panel, specify the task frequency. For optimal performance, select a range between thirty minutes and one hour.
- In the General panel, click the Enable toggle button.
- Click Save.