Overview
Reserving inventory for FBA will ensure that received inventory will not be made available on various channels before it has arrived at Amazon’s Fulfillment Center.
Reserving inventory will also increase labor efficiency because received inventory will be flagged to ensure your shipping department doesn’t spend time stocking it on the warehouse shelf and then repacking it for your FBA inbound shipment.
Add Products to FBA Shipments
Before starting an FBA shipment in Sellercloud, make sure that products are ready to be shipped via FBA. Products must be Amazon Enabled, fulfilled by Amazon, and have a valid FNSKU. Learn more information in this article.
- Go to Inventory > FBA Inbound Shipments > Create New FBA Inbound Shipment.
- In the Products tab, click Add Products to open the search page. To enable case quantity, click Enable Case Qty button.

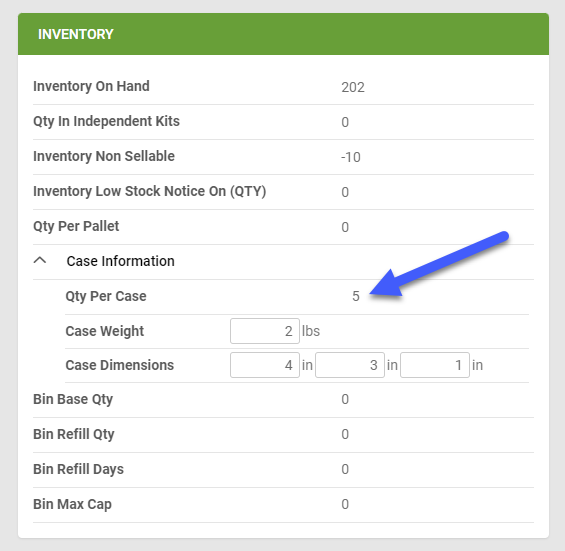
- If you enabled case quantity – The search page shows Cases Qty and Qty Per Case columns, and the Qty Per Case field auto-populates, if you configured that value on the product’s Purchasing tab.
- If you did not enable case quantity (can be enabled later) – The search page shows only a Qty To Ship column.
- If you enabled case quantity – The search page shows Cases Qty and Qty Per Case columns, and the Qty Per Case field auto-populates, if you configured that value on the product’s Purchasing tab.
- Select product(s) to ship and enter the number of cases to ship in the Cases Qty field.
- If you are using the Sellercloud Mobile Application, you also have the option to use your phone’s camera to scan barcodes, instead of manually typing.

- If you are using the Sellercloud Mobile Application, you also have the option to use your phone’s camera to scan barcodes, instead of manually typing.
- Click Add Selected to add more products, or Add & Close to proceed > Next.
Amazon Prep Guidance
There are cases when certain items may have special packaging or label requirements. Amazon provides preparation instructions, including any of these requirements.
- In the Prep Guidance tab of the FBA Inbound Shipment creation wizard, review the item preparation instructions provided by Amazon.
- You can print barcode labels or revise dimensions and weight.

Send Kits to FBA
You must set up any Kit Products that are Fulfilled by Amazon (FBA) with the Independent Kit Type to be able to add them to FBA Inbound Shipments and track your inventory.
The following Client Settings can help you streamline the process:
- Auto Assemble Kit when adding to FBA and WFS Shipments – With this setting enabled, Sellercloud automatically checks if there is enough quantity of each component and assembles the kits. They will be assembled into the Ship To Warehouse in the FBA Shipment.
- Enable Validate Inventory for FBA and WFS Shipments – When you click the Reserve Quantities button to reserve inventory, the system will now check the actual availability and return an error message if there is no availability.
- FBA And WFS Shipments Ignore Negative Inventory When Assembling Kit – when enabled, Sellercloud will skip validating available inventory when adding a kit parent to the Shipment. Additionally, if the Kit Parent has negative inventory, we will only assemble enough for the Shipment, and the Product will retain the original negative value.
- Auto Assemble Kit On Update Of Shipment
- Auto Assemble Kit When Importing FBA and WFS Shipment
Additionally, enable these settings to auto-disassemble when removing or adjusting a kit from the shipment or canceling the shipment altogether:
- Auto Dis-Assemble Kit when removing from FBA and WFS Shipments
- Auto Dis-Assemble Kit when cancelling FBA and WFS shipment
- Auto Dis-Assemble only if it was assembled for shipment
- Auto Dis-Assemble Kit When Removing From FBA And WFS Shipments
Reserve Quantity for FBA Inbound Shipments
- Go to FBA Inbound Shipments > Manage Shipments > select a shipment.
- On the FBA Inbound Shipment page, click Actions > Reserve Quantities.

- On the Reserve Quantities page, enter the Qty to Reserve and click Reserve. The Inventory Available Quantity will then decrease to reflect the inventory reserved for FBA.
 The Inventory Available Quantity column does not reflect changes that occurred after you opened the page. If you want to ensure that the quantity you are adding is currently available, enable the advanced client setting Enable Validate Inventory for FBA and WFS Shipments. When clicking the Reserve button, the system will now check the actual availability and will return an error message if there is no availability.
 - Once the status of the FBA Inbound Shipment changes to Shipped, the inventory will no longer be reserved. It will not, however, become available for sale while in transit. This is because FBA inbound shipments are placed in an unsellable interim warehouse and will not become available until they are received in the Amazon Fulfillment Center.
- To release reserved items, go to the Reserve Quantities page and click Unreserve.

- To automatically reserve quantity every time you create a shipment, enable the client setting Auto Reserve When Adding product to FBA Shipment. To familiarize yourself with all client settings, see this article.
Reserving Inventory for FBA Inbound Shipments
Reserving inventory for FBA will ensure that received inventory will not be made available on various channels before they have arrived at Amazon’s Fulfillment Center.
Reserving inventory will also increase labor efficiency because received inventory will be flagged to ensure your shipping department doesn’t spend the effort stocking it on the warehouse shelf and then repacking it for your FBA inbound shipment.
Reserve Quantity When Creating a FBA Inbound Shipment
- After adding a product to the shipment, click Reserve Quantities from the action menu.
- On the grid enter a value in the Reserve Quantity field.
- Click Reserve Quantities. The Inventory Available Quantity will then decrease to reflect the inventory reserved for FBA.
- Once the status of the FBA Inbound Shipment changes to “Shipped” the inventory will no longer be reserved. They will not, however, become available for sale while in transit. This is because FBA inbound shipments are placed in an unsellable interim warehouse and will not become available until they are received in the Amazon Fulfillment Center.
- Open the Receive Quantities page.
- Now select the item you want to release and click UnReserve Quantities on the action menu.
The Inventory Available column can not reflect any changes that occurred after you opened the page. If you want to make sure that you that the quantity you are adding is currently available, enable the client setting Enable Validate Inventory for FBA and WFS Shipments. Now, when clicking the Reserve Quantities button, the system will check the actual availability at that moment and will return an error message if there is no availability.
To view the inventory movement after quantity has been reserved, open the “Inventory Movement History” page of the reserved product. The reserved quantity is noted in the grid under the movement type “FBA Reserved.”
Mark Qty for Reserve When Creating a Purchase Order
- Create PO and add products.
- Enter a quantity value in the box called FBA Allocation. This will flag those items for FBA as they are received in ReceiveBridge to let the receiver know that the quantity should be used for FBA and should not be shelved. It will not actually reserve the Qty.
- Configure ReceiveBridge to flag FBA.
- Menu > Options > General tab > Enable FBA Allocation. Now, when receiving the purchase order, this column will show the quantity intended for FBA. The receiving department staff will then know not to shelve that quantity, and will instead direct it to be added to the FBA Shipment.