Overview
Instead of creating a shipment through the standard FBA Workflow, you can create and prepare your shipment in Seller Central and seamlessly import it into Sellercloud. Once you have completed the shipment in Seller Central, Sellercloud makes importing easy and will ensure that inventory is deducted properly based on what you have shipped to Amazon.
Import FBA Inbound Shipments
FBA Inbound Shipments must be at least partially processed before being imported into Sellercloud. You must confirm Placement Options on Seller Central for the shipment plan. Then, you can bring in the shipments as Unshipped and with the status Working or as Shipped and Closed, depending on whether you prefer to complete the process in Sellercloud or Amazon.
To import an FBA Inbound Shipment from Amazon:
- Create the FBA Inbound Shipment in Seller Central.
- Complete the shipping plan process and confirm placements.
- In Sellercloud, go to Inventory > FBA Inbound Shipments > Import FBA Inbound Shipment.
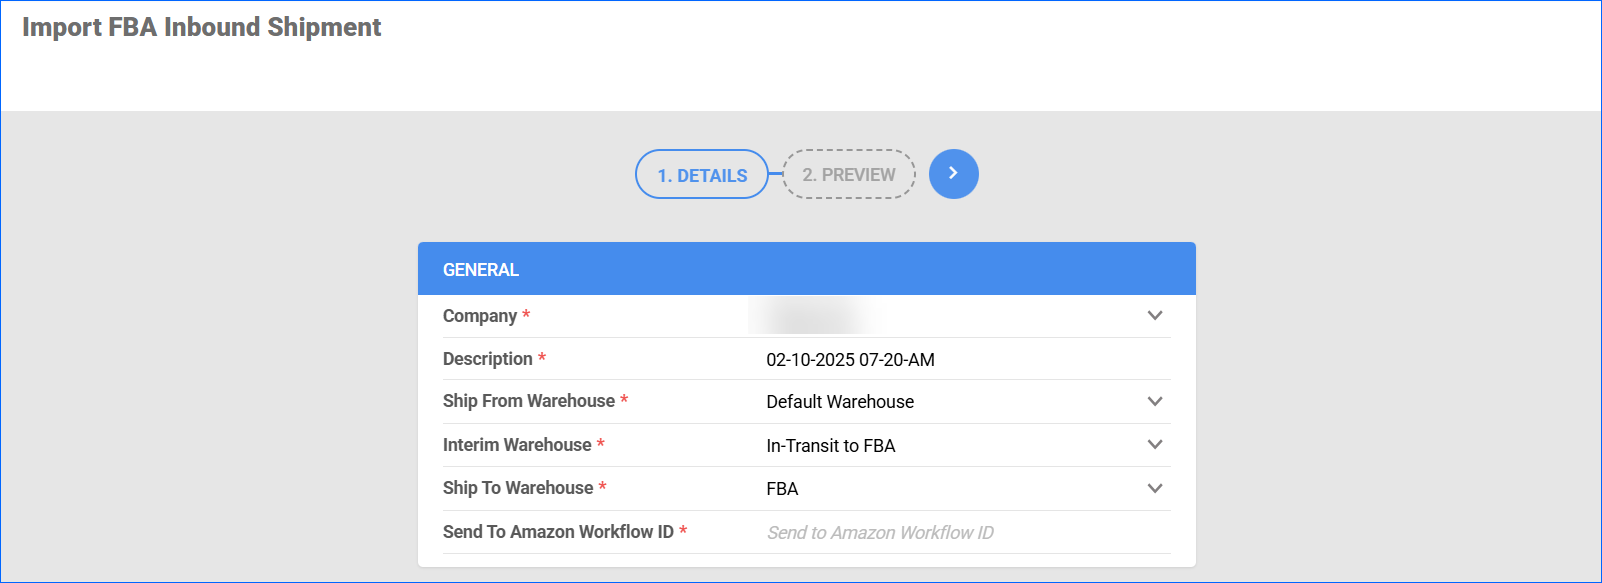
- In the General panel of the Details tab:
- The Default Company will be auto-selected. You can change it to the one that has the correct Amazon account credentials.
- The Ship To and Interim Warehouse fields will be auto-populated based on the relevant Client Settings. You can edit them if necessary.
- The Ship From Warehouse is based on the company Channel Warehouse selected for FBA. You can edit it if necessary.
- The Description is automatically set to the current date and time. You can edit it if necessary.
- Enter the Send to Amazon Workflow ID. All Amazon Shipments within the plan will be imported under one local shipment.
The Workflow ID is a long string of letters and numbers starting with wf. You can find it in the URL of a shipment and at the bottom of the Shipment Details page in Seller Central.
- Then, click the blue arrow to preview the shipment and create an empty local FBA Inbound Shipment.
- In the Preview tab, you will see a grid similar to that of Step 3: Prep Guidance of the FBA Inbound Shipment Wizard. Here, you can review the products and their quantities. If a SKU is split into several shipments within the plan, you will see all units merged into a single line on this page. However, upon import, the quantities will be split accordingly.

- Click the green flag button to finish the process. A new queued job will be created to import the shipment.
-
- By default, imported shipments will have the Working status. You can view them on the Manage Shipments page.
- If the shipment has already been shipped from Seller Central, we will import it with the status Closed and deduct inventory from the Ship From warehouse. You can view a movement record on the products’ Inventory Movement page.
Related Settings
Consider the following settings for this workflow:
- (App Setting) EnableAlternateValidateInventoryCheckWhenImportingShipment – This App Setting must be enabled to validate inventory availability when importing FBA Shipments. Open a ticket with Sellercloud Support to confirm if this setting is enabled on your server.
- (Client Setting) Auto Assemble Kit When Importing FBA Shipment – We recommend enabling this client setting to ensure Kit Products are automatically assembled when imported with a shipment.
- (Client Setting) Default FBA and WFS Ship From Warehouse – If you select a warehouse from the dropdown of this setting, we will assign it as the default Ship From Warehouse for any new FBA Inbound Shipment you import from Amazon.
- (Client Setting) Default FBA Shipment Interim Warehouse – If you select a warehouse from the dropdown of this setting, we will automatically assign it as the Interim Warehouse for any new FBA Inbound Shipment you import from Amazon.
