Overview
HomeRoots is a B2B e-commerce platform offering a wide range of home products, including furniture, lighting, and décor. Based in New Jersey, HomeRoots simplifies purchasing for businesses by offering competitive pricing, efficient logistics through 3PL services, and fast delivery across North America.
Integrating HomeRoots into your Sellercloud account allows you to seamlessly import orders, upload tracking information, and ensure your HomeRoots store is always up-to-date with the latest inventory data. This integration works through EDI documents and CSV files, transmitting information between the two services via plugins and Scheduled Tasks.
Prerequisites
Before you can integrate HomeRoots with Sellercloud, complete the following requirements.
Sellercloud Support
Open a ticket with Sellercloud Support and request the following plugins be installed on your server:
- HomeRoots EDI 850 Order Import – Imports orders from HomeRoots to Sellercloud in EDI 850 format and sends back acknowledgment in EDI 997 format.
- HomeRoots EDI 855 Order Acknowledgement Export – Sends order acknowledgment to HomeRoots in EDI 855 format.
- (Optional) HomeRoots PDF Doc Order Export – Exports a .ZIP file containing the packing slip and label PDFs received with the 850 order import.
- (Optional) HomeRoots – Inventory Export – Exports available inventory count from Sellercloud to HomeRoots in CSV format.
If necessary, you can request additional customizations or other plugins for this integration. Any such modifications will be billable.
HomeRoots Support
Contact HomeRoots Support for the following:
- SFTP details: Server Name, Username, and Password. You will need them when setting up the scheduled tasks to automate the plugins.
- HomeRoots’ ISA ID and Qualifier.
- Provide HomeRoots with your Customer ISA ID and Qualifier.
Custom Company Settings
Create the following Custom Company Settings:
On your Default company:
- STControlNumber – Set to 1.
- GSControlNumber – Set to 1.
- ISAControlNumber – Set to 1.
On the company created for the integration:
- HomeRoots_ISAID – Provided by HomeRoots.
- HomeRoots_Qualifier – Provided by HomeRoots.
- HomeRoots_Customer_ISAID – Your ISA ID. Typically, this is your phone number, but can be whatever you set up with HomeRoots.
- HomeRoots_CustomerQualifier – Provided by HomeRoots.
- HomeRoots_FTP_Folder_ExportFiles_Path – Set the specific FTP folder for exported files. This can be “/”.
- HomeRootsAddressID – Populate with your Warehouse Address ID. This code must match the ID on HomeRoots.
- (Optional) HomeRoots850_ImportOrdersUnshipped – When set to TRUE, all imported orders will have Payment Status: Unpaid in Sellercloud.
- (Optional) HomeRootsSafetyQty – Set a default Safety Quantity for all products sent to HomeRoots.
Custom Product Columns
Create the following Custom Product Columns:
- (optional) HomeRoots_Enabled – This column is used to enable only specific products for HomeRoots. Set to True for any SKUs you want to send with the Inventory Export plugin.
Custom Order Columns
Create the following Custom Order Column:
- HomeRoots_PDFDoc_IsExported – Set to True by the HomeRoots PDF Doc Order Export plugin after processing the order.
Order Import
The HomeRoots EDI 850 Order Import plugin imports order data from HomeRoots to Sellercloud in EDI 850 format. By default, the orders are imported with Status Shipped and Completed. The packing slip and shipping label are saved as Order Documents, which can then be exported in bulk with the Order Documents Download plugin.
If you have a different workflow, you can also opt to import all orders as Unshipped by configuring the HomeRoots850_ImportOrdersUnshipped custom company setting. The order documents will still be saved on each order.
The plugin matches the order items in the EDI 850 to your Sellercloud Product IDs. If an order comes in with a SKU that does not exist in your Catalog, it will be placed On Hold.
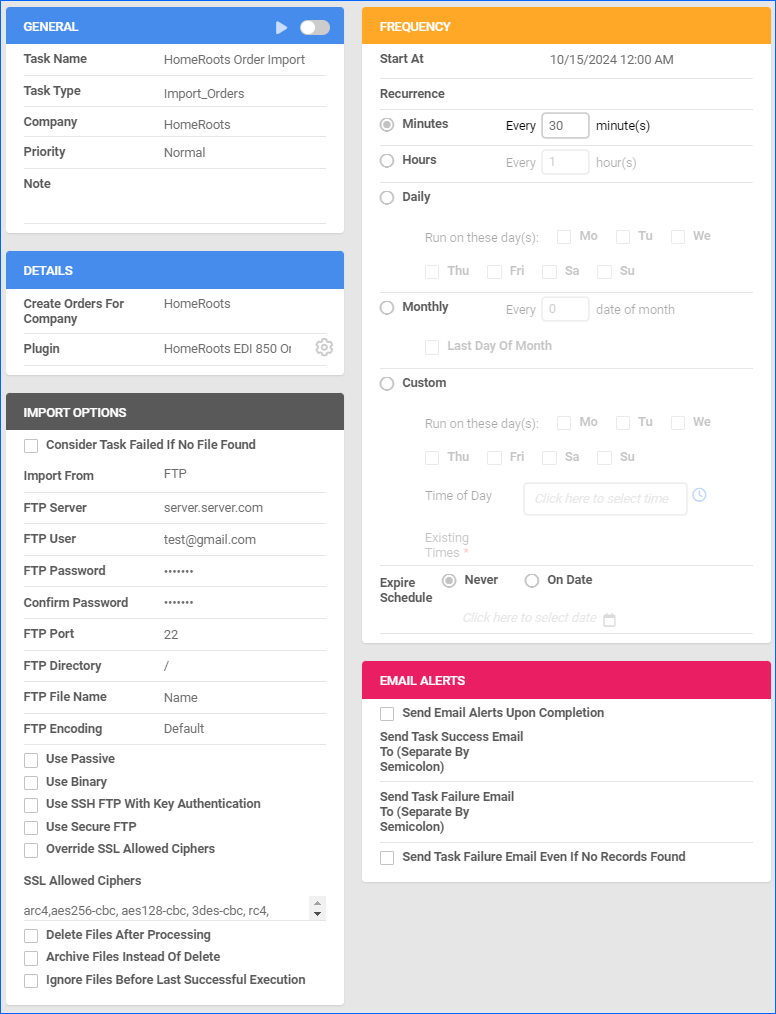
Automate Order Import
To create a Scheduled Task that imports orders:
- Navigate to Settings > Scheduled Tasks > Manage Scheduled Tasks.
- Click the green + icon: Create New Scheduled Task.
- Complete as follows:
- Click Task Type and select Import Orders.
- Set the Task Name.
- Select the Company.
- Select the Start Time.
- Click CREATE.
- The newly created Scheduled Task Details page will open automatically. Click the Edit button at the top right corner.
- In the Details panel:
- Click Create Orders For Company and select the company designated for this integration.
- Click the Plugin menu and select HomeRoots EDI 850 Order Import.
- In the Import Options panel:
- Set Import From to FTP
- Fill out the FTP fields.
- In the Frequency panel, specify the task frequency. For optimal performance, select a range between thirty minutes and one hour.
- In the General panel, click the Enable toggle button.
- Click Save.
Order Acknowledgement Export
The HomeRoots EDI 855 Order Acknowledgement Export sends order acknowledgment to Integration following the 855 EDI format and marks the orders as acknowledged.
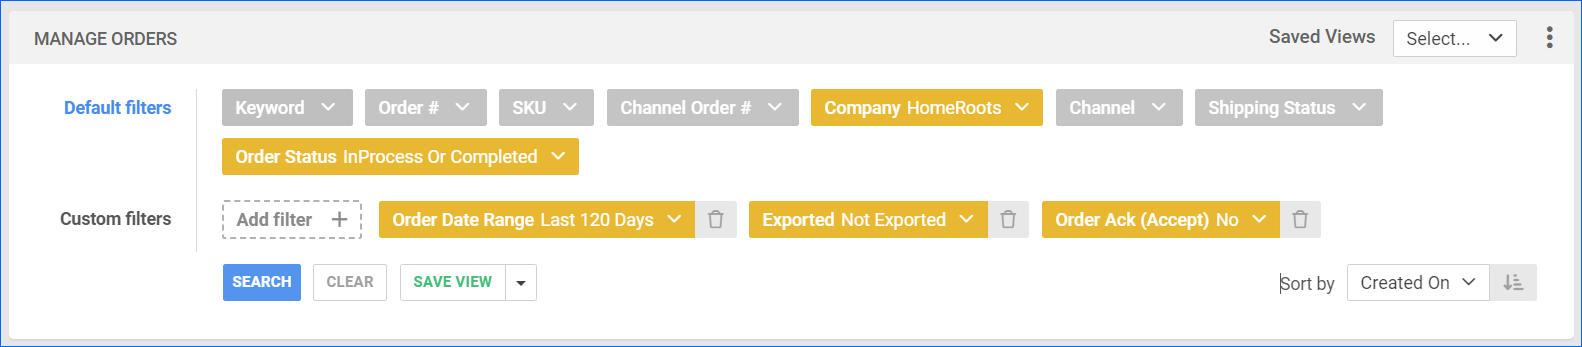
Before you move on, create a Saved Search for orders filtered by:
- Company – The company you created for the integration
- Order Status – InProcess Or Completed
- Exported – Not Exported
- Order Ack (Accept) – No
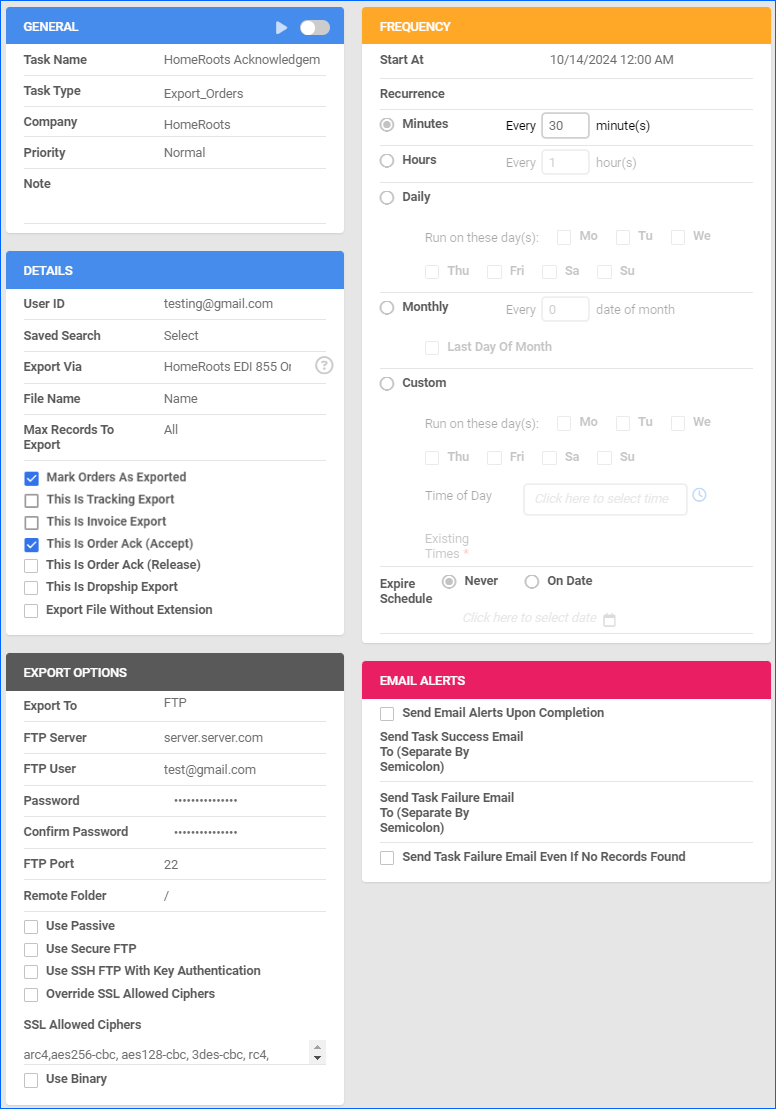
Automate Order Acknowledgment
To create a Scheduled Task that sends order acknowledgment:
- Navigate to Settings > Scheduled Tasks > Manage Scheduled Tasks.
- Click the green + icon: Create New Scheduled Task.
- Complete as follows:
- Click Task Type and select Export Orders.
- Set the Task Name.
- Select the Company.
- Select the Start Time.
- Click CREATE.
- On the Scheduled Task page, click the Edit button at the top right corner.
- In the Details panel:
- Click the User ID menu and select your email.
- Click the Saved Search menu and select the saved search you created earlier.
- Click the Export Via menu and select HomeRoots EDI 855 Order Acknowledgement Export.
- Check Mark Orders As Exported.
- Check This is Order Ack (Accept).
- In the Export Options panel, set Export To to FTP and fill out the FTP fields.
- In the Frequency panel, specify the task frequency. For optimal performance, select a range between thirty minutes and one hour.
- In the General panel, click the Enable toggle button.
- Click Save.
Order Documents Download
The HomeRoots PDF Doc Order Export plugin allows you to download packing slips and shipping label PDFs for the orders imported by the HomeRoots EDI 850 Order Import plugin.
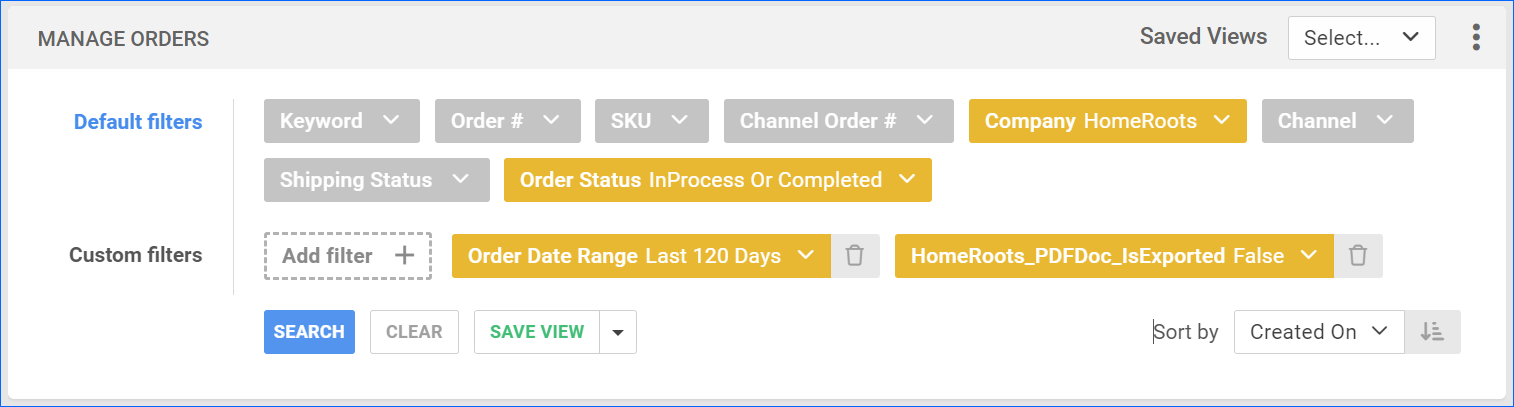
Before you move on, create a Saved Search for orders filtered by:
- Company – The company you created for the integration
- Order Status – InProcess Or Completed
- HomeRoots_PDFDoc_IsExported – False
Automate Order Documents Download
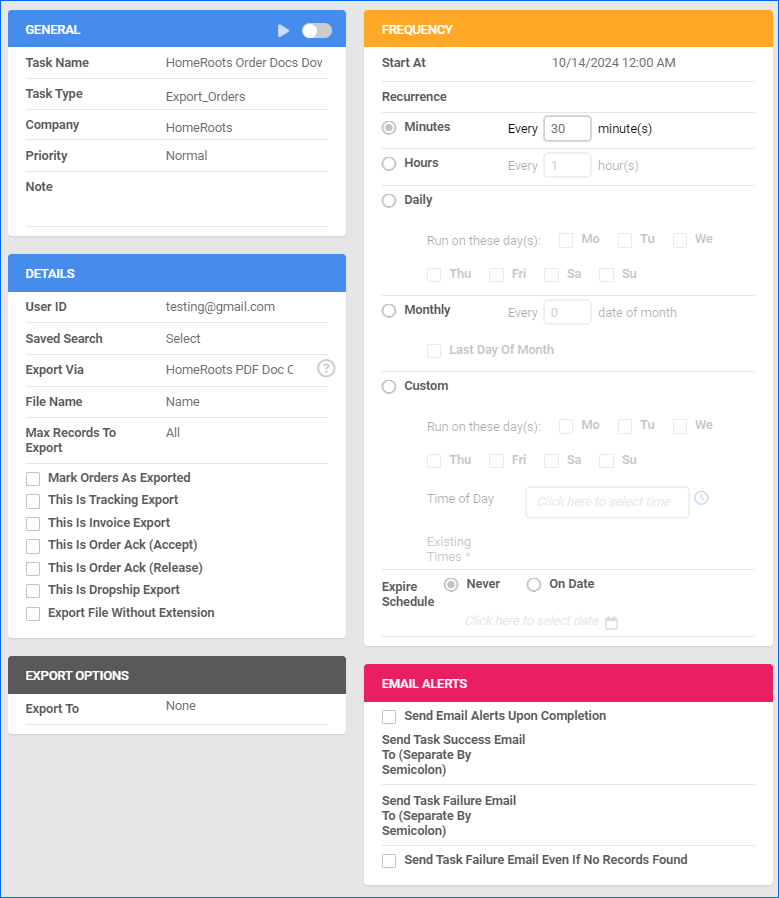
To create a Scheduled Task that exports order documents:
- Navigate to Settings > Scheduled Tasks > Manage Scheduled Tasks.
- Click the green + icon: Create New Scheduled Task.
- Complete as follows:
- Click Task Type and select Export Orders.
- Set the Task Name.
- Select the Company.
- Select the Start Time.
- Click CREATE.
- On the Scheduled Task page, click the Edit button at the top right corner.
- In the Details panel:
- Click the User ID menu and select your email.
- Click the Saved Search menu and select the saved search you created earlier.
- Click the Export Via menu and select HomeRoots PDF Doc Order Export.
- In the Export Options panel, set Export To to None.
- In the Frequency panel, specify the task frequency. For optimal performance, select a range between thirty minutes and one hour.
- In the General panel, click the Enable toggle button.
- Click Save.
The .ZIP files containing the exported documents will be available to download from the Queued Job Details page.
Inventory Export
Depending on your workflow, you may want to send regular inventory levels and restock ETAs to HomeRoots. The HomeRoots – Inventory Export plugin exports available inventory from Sellercloud to HomeRoots in CSV format. If a product has 0 quantity, we send a default 90-day restock ETA.
Optionally, you can enable only specific products for HomeRoots by setting their HomeRoots_Enabled Custom Column for Products to True:
- For one product at a time, go to the Product Details Page > click Toolbox and select Custom Columns > click Edit > update the HomeRoots_Enabled column > Save.
- For multiple products, follow the steps to Bulk Update Products and use the HomeRoots_Enabled column – set it to True for all products you want to enable.
Unlike core integrations, plugin integrations don’t require products to be in the company with the scheduled tasks. The export will include the products you select with your Saved Search.
Next, create a Saved Search for products filtered by HomeRoots_Enabled – True. You can add more filters to the search to narrow down the export further.
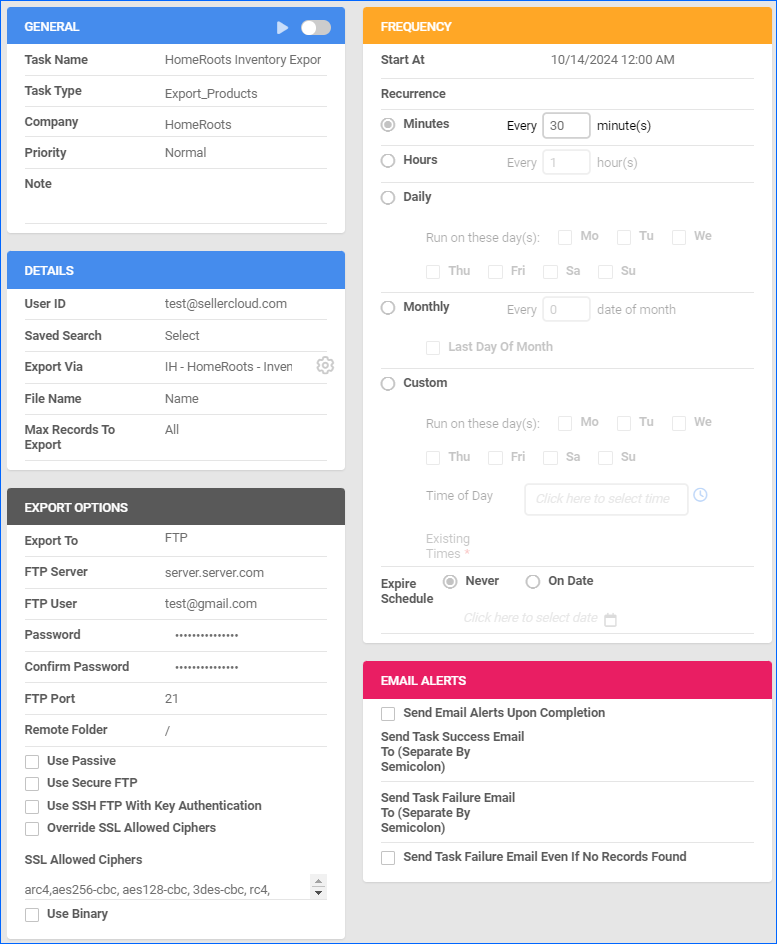
Automate Inventory Export
To create a Scheduled Task that exports inventory:
- Navigate to Settings > Scheduled Tasks > Manage Scheduled Tasks.
- Click the green + icon: Create New Scheduled Task.
- Complete as follows:
- Click Task Type and select Export Products.
- Set the Task Name.
- Select the Company.
- Select the Start Time.
- Click CREATE.
- On the Scheduled Task page, click the Edit button at the top right corner.
- In the Details panel:
- Click the User ID menu and select your email.
- Click the Saved Search menu and select the saved search you created earlier.
- Click the Export Via menu and select HomeRoots – Inventory Export.
- In the Export Options panel, set Export To to FTP and fill out the FTP fields.
- In the Frequency panel, specify the task frequency. For optimal performance, select a range between thirty minutes and one hour.
- In the General panel, click the Enable toggle button.
- Click Save.