Overview
When you integrate a channel on which you already have active listings, you can import those listings into Sellercloud, along with their associated product information. This allows for a smooth transition to managing your Catalog from Sellercloud and minimizes the amount of manual work necessary.
Import Listings from Channels
If you have listings across multiple channels, it’s important to note that you’ll need to import them separately for each channel. However, it’s not necessary to create a different company for each marketplace. You can easily keep track of your listings, while you have all of your integrations under one company.
Some cases that require multiple companies to be created are if you’re selling on international marketplaces or have an Amazon Unified Account. This way, you will have the option to configure the correct currency and country code. Additionally, if you have integrated more than one website channel, you can keep a better track of your orders. Another circumstance in which multiple companies may be required is if you have Channel Plugin Integrations.
Occasionally, you might need to use Shadow Products. For example, Amazon and eBay only allow a single SKU to be listed once, under one category. By creating a Shadow SKU, or multiple shadows, the product can be listed in multiple categories and share inventory across different companies.
Import Amazon Listings
You can import your Amazon Listings to Sellercloud manually or automatically.
Manually
To import listings from Amazon manually:
- Go to Settings > Companies > Manage Companies > Open a company.
- From the Toolbox, go to Channels > Amazon Settings > Reports.
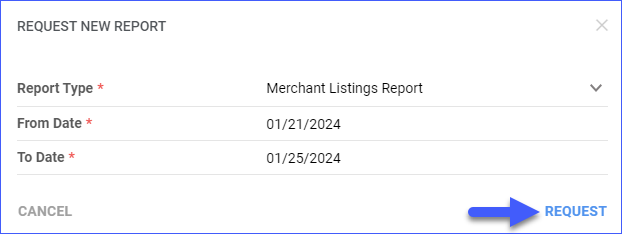
- Click on the three-dot icon in the grid and select Request New Report to generate the most current Active Listings report.

- From the Report Type field, select Merchant Listings Reports.
- Select the From Date and To Date of the report and click Request Report.
- Contact Sellercloud Support or your onboarding specialist to obtain the output file. Once you have it, you can use it to create a template and bulk-create your Sellercloud products.
Automatically
To automate the reports from Amazon, navigate to:
- Settings > Companies > Manage Companies > Open a company.
- Toolbox > Channels > Amazon Settings > General Settings.
- Navigate to the Control panel.
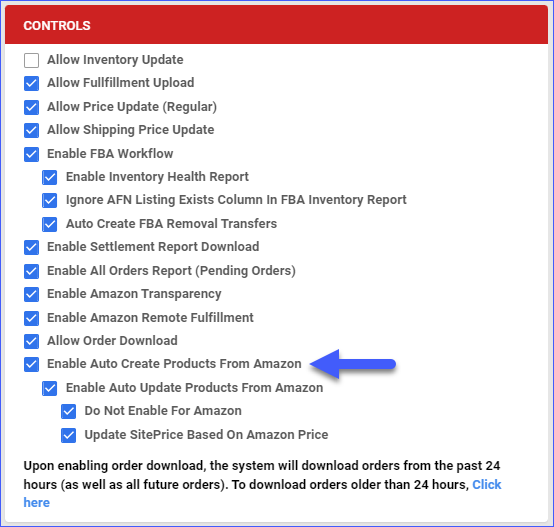
- Click Edit and check Enable Auto Create Products for Amazon. Optionally, you can configure the following sub-settings:
- Enable Auto Update Products From Amazon – Enable this to allow Sellercloud to automatically update product fields based on the information received with the Active Listings Reports.
- Do Not Enable For Amazon – By default, Sellercloud will automatically enable your Products for Amazon if they are in the latest Active Listings Report. Enable this setting if you would like to keep your products disabled. This is useful if you are not using Sellerlcoud to manage your Inventory on Amazon.
- Update Site Price Based On Amazon Price – Enable this to allow Sellercloud to automatically update your Products’ Site Price based on the Amazon Price we receive in the Active Listings Report.
- Click Save.
Import eBay Listings
Before downloading your listings, it’s essential to assign Custom Labels to all your eBay products. Custom Labels serve as SKUs in Sellercloud, even for variation parents and components. Failure to set Custom Labels will result in an error when attempting to download your listings.
To import eBay Listings, navigate to:
- Settings > Company Settings > Select a company.
- Toolbox > Import eBay Listings.
- Action Menu > Download Listings. This will create a job to import all the active listings from eBay.

- Select products from the list > Action Menu > Create Selected Products.
- Once the job is complete, the SKUs will all show up in red because they are products that are on eBay but don’t yet exist in Sellercloud.
- If the SKU already exists, select the option to Download the eBay properties.
Import Walmart Marketplace Listings
To import your listings, navigate to:
- Go to Settings > Companies > Manage Companies > Select a Company.
- Toolbox > Walmart Marketplace > Reports (API).
- In the Report Type dropdown, choose Item.
- Click Search.

- Download the Zip File, open the Excel Document in it, and copy the relevant information from each required column.
- Download the Walmart Marketplace Import Template, and paste the copied information under each respective column. Be sure to:
- Select the appropriate Shipping Weight header: PackageWeightLbs or PackageWeightOz. To include both weight units, split the data into two separate import files.
- Set WalmartAPIEnabled to TRUE for all products.
- Navigate to Catalog > Tools > Bulk Product Update.
- Click on Select File and input the document.
- Click Upload.

Import Shopify Listings
You can import listings from Shopify either manually or allow Sellercloud to create local products automatically.
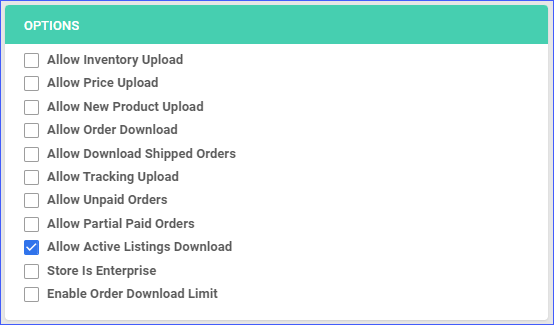
Prior to downloading your Shopify listings, navigate to Company > Toolbox > Website > General > and enable the Allow Active Listings Download checkbox.
Manually
You can manually create SKUs in Sellercloud based on the Active Listings you currently have on Shopify via a file import. This gives you the flexibility to decide which products you want to bring over. To do that:
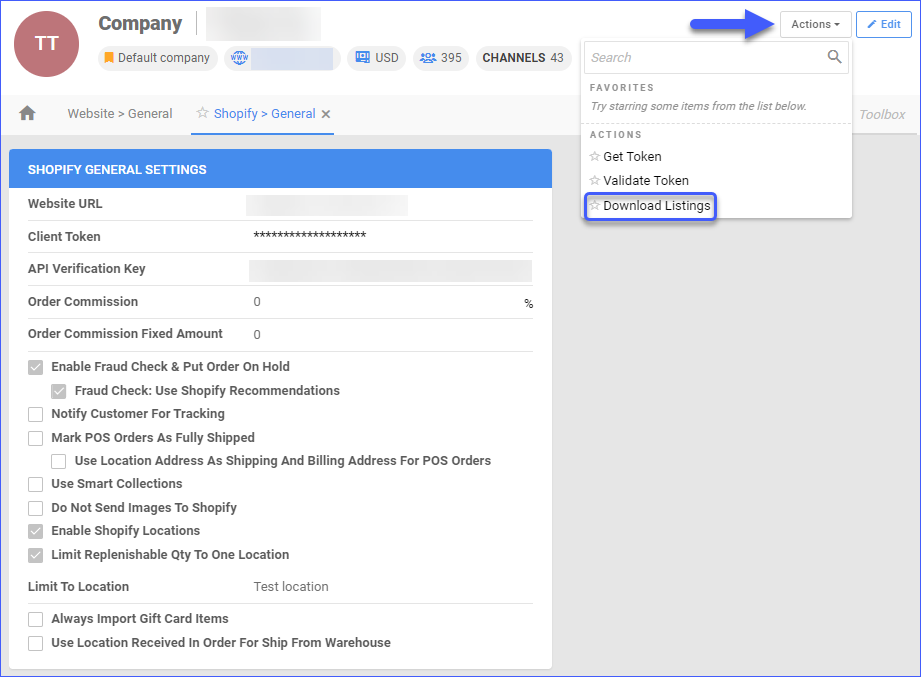
- Go to Company Settings > Select a company > Toolbox > Website > Sellercloud integrated Website > Shopify General.
- In Actions select Download Listings.
- Select the dates and click Download.
- Go to Queued Jobs > Search > click the Job ID of the most recent job.
- Reload the page until the document is available to download.
- Go to Catalog > Tools > Import Product Info > Import Info Via Plugin.
- Select the Shopify Import Plugin from the dropdown > attach the file that you downloaded from the Queued Job > click Import.

Automatically
You also have the option to allow automatic product creation based on your current active listings on Shopify. Variations will also be created via this method. To set this up:
- Go to Settings > Open your Shopify-integrated Company.
- Open the Toolbox > Website General Settings.
- Enable Auto Create Local Products > click Save.
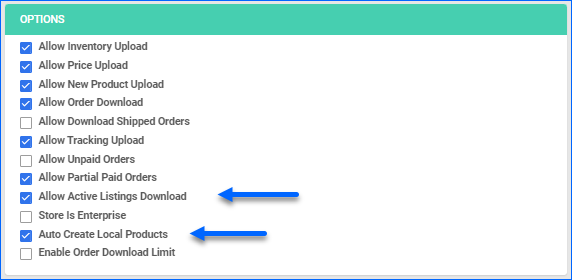
Once the setting is enabled, Sellercloud will periodically download the active listings report and generate Queued Jobs, which will create the local SKUs. This process will occur overnight in order to prevent server slowness.
Import Other Channel Listings
Each channel has different requirements for listing products. For the majority of the channels, we are not able to automatically pull in the listings report.
You will need to perform the following steps:
- Export the list of active SKUs directly from the channel.
- Create a file with these three required columns:
- ProductID
- ProductName
- (the channel name)_Enabled
- If you would like to add extra information, see the correct column headers for importing.
- Upload the file into the Sellercloud system via a Bulk Product Update. Catalog > Tools > Import Product Info > Bulk Product Update.

Other Important Information
Cost
For units that you already have inventory in the warehouse, the product’s cost needs to be entered before posting these products. This will keep your Profit and Loss Reports accurate.
Price
If you do not use a repricer, we suggest importing pricing individually or in bulk. Automatic price updates in Sellercloud are not advisable due to the potential risk of pricing errors that could result in financial loss.
Individually
To update a product’s price individually, navigate to:
- Catalog > Manage Catalog > Open a product.
- Click Edit in the top right corner.
- Navigate to the Pricing panel and adjust the price.
- Click Save.
In Bulk
To import pricing information in bulk, navigate to:
- Catalog > Tools > Import Product info.
- Click on Generate Template and create three columns:
- ProductID
- ProductName
- Price
- Populate the fields and go back to Sellercloud.
- Select the newly created template and click Upload.
Purchasing and Dropshipping (optional)
If you’re importing POs, then the vendor SKU and default vendor need to be set on the product. For products with case quantity, don’t forget to set the vendor SKU on the specific product you’ll add to the purchase order. You can also do this after your product goes live, as purchase orders are saved in Sellercloud. This way, you have the flexibility to manage your inventory efficiently and make adjustments as needed.