Overview
With Sellercloud, you can capture Inventory Snapshots, saving the current state of specific products and storing the data into a file. This allows you to revert back to previous inventory levels and restore all related information.
The output file includes the following columns:
- ProductID
- WarehouseID
- WarehouseName
- WarehouseQty
- OffsetQty
- PhysicalInventoryQty
- PhysicalInventoryDate
- InventoryAvailableQty
- AggregatePhysicalQty
- AggregateQty
- SiteCost
- LastCost
- AverageCost
This is a three-step process:
- You configure a Scheduled Task.
- You use the task to export snapshot files manually or automatically.
- To revert to a previous state, you import the information from the snapshot files into Sellercloud.
Configure a Scheduled Task
To set up a task that creates inventory snapshots:
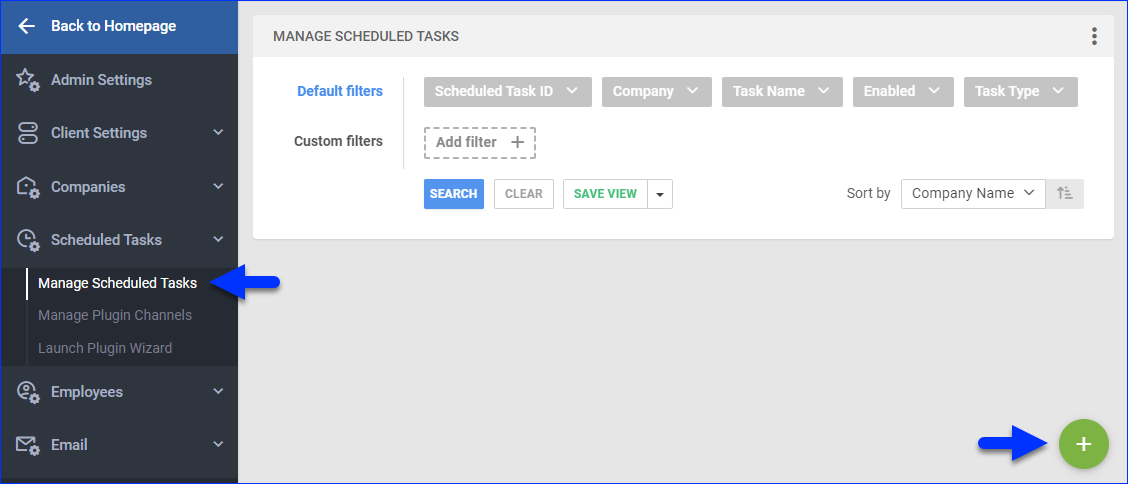
- Go to Settings > Scheduled Tasks > Manage Scheduled Tasks.
- Click the green + icon: Create New Scheduled Task.
- Complete as follows:
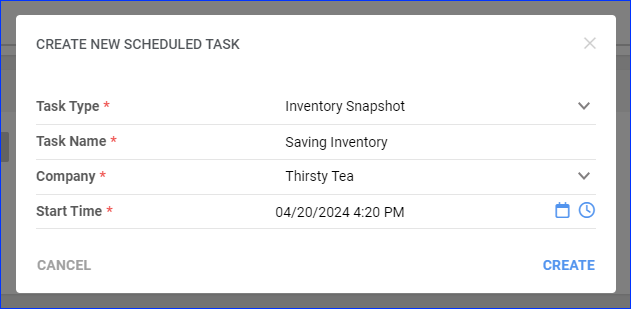
- Set the Task Type to Inventory Snapshot.
- Enter the Task Name.
- Select the Company.
- Select the Start Time.
- Click CREATE.
- The following message appears at the bottom of your screen: “Scheduled task created successfully. Click Here to configure the task details.” – click the link.

- Click Edit.
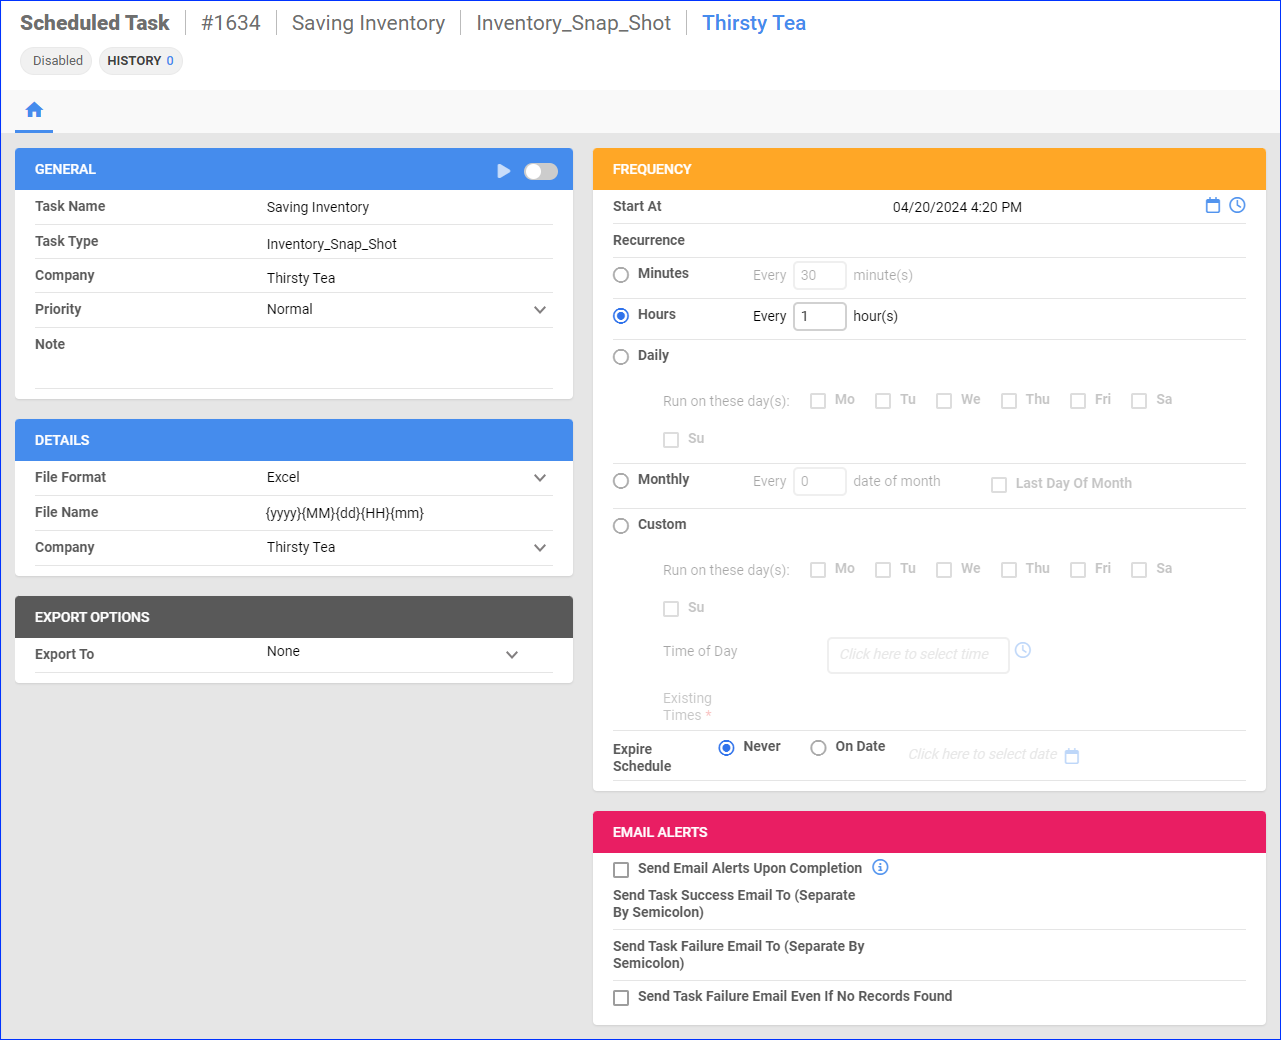
- In the Details panel:
- Select the File Format for your exports.
- Optionally, you can enter a custom File Name for your exports. You can use the following placeholder {yyyy}{MM}{dd}{HH}{mm} to populate the file name with the creation date.
- Select the Company with the products whose inventory data you want to export.
- In the Export Options section, leave Export To to None. Alternatively, you can select Email and configure the settings below to receive the snapshots by email.
- In the Frequency section, specify the task frequency.
- Click Save on the top right.
Export Snapshots
Once you have set up the scheduled task, you can use it to export snapshots automatically or manually.
Automatically
To export snapshots automatically:
- Go to Settings > Scheduled Tasks > Manage Scheduled Tasks.
- Find the scheduled task. You can set the Task Type filter to Inventory Snap Shot to find it quickly.
- Click the task’s ID to open it.

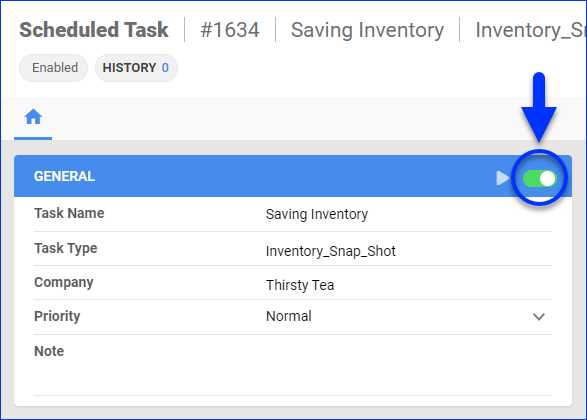
- Click the Enable button in the General panel. This will enable the scheduled task to run automatically based on your settings in the Frequency panel.
Next, to download your automatically created snapshots:
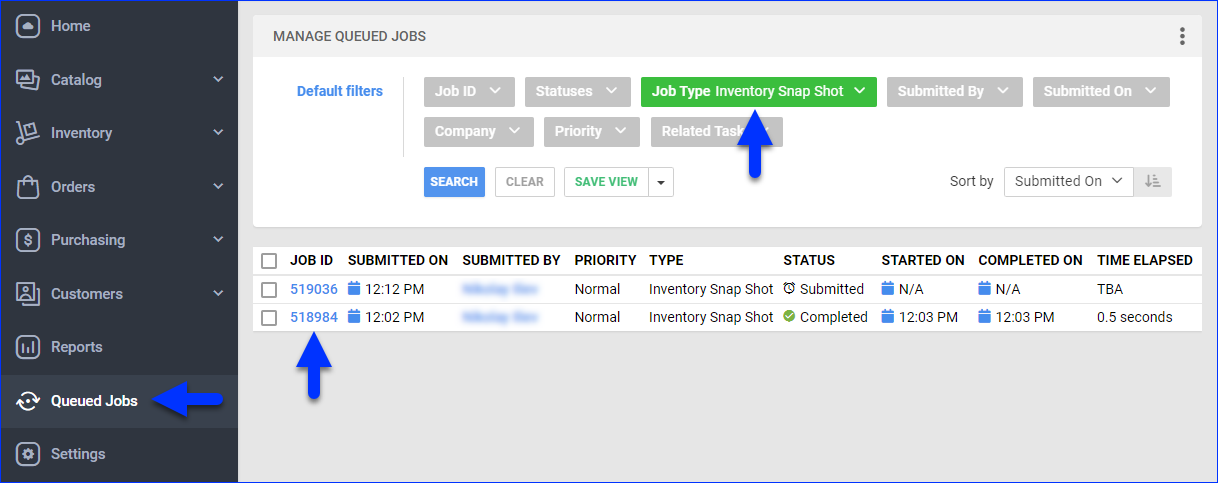
- Go to the Queued Jobs page.
- Set the Job Type filter to Inventory Snap Shot.
- Click the Job ID.
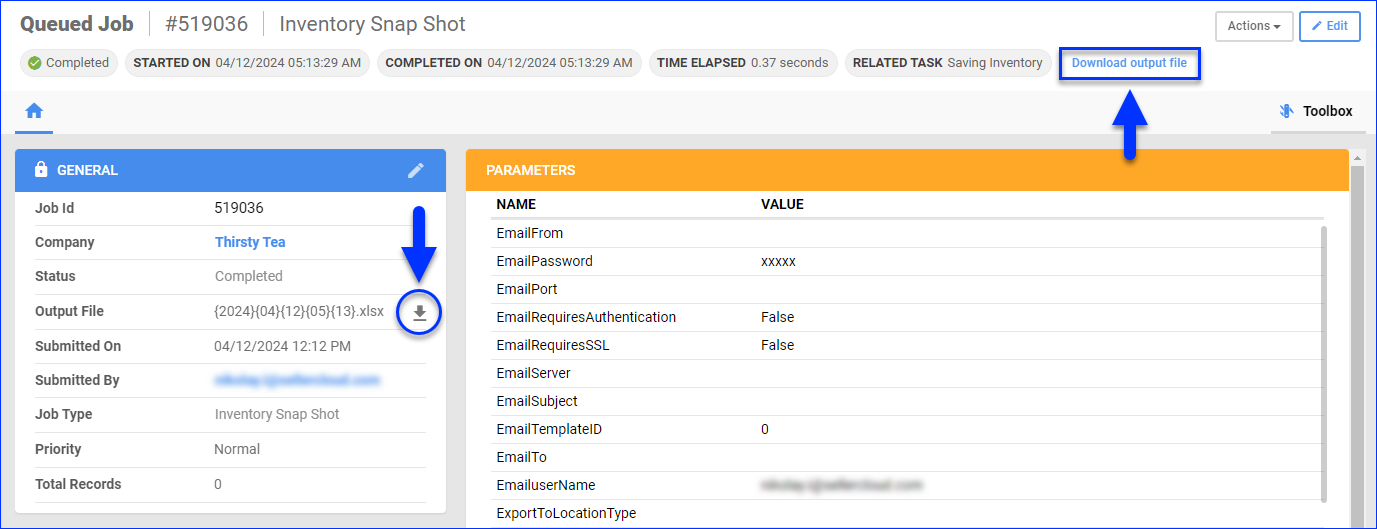
- Click the Download output file button at the top right or the download icon next to the Output File field in the General panel.
Manually
To export a snapshot manually:
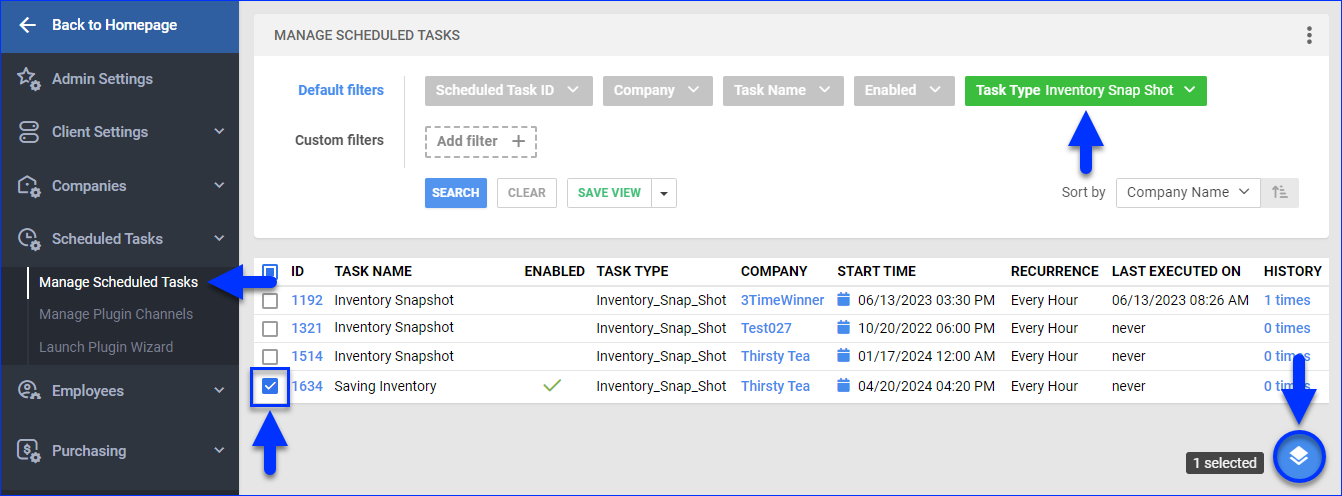
- Go to Settings > Scheduled Tasks > Manage Scheduled Tasks.
- Find the scheduled task. You can set the Task Type filter to Inventory Snap Shot to find it quickly.
- Check the box to the left of the task’s ID to select it.
- Click the blue Actions icon at the bottom right and select Execute.
- A Queued Job will be created. Click the link to open it.

- Click the Download output file button at the top right or the download icon next to the Output File field in the General panel.

Revert to a Snapshot
To revert back to a saved inventory snapshot:
- Export an inventory snapshot file.
- Use one of these options:
- To set a physical inventory count, go to Inventory > Tools > Import Inventory Info > Import Physical Inventory. This option uses the column headers Warehouse, PhysicalInventoryQty, and InventoryDate. See Product Inventory Physical to learn more.
- To adjust products’ inventory per warehouse, go to Inventory > Tools > Import Inventory Info > Import Inventory Adjustments. This import option uses the column headers WarehouseName, AdjustmentQty, and AdjustmentReason. See Product Inventory Adjustments to learn more.
- To adjust products’ inventory per warehouse bin, go to Inventory > Tools > Import Inventory Info > Import Warehouse Bin Info. This option uses the column headers WarehouseName, BinName, QtyToAdjust, and Reason. See Product Inventory Adjustments to learn more.
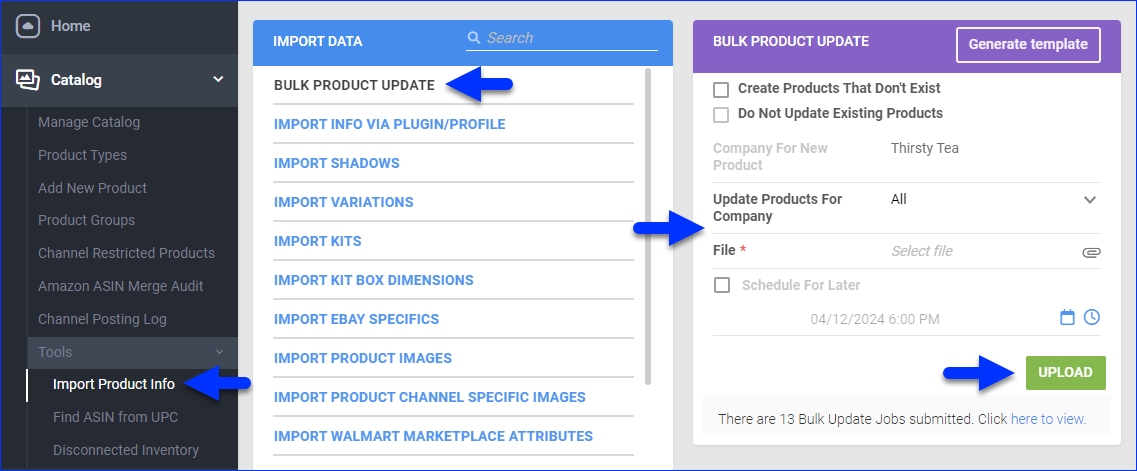
- To revert product costs, go to Catalog > Tools > Import Product Info > Bulk Product Update. This option lets you update the SiteCost and LastCost. See Bulk Update Products to learn more.
- To import a backdated Average Cost, see Prime Average Cost.
- If available for your import method, click the Download button to download the required template.
- Update the template based on the information from the inventory snapshot file.
- Click File and select the updated template file.
- Click Import. A Queued Job will be created to complete your request.
Overview
With Sellercloud, you can capture Inventory Snapshots, saving the current state of specific products and storing the data into a file. This allows you to revert back to previous inventory levels and restore all related information.
The output file includes the following columns:
- ProductID
- WarehouseID
- WarehouseName
- WarehouseQty
- OffsetQty
- PhysicalInventoryQty
- PhysicalInventoryDate
- InventoryAvailableQty
- AggregatePhysicalQty
- AggregateQty
- SiteCost
- LastCost
- AverageCost
This is a three-step process:
- You configure a Scheduled Task.
- You use the task to export snapshot files manually or automatically.
- To revert to a previous state, you import the information from the snapshot files into Sellercloud.
Manage Inventory Snapshots
- Company Settings > Toolbox > Scheduled Task.
- Select Inventory Snapshot from the Task Type Dropdown. Click GO.
- Schedule the task interval and save.
- The task will capture the inventory level at the set intervals and save them to a file.
- To view the file, navigate Settings > Inventory Snapshot.
- Snapshots are ordered in the grid. Click on the desired file.
- The record includes: Warehouse, WarehouseQty, OffsetQty, PhysicalInventoryQty, PhysicalInventoryDate, InventoryAvailableQty, AggregatePhysicalQty, SiteCost, LastCost, and AverageCost.
- To restore your inventory to that Inventory Snapshot quantity level, select that job on the grid and click Restore.