Overview
Kit Types
You can select any two products In a kit’s properties and sell them as a bundled kit. The kit feature can bind the inventory counts of multiple components and ensure there will be no risk of overselling the parent SKU or the child components.
The Inventory Relationship between Kit Parent and Components depends on the Kit Type selected. Make sure you review the three types of kit relationships below before you create and configure your kit products.
-
All Component Kit
All Component means that the kit will only be available for sale when all of the components are available. This configuration is often used when all components are necessary to create the final product.
The inventory of the parent is calculated based on the component with the least available units. The Aggregate quantity of that SKU, divided by the number of units of that component necessary for the kit, makes up the Kit Available Inventory.
With this Kit Type, the components maintain their inventory count but share it with the parent. This means that if the inventory of a component runs out, the inventory of the entire kit becomes zero as well.
Main Component Kit
If you choose the Main Component configuration, the kit will be available as long as the designated main component is available. This configuration is often used when there is one product that is necessary to create the final product, and the rest are supplemental or can be replaced by similar SKUs.
The Inventory Quantity of the parent is drawn only from the Main Component. The main component maintains its inventory count but shares it with the parent. This means that if the inventory of the main component runs out, the inventory of the entire kit will become zero as well.
Independent Kit
For Independent Kits, the inventory quantity of the parent is “independent” of the components. This means that the Inventory Quantity of the parent is not drawn from the components. The kit’s independence is maintained during sales as well. Sales of the kit will not reduce the inventory of components, and sales of components will not affect the inventory of the kits.
This kit type is the only one for which the Inventory Available Quantity isn’t calculated automatically and the only kit with Physical Quantity. Independent kits need to be Assembled to have any inventory at all. By assembling, you subtract the necessary units from the components and add units to the parent. See the Assemble & Disassemble Independent Kits section below for more information.
Create Kits
You can create kits individually or in bulk.
Individually
- Navigate to Catalog > Manage Catalog > Search > Open the product you wish to configure as a kit.
- Go to Toolbox > Kit.
- Press Edit and go to the Components panel.
- Click the plus icon and search for products to add to the kit.
- Select the ones you want to add and press Add & Close. Your components will appear in the Components panel.
- Add more products to the kit, enter quantities for each kit component, and press Save
Note: Kit components can be arranged in sequence by dragging and dropping the component into its desired sequence in the grid. - If you are creating a Main Component kit, click on the Main checkbox to mark your main component.

In Bulk
You can import kits in bulk through a file import.
- Go to Catalog > Tools > Import Product Info.
- Select Import Kits and download the template.

- Complete the fields and save.
- Return to Sellercloud and press Click to upload file > Import.
Manage Kits
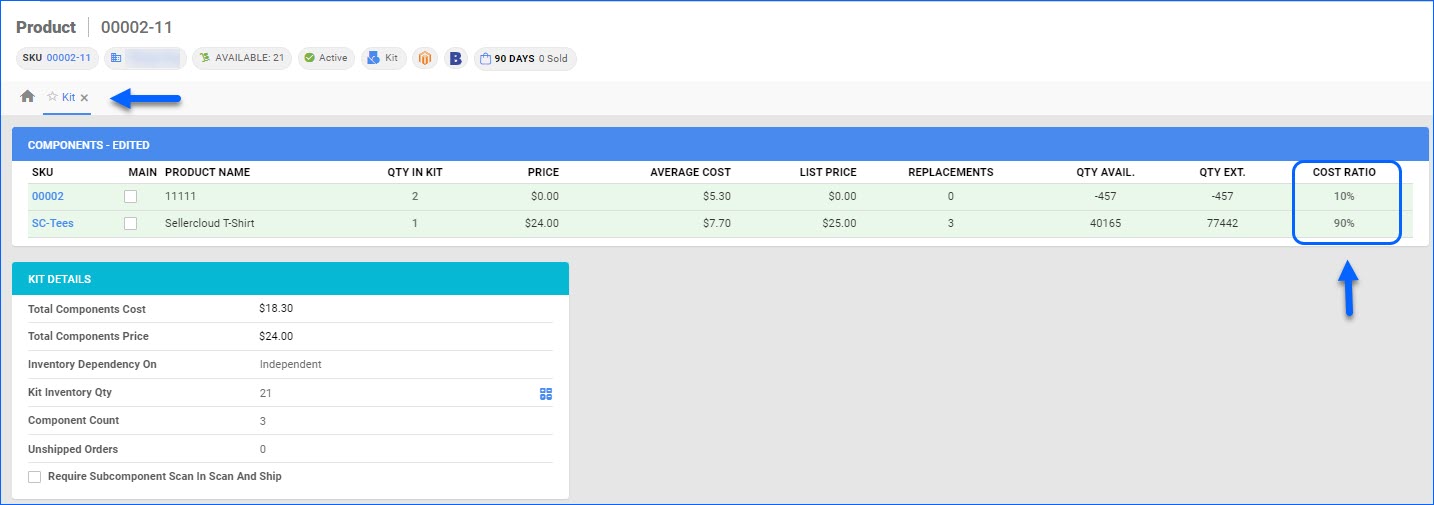
Kit Details
You can manage some Kit settings from Catalog > Manage Catalog > Open a Kit Parent > Toolbox > Kit > Kit Details panel. The following options are available in the panel:
- Total Components Cost — The sum of all components’ costs (multiplied by each individual component count).
- Total Components Price — The sum of all components’ prices (multiplied by each individual component count).
- Inventory Dependency On — Shows the type of kit. Refer to the Kit Types section above.
- Kit Inventory Qty — Shows the kit inventory quantity. Use the Calculator icon on the right to re-calculate it.
- Component Count — Shows the number of components necessary to build this kit.
- Unshipped Orders — Shows the number of unshipped orders for this kit.
- Require Subcomponent Scan in Scan and Ship — When creating an All Components or Main Component kit, you can require your shippers to scan each component. Enable the option for the components to display in the Scan and Ship window for individual verification.

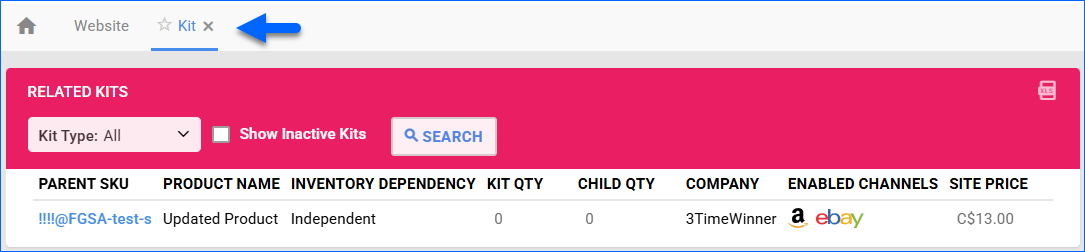
Related Kits
It is possible to configure multiple kits that contain the same SKU. You can view this information by going to Catalog > open a Kit Component > and selecting Kit from the Toolbox.
You can filter the information in the Raled Kits by Kit Type. Additionally, you can check the Show Inactive Kits box.
The panel provides the following information about the kits the SKU is part of:
- Parent SKU – A hyperlink for the Product Details page of the Kit Parent.
- Product Name – The name of the Kit Parent.
- Inventory Dependancy – Kit Type.
- Kit Qty – Current available inventory of the Parent.
- Child Qty – Current available inventory of the Component.
- Company – The company of the Kit Parent.
- Enabled Channels – Logos of the channels for which the Parent is currently enabled. Click to view the Channel Properties page for the SKU.
- Site Price – Price of the Kit Parent.
Kit Cost Calculations
When the Client Setting Enable ALL Kits Cost calculation Once a day is enabled, the Site Cost, Last Cost, and Average Cost of All Components and Main Component kit parents will be updated once daily based on the costs of their kit components.
To do the same for Independent kit parents, enable Enable Kit Cost Calculation For Independent Kits Too. Otherwise, kit component costs won’t be considered in the calculation, and their costs will come only from Assembling and Receiving POs. So, for your independent kits, the best setting depends on what you receive in POs. If you receive:
- Independent Kit Parents – Disable this setting so the cost will be calculated from the kit parent.
- Components – Enable the setting so the cost will be calculated from the kit components.
Remove a Kit Relationship
There are three ways to break a Kit relationship.
Individually
You can remove Kit Components from the parent without losing the original SKU that used to be the child. By deleting all the components, the Kit Parent becomes a regular product.
- Navigate to the Product Properties Page of your Kit Parent in Catalog.
- Go to Toolbox > Kit > Click Edit.
- In the Components Panel, click the Delete Icon of the child you want to remove. Delete all of them to fully Unkit the product.

In Bulk
To unkit multiple bundles:
- Go to Catalog > Manage Catalog> Search for the items you want to break up. Use the filter of Kit > Kit Parent as the relationship should be removed from the parent.
- Select the items and go to the Action Menu in the bottom right corner.

- Choose the option Break Kit/Unkit. This will create a Queued Job, and you should see a message at the bottom of the screen where you can monitor the progress.
With a File Import
You can break a Kit Product relationship via a file import. The steps are similar to the Bulk Kit creation:
- Go to Catalog > Tools > Import Product Info.
- Select Import Kits and download the template.
- Complete the fields and save.
- Click on the Break Kit If No Child SKU Is Available In File checkbox.

- Press Click to upload file > Select the filled-in template from your computer > Click Import.
Assemble & Disassemble Independent Kits
In order to redistribute inventory from your components to your Independent Kit parents or vice versa, you need to assemble or disassemble your kits. You can do this either individually or in bulk with a file import.
Disassembling an Independent Kit can also trigger a recalculation of the components’ Costs. See the Kit Cost Calculation Client Settings section for more details.
Individually
To assemble or disassemble an individual kit:
- Go to the Catalog > Manage Catalog > Open your Kit Parent.
- From the product’s Toolbox, choose Kit.
- Click Edit and go to the Kit Assemblies panel.

-
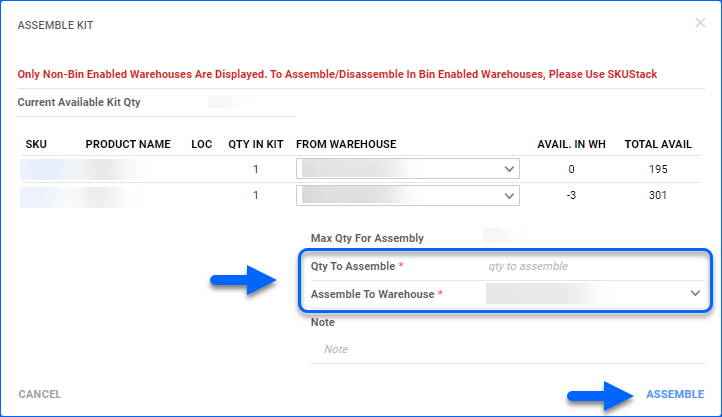
- To assemble, click on the Plus icon > Assemble Kit.
- Enter the Qty to Assemble. You will only be able to assemble a quantity that is equal to or less than Max QTY For Assembly (as per the available quantity of components in the chosen warehouse).
- Select a From Warehouse (the warehouse from which the Component inventory will be deducted) and Assemble To Warehouse (the warehouse where the Kit Parent inventory will be added).
- Click Assemble.
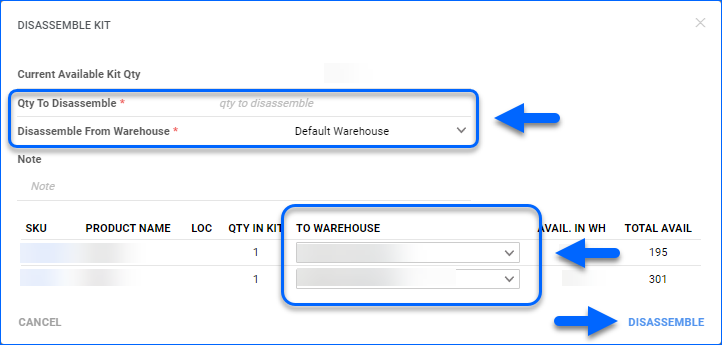
- If you want to disassemble a kit, click the Minus icon.
- Enter Qty to Disassemble. You can only fill in a number that is equal to or lower than the Current Available Kit Quantity in the chosen warehouse.
- Select Disassemble From Warehouse – the warehouse from which the Kit Parent qty will be deducted.
- Choose To Warehouse for each Child SKU – the warehouse to which the disassembled components will be added.
- Click Disassemble.
- To assemble, click on the Plus icon > Assemble Kit.
-
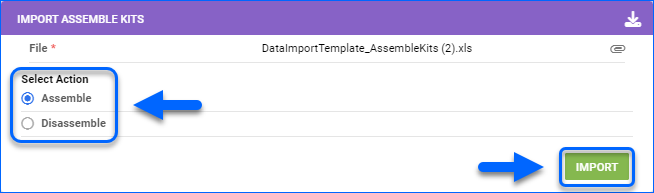
In Bulk
You also have the option to assemble or disassemble multiple kits with a file import:
- Navigate to Inventory > Tools > Import Inventory Info.
- Select Import Assemble Kits and click on the Download template icon (available file types are TAB Delimited, CSV, and Excel).
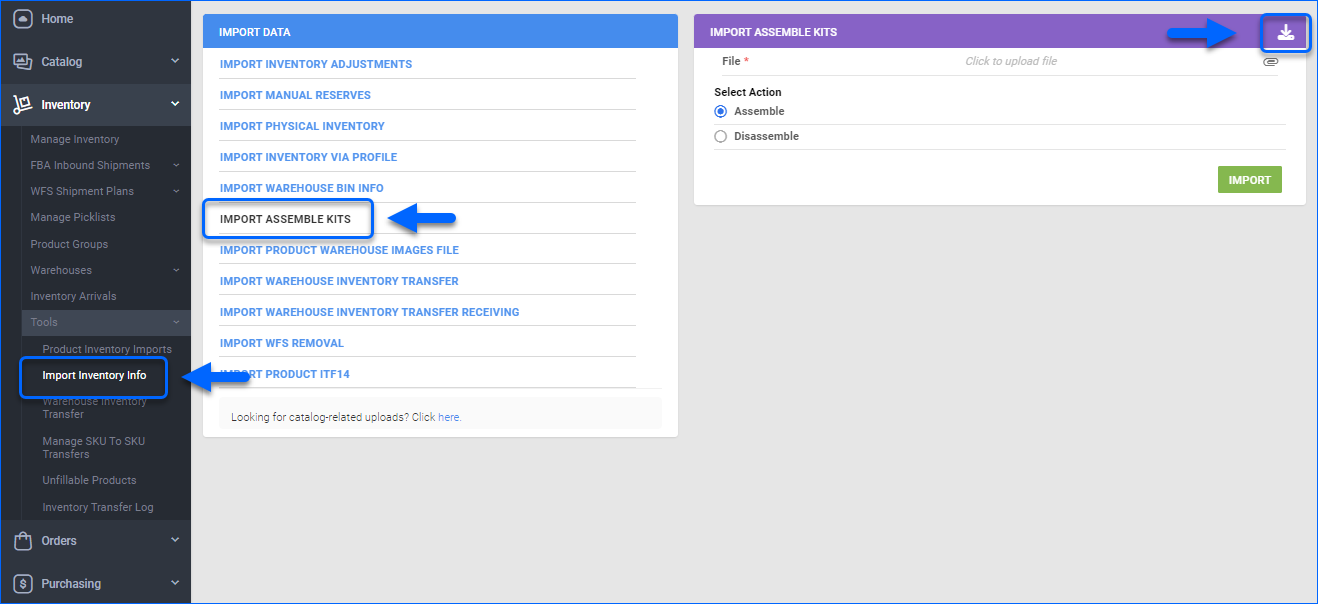
- Populate the required file columns:
- KitParent – The SKU of the Independent Kit Parent that you wish to assemble/disassemble.
- QtytoAssemble – The number of kits that you wish to assemble/disassemble. Ensure that the populated quantities are available in the selected warehouses.
- AssembleFromWarehouse – The Warehouse ID or Name from/to which the Components will be deducted, or added in case of a disassembly.
- AssembleToWarehouse – Select to which Warehouse ID or Name the kit is added or deducted in case of a disassembly.
- Optionally, add an AssemblyNote and save your populated file.
- Click to upload file.
- Select the desired action – Assemble or Disassemble. Only one option can be selected per file.
- Click Import.
This action will create a Queued job where you can track the progress of your import and see any errors that may occur. If you want to move the inventory to another warehouse, you can perform a Warehouse inventory transfer.
Send Kits to FBA and WFS
Only Independent can be Fulfilled by Amazon and added to FBA Inbound Shipments and WFS Shipment Plans.
There are client settings that can help you streamline the process. Go to Settings > Client Settings > General Client Settings > Click on the Advanced button > Search for and enable the settings you want to use.
- Auto Assemble Kit when adding to FBA and WFS Shipments – when enabled, Sellercloud will automatically check if there is enough quantity in the components and assemble the kits. They will be assembled into the Ship From Warehouse of the FBA Shipment.
- Enable Validate Inventory for FBA and WFS Shipments
- Auto Assemble Kit On Update Of Shipment
- Auto Assemble Kit When Importing FBA and WFS Shipment
Additionally, enable these settings to auto-disassemble when removing/adjusting a kit from the shipment or canceling the shipment altogether:
- Auto Dis-Assemble Kit when removing from FBA and WFS Shipments
- Auto Dis-Assemble Kit when cancelling FBA and WFS shipment
- Auto Dis-Assemble only if it was assembled for shipment
- Auto Dis-Assemble Kit When Removing From FBA And WFS Shipments
Related Settings
Below, you can learn more about the different settings related to kits and how they affect your kit products.
Kit Cost Calculation Client Settings
- Show total cost on Manage Inventory using — Allows you to choose the value on which the kit cost will be calculated:
- Site Cost
- Average Cost
- Last Cost (the last cost of the item in the latest PO received)
When using Average Cost or Last Cost, if a component has a cost of $0, Sellercloud will pull the value from the Site Cost. If you want components with an Average Cost of $0 (a gift component, for example), then Sellercloud recommends doing an Average Cost adjustment to $0.01 to avoid using the Site Cost as the default.
- Enable ALL Kits Cost Calculation Once a Day — Recalculates the kit costs once a day (outside of work hours).
- Enable Kit cost calculation for independent kits too — Allows cost calculation for Independent kits. (requires Enable ALL Kits Cost calculation Once a day to be enabled).
- Use Equal Cost Ratio On Kit Disassembly When Not Defined – the Cost Ratio is set on the components of an Independent Kit. When disassembling, each component’s cost is recalculated based on the ratio percentage to the total Kit Parent cost using the following logic:
- When this setting is disabled, the Kit only has one component, and no ratio is configured, so Sellercloud forces the ratio to be 100% for that component.
- When the setting is disabled, there are multiple components, and no ratio is configured, the parent’s average cost won’t flow to the components.
- When a ratio is configured, the cost will always flow to the components upon disassembly, regardless of the setting.
- When there is no ratio configured, there are multiple components, and the setting is enabled, Sellercloud will evenly split the parent’s cost to the components upon disassembly.
Invoice Client Settings
Normally, when printing an invoice for an order that contains kits, the Kit Parent is displayed, followed by its components. When processing a kit order with a dependency on All components or Main component(s), component information such as SKU, Product Name, and quantity will display on the invoice. However, the invoice is printed differently for All Component and Main Component(s) based on which setting below is enabled:
- Format Kit Items as regular items while printing Invoice — Prints the items as regular items (non-kit items).
- Hide Kit components when printing order invoice — Shows the kit parent name and hides the kit components from the order invoice.
- Hide Kit Parent when adding kit items as Regular Items — Prints out the kit components and hides the kit parent.
Weight-related Client Settings
- Set Kit Items weight to Kit Parent — Kit Parent’s Ship Weight and Product Weight are calculated based on the kit components’ weight.
- Enable Kit Weight Calculation Once a Day — A service will automatically detect any Kit Parent whose Ship or Product Weight does not equal the total weight of all components and will update the Kit Parent to match that weight.
- Example: Kit Parent SKU A has Components SKU B (5 lb weight) and SKU C (10 lbs).
Kit Parent (SKU A) will have a 15 lb weight (assuming the component count is 1. Otherwise, multiply the component weight by the component count). - When this setting is enabled, you will not be able to edit the Weight Fields of Kit Parents. You may only change the weight of components, which will then automatically reflect on the Parent when the daily calculation runs.
- Example: Kit Parent SKU A has Components SKU B (5 lb weight) and SKU C (10 lbs).