Overview
Magento, currently known as Adobe Commerce, is an e-commerce platform used to build and manage online stores. It offers features for catalog management, order processing, payment integration, and customer management. With its flexibility, scalability, and extensive customization options, Magento empowers you to create tailored and engaging online shopping experiences for your customers.
You can integrate Magento into Sellercloud through plugins using APIs. While you can integrate either version of Magento, overall, Magento 2 offers a more modern, scalable, and feature-rich service than Magento 1. In addition, at this time, Magento 1 is no longer supported by Adobe.
The following features are supported by the integration:
- Automatic export from Sellercloud to Magento:
- Products
- Inventory/Prices
- Order Tracking
- Order Cancellations and Refunds
- Automatic import from Magento to Sellercloud:
- Orders
- Active Listings
- Categories
- Attributes
- RMAs
This is a high-level overview of the integration process:
- SOAP is deployed on the Magento installation by a developer to enable communication between the plugin and the Magento system. CRON is also set up on the installation.
- Sellercloud’s Magento plugin is deployed by someone with access to the Magento site’s FTP (e.g., site admin, developer) or Sellercloud Support.
- Commands are executed via SSH to ensure the proper functioning and optimization of the Magento installation.
- A Magento admin user with full access to the Magento Web Services (API) is created, and the API key and password are retrieved.
- The Magento API credentials are entered into Sellercloud, and the integration is enabled.
- Any other Magento Account Settings are configured in Sellercloud.
- Products, Listings, and Orders are managed from Sellecloud.
Prerequisites
The prerequisites for setting up the integration differ depending on your version of Magento.
Magento 2
To install the Magento 2 plugin:
- Request the plugin from Sellercloud Support.
- Upload the plugin to a remote server, placing Sellercloud’s folder (in the plugin zip file) under /app/code.
- Enable the module with one of the two methods below.
- Go to Admin > Store > Configuration > Advanced > Advanced > Enable Sellercloud_Scm2
- In the FTP, edit /app/etc/config.php by entering 1 for Sellercloud_Scm2.
- Run a setup upgrade:
- Log into your terminal via SSH access. You typically use an SSH client like PuTTY or Terminal on macOS/Linux to establish this connection.
- Run the command cd public_html to go to your Magento root directory. This is where all the Magento files and directories are located.
- Run the command php bin/magento setup:upgrade to upgrade the Magento application, including database schema and data structures. This is necessary after installing new extensions or making changes to the codebase to ensure any changes made are properly reflected in the Magento system.
- Run the command php bin/magento setup:di:compile to compile Magento’s dependency injection configuration and generate all necessary code for the application. This is necessary when any modified code in the extension is uploaded to ensure that the changes are reflected properly. Compilation may take some time, depending on the size and complexity of the codebase.
- Clean the cache with one of the two methods below:
- Go to Admin > System > Cache Management.
- Running the command php bin/magento:cache:clean.
Web services are a set of Web APIs that can be accessed and executed on a remote system. To do that, you must grant the required permissions to enable access and update information on Magento. The first step is to create a new role and then assign this role to a new user.
To create a new user and grant the required permissions:
- Log into the Magento2 admin portal.
- Go to System > User Roles, and create an admin role with full access.
- Create a new user from System > All users.
- Assign an admin role you have created to a new user.
- Go to System > Integrations
- Adjust the integration settings for this user. You will enter the username and password (on the bottom) into your WebService Username (API Key) and WebService Password (API Password) settings in Sellercloud later.
- On the same page, click the API, and select All from the dropdown.
- Save the changes.
Next, continue with the steps in the Client Settings section before you start setting up the integration in Sellercloud.
Magento 1
To install the Magento1 plugin:
- Request the plugin from Sellercloud Support.
- Upload the _import folder of the plugin to http://yoursite.com/ so that http://www.yoursite.com/_import is accessible.
- Upload the _export folder of the plugin to http://yoursite.com/ so that http://www.yoursite.com/_export is accessible.
- Log into FTP using an Admin account.
- Right-click a folder or a file name, select its Permissions option, and enter the correct numeric value from those listed below:
- The _import and _export folders must have execution rights set to 0775 or 0777.
- The files in the _import and _export folders must have execution rights. 0445 is preferred; otherwise, 0777 is usable.
- The _import/log folder should have the write permission of 0777.
- Run http://www.site.com/_import/ (if your URL is http://www.site.com) in your browser to test it. Full authentication is required in the request URLs.
Web services are a set of Web APIs that can be accessed and executed on a remote system. To do that, you must grant the required permissions to enable access and update information on Magento. The first step is to create a new role and then assign this role to a new Soap/XML-RPC user.
To create a new user and grant the required permissions:
- Log in to the Magento1 admin portal.
- Go to System > Web Services > Soap/XML-RPC-Users.
- Click Add New User.
- Complete the required fields and create a password to enter in the API key Save the password, as you will need to use it in Sellercloud.
- Click Save.
- Go to System > Web Services > Soap/XML-RPC-Roles.
- Click Add New Role.
- Give a name to the new role and enter the admin password.
- From the left navigation menu, select Role Resources.
- Select All from the Resource Access dropdown.
- Click Save.
- Assign a newly created Role to the new user you have created in steps 1-5.
Next, continue with the steps in the Client Settings section before you start setting up the integration in Sellercloud.
Client Settings
The following Client Settings control what orders will be imported to Sellercloud:
- Magento: Enable Pending Orders – If this setting is enabled, Sellercloud will import orders with the Pending status from Magento. This status refers to a new order that does not include a customer payment, an invoice, or a tracking number at the time of import. In short, this is the initial status that the channel assigns to an order. When you enable the setting for the first time, we will import all pending orders with the next service run. If the setting is disabled, Sellercloud will only import Charged or Invoiced orders into Sellercloud and skip pending ones.
- Do Not Create Magento Orders With Review Status – If this setting is enabled, Sellercloud will not import orders with the Review status from Magento.
- Do Not Create Magento Unpaid Orders – If this setting is enabled, Sellercloud will not import unpaid orders from Magento.
- Only Create Magento Orders If Older Than X Hours – If this setting is enabled, Sellercloud will only import orders older than the number of hours you select.
Product Identifiers
In Magento, each product can have two identifiers: an ID, which contains only digits, and a SKU, which can be alphanumeric. The API Sellercloud uses to update products on Magento can work either with the ID or SKU, but not both.
The MagentoProductIdentifierType App Setting determines which identifier Sellercloud will be used. Misconfiguring it may result in Sellercloud being unable to update products on Magento. Contact Sellercloud Support for assistance with the setting.
Magento may try to use the ID instead of the SKU if the SKU contains only digits. To resolve this issue, use the code below to update one of the Magento files:
|
/public_html/app/code/core/Mage/Catalog/Helper/Product.php Line #427
if ($identifierType == ‘sku’) {
$idBySku = $product->getIdBySku($productId);
if ($idBySku) {
$productId = $idBySku;
$identifierType = ‘id’ ;
}
if ($loadByIdOnFalse) {
$identifierType = ‘id’;
}
}
|
Integrate Magento
To integrate Magento:
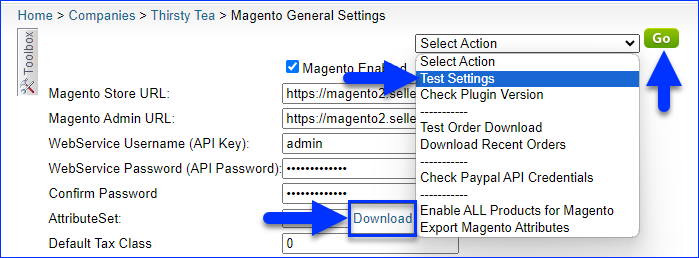
- Go to Company Settings.
When you have multiple Companies, each company can be connected to a different Magento website. - Click Toolbox and select Magento > General Settings.
- Click Edit.
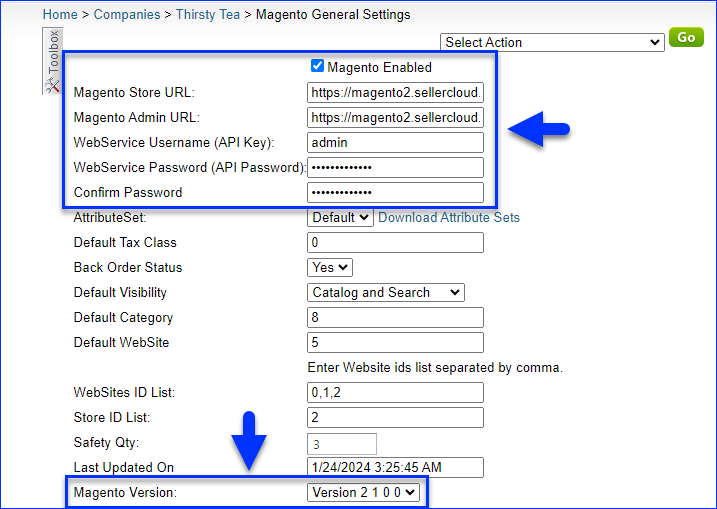
- Check Magento Enabled.
- Enter the Magento Store URL used to navigate to your Magento store and add the suffix api/v2_soap/index/. For example, http://www.cellphonemate.net/api/v2_soap/index/.
If your domain starts without the www prefix, the API URL will need to reflect that, like http://cellphonemate.net/api/v2_soap/index/. Also, try to navigate to the URL in the browser to test that it isn’t redirected to another address. For example, if it redirects you to an https address, then something needs to change on the Magento side before it will work. - Enter the Magento Admin URL.
- Enter the credentials to the Web Service API into the WebService Username (API Key), WebService Password (API Password), and Confirm Password fields.
- Select your Magento Version.
- Check Enable Custom Plugin Communication and enter your Custom Plugin Base URL – [yourdomain.com]/scm2/.
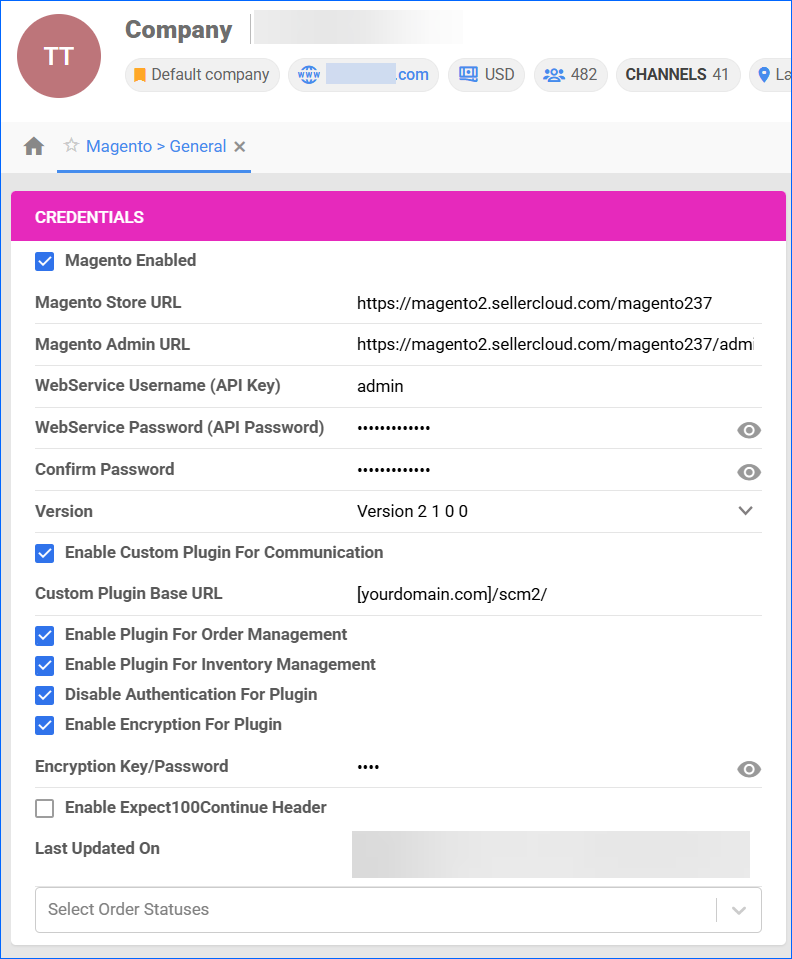
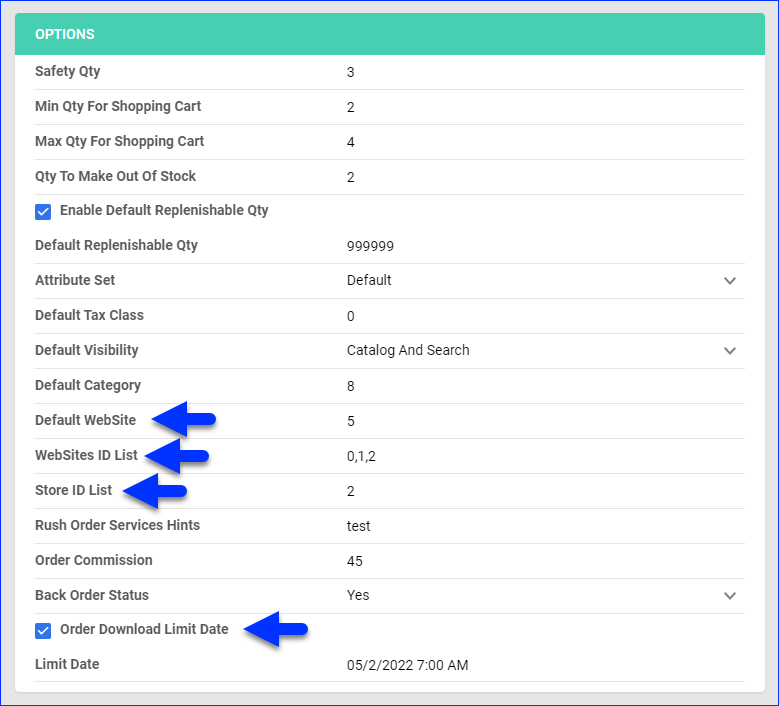
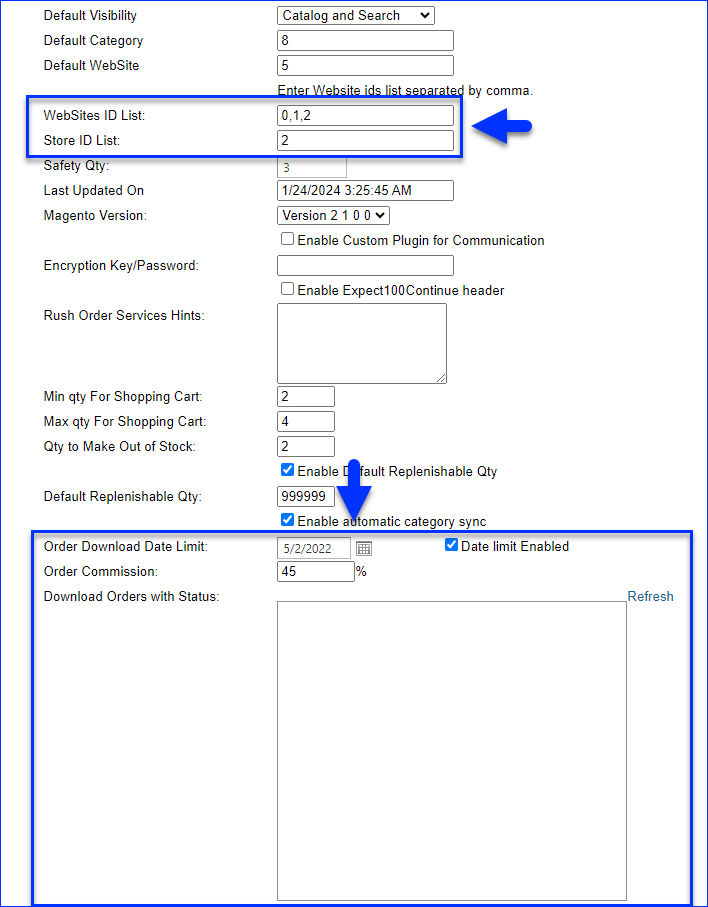
- Magento can manage multiple stores from a single installation, and each is assigned an ID.
- The Default Website field refers to the main website that is being managed by your Magento installation.
- To connect only specific websites, enter a comma-separated list of website codes (alphanumeric, not the website ID) into the WebSites ID List.
- To connect only specific stores, enter a comma-separated list of store codes (alphanumeric, not the store ID) into the Store ID List.
- To set up the order import:
- If you connect only specific stores or websites with the WebSites ID List and Store ID List settings, orders will be imported based on that; otherwise, all orders will be imported.
- Optionally, enable Order Download Limit Date and set a Limit Date to only download orders starting from a specific date.
- Optionally, in the Download Orders with Status field, select the Magento order statuses that Sellercloud is allowed to import. Here, you can allow statuses like Review, Hold, Processing, and more.
- Configure the remaining Magento Account Settings according to your needs.
- Click Save.
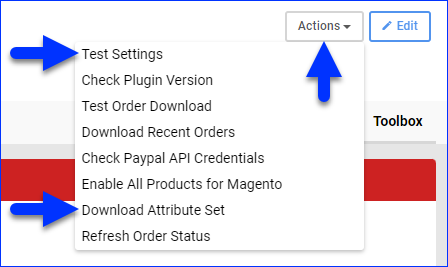
- Click Actions and select the Test Settings option to verify your credentials and settings. Do not skip this step.
- Click Actions and select Download Attribute Set. This will import the Magento Attribute Set configurations into Sellercloud. You do not need to select anything here. You will be able to select the attribute set at the product level.
Next, learn how to manage your Products, Listings, and Orders from Sellecloud.
Overview
Magento, currently known as Adobe Commerce, is an e-commerce platform used to build and manage online stores. It offers features for catalog management, order processing, payment integration, and customer management. With its flexibility, scalability, and extensive customization options, Magento empowers you to create tailored and engaging online shopping experiences for your customers.
You can integrate Magento into Sellercloud through plugins using APIs. While you can integrate either version of Magento, overall, Magento 2 offers a more modern, scalable, and feature-rich service than Magento 1. In addition, at this time, Magento 1 is no longer supported by Adobe.
The following features are supported by the integration:
- Automatic export from Sellercloud to Magento:
- Products
- Inventory/Prices
- Order Tracking
- Order Cancellations and Refunds
- Automatic import from Magento to Sellercloud:
- Orders
- Active Listings
- Categories
- Attributes
- RMAs
This is a high-level overview of the integration process:
- SOAP is deployed on the Magento installation by a developer to enable communication between the plugin and the Magento system. CRON is also set up on the installation.
- Sellercloud’s Magento plugin is deployed by someone with access to the Magento site’s FTP (e.g., site admin, developer) or Sellercloud Support.
- Commands are executed via SSH to ensure the proper functioning and optimization of the Magento installation.
- A Magento admin user with full access to the Magento Web Services (API) is created, and the API key and password are retrieved.
- The Magento API credentials are entered into Sellercloud, and the integration is enabled.
- Any other Magento Account Settings are configured in Sellercloud.
- Products, Listings, and Orders are managed from Sellecloud.
Prerequisites
The prerequisites for setting up the integration differ depending on your version of Magento.
Magento 2
To install the Magento 2 plugin:
- Request the plugin from Sellercloud Support.
- Upload the plugin to a remote server, placing Sellercloud’s folder (in the plugin zip file) under /app/code.
- Enable the module with one of the two methods below.
- Go to Admin > Store > Configuration > Advanced > Advanced > Enable Sellercloud_Scm2
- In the FTP, edit /app/etc/config.php by entering 1 for Sellercloud_Scm2.
- Run a setup upgrade:
- Log into your terminal via SSH access. You typically use an SSH client like PuTTY or Terminal on macOS/Linux to establish this connection.
- Run the command cd public_html to go to your Magento root directory. This is where all the Magento files and directories are located.
- Run the command php bin/magento setup:upgrade to upgrade the Magento application, including database schema and data structures. This is necessary after installing new extensions or making changes to the codebase to ensure any changes made are properly reflected in the Magento system.
- Run the command php bin/magento setup:di:compile to compile Magento’s dependency injection configuration and generate all necessary code for the application. This is necessary when any modified code in the extension is uploaded to ensure that the changes are reflected properly. Compilation may take some time, depending on the size and complexity of the codebase.
- Clean the cache with one of the two methods below:
- Go to Admin > System > Cache Management.
- Running the command php bin/magento:cache:clean.
Web services are a set of Web APIs that can be accessed and executed on a remote system. To do that, you must grant the required permissions to enable access and update information on Magento. The first step is to create a new role and then assign this role to a new user.
To create a new user and grant the required permissions:
- Log into the Magento2 admin portal.
- Go to System > User Roles, and create an admin role with full access.
- Create a new user from System > All users.
- Assign an admin role you have created to a new user.
- Go to System > Integrations
- Adjust the integration settings for this user. You will enter the username and password (on the bottom) into your WebService Username (API Key) and WebService Password (API Password) settings in Sellercloud later.
- On the same page, click the API, and select All from the dropdown.
- Save the changes.
Next, continue with the steps in the Client Settings section before you start setting up the integration in Sellercloud.
Magento 1
To install the Magento1 plugin:
- Request the plugin from Sellercloud Support.
- Upload the _import folder of the plugin to http://yoursite.com/ so that http://www.yoursite.com/_import is accessible.
- Upload the _export folder of the plugin to http://yoursite.com/ so that http://www.yoursite.com/_export is accessible.
- Log into FTP using an Admin account.
- Right-click a folder or a file name, select its Permissions option, and enter the correct numeric value from those listed below:
- The _import and _export folders must have execution rights set to 0775 or 0777.
- The files in the _import and _export folders must have execution rights. 0445 is preferred; otherwise, 0777 is usable.
- The _import/log folder should have the write permission of 0777.
- Run http://www.site.com/_import/ (if your URL is http://www.site.com) in your browser to test it. Full authentication is required in the request URLs.
Web services are a set of Web APIs that can be accessed and executed on a remote system. To do that, you must grant the required permissions to enable access and update information on Magento. The first step is to create a new role and then assign this role to a new Soap/XML-RPC user.
To create a new user and grant the required permissions:
- Log in to the Magento1 admin portal.
- Go to System > Web Services > Soap/XML-RPC-Users.
- Click Add New User.
- Complete the required fields and create a password to enter in the API key Save the password, as you will need to use it in Sellercloud.
- Click Save.
- Go to System > Web Services > Soap/XML-RPC-Roles.
- Click Add New Role.
- Give a name to the new role and enter the admin password.
- From the left navigation menu, select Role Resources.
- Select All from the Resource Access dropdown.
- Click Save.
- Assign a newly created Role to the new user you have created in steps 1-5.
Next, continue with the steps in the Client Settings section before you start setting up the integration in Sellercloud.
Client Settings
The following Client Settings control what orders will be imported to Sellercloud:
- Magento: Enable Pending Orders – If this setting is enabled, Sellercloud will import orders with the Pending status from Magento. This status refers to a new order that does not include a customer payment, an invoice, or a tracking number at the time of import. In short, this is the initial status that the channel assigns to an order. When you enable the setting for the first time, we will import all pending orders with the next service run. If the setting is disabled, Sellercloud will only import Charged or Invoiced orders into Sellercloud and skip pending ones.
- Do Not Create Magento Orders With Review Status – If this setting is enabled, Sellercloud will not import orders with the Review status from Magento.
- Do Not Create Magento Unpaid Orders – If this setting is enabled, Sellercloud will not import unpaid orders from Magento.
- Only Create Magento Orders If Older Than X Hours – If this setting is enabled, Sellercloud will only import orders older than the number of hours you select.
Product Identifiers
In Magento, each product can have two identifiers: an ID, which contains only digits, and a SKU, which can be alphanumeric. The API Sellercloud uses to update products on Magento can work either with the ID or SKU, but not both.
The MagentoProductIdentifierType App Setting determines which identifier Sellercloud will be used. Misconfiguring it may result in Sellercloud being unable to update products on Magento. Contact Sellercloud Support for assistance with the setting.
Magento may try to use the ID instead of the SKU if the SKU contains only digits. To resolve this issue, use the code below to update one of the Magento files:
|
/public_html/app/code/core/Mage/Catalog/Helper/Product.php Line #427
if ($identifierType == ‘sku’) {
$idBySku = $product->getIdBySku($productId);
if ($idBySku) {
$productId = $idBySku;
$identifierType = ‘id’ ;
}
if ($loadByIdOnFalse) {
$identifierType = ‘id’;
}
}
|
Integrate Magento
To integrate Magento:
- Go to Company Settings.
When you have multiple Companies, each company can be connected to a different Magento website. - Click Toolbox and select Magento > General Settings.
- Check Magento Enabled.
- Enter the Magento Store URL used to navigate to your Magento store and add the suffix api/v2_soap/index/. For example, http://www.cellphonemate.net/api/v2_soap/index/.
If your domain starts without the www prefix, the API URL will need to reflect that, like http://cellphonemate.net/api/v2_soap/index/. Also, try to navigate to the URL in the browser to test that it isn’t redirected to another address. For example, if it redirects you to an https address, then something needs to change on the Magento side before it will work. - Enter the Magento Admin URL.
- Enter the credentials to the Web Service API into the WebService Username (API Key), WebService Password (API Password), and Confirm Password fields.
- Select your Magento Version.
- Magento can manage multiple stores from a single installation, and each is assigned an ID.
- The Default Website field refers to the main website that is being managed by your Magento installation.
- To connect only specific websites, enter a comma-separated list of website codes (alphanumeric, not the website ID) into the WebSites ID List.
- To connect only specific stores, enter a comma-separated list of store codes (alphanumeric, not the store ID) into the Store ID List.
- To set up the order import:
- If you connect only specific stores or websites with the WebSites ID List and Store ID List settings, orders will be imported based on that; otherwise, all orders will be imported.
- Optionally, enable Order Download Limit Date and set a Limit Date to only download orders starting from a specific date.
- Optionally, in the Download Orders with Status field, select the Magento order statuses that Sellercloud is allowed to import. Here, you can allow statuses like Review, Hold, Processing, and more.
- Additionally, make sure you check out the Client Settings section.
- Configure the remaining Magento Account Settings according to your needs.
- Click Save.
- Click Select Action and select the Test Settings option to verify your credentials and settings. Do not skip this step.
- Click Select Action and select Download Attribute Set. This will import the Magento Attribute Set configurations into Sellercloud. You do not need to select anything here. You will be able to select the attribute set at the product level.
Next, learn how to manage your Products, Listings, and Orders from Sellecloud.