Overview
Sellercloud helps you track and manage the shipping and receiving process for Purchase Orders (POs) delivered with Shipping Containers. This workflow allows you to stay on top of different parts of the process, from the initial order placement to the arrival of the shipping container at the shipping port and up to the receiving of the purchased items at your warehouse.
You can also use this workflow to group together multiple regular POs just to organize the receiving process. Once you receive orders grouped with the shipping container feature, associated POs are automatically updated with any relevant information, such as received quantities.
When a single PO contains multiple items, you can split it into multiple shipping containers. To see a PO’s shipping containers, go to the PO Details Page, click Toolbox, and select the Shipping Containers tab.
Manage Shipping Containers
There are two pages related to shipping containers:
- The Manage Shipping Containers Page:
- Lets you create new shipping containers.
- Lets you view all your shipping containers and filter them in various ways, such as by shipping or receiving status.
- Lets you perform bulk actions on multiple containers simultaneously, such as changing their shipping or receiving status.
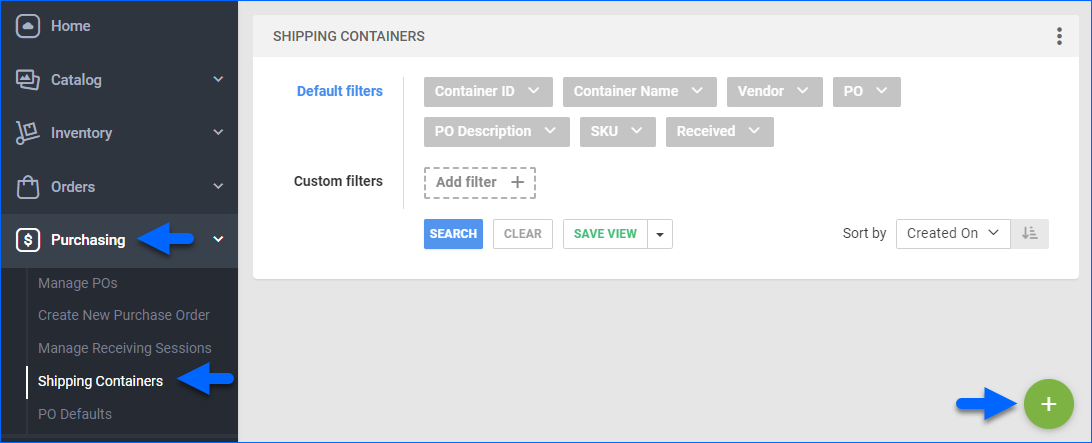
- To access the Shipping Containers page, go to Purchasing > Shipping Containers.
- The Shipping Container Details Page:
- Each individual shipping container has its own details page.
- This page lets you view and manage everything about a specific shipping container, such as shipping and receiving, expected delivery dates, and more.
- To access the Shipping Container Details page, navigate to Shipping Containers and click on a Container ID.
Create Shipping Containers
To create a shipping container:
- Go to the Shipping Containers page.
- Click the green plus icon at the bottom right.
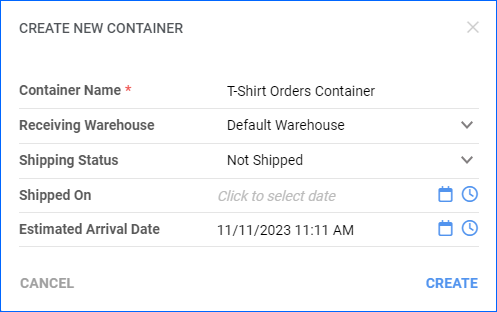
- Complete as follows:
- The Container Name must match the container ID your Vendor provided when applicable. Enable the Client Setting Do Not Allow Duplicate PO Container Names to enforce a container name validation, preventing duplicate container names.
- The Receiving Warehouse where the items are expected to arrive. It must match the receiving Warehouse on any POs you plan to add to this container.
- The Shipping Status indicates the container’s current stage within the shipping process: Receiving Errors, Not Shipped, Shipped, Not Arrived, or Arrived.
- Shipped On is the date when the container has been or will be shipped.
- The Estimated Arrival Date is the date when the items are expected to arrive at the warehouse.
- Click Create.
- The Container Name must match the container ID your Vendor provided when applicable. Enable the Client Setting Do Not Allow Duplicate PO Container Names to enforce a container name validation, preventing duplicate container names.
Add Items to a Container
You can fill a container with items manually or by importing a file.
Manually
To add items to a container manually:
- Go to the Shipping Container Details page.
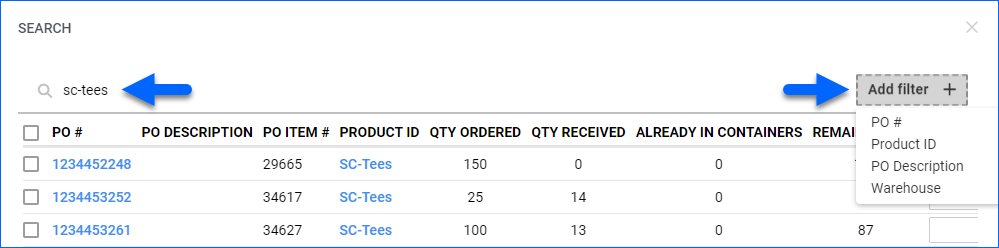
- Click the Add New Item plus icon at the top right of the Items panel.

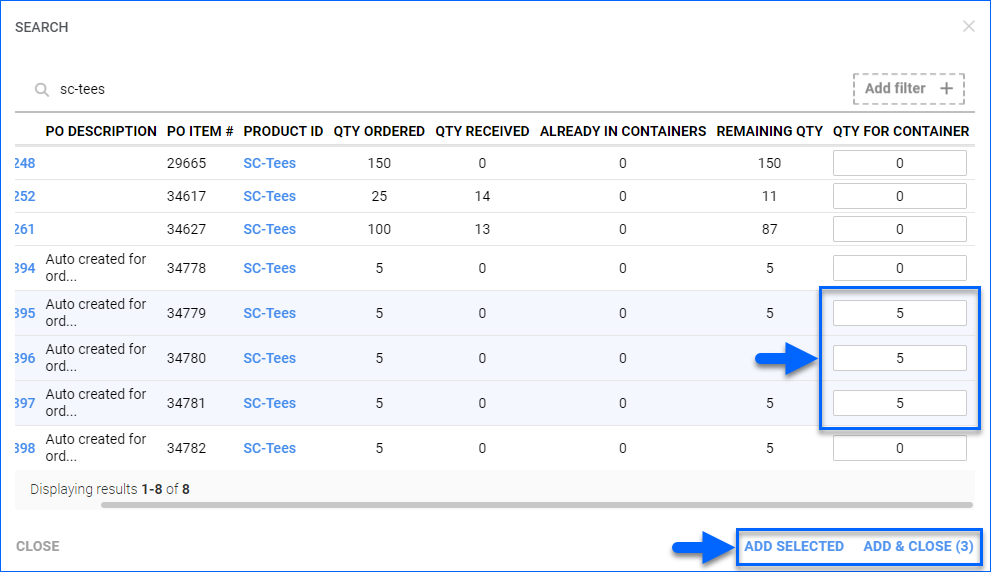
- Search for items by SKU. Optionally, you can filter your search by clicking the Add Filter button. You can filter by PO ID, PO Description, or Warehouse.
- When an item appears next to the correct PO, check the box to the left to select it.
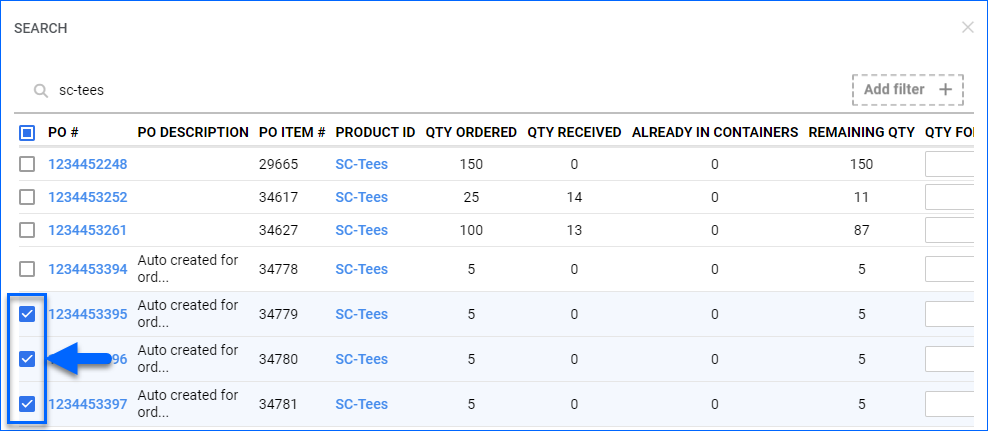
- Enter the Qty For Container in the last field to the right.
- Click Add & Close. Alternatively, click Add Selected to keep searching and adding items.
File Import
To import products to a Shipping Container via a file:
- Go to the Shipping Container Details page.
- Click the Download template icon at the top right of the Items panel.

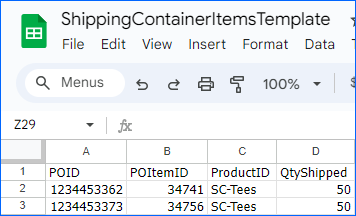
- Fill out the spreadsheet template:
- POID – A PO’s unique identification number.
- POItemID – The automatically generated line item ID on the PO. You can find it by going to the PO > Toolbox > Items tab. You can also use it to update items in the shipping container.
- ProductID – The product’s SKU.
- QtyShipped – The item’s quantity in the container.
- Click the Upload New Items icon and select the updated spreadsheet.

Receive Shipping Containers
You can mark the items in a shipping container as received for one container at a time or for multiple containers in bulk:
Single Container
To receive items in a single container:
- Go to the Shipping Container Details page.
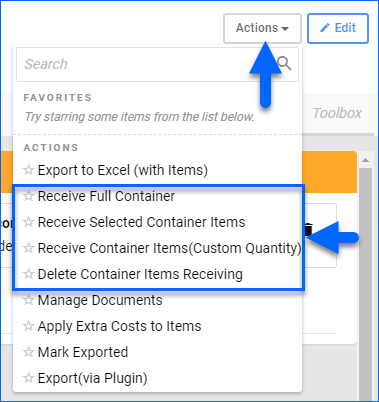
- In the upper right, click Actions and select the appropriate option:
- Receive Full Container – Mark all items in the container as fully received at the warehouse. This action sets the Container Status to Received and updates the Received On date and any Received item quantities. The received inventory will appear in the selected warehouse, and the relevant POs will also update their Status to Partially Received or Fully Received and reflect any Received item quantities.
- Receive Selected Container Items – Mark only specific selected items as received at the warehouse. This action updates any Received item quantities. If all items are received after this action, it also sets the Container Status to Received and updates the Received On date. The received inventory will appear in the selected warehouse, and the relevant POs will also update their Status to Partially Received or Fully Received and reflect any Received item quantities.
- Receive Container Items (Custom Quantity) – Mark partial item quantities as received at the warehouse. This action updates any Received item quantities. If all items are received after this action, it also sets the Container Status to Received and updates the Received On date. The received inventory will appear in the selected warehouse, and the relevant POs will also update their Status to Partially Received or Fully Received and reflect any Received item quantities.
- Delete Container Items Receiving – Delete any received quantities of items in the container, which also sets the quantities in the Received column back to 0. If you do this action for all items in the container, it also clears the Received On date.
Multiple Containers
To receive items in multiple containers:
- Go to the Shipping Containers page and find the containers with items to receive.
- Check the boxes to the left of the containers to select them.
- Click the blue Actions icon at the bottom right.

- Select Receive Containers. This action updates the Received On date and any Received item quantities.
- Specify the Warehouse where the shipments will be received.
- Fill in the Bin Name if receiving in a Bin-Enabled warehouse.
- Click Receive. This action sets the Container Status to Received and updates the Received On date and any Received item quantities for all selected containers. The received inventory will appear in the selected warehouse, and the relevant POs will also update their Status to Partially Received or Fully Received and reflect any Received item quantities.
- The action turns into a Queued Job.
Update Container Statuses
You can update your shipping containers’ statuses for one container at a time or multiple containers in bulk:
Single Container
To update a single container’s statuses:
- Go to the Shipping Container Details page.
- Click Edit.
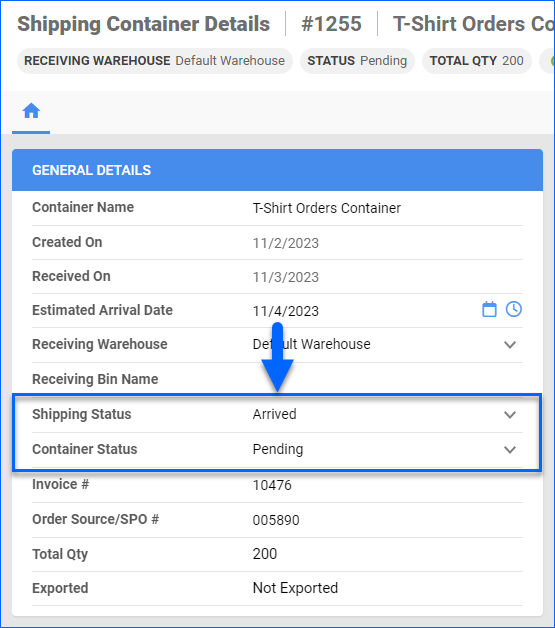
- Update the Container Status field to change the container’s general status: Saved, Ordered, Pending, Received, or Completed.
- Update the Shipping Status field to change the container’s shipping status: Arrived, Not Arrived, Shipped, Not Shipped, or Receiving Errors.
- Click Save.
Multiple Containers
To update multiple containers’s statuses:
- Go to the Shipping Containers page.
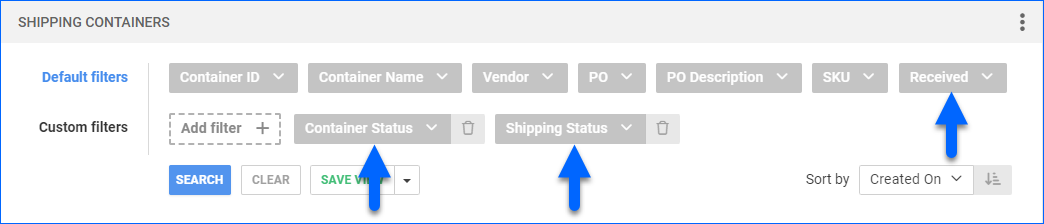
- Search to find containers. Optionally, you can filter them by their current status:
- Shipping Status – Show only containers with one or more Shipping Status values: Arrived, Not Arrived, Shipped, Not Shipped, or Receiving Errors.
- Container Status – Show only containers with one or more specific Container Status values: Saved, Ordered, Pending, Received, or Completed.
- Received – Show only containers with one or more receival status values: Fully Received, Partially or Fully Received, Partially Received, None or Partially Received, or Not Received.
- Check the boxes to the left of the containers to select them.
- Click the blue Actions icon on the bottom right.

- Select from the following status-related actions:
- Receive Containers – Mark all items in the selected containers as fully received at the warehouse. This action sets the Container Status to Received and updates the Received On date and any Received item quantities. The received inventory will appear in the selected warehouse, and the relevant POs will also update their Status to Partially Received or Fully Received and reflect any Received item quantities.
- Set Containers Status – Update the selected containers’ Container Status field to Saved, Ordered, Pending, Received, or Completed.
- Mark Arrived – Set the Shipping Status of the selected containers to Arrived to indicate they arrived at the shipping port.
- Mark Not Arrived – Set the Shipping Status of the selected containers to Not Arrived to indicate they have not arrived at the shipping port.
- Mark Exported – Set the Exported status of the selected containers to Exported.
- Mark Un-Exported – Set the Exported status of the selected containers to Not Exported.
Container Costs
Container shipping, duties & tariffs, and other expenses can be reflected in an item’s Average Cost.
Overview
Sellercloud helps you track and manage the shipping and receiving process for Purchase Orders (POs) delivered with Shipping Containers. This workflow allows you to stay on top of different parts of the process, from the initial order placement to the arrival of the shipping container at the shipping port and up to the receiving of the purchased items at your warehouse.
You can also use this workflow to group together multiple regular POs just to organize the receiving process. Once you receive orders grouped with the shipping container feature, associated POs are automatically updated with any relevant information, such as received quantities.
When a single PO contains multiple items, you can split it into multiple shipping containers. To see a PO’s shipping containers, go to the PO Details Page, click Toolbox, and select the Shipping Containers tab.
Manage Shipping Containers
There are two pages related to shipping containers:
- The Manage Shipping Containers Page:
- Lets you create new shipping containers.
- Lets you view all your shipping containers and filter them in various ways, such as by shipping or receiving status.
- Lets you perform bulk actions on multiple containers simultaneously, such as changing their shipping or receiving status.
- To access the Shipping Containers page, go to Purchasing > Shipping Containers.
- The Shipping Container Details Page:
- Each individual shipping container has its own details page.
- This page lets you view and manage everything about a specific shipping container, such as shipping and receiving, expected delivery dates, and more.
- To access the Shipping Container Details page, navigate to Shipping Containers and click on a Container ID.
Create Shipping Containers
- Go to Inventory > Purchasing > Shipping Containers.

- Click Create new container.
- Enter a container name. This typically should match the container ID that has been supplied to you by the vendor. Enable the Client Setting Do Not Allow Duplicate PO Container Names to enforce a container name validation, preventing duplicate container names.
- Complete the fields as needed > Save Container.

Add Items to a Container
Items can be added to a container manually or in bulk through a file upload. To do this, the items must be added to a PO.
Manually
- Go to the Container detail page > Add Items.
- Enter a PO# > Search. All items in the PO will be returned. If you also enter the ProductID or Vendor SKU and the related PO#, the search will return that product only.
- Fill in the quantity per product. This information should be on the container file sent to you from the vendor. Repeat the process for all applicable POs and products.
- Click Add Selected Items > Save Container.
Through a file upload
- Open a Container > Download Sample.
- Populate the columns as follows:
- PO ID
- POItemID— the line item id for the product on the PO. This unique is required because a SKU may be added more than once to any PO.
- ProductID— SKU
- Qty Shipped— the qty of the item shipped in this container.
- Qty Received— Leave blank until items are received. See below.
- Save the file > Return to Sellercloud.
- Click Choose File > Select your file > Upload File.

Receive Shipping Containers
Sellercloud offers the ability to receive individual containers or multiple through a file upload.
Individually
- Open a Container > Select items > Select Action.
- Receive Full Container— Will receive whole container
- Receive Container Items— Will receive selected items
- Receive Container Items (Custom Quantity)— Lets you control quantity received per item
- Save Container. If nothing is added for a line item, the entire shipped quantity of that line item will be received in Step 4.
- Go to the Shipping Containers page > Select a Container > Select Action > Receive Containers > Go.
- Select a WarehouseID and enter a Bin Name.
- The selection Default will receive the inventory to the receiving warehouse set on the PO. Selecting a warehouse will override what has been set on the PO.
- Click Receive Container. The inventory will be received to the defined warehouse and the PO will be updated with the received item(s). The statuses will update as either Partially Received or Fully Received.

In Bulk
- Open a Container > Download Sample.
- Populate the Qty Received field > Save the file.
- Return to Sellercloud > Choose File > Upload File.
- The container will be received and the PO will be updated with the received item(s). Its status will update accordingly as Partially Received or Fully Received.