Overview
Sellercloud gives you an opportunity to associate similar products, so they can serve as replacement alternatives to one another. Replacement Products differ from product shadows because they are independent and their inventory must be tracked separately.
By default, Replacement Products are interchangeable, meaning either SKU can replace the other. However, Sellercloud’s Client Setting Make Replacement Items One Way only gives you the option to restrict the replacement products relationship, so a SKU replaces another product one way only.
Create Replacement Products
You can add Replacement Products in Sellercloud individually, or in bulk via a file import.
Individually
To create replacement product relationships individually:
- Navigate to Catalog > Manage Catalog and select the product you want to add replacement products to.
- From the Toolbox, select Replacement Products.
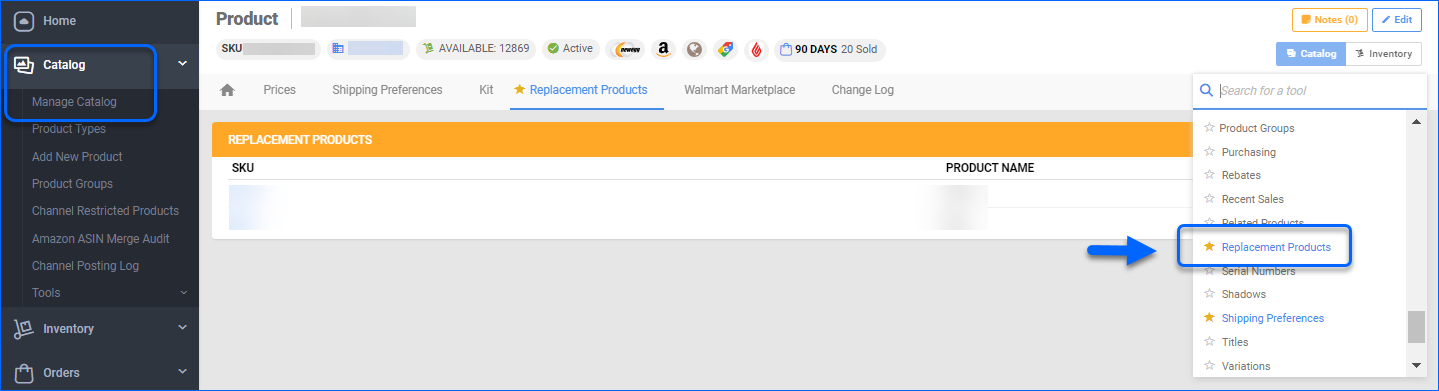
- Click Edit.
- Click the + icon on the Replacement Products panel.

- Search for items that match the selected product the most. Alternatively, click Add Filter to narrow the list of return results.
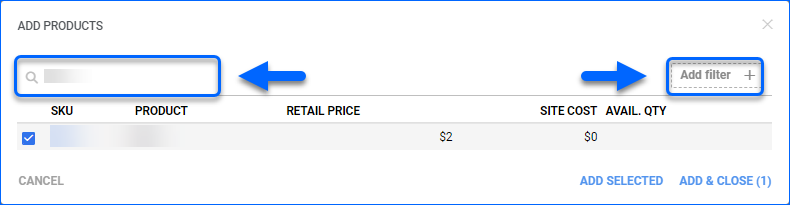
- Select the appropriate item/s.
- Click Add Selected to keep searching, or Add & Close to finish the selection.

- Click Save.
In Bulk
Replacement Products can be imported in bulk through an update file with Sellercloud’s Import Product Replacements tool.
To create multiple replacement product relationships simultaneously:
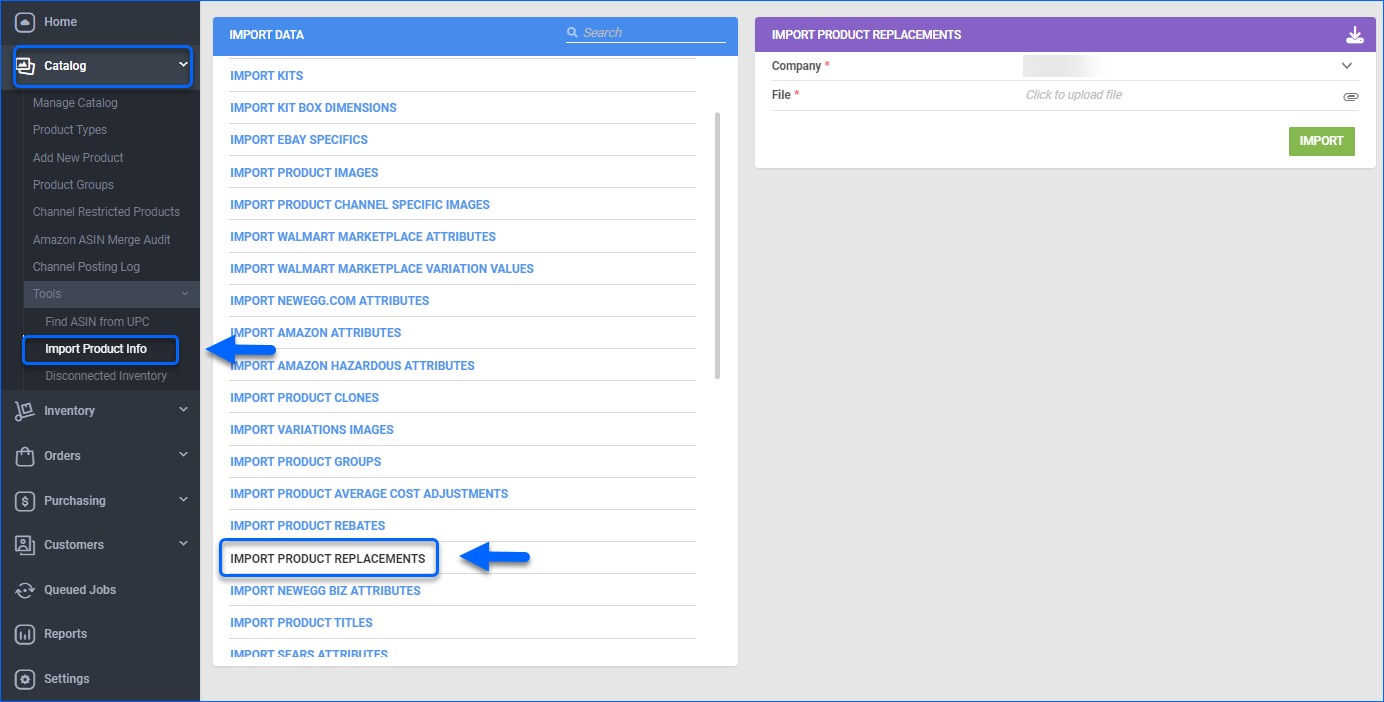
- Navigate to Catalog > Tools > Import Product Info.
- Select Import Product Replacements.
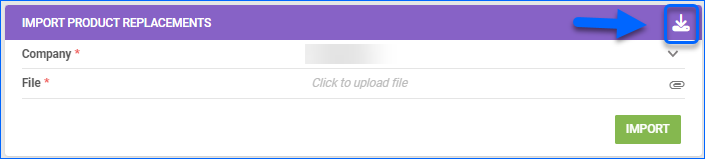
- Choose a file format (the available options are Tab Delimited, CSV or Excel) and download an import template.
- In the downloaded file, populate the corresponding column fields:
- ProductID (required) – A mandatory field, in which you add the SKU that you want to have a replacement for.
- ReplacementProductID (required) – A mandatory field, in which you add the SKU with which you want to replace the original product.
- Action – Optional field, which you can utilize to unlink replacement products – enter the respective SKUs and insert text _DELETE_.
- Priority – Optional field, where you can categorize the replacement products’ priority levels. Utilize this option when you select several ReplacementProductIDs for a single ProductID, so the Priority can determine the sequence in which a replacement is processed (the highest Priority is 1).

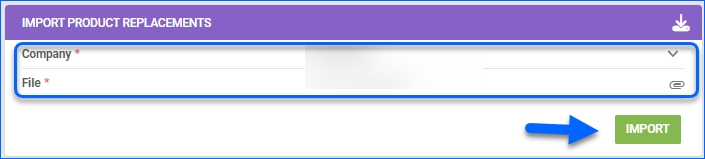
- Once done, return to the Import Product Replacements panel and select a Company from the dropdown menu.
- Click to upload file and select your prepared spreadsheet.
- Click Import.
A Queued Job is created, from which you can monitor the import status. Once completed successfully, the replacement product relationships will be updated.
Manage Replacement Products
You can also create and manage your Replacement Products using other Sellercloud solutions such as Skustack and Shipbridge.
Replacement Products In Skustack
In Skustack, you can easily create and manage replacement product relationships directly from your handheld device. Find and pick replacement items as you go by scanning the products’ SKU, UPC, or Alias. Learn more about that here.
Replacement Products In Shipbridge
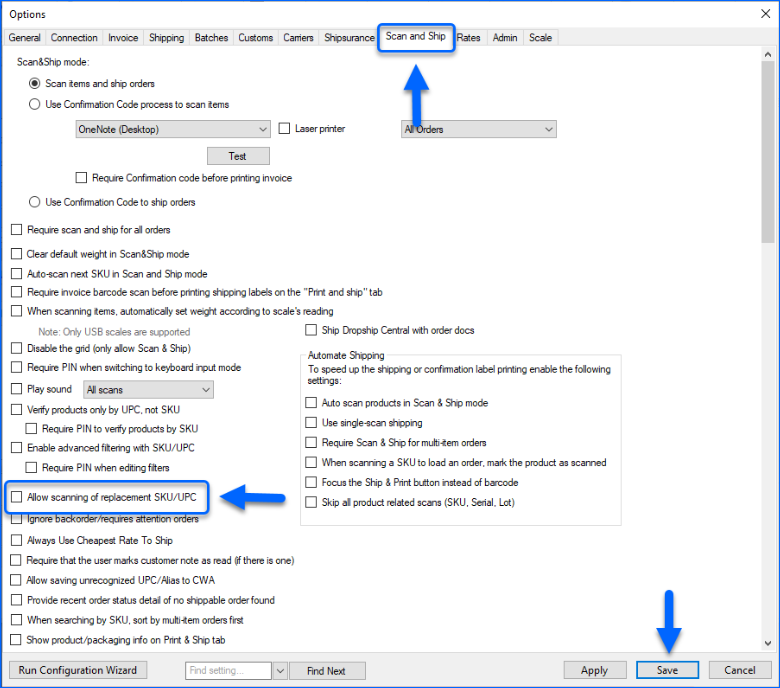
In Shipbridge, the Scan and Ship workflow requires you to scan an order item before printing the respective shipping label. In case of interchangeable items, you may wish to scan a Replacement Product. To achieve this, you must first enable the Allow Scanning of Replacement SKU/UPC setting in Shipbridge Options:
- Open Shipbridge > Menu > Options > Scan and Ship.
- Enable the option Allow scanning replacement SKU/UPC.
- Click Save.
Once done, you can scan in a replacement SKU, when shipping the order through Scan and Ship. After shipping, the reserve on the ordered items will be removed and the inventory of the replacement item will be adjusted accordingly.
Configure Kit Replacements
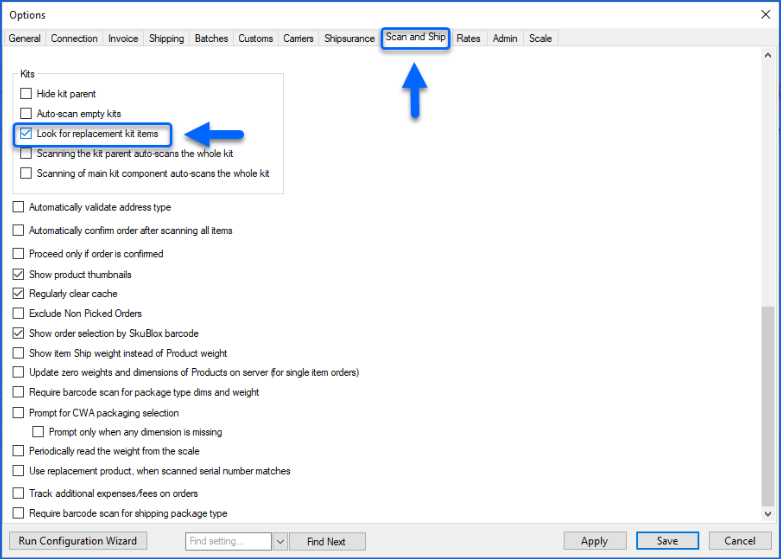
Kits can have replacements that have different quantity configurations. For example, a kit comprised of 12 packs of 50 = 600 can be replaced by a kit of 30 packs of 20 = 600. Despite the different packaging quantities, both kits have the same total number of items, which is 600. So, you can replace one kit with the other without changing the total number of ordered items. To activate this feature, enable Look for replacement kit items setting in Shipbridge:
- Navigate to Shipbridge Menu > Options and select the Scan and Ship tab.
- Check setting Look for replacement kit items.
- Click Save.
Export Replacement Products
Regardless of how they were created, you can export your Replacement Products and use the exported file to remove any replacement relationships you no longer wish to have.
To export a list of your Replacement Products:
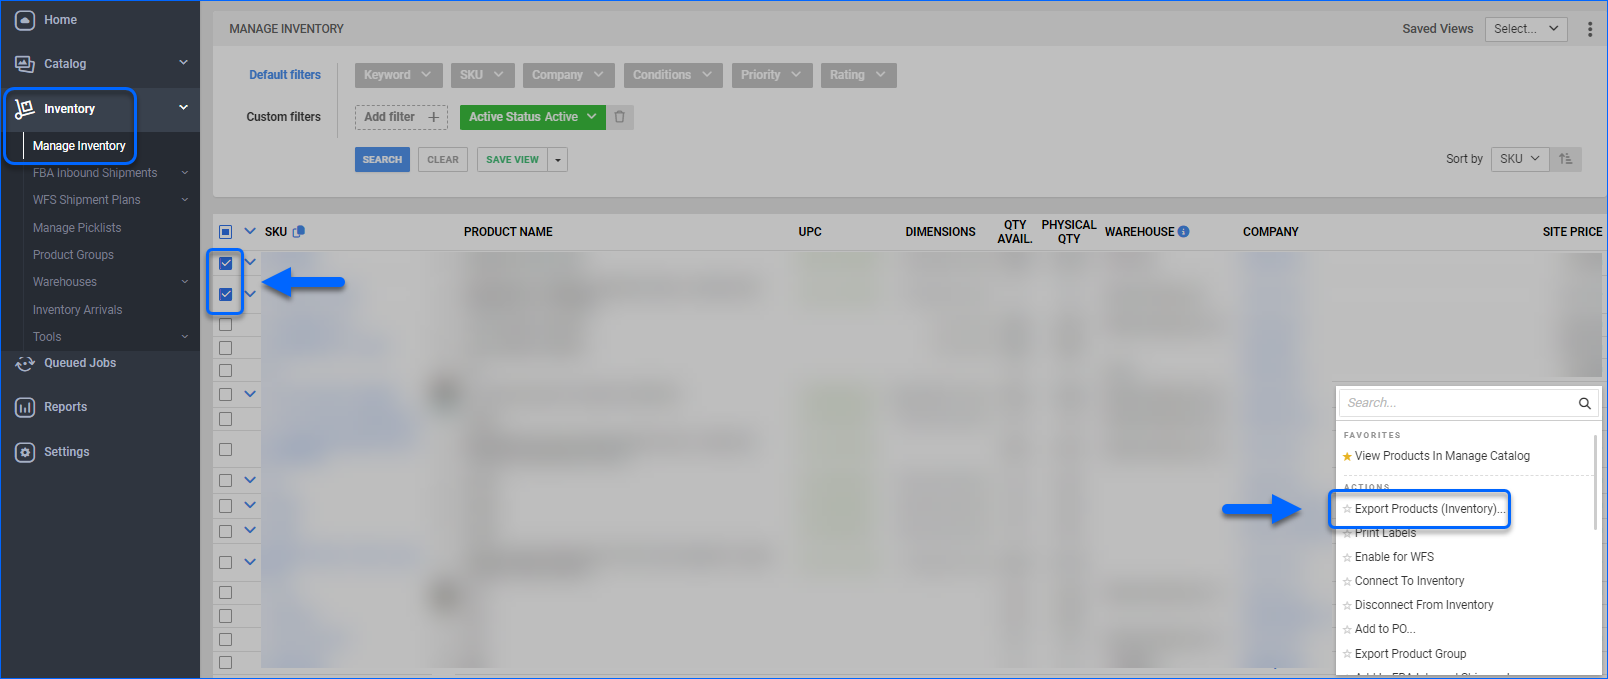
- Navigate to Inventory > Manage Inventory and select the product(s) whose replacement SKUs you want to include in an export file.
- In the bottom-right corner, click the Actions icon, and select the Export Products (Inventory) option.
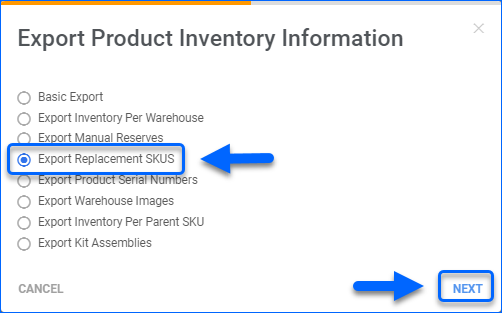
- In the following popup, select the Export Replacement SKUS.
- Click Next.
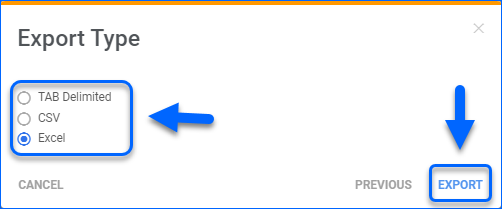
- Choose the appropriate file format (either Tab Delimited, CSV, or Excel), and click Export.
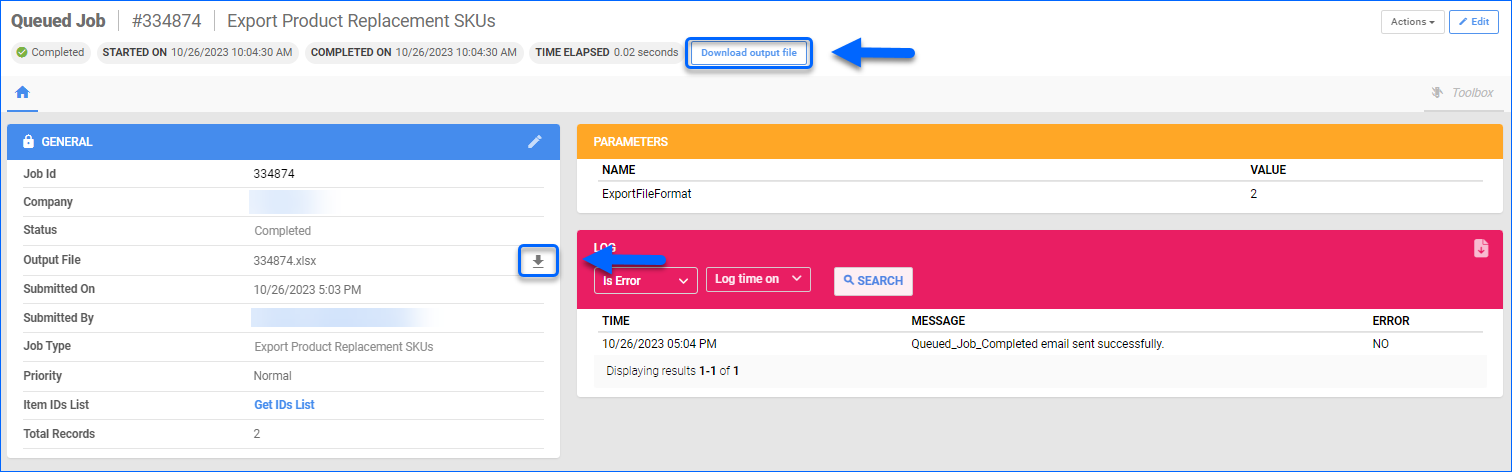
A Queued Job is created, from which you can monitor the export status. Once completed successfully, you can download the requested file by clicking the Download Output File button or the output file link.
Delete Replacement Product Relationships
To delete an existent replacement product relationship, adjust the extracted spreadsheet and upload the file through Catalog > Tools > Import Product Info > Import Product Replacements.
Alternatively, you can delete replacement product relationships from the Product Details page:
- Navigate to Catalog > Manage Catalog and select the desired product.
- From the Toolbox, choose Replacement Products.
- Click Edit.
- In the Replacement Products panel, click the Delete button to remove the respective product’s replacement relationship.
- Click Save.

Related Client Settings
Sellercloud gives you the option to configure other related Client Settings, so you can further customize your Replacement Product processes:
- Can’t Use Replacement Items – Enable this setting, if you want to discontinue using Replacement Products in general.
- Allow Replacements For Picking Bins – Activate this option to allow replacement products to be added to Picking Bins.
- Consider Replacement Qty As Available Qty in Picklist – Enable this setting, if you want to consider Replacement Product’s availability when generating a Picklist.
- Display Replacement Product Info On Order Invoice – Enable this setting to include the replacement product details in the order invoice.
- Display Replacement In Picklist – Once enabled, the setting will include the Replacement Product info in the Picklist.
- Display Replacement SKU LOC in Picklist – Activate this option to display the Replacement Product’s location, when generating a Picklist.
To locate the above settings:
- Navigate to Settings > Client Settings > General Client Settings.
- (Optional) Click the Advanced toggle to view advanced options.
- Search for the respective setting and once configured, click Save.