Overview
Staples is a U.S.-based retailer specializing in office supplies, technology, and furniture. It caters to both individual customers and businesses and offers a wide range of products, including electronics, cleaning supplies, and ergonomic office solutions, making it a one-stop shop for business essentials.
Integrating Staples into your Sellercloud account allows you to seamlessly import orders, upload tracking information, and ensure your Staples store is always up-to-date with the latest inventory data. This integration works through EDI documents, transmitting information between the two services via plugins and Scheduled Tasks. The document exchange goes through Rithum, previously known as CommerceHub.
If necessary, you can open a ticket with Sellercloud Support to request additional customizations or other plugins for this integration. Any such modifications will be billable.
Prerequisites
Before you can integrate Staples into Sellercloud, complete the following requirements.
Rithum Support
Before going live, you must follow a testing plan provided by Rithum, which involves sending a test transaction for each test order in the plan. Rithum provides two main documents related to that—a Supplier Test Plan and a Supplier Guide. You must complete the entire test plan by following the outlined procedures.
Rithum will supply you with both the test and production credentials. Once you complete all test cases outlined in the test plan document, the platform will provide you with the production credentials and SFTP details that you can set in Sellercloud and start selling.
Sellercloud Support
Open a ticket with Sellercloud Support and request the following plugins be installed on your server:
- Staples Order Import EDI 850 – Imports orders from Staples to Sellercloud in EDI 850 format.
- Staples Order Export EDI 855 – Sends order acknowledgment to Staples in EDI 855 format.
- Staples Tracking Export EDI 856 – Exports tracking information to Staples in EDI 856 format.
- Staples Inventory Export EDI 846 – Exports inventory to Staples in EDI 846 format.
- Staples PDF Invoice – Generates a printable PDF packing slip in a format that complies with Staples’s requirements.
Custom Company Settings
Create the following Custom Company Settings.
On your default company:
- STControlNumber
- GSControlNumber
- ISAControlNumber
On the company created for the integration:
- Staples_ISAID – CommerceHub’s unique identifier for EDI document transmission. Contact them for the value of this setting.
- Staples_ISAQualifier – Set to 12.
- CustomerISAID_Staples – Enter a unique phone number that is not used for any other integration.
- CustomerISAQualifier_Staples – Set to ZZ.
- StaplesIsInProduction – Set to False during the testing stage and True when going live.
- Staples_InternalVendorID – Defined by your Staples integration type. Ex. staples, staplesadvus, etc. Contact CommerceHub for the value of this setting.
- (Optional) ExportMultipleWarehousesOnStaples846 – Set to True to enable the warehouse mapping setting below.
- (Optional) Staples_WarehouseCodeMapping – Map your Sellercloud warehouses to those at Staples following this format: {WarehouseID},{WarehouseCode},{SafetyQty} where WarehouseID is the ID of a warehouse in Sellercloud, the WarehouseCode comes from Staples, and at the end, you can define a Safety Quantity. For example:
- WarehouseID in Sellercloud = 123, WarehouseCode = California, Safety Quantity = 0
- WarehouseID in Sellercloud = 234, the WarehouseCode = Florida, Safety Quantity = 5
- Setting value: 123,California,0;234,Florida,1
- (Optional) Staples_DefaultShippingService – Enter the name of the default Shipping Service for Staples orders. Click the Accepted Values dropdown below for a complete list of shipping services. If you don’t configure this setting, the default Shipping Service is USPS First Class Mail. When Rithum sends the code UNSP, the Shipping Service will be set to the default.
2nd day – (carrier not specified)
A-1 Freight Service Inc.
A. Duie Pyle Inc.
A. Duie Pyle Inc.
A/T Transportation Inc.
AAA Cooper Transportation
ABF
AC Freight Systems
Active Aero
Advantage Express Delivery
AIM
Airborne Freight Corp.
Airgroup Express
AIT Worldwide Logistics
All Star Trucking Inc.
All Star Trucking Inc.
Alto Freight
Alvan Motor Freight
AMA Transportation
AMA Transportation
Apollo Motor Express Inc.
Applegate Drayage Company
ATS/TForce Integrated Solutions
Averitt Express
Bax Global, Inc.
Bax Global, Inc.
Beaver Express Service
Bekins Van Lines
Bekins Van Lines
Benton Express (service level unspecified)
Best Overnite
Bestar
Bill Clark Truck Line Inc.
BLM Transportation
Bob’s Pickup & Delivery
Brandt Truck Line Inc.
Brown Transfer/Transport
Bullet Trucking, Inc.
Bullocks Express Transportation
Bush Fleet , Erie (PA)
C&M Transportation, Inc.
C.H. Robinson Worldwide Inc.
C.W. Henderson – Basic Service
C.W. Murphy Freightline
Caldwell Freight Lines
California Overnight
Cambells Express
Canada Post – Expedited Parcel
Canpar
Central Freight Lines
Central Freight Lines
Central Transport Inc.
Central Transport Inc.
CEVA Logistics – Basic Service
Clark Bros. Transfer
Clarke Transport
Commercial Furniture Transport
Continental Freightways
Contract Freighters Inc. – Basic Service
Contract Furniture Trans.
Conway
Conway
Courier Express Inc.
Cross Country Courier
Crown Xpress – Basic Service
CRST International Inc.
Crystal Motor Express Inc.
Custom Freight Systems, Inc.
Custom Freight Systems, Inc.
Custom Global Logistics (service unspecified)
Custom Transport, Inc.
Custom Transport, Inc.
Customer Pick Up
D2 Freight – Basic Service
Dash Courier Service
DATS Trucking Inc.
Dawes Transport
Day & Ross
Daylight Transport
Dayton Freight
DCM Transportation
Dedicated Distribution Services
Demar Logistics, Inc. – Ground
DHL Global Mail
DHL Shipping (service level unspecified)
Distribution Services Inc. by air
Dohrn Transfer Co.
Don Hummer Trucking – Basic Service
Dugan Truck Line LLC
Dynamex
Eagle Global Logistics
Eagle Transports
Eagle Transports
Eagle Transports
Eastern Connection Ground
Echo Global Logistics (service unspecified)
Echo Global Logistics – Basic Service
Economy Freight Inc.
EDI Express, Inc. – Basic Service
Elk Logistics – Basic Service
Emerald Package Express
Emery Worldwide
Enroute USA
Equipment Distributors
Estes Express Lines
Estes Express Lines
Estes Level2 Logistics – Basic Service
Executive Courier
Expeditor’s International
Farmore Transportation Services
Fastfrate
FedEx Freight Economy
FedEx Freight Economy
FedEx Freight Economy
FedEx Freight Priority
FedEx Ground
FedEx Ground
FedEx Ground
FedEx Ground
FedEx Ground
FedEx National LTL
FedEx Next Day (Standard)
FedEx Next Day (Standard)
FedEx Next Day (Standard)
FedEx Next Day (Standard)
Fire King Delivery Service
Freight Masters Inc., Minnesota
Freightco Dedicated – Basic Service
Frontier Express
Frontier Express
Frontline Freight – Basic Service
Furniture Transport Systems (service unspecified)
Gator Freightways, Inc.
Gator Freightways, Inc.
GI Trucking
Global Express
Global Express
Gold Coast Freightways, Inc.
Ground (carrier not specified)
Guilbault – Basic Service
H&W Transfer & Cartage, Inc.
Hartt Transportation Systems – Basic Service
Hazen Transport
Heartland Express Services Inc
HEP Direct – Basic Service
Hill Installation Services
Hogan Transports – Basic Service
Holland Special (service unspecified)
HVH Transportation Inc.
Ida Tran Freight Lines
J & S Delivery Service
J & S Delivery Service
Jackson Trucking
Jacobson Dedicated – Basic Service
JB Hunt_1
Jim Loyd Transport Co., Inc.
JMS Transportation (service level unspecified)
Johnson Trucking
JP Express Service
JRB Target
JTI logistics LLC – Basic Service
JTW Express
K & R Express
Key Trucking, Inc.
Knight Transportation Inc
Lakeville Motor Express, Inc.
Land Air Express
Landmark Global Inc.
Landstar Ranger Inc
Leader Transport – Basic Service
Lewis Truck Lines, Inc.
Link Trucking Inc.
Loomis Express
Lynden Transport
Mach 1 ground
Magno Inernational – Basic Service
Mainfreight – Basic Service
Mainstreet Delivery
Manitoulin Transport – Basic Service
Manna Distribution Services
Manna Distribution Services
Mark IV Transportation
Matheson Fast Freight Inc.
Mergenthaler Transfer and Storage
Meyers Transport Limited
Midland Transport LTL Service
Midwest Motor Express
Milan Express Co.
Milan Express Co.
Millis Transfer
Molerway Freight Lines
Motor Cargo
Mountain Valley Express – Basic Service
MXD Group (service unspecified)
MXD Group (service unspecified)
MXD Group – Basic Service
MXD Group – Basic Service
MXD Group – Basic Service
N & M Transfer
Nancy Baer Trucking
National Delivery Systems
Nationex (service unspecified)
Nations Express (service unspecified)
Nebraska Trucking Company (service unspecified)
Nesel Fast Freight (VA Inc.)
New Century Transportation Inc.
New England Motor Freight
New Penn Motor Express
New Way Trucking – Basic Service
Newcomb Trucking – Basic Service
NLI International Corp. – Basic Service
NonstopDelivery – Basic Service
Normandin truck carrier
North Park Transportation Co.
Northway Carriers Inc.
Not Applicable- no shipping required
NVC Logistics – Basic Service
Oak Harbor Freight Lines, Inc.
Ohio Connection
Old Dominion
Ontrac – service unspecified
Overnight – (carrier not specified)
Overnite
Pacer Transportation Solutions – Basic Service
Papineau Int SEC – Basic Service
PENSKE
Performance Freight Systems, Inc.
Piedmont (service unspecified)
Pilot Freight Services
Pinnacle Transportation
PITT Ohio
Pjax, Inc.
Pjax, Inc.
PMM Transport LLC
Price Truck Line
Priority Express
Priority Express
Pro Express Inc.
Public Logistics
Public Transportation Services
Public Transportation Services
Publishers Distribution Services
Purolator Courier, ground
Purolator Courier, ground
Purolator Freight
R & L Carriers
R.B. Trucking
RAC Transport Co., Inc.
Rapid Freightways
RIST Transport
Roadrunner Transportation
Roadway Reverse Logistics, Inc.
Robert Transport
Roehl Transport, Inc.
Ruan Transport (service unspecified)
Saia Motor Freight
Sameday Worldwide – Basic Service
Sammy Jackson Enterprises
Schneider Bekins
Schneider National Carriers Inc.
Seko
Service Transport Inc.
Service West private carrier
Sharut Furniture
Soniq Transportation and Warehouse
Southeastern Freight Lines
Southern Furniture Transport (service unspecified)
Southwestern Motor Transport
Specialized Transportation
Stan Koch & Son’s Trucking, Inc.
Studio RTA private carrier
Studio RTA private carrier
Styline Logistics
Sweeney Transport
Swift Transport (service unspecified)
Swift Transport (service unspecified)
TanTara Transportation – Basic Service
Target Logistics
Target Logistics
Target Logistics
Tax Airfreight, Inc.
Todd Transit
Total Transportation Inc.,PA
Total Transportation Inc.,PA
Towne Air Freight
TP Freight Lines
Transport Corporation of America, Inc.
Tranx Limited
Tri-State Express Inc.
Trucks For You Inc. – Basic Service
TSI Transportation LLC – Basic Service
Unspecified
Unspecified
UPS Freight (service level unspecified)
UPS Ground
UPS Ground
UPS Ground
UPS Mail Innovations – Standard
UPS Mail Innovations – Standard
UPS Supply Chain Solutions (SCS)
Urban Express
US Xpress
US Xpress
USF Dugan
USF Holland
USF RED STAR
USF Reddaway
USPS (service level unspecified)
USPS (service level unspecified)
USPS First Class Mail
Valley Cartage
Velocity Express
Vitran Express
Volpe Express Inc.
WARD Trucking
Watkins Motor Lines
Werner Enterprises Inc
Wilson Trucking
Wilson Trucking
Worldwide Logistics Inc.
XPO Logistics LLC
Yellow (YRC)
Yellow / Direct Ship
YRC (service level unspecified)
Yusen Logistics (Americas) Inc (Intermodal) - (Optional) Staples_UseInventoryIfOrderIsAccepted – If this setting is True, Sellercloud will check if your current inventory is enough for the order to be shipped. If the inventory is insufficient, the Staples_IsOrderRejected Custom Order Column will be set to True.
- (Optional) Staples_SkipImportingPayment – This setting defaults to False. If you set it to True, order payments won’t be imported to Sellercloud.
Custom Product Columns
Create the following Custom Product Columns:
- STAPLES_SKU – The product’s SKU at Staples.
- (Optional) Staples_Enabled – Enable only specific products for Staples. Set to True for any products you want to send with the Inventory Export plugin.
Custom Order Columns
Create the following Custom Order Columns:
- Staples_IsOrderRejected – This column defaults to False, and is automatically set to True when you have insufficient inventory to fulfill an order. You must have the Staples_UseInventoryIfOrderIsAccepted Custom Company Setting set to True.
- STAPLES_CUSTOMER_ID
- STAPLES_STORE_ID
- STAPLES_ORDER_TYPE – This column is automatically populated by the Order Import plugin with one of the following values:
- Staples: COM or LOMS
- Staples Advantage: CNT
- Staples Canada – BDD
- Quill – QUL
- All HiTouch variants – HTCH, HTCH1AJS, HTCH2, HTCH2AJS, or HTCH3
- STAPLES_RELEASE_NUMBER
- (Optional) STAPLES_REFERENCE_NUMBER
Order Import
This plugin imports order data from Staples to Sellercloud in EDI 850 format. The plugin matches products in the two services as follows:
- First, it matches the Staples Vendor SKU from the EDI file to Sellercloud’s ProductID (SKU)
- If the above don’t match, it matches the Staples Merchant SKU from the EDI file to Sellercloud’s STAPLES_SKU Custom Product Column.
Automate Order Import
To create a Scheduled Task that imports orders:
- Navigate to Settings > Scheduled Tasks > Manage Scheduled Tasks.
- Click the green + icon: Create New Scheduled Task.
- Complete as follows:
- Click Task Type and select Import Orders.
- Set the Task Name.
- Select the Company.
- Select the Start Time.
- Click CREATE.
- On the Scheduled Task page, click the Edit button at the top right corner.
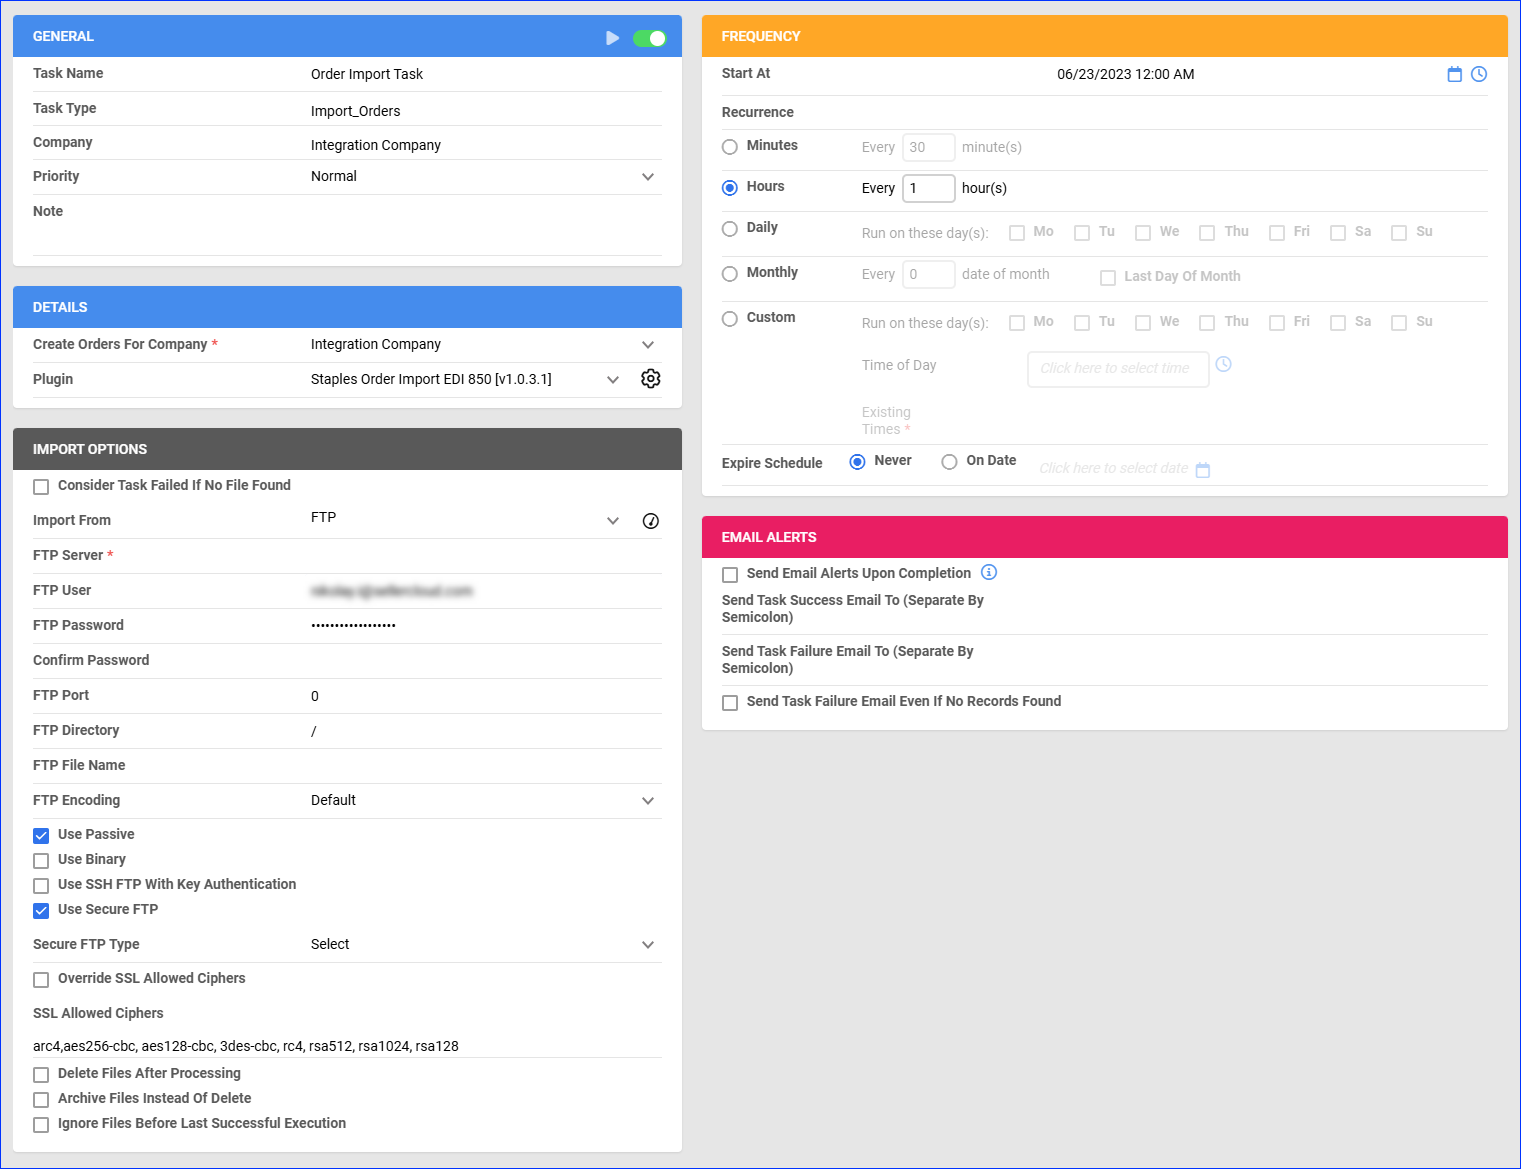
- In the Details panel:
- Click Create Orders For Company and select the company designated for this integration.
- Click the Plugin menu and select Staples Order Import EDI 850.
- In the Import Options panel, set Import From to FTP and fill out the FTP fields. Make sure to check Use Passive and Use Secure FTP.
- In the Frequency panel, specify the task frequency. For optimal performance, select a range between thirty minutes and one hour.
- In the General panel, click the Enable button.
- Click Save.
Order Acknowledgment
This plugin sends order acknowledgment to Staples following the 855 EDI format and marks orders as acknowledged after export.
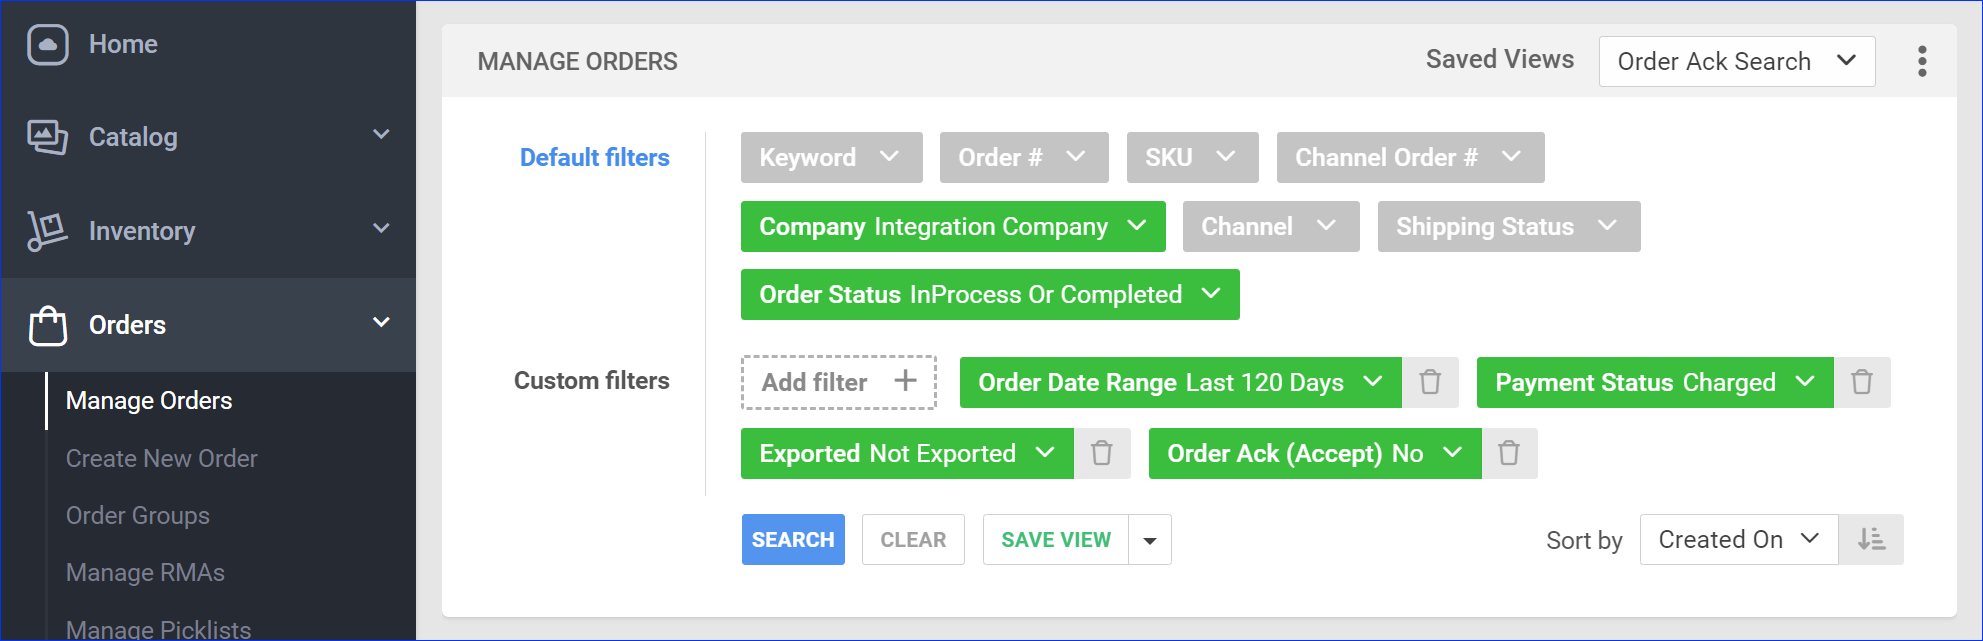
Before you move on, create a Saved Search for orders filtered by:
- Company – The company you created for the integration
- Order Status – InProcess Or Completed
- Payment Status – Charged
- Exported – Not Exported
- Order Ack (Accept) – No
Automate Order Acknowledgment
To create a Scheduled Task that sends order acknowledgment:
- Navigate to Settings > Scheduled Tasks > Manage Scheduled Tasks.
- Click the green + icon: Create New Scheduled Task.
- Complete as follows:
- Click Task Type and select Export Orders.
- Set the Task Name.
- Select the Company.
- Select the Start Time.
- Click CREATE.
- On the Scheduled Task page, click the Edit button at the top right corner.
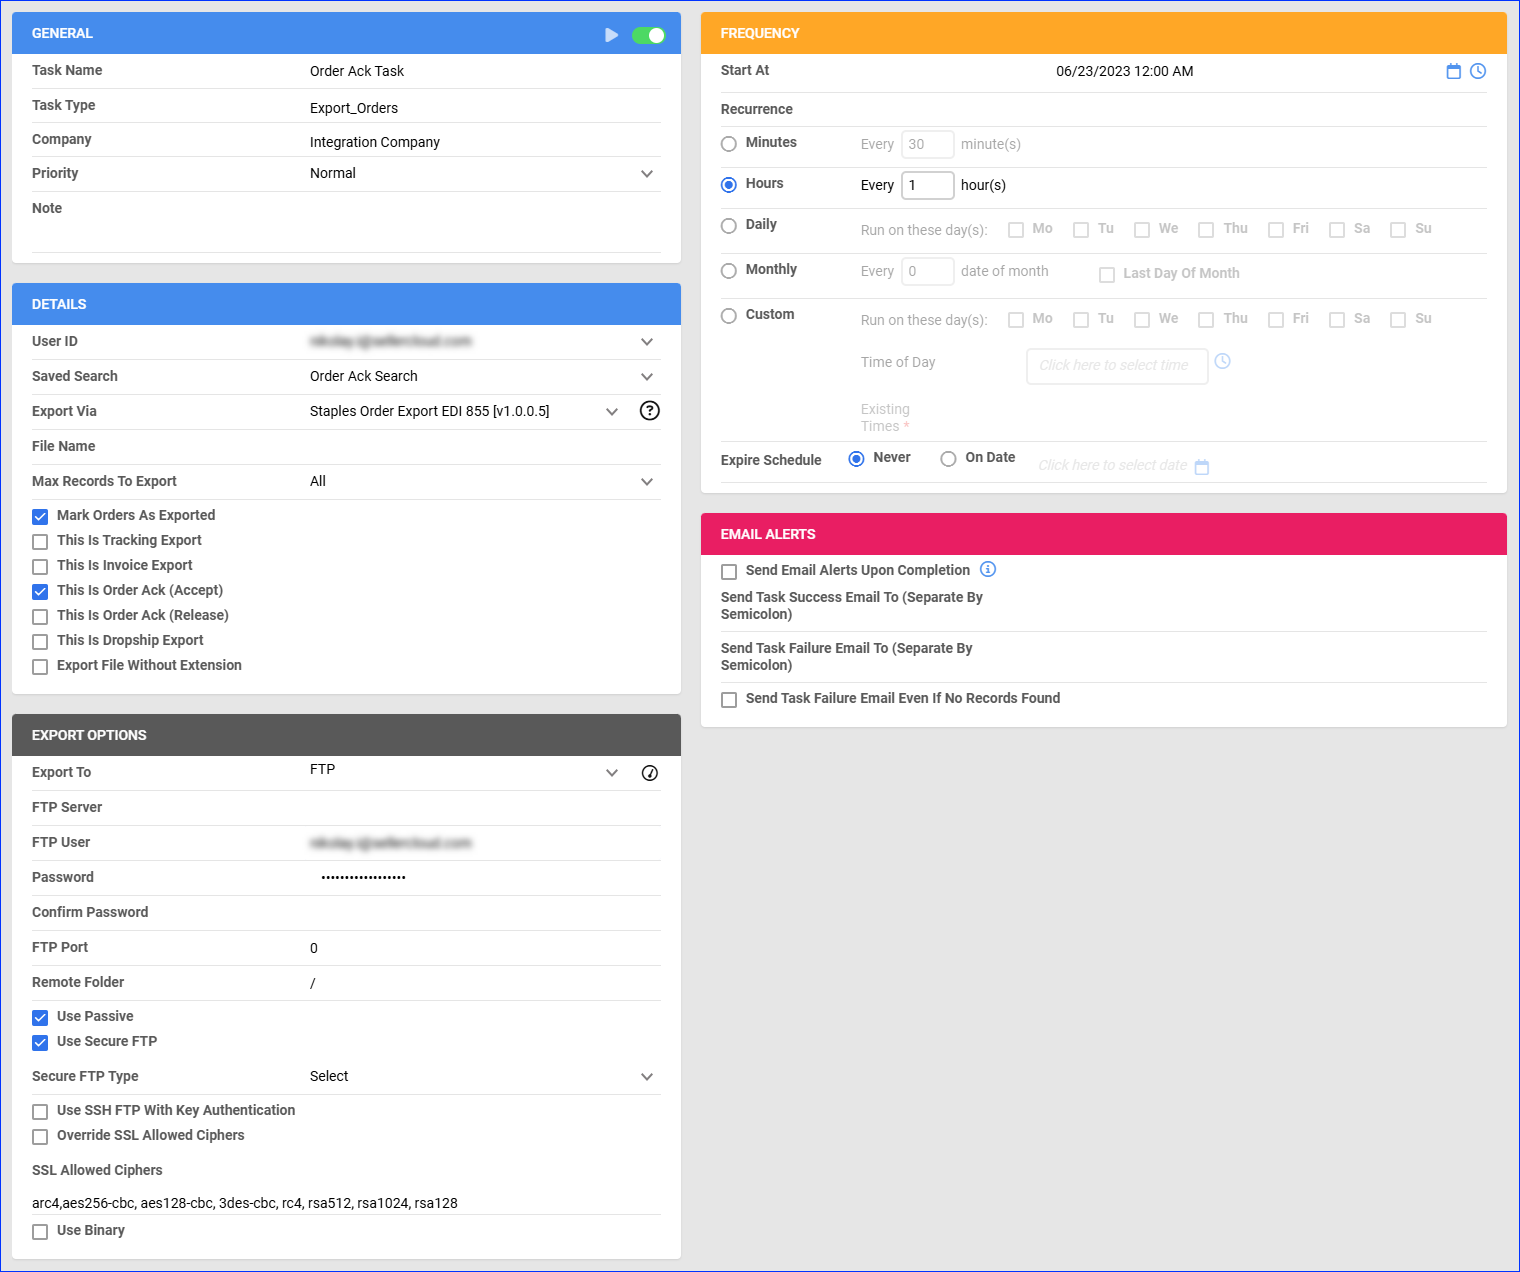
- In the Details panel:
- Click the User ID menu and select your email.
- Click the Saved Search menu and select the saved search you created earlier.
- Click the Export Via menu and select Staples Order Export EDI 855.
- Check Mark Orders As Exported.
- Check This is Order Ack (Accept).
- In the Export Options panel, set Export To to FTP and fill out the FTP fields. Make sure to check Use Passive and Use Secure FTP.
- In the Frequency panel, specify the task frequency. For optimal performance, select a range between thirty minutes and one hour.
- In the General panel, click the Enable toggle button.
- Click Save.
Tracking Export
This plugin exports tracking from Sellercloud to Staples following the 856 EDI format.
Before you move on, create a Saved Search for orders filtered by:
- Company – The company you created for the integration
- Order Status – InProcess Or Completed
- Shipping Status – FullyShipped
- Payment Status – Charged
- Order Ack (Accept) – Yes
- Tracking Uploaded – No
![]()
Automate Tracking Export
To create a Scheduled Task that exports order tracking:
- Navigate to Settings > Scheduled Tasks > Manage Scheduled Tasks.
- Click the green + icon: Create New Scheduled Task.
- Complete as follows:
- Click Task Type and select Export Orders.
- Set the Task Name.
- Select the Company.
- Select the Start Time.
- Click CREATE.
- On the Scheduled Task page, click the Edit button at the top right corner.
- In the Details panel:
- Click the User ID menu and select your email.
- Click the Saved Search menu and select the saved search you created earlier.
- Click the Export Via menu and select Staples Tracking Export EDI 856.
- Check This Is Tracking Export.
- In the Export Options panel, set Export To to FTP and fill out the FTP fields. Make sure to check Use Passive and Use Secure FTP.
- In the Frequency panel, specify the task frequency. For optimal performance, select a range between thirty minutes and one hour.
- In the General panel, click the Enable toggle button.
- Click Save.
![]()
Inventory Export
This plugin exports inventory from Sellercloud to Staples in EDI 846 format.
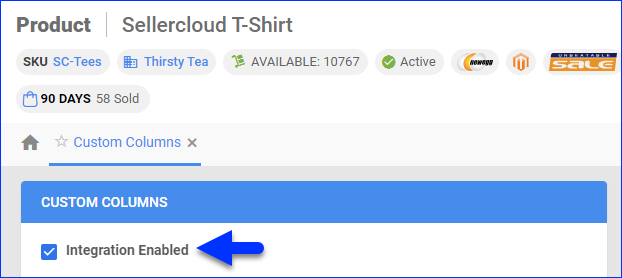
Optionally, you can enable only specific products for Staples by setting their Staples_Enabled Custom Product Column to True:
- For one product at a time: go to the Product Details Page > click Toolbox and select Custom Columns > click Edit, update the Staples_Enabled column, and Save.
- For multiple products in bulk: follow the steps to Bulk Update Products and use the Staples_Enabled column – set it to True for all products you want to enable.
Unlike core integrations, plugin integrations don’t require products to be in the company with the scheduled tasks. The export will include the products you select with your Saved Search.
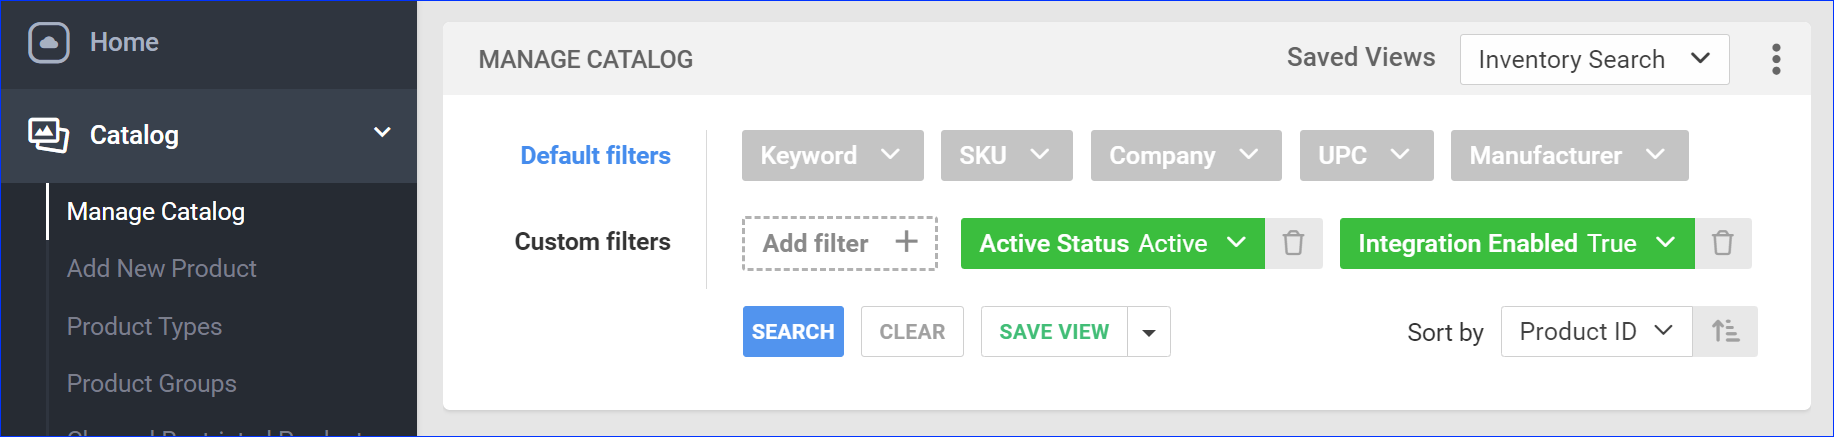
Next, create a Saved Search for products filtered by Staples_Enabled – True. Optionally, you can add more filters to the search to narrow down the export further.
Automate Inventory Export
To create a Scheduled Task that exports inventory:
- Navigate to Settings > Scheduled Tasks > Manage Scheduled Tasks.
- Click the green + icon: Create New Scheduled Task.
- Complete as follows:
- Click Task Type and select Export Products.
- Set the Task Name.
- Select the Company.
- Select the Start Time.
- Click CREATE.
- On the Scheduled Task page, click the Edit button at the top right corner.
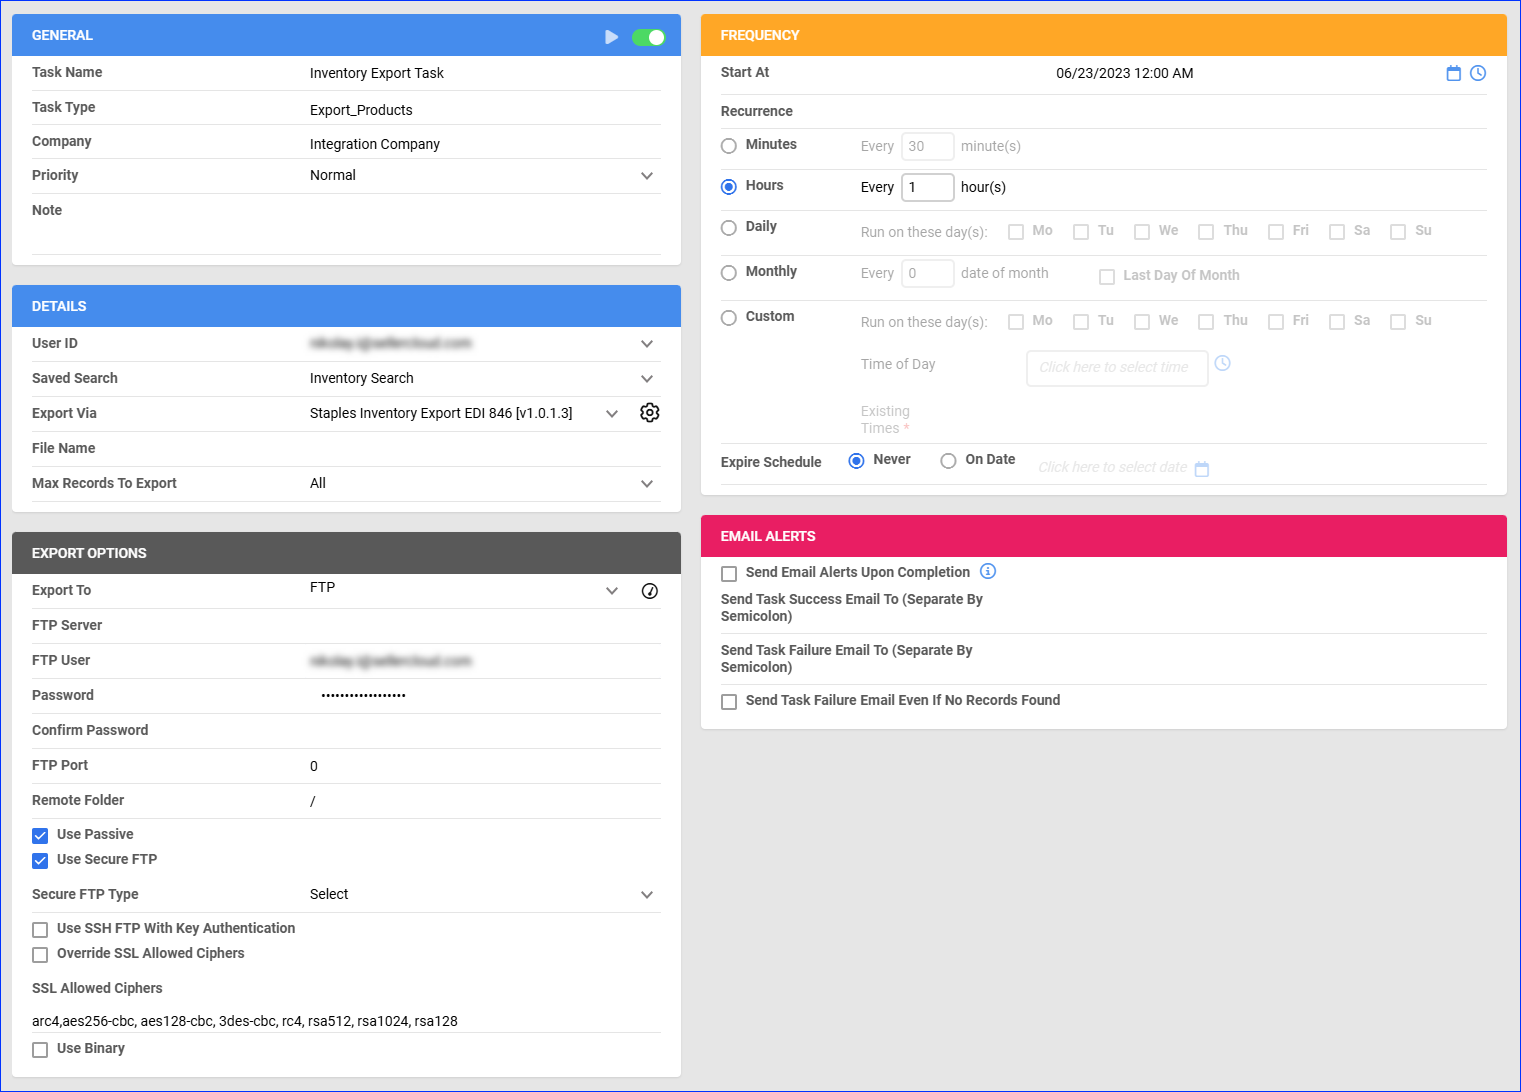
- In the Details panel:
- Click the User ID menu and select your email.
- Click the Saved Search menu and select the saved search you created earlier.
- Click the Export Via menu and select Staples Inventory Export EDI 846.
- In the Export Options panel, set Export To to FTP and fill out the FTP fields. Make sure to check Use Passive and Use Secure FTP.
- In the Frequency panel, specify the task frequency. For optimal performance, select a range between thirty minutes and one hour.
- In the General panel, click the Enable toggle button.
- Click Save.
Configure PDF Invoices
With the Staples PDF Invoice plugin set up under your designated company, you can print PDF invoices with information about your Staples orders and the products they include through Sellercloud or Shipbridge. Based on the value of the STAPLES_ORDER_TYPE Custom Order Column, you can print the following invoice types:
- Staples
- Staples Advantage
- Staples Canada
- Quill
- All HiTouch variants
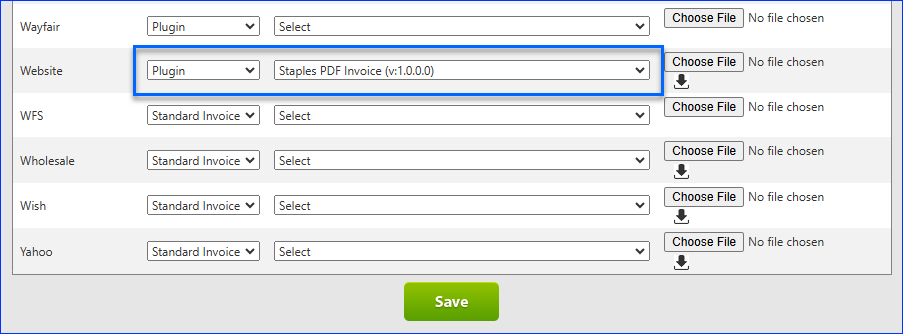
To set up the invoice plugin:
- Go to the Company Settings of the company you created for the integration
- Click Toolbox and select Invoice Settings.
- Click Per Channel Preferences.
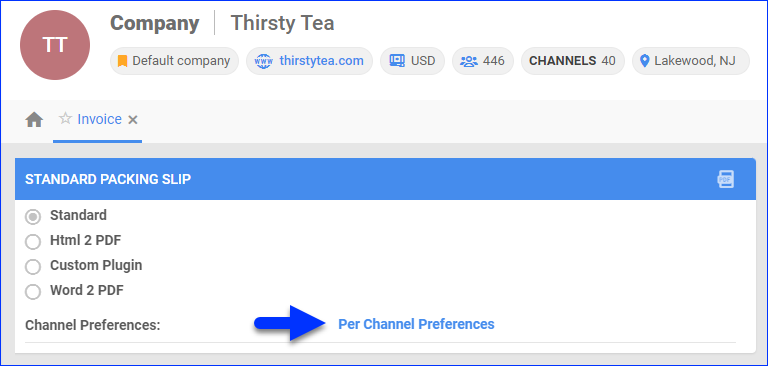
- For Website, select Plugin > Staples PDF Invoice.
- Click Save.