Overview
BJ’s Wholesale Club is a membership-based warehouse club chain in the US selling a wide range of products, including groceries, electronics, furniture, appliances, clothing, and more. By buying products from manufacturers and suppliers in large quantities, BJ’s can offer discounts to their members.
Integrating BJ’s into your Sellercloud account allows you to seamlessly import orders, upload tracking information, and ensure your BJ’s store is always up-to-date with the latest inventory data. The integration works through EDI documents, transmitting information between the two services via plugins and Scheduled Tasks. The document exchange goes through Rithum, previously known as CommerceHub.
If necessary, you can open a ticket with Sellercloud Support to request additional customizations or other plugins for this integration. Any such modifications will be billable.
Prerequisites
Before you can integrate BJ’s with Sellercloud, complete the following requirements.
Rithum Support
Contact Rithum Support and request:
- A Supplier Test Plan and a Supplier Guide. Prior to production deployment, the entire test plan must be completed according to the documented procedures, including submission of a test transaction for each test order.
- Test and production credentials. Once you complete all test cases outlined in the test plan document, the platform will provide you with the production SFTP details: Server Name, Username, and Password. You will need them when setting up the scheduled tasks to automate the plugins. Also, make sure to ask for their ISA ID and Vendor Number – you will need those when populating the custom company settings.
Sellercloud Support
Open a ticket with Sellercloud Support and request that the following plugins be installed on your server:
- BJs EDI 850 Order Import – Imports orders from BJ’s to Sellercloud in EDI 850 format.
- BJs EDI 856 Order Export – Exports tracking information from Sellercloud to BJ’s in EDI 856 format.
- BJs EDI810 Order Invoice Export – Exports invoices from Sellercloud to BJ’s in EDI 810 format.
- BJ EDI 846 Product Export – Exports inventory levels from Sellercloud to BJ’s in EDI 846 format.
Custom Company Settings
Create the following Custom Company Settings.
On your default company:
- STControlNumber
- GSControlNumber
- ISAControlNumber
On the company created for the integration:
- BJs_CustomerISAID – Enter a phone number that is not used for any other EDI integration.
- BJs_ISAID – Contact BJ’s for the value of this column.
- BJs_CustomerQualifier – Set to ZZ.
- BJs_Qualifier – Set to 12.
- BJs_VendorNumber – Contact BJ’s for the value of this column.
- BJs_MarkOrdersUnpaid – Optional setting. Set to True to import orders as unpaid.
- BJs_ShippingRequiresThirdPartyBilling – Optional setting, defaults to False. Set to True to import orders as requiring Third-Party Billing for shipping.
- CommerceHub_LINTransactionsLimit – Optional setting, type integer, defaults to 0. Controls the maximum number of products included in a single transaction. Set to 0 (or a negative value), or leave the setting undefined, to prevent products from being split across multiple transactions. When set to a positive value, the plugin sends up to the specified number of products per transaction.
Custom Order Columns
Create the following Custom Order Columns:
- BJ_OrderInternalControlNumber
Custom Product Columns
Create the following Custom Product Columns:
- BJs_Enabled – Optional column used to enable only specific products for BJ’s. Set to True for any products you want to send with the Inventory Export plugin.
- BJs_SKU – A product’s SKU at BJ’s.
- BJsDiscontinued – Optional setting. Set to True to mark SKUs as discontinued for BJ’s and send a quantity of zero.
Order Import
This plugin imports order data from BJ’s to Sellercloud in EDI 850 format and exports order acknowledgment in EDI 997.
Automate Order Import
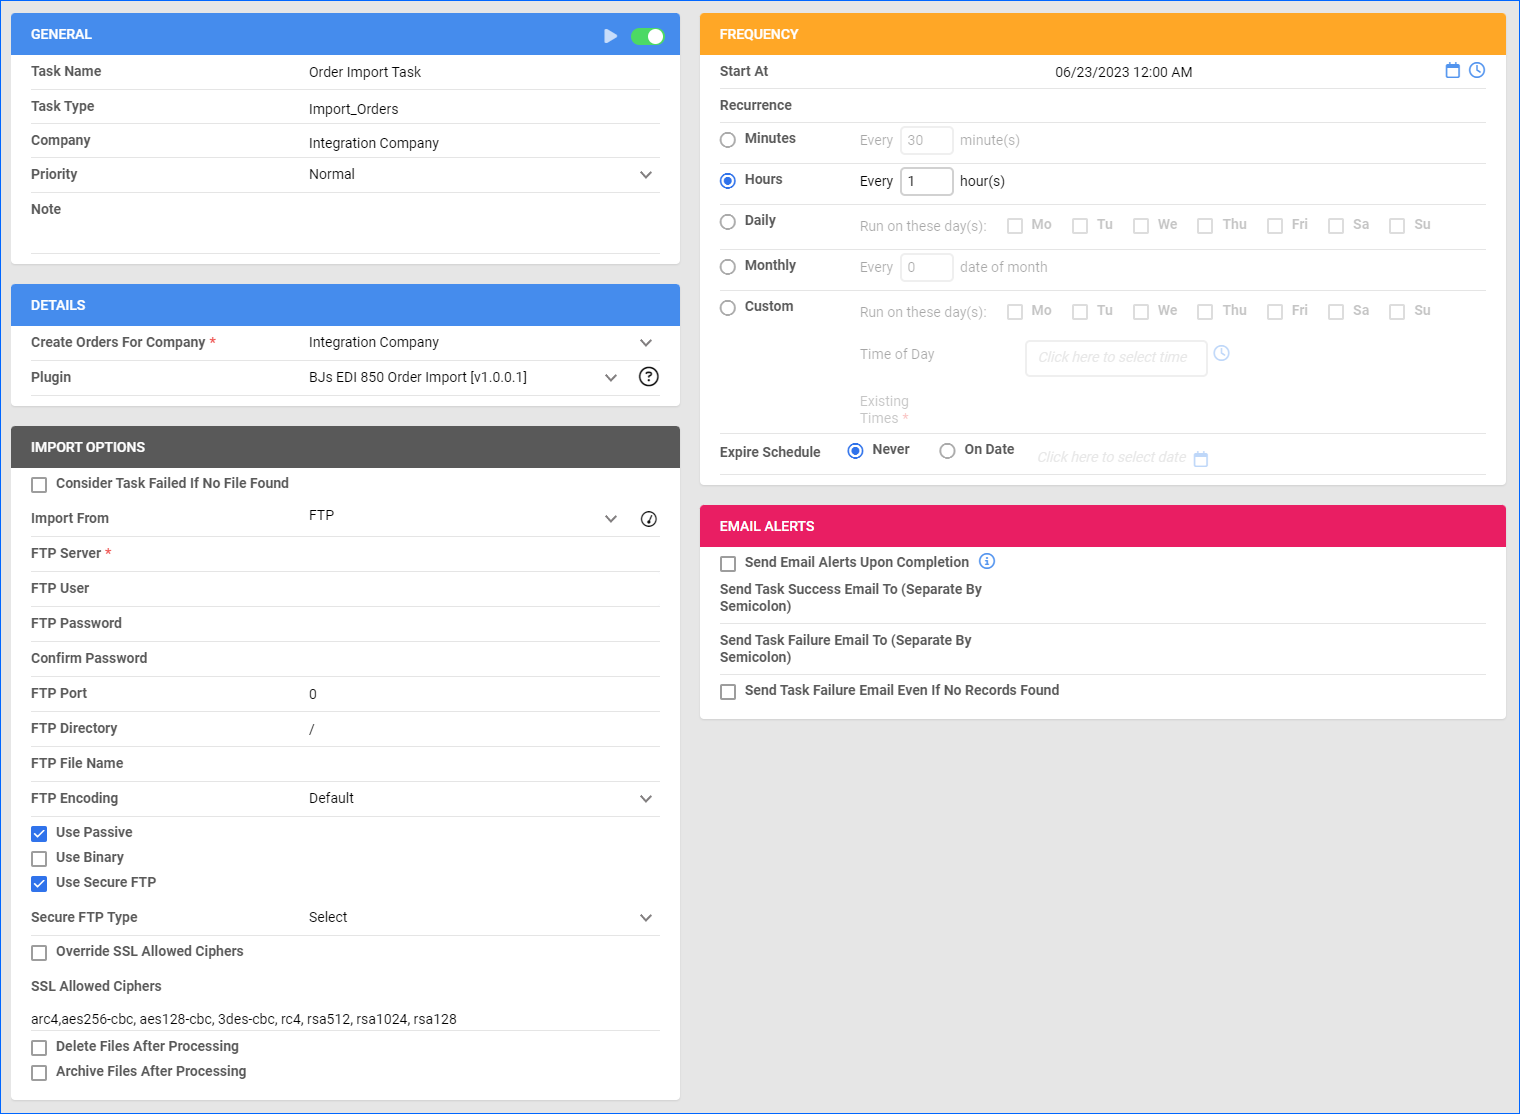
To create a Scheduled Task that regularly imports orders:
- Navigate to Settings > Scheduled Tasks > Manage Scheduled Tasks.
- Click the green + icon: Create New Scheduled Task.
- Complete as follows:
- Click Task Type and select Import Orders.
- Set the Task Name.
- Select the Company.
- Select the Start Time.
- Click CREATE, and the new Scheduled Task page will load on your screen.
- Click the Edit button on the top right.
- In the Details panel:
- Click Create Orders For Company and select the company designated for this integration.
- Click the Plugin menu and select BJs EDI 850 Order Import.
- In the Import Options panel:
- Set Import From to FTP and fill out your FTP credentials.
- Set the FTP Directory to /outgoing/intchg.
- Make sure to check Use Passive and Use Secure FTP.
- In the Frequency panel, specify the task frequency. For optimal performance, select a range between thirty minutes and one hour.
- In the General panel:
- Fill in “FTP” in the Note field.
- Click the Enable button.
- Click Save on the top right.
Tracking Export
This plugin exports tracking from Sellercloud to BJ’s following the 856 EDI format.
This plugin supports backorders and cancellations:
- Such orders must be PartiallyShipped, FullyShipped, or canceled.
- To backorder items, set their Backorder Quantity to anything above 0 and export the order.
- To cancel specific items, Split Them Off from the original order and Cancel the split-off order. To cancel all items, cancel the original order and export it.
When sending product quantities normally (without backorder or cancellations), Sellercloud matches the item’s Ship From Warehouse to the Channel Warehouse Mapping. Make sure your Sellercloud Warehouses are mapped correctly to BJ’s Warehouse Codes.
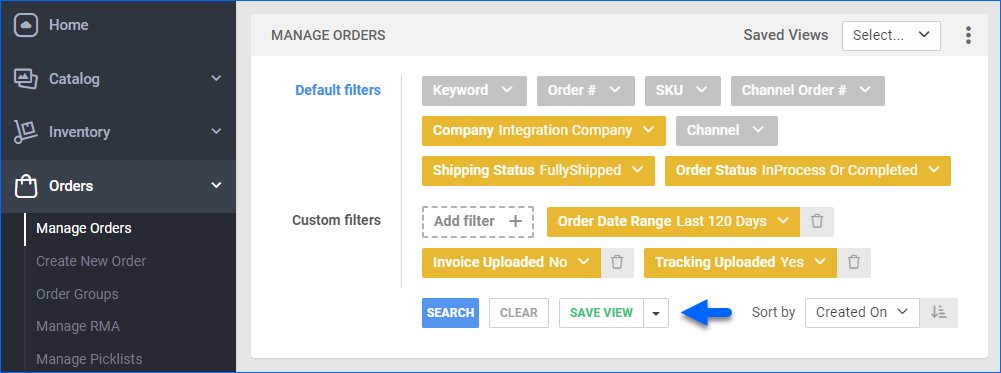
Before you move on, create a Saved Search for orders filtered by:
- Company – The company you created for the integration
- Order Status – InProcess Or Completed
- Shipping Status – FullyShipped
- Payment Status – Charged
- Tracking Uploaded – No
Automate Tracking Export
To create a Scheduled Task that regularly exports order tracking:
- Navigate to Settings > Scheduled Tasks > Manage Scheduled Tasks.
- Click the green + icon: Create New Scheduled Task.
- Complete as follows:
- Click Task Type and select Export Orders.
- Set the Task Name.
- Select the Company.
- Select the Start Time.
- Click CREATE, and the new Scheduled Task page will load on your screen.
- Click the Edit button on the top right.
- In the Details panel:
- Click the User ID menu and select your ID.
- Click the Saved Search menu and select the saved search you created earlier.
- Click the Export Via menu and select BJs EDI 856 Order Export.
- Check This Is Tracking Export.
- In the Export Options panel:
- Set Export To to FTP and fill out your FTP credentials.
- Set the Remote Folder path to /incoming/intchg.
- Make sure to check Use Passive and Use Secure FTP.
- In the Frequency panel, specify the task frequency. For optimal performance, select a range between thirty minutes and one hour.
- In the General panel, click the Enable toggle button.
- Click Save on the top right.
Invoice Export
This plugin exports invoices from Sellercloud to BJ’s in EDI 810 format.
Before you move on, create a Saved Search for orders filtered by:
- Company – The company you created for the integration
- Shipping Status – Fully Shipped
- Order Status – InProcess Or Completed
- Invoice Uploaded – No
- Tracking Uploaded – Yes
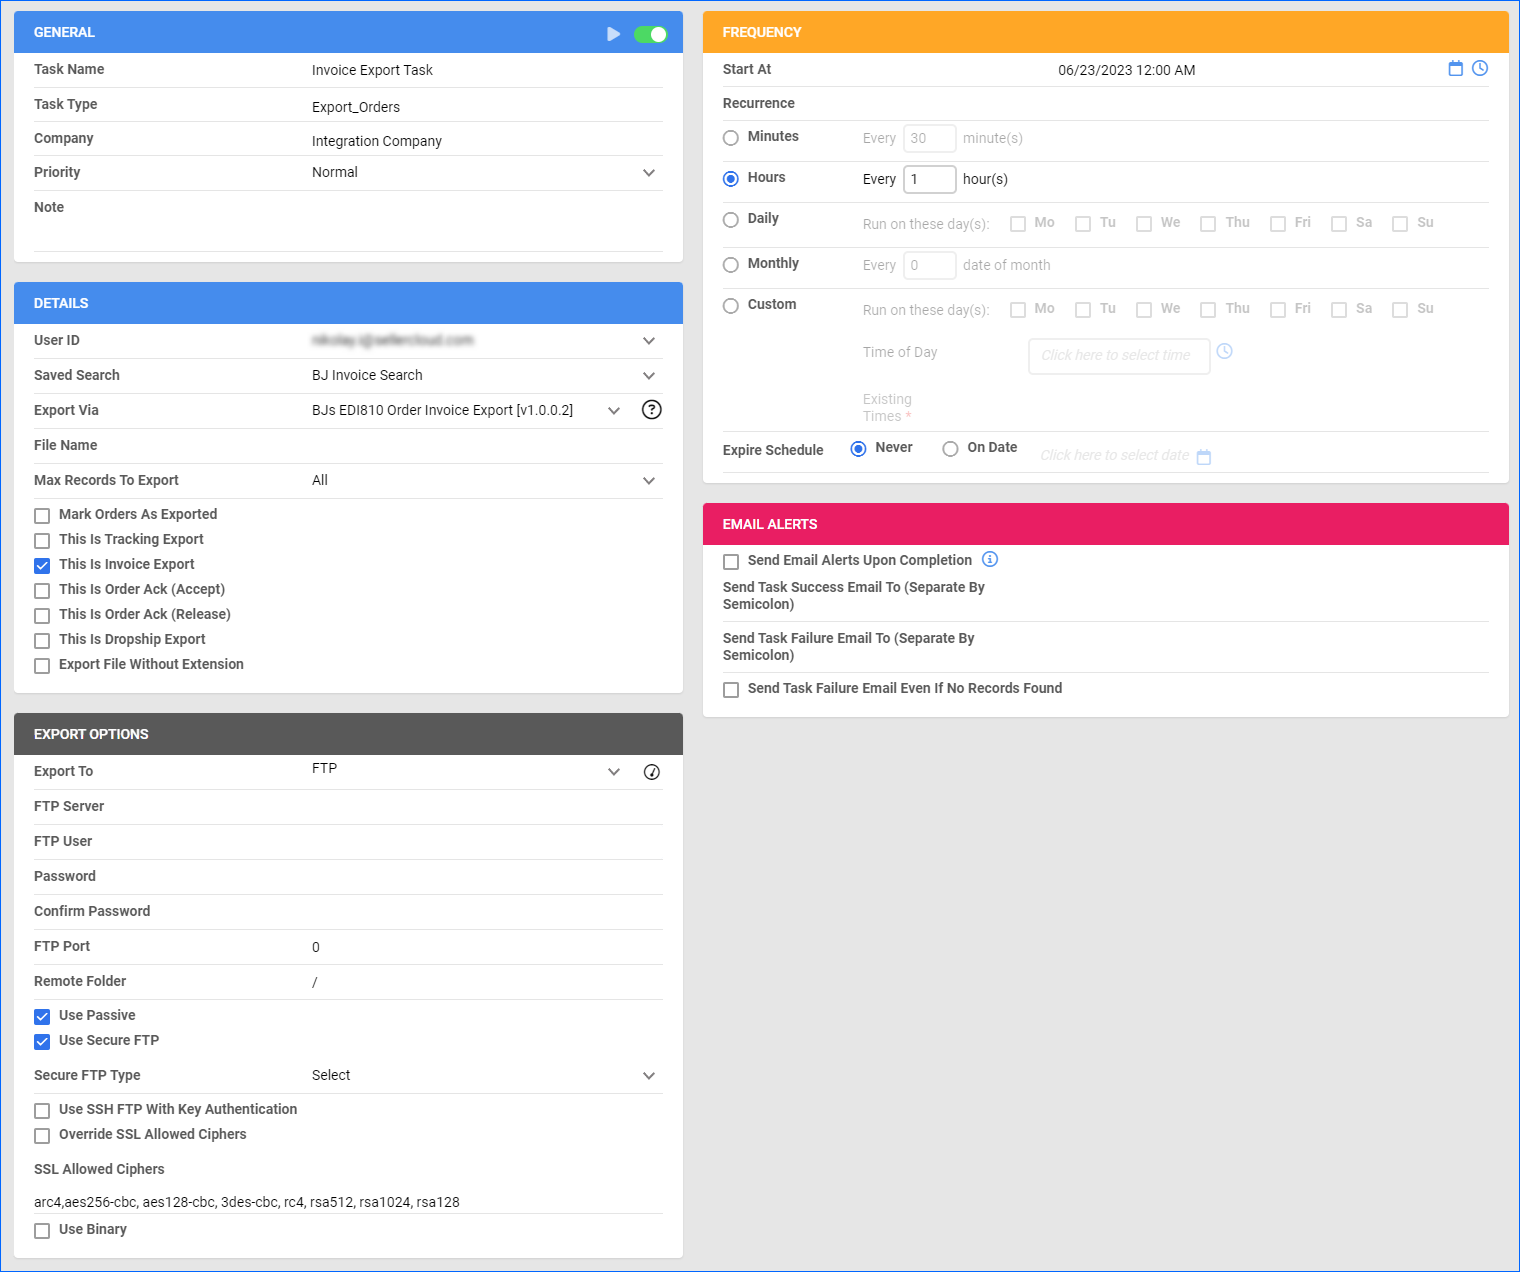
Automate Invoice Export
To create a Scheduled Task that regularly exports invoices:
- Navigate to Settings > Scheduled Tasks > Manage Scheduled Tasks.
- Click the green + icon: Create New Scheduled Task.
- Complete as follows:
- Click Task Type and select Export Orders.
- Set the Task Name.
- Select the Company.
- Select the Start Time.
- Click CREATE, and the new Scheduled Task page will load on your screen.
- Click the Edit button on the top right.
- In the Details panel:
- Click the User ID menu and select your ID.
- Click the Saved Search menu and select the saved search you created earlier.
- Click the Export Via menu and select BJs EDI810 Order Invoice Export.
- Check This Is Invoice Export.
- In the Export Options panel:
- Set Export To to FTP and fill out the FTP fields.
- Set the Remote Folder path to /incoming/intchg.
- Make sure to check Use Passive and Use Secure FTP.
- In the Frequency panel, specify the task frequency. For optimal performance, select a range between thirty minutes and one hour.
- In the General panel, click the Enable toggle button.
- Click Save on the top right.
Inventory Export
This plugin exports inventory from Sellercloud to BJ’s in EDI 846 format, including product identifiers, pricing, and quantities.
After setting up Channel Warehouse Mapping for the integration company, the plugin sends different product quantities per warehouse. The Warehouse Codes you set for the Website Channel must correspond to warehouses in BJ’s. If you don’t set up this mapping, the plugin will send a quantity of zero.
Optionally, you can enable only specific products for BJ’s by setting their BJs_Enabled Custom Column for Products to True:
- For one product at a time: go to the Product Details Page > click Toolbox and select Custom Columns > click Edit, update the BJs_Enabled column, and Save.
- For multiple products in bulk: follow the steps to Bulk Update Products and use the BJs_Enabled column – set it to True for all products you want to enable.
Unlike core integrations, plugin integrations don’t require products to be in the company with the scheduled tasks. The export will include the products you select with your Saved Search.
Next, create a Saved Search for products filtered by BJs_Enabled – True. Optionally, you can add more filters to the search.
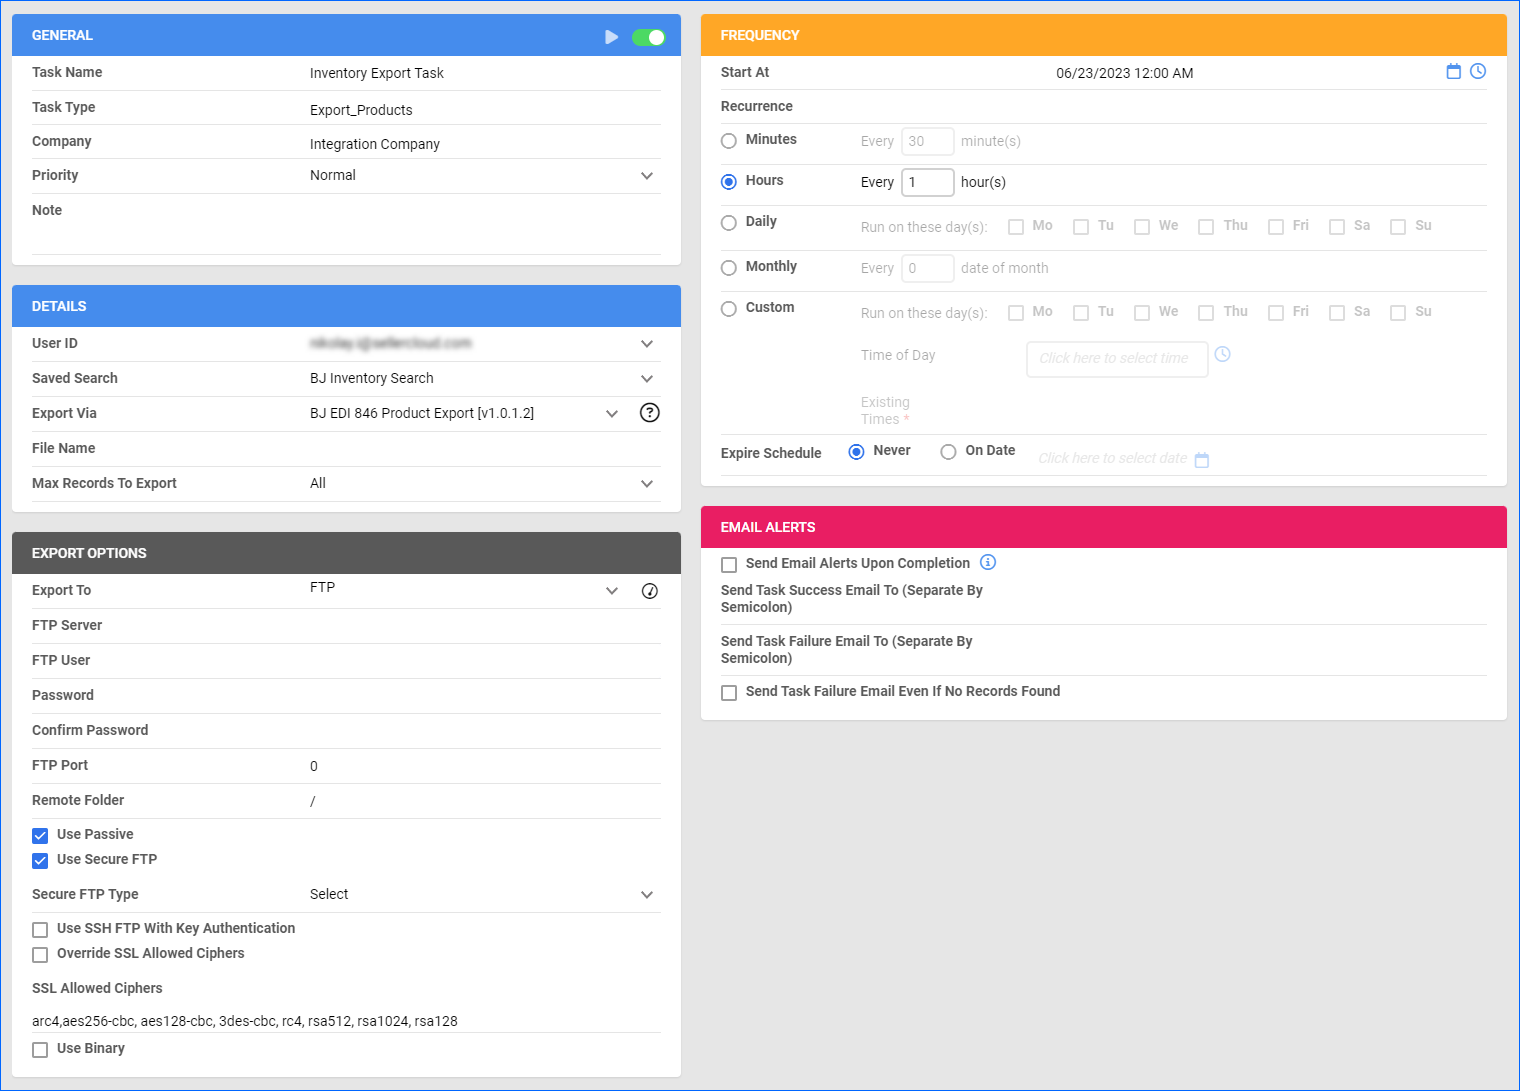
Automate Inventory Export
To create a Scheduled Task that regularly exports inventory:
- Navigate to Settings > Scheduled Tasks > Manage Scheduled Tasks.
- Click the green + icon: Create New Scheduled Task.
- Complete as follows:
- Click Task Type and select Export Products.
- Set the Task Name.
- Select the Company.
- Select the Start Time.
- Click CREATE, and the new Scheduled Task page will load on your screen.
- Click the Edit button on the top right.
- In the Details panel:
- Click the User ID menu and select your ID.
- Click the Saved Search menu and select the saved search you created earlier.
- Click the Export Via menu and select BJs EDI 846 Product Export.
- In the Export Options panel:
- Set Export To to FTP and fill out your FTP credentials.
- Set the Remote Folder path to /incoming/intchg.
- Make sure to check Use Passive and Use Secure FTP.
- In the Frequency panel, specify the task frequency. For optimal performance, select a range between thirty minutes and one hour.
- In the General panel, click the Enable toggle button.
- Click Save on the top right.


