Overview
SKUs (Stock Keeping Units) are unique alphanumeric identifiers assigned to products upon creation, facilitating efficient catalog and inventory management, order processing, marketplace integrations, performance analysis, and clear differentiation between product variants. Sellercloud provides you with several structured processes for assigning those identifiers, allowing you to create new SKUs individually, in bulk, with a file import, or through your connected sales channels.
Once created, you can view and modify their properties on the Product Details Page. Additionally, you can perform various related actions and change their status to Inactive or Discontinued, Copy and Clone SKUs, initiate SKU to SKU transfers, and more.
Create Product SKUs
You can create new product SKUs individually, in bulk, or through a connected sales channel.
Individually
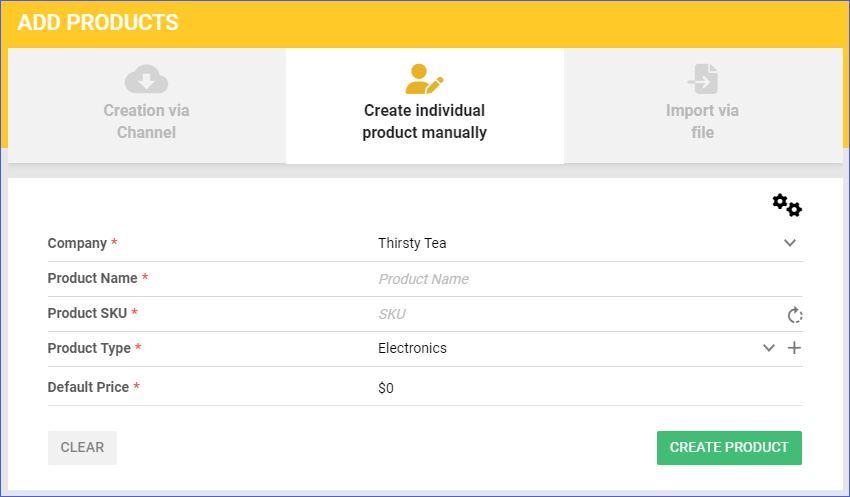
To create individual products:
- Navigate to Catalog > Add New Product.
- Click on Create Individual Product Manually.
- Fill in the required information.
- Company
- Product Name
- Product SKU – If you have filled in the Product Name field, you can generate a random product SKU by clicking the Generate icon.
- Product Type
- Click Create Product.
Required Fields For New Product
To create a new product, certain minimum requirements must be met. The mandatory fields include Company, Product Name, Product SKU, and Product Type. For additional customization, click on the Gear icon in the upper right-hand corner.
To configure specific fields, select the checkbox Show in Form, and to make a field mandatory for product creation, choose Mark as Required.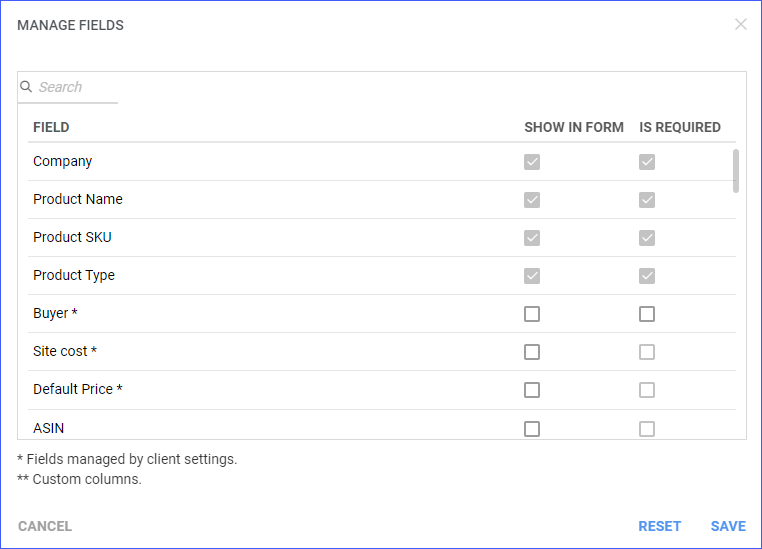
In Bulk
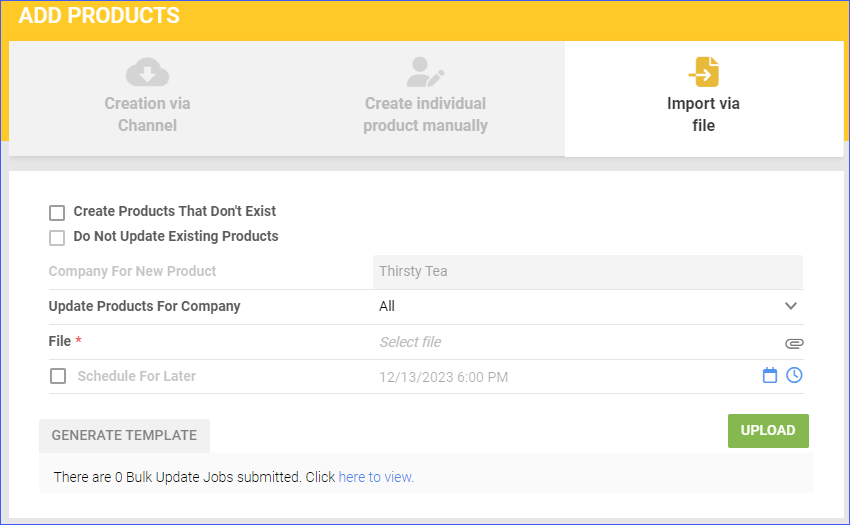
Sellercloud also allows you to create multiple products simultaneously through a file upload. To create product SKUs in bulk:
- Navigate to Catalog > Add New Product.
- Select Import via File.
- Click Generate Template to use an existing template or generate a new one. The required columns to create SKUs using this tool are ProductID and ProductName. It is recommended to also include ProductTypeName; otherwise, your company’s default product type will be assigned.
- Enable the Create Products That Don’t Exist option. If you don’t want to affect existing products with your import, you should also enable the Do Not Update Existing Products option.
- Select the company where the products should be created. To create products for more than one company, use the CompanyID column header in the template file instead.
- Click the File field and select the file from your computer.
- Click Upload.
Via Channel
To learn more about creating products directly from your connected sales channels, refer to our Create Products From a Channel article.
Manage SKUs
In some cases, it’s possible to update a product’s SKU in Sellercloud. However, once there are existing orders, inventory records, purchase orders, or historical data associated with the product, the SKU becomes unmodifiable.
Alternatively, for SKUs that can’t be changed or modified, you can Deactivate Products, which will remove products from the default product searches.
Rename a SKU
To change a product SKU:
- Navigate to Catalog > Manage Catalog.
- Select your product
- Action Menu > Change Product SKU.
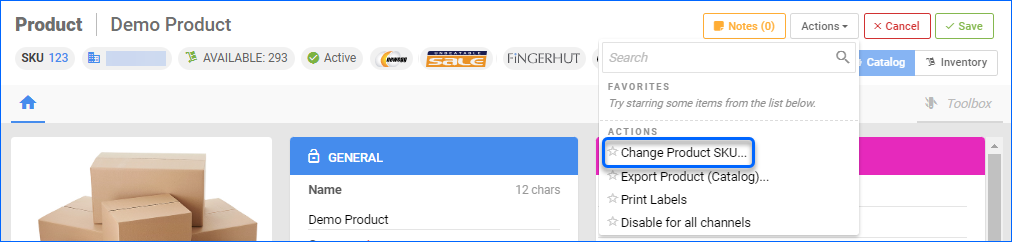
- A pop window will appear to enter the new SKU.
- Click Change.
Alternatively, you can select the product from the Manage Catalog Page and change it from there.
Product Properties
On the Product Details Page, you can view and modify the product’s default properties as needed.
Related Client Settings
The following Client Settings are available:
- Require To Set Default Price When Creating Product
- This setting makes it necessary to set a default price when creating a product, ensuring all products have a defined pricing value from the start.
- Require SiteCost And Buyer/Purchaser While Creating Product
- This setting makes it mandatory to include Site Cost and Buyer/Purchaser details when creating a product, ensuring complete information for each product entry.
- Require Manufacturer When Creating Product
- This setting ensures that you must specify a manufacturer when creating a product, making it a mandatory field during the product creation process.
Overview
SKUs (Stock Keeping Units) are unique alphanumeric identifiers assigned to products upon creation, facilitating efficient catalog and inventory management, order processing, marketplace integrations, performance analysis, and clear differentiation between product variants. Sellercloud provides you with several structured processes for assigning those identifiers, allowing you to create new SKUs individually, in bulk, with a file import, or through your connected sales channels.
Once created, you can view and modify their properties on the Product Details Page. Additionally, you can perform various related actions and change their status to Inactive or Discontinued, Copy and Clone SKUs, initiate SKU to SKU transfers, and more.
Create Product SKUs
You can create new product SKUs individually, in bulk, or through a connected sales channel.
Individually
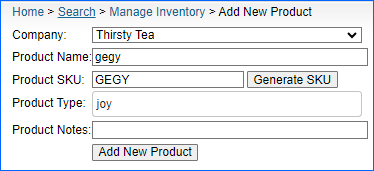
To create individual products:
- Navigate to Inventory > Add New Product.
- Fill in all required information.
- Company
- Product Name
- Product SKU
- Product Type
- Click Create Product.
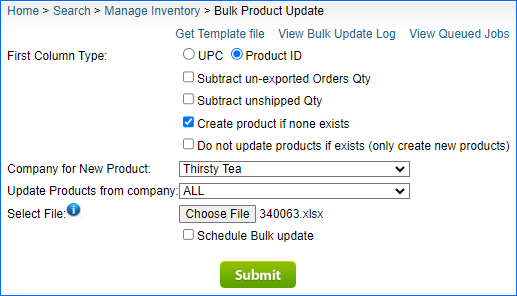
In Bulk
Sellercloud also allows you to create multiple products simultaneously through a file upload. To create product SKUs in bulk:
- Navigate to Inventory > Bulk Update Products.
- Click Get Template File to use an existing template or generate a new one. The required columns to create SKUs using this tool are ProductID and ProductName. It is recommended to also include ProductTypeName; otherwise, your company’s default product type will be assigned.
- Enable the Create product if none exists option. If you don’t want to affect existing products with your import, you should also enable the Do not update products if exists option.
- Select the company where the products should be created. To create products for more than one company, use the CompanyID column header in the template file instead.
- Click the File field and select the file from your computer.
- Click Upload.
Via Channel
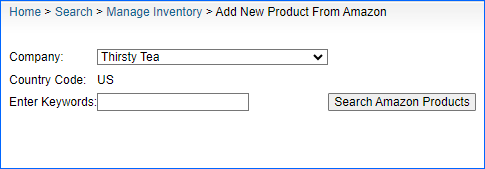
To create products via a connected sales channel, navigate to:
- Inventory > Add Product via (channel).
- Currently, you can add products from:
- Amazon
- eBay
- Jet
- Overstock
- Sears
- Walmart Marketplace
- Wayfair
- Enter the required information and click Add Product.
Manage SKUs
In some cases, it’s possible to update a product’s SKU in Sellercloud. However, once there are existing orders, inventory records, purchase orders, or historical data associated with the product, the SKU becomes unmodifiable.
Alternatively, for SKUs that can’t be changed or modified, you can Deactivate Products, which will remove products from the default product searches.
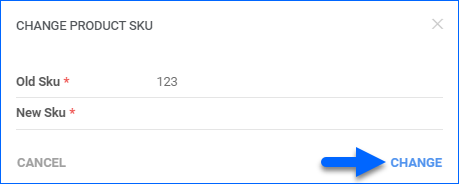
Rename a SKU
To change a product SKU:
- Select the product from the Manage Inventory page.
- From the Action Menu > Change Product SKU > Go.
- Enter the new SKU > Change SKU.
If you are changing the SKU to match the product code on a channel, consider keeping the current SKU and instead, use the Merchant SKU field on each channel’s product properties page to link the SKU with the channel.
Product Properties
On the Product Details Page, you can view and modify the product’s default properties as needed.
Related Client Settings
The following Client Settings are available:
- Require To Set Default Price When Creating Product
- This setting makes it necessary to set a default price when creating a product, ensuring all products have a defined pricing value from the start.
- Require SiteCost And Buyer/Purchaser While Creating Product
- This setting makes it mandatory to include Site Cost and Buyer/Purchaser details when creating a product, ensuring complete information for each product entry.
- Require Manufacturer When Creating Product
- This setting ensures that you must specify a manufacturer when creating a product, making it a mandatory field during the product creation process.