Overview
The Manage Catalog page gives you quick access to all your products. On this page, you can:
- See products in your Sellercloud account
- Use search filters to show only specific products
- Save your search filter setups so you can repeat searches quickly and easily
- Sort the products from your search results based on different product data fields
- Show or hide product data fields from the search results grid
- Perform a wide range of actions on products individually or in bulk
Page Overview
To access your product catalog, go to Catalog > Manage Catalog.
The Manage Catalog page consists of three key components:
- Search Filters – A wide range of search options that let you narrow down your search results and show only the products you are interested in. You can save specific searches for repeat use.
- Search Results – A list of products that match your search criteria. You can sort it differently and even show or hide different data columns.
- Actions – A wide range of product-related actions you can perform on one product at a time or in bulk. These actions help you manage your products both within Sellercloud and in connected sales channels.
Search Filters
Filters offer multiple-choice selection lists or allow you to enter specific values. Your choices build on each other. Each subsequent choice narrows the scope of your search results further and affects what the page displays. You can add as many filters as you like or none at all.
There are Default filters that are always displayed and Custom filters that you can display manually by clicking the Add filter button and selecting a filter from the list. To remove a custom filter from the page, click the Trash icon next to it.
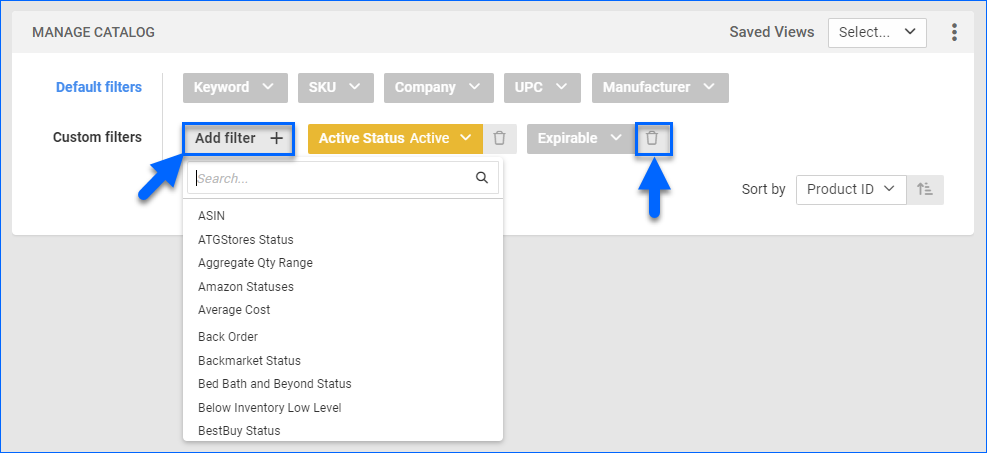
After you click Search, each filter you apply gets highlighted in orange or green. If a filter is gray or not displayed at all, it’s not active. You can add or remove filters and search again at any time.
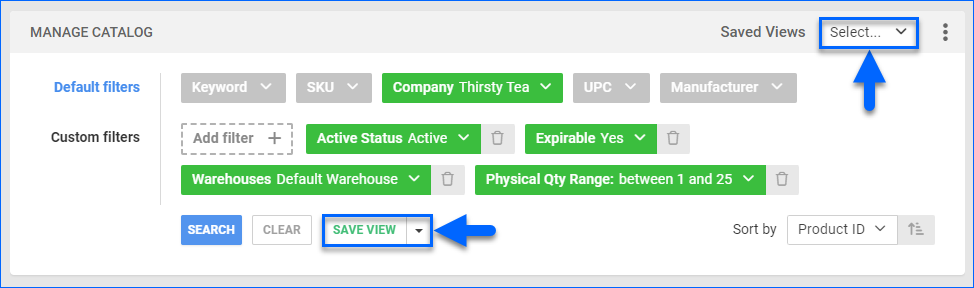
Once you have set up your filters, you can click Save View to save the search. Then, you can repeat the same search by selecting it from the Saved Views menu on the top right.
Search Results
The search results show a list of products matching your search criteria. This list is comprised of various data columns showing product information.
There are two levels of columns. Level 1 columns are always visible. There are also Level 2 columns – when available, you can view them by clicking the small blue arrow to the product’s left. This provides you with more information about Variation Products without having to open the product details.
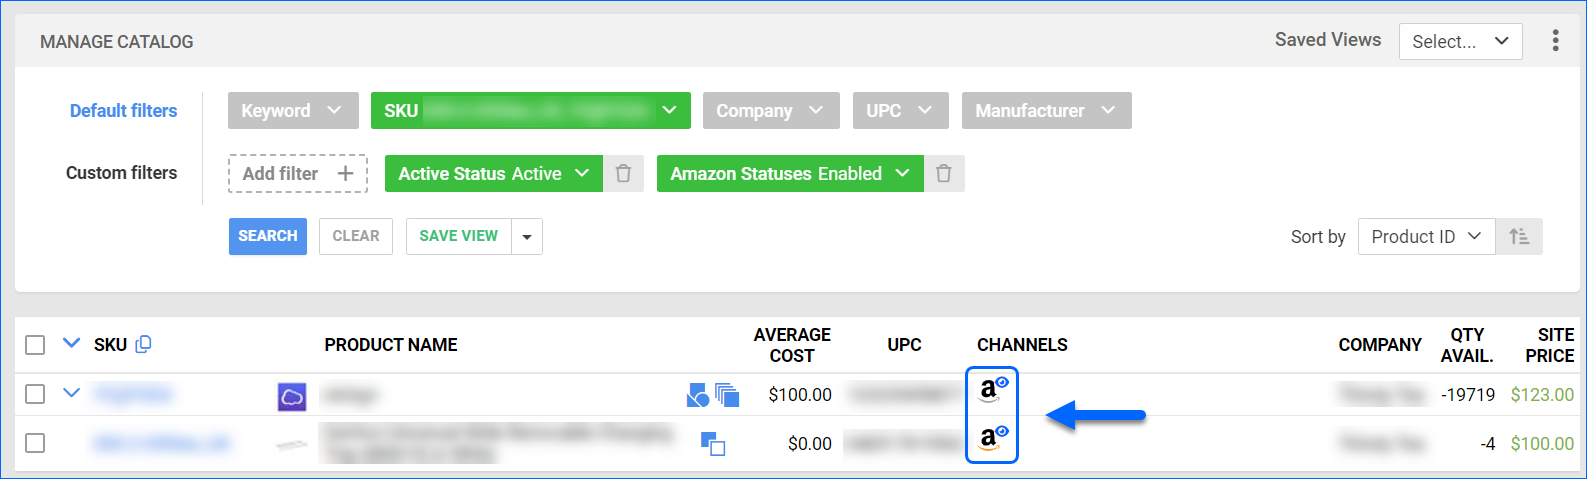
 The grid column Channel displays the logos of the channels for which each product is enabled. Click on the logo to open the channel-specific properties of the SKU. Additionally, the logo for products that are Posted and Active on Amazon will be displayed in color, while enabled-only SKUs will be shown with a greyed-out logo.
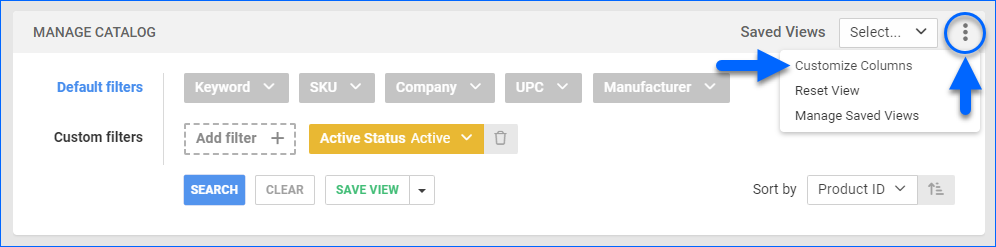
You can add, remove, and even reorder data columns. Click the three dots icon on the top right and select Customize Columns.
Now you can:
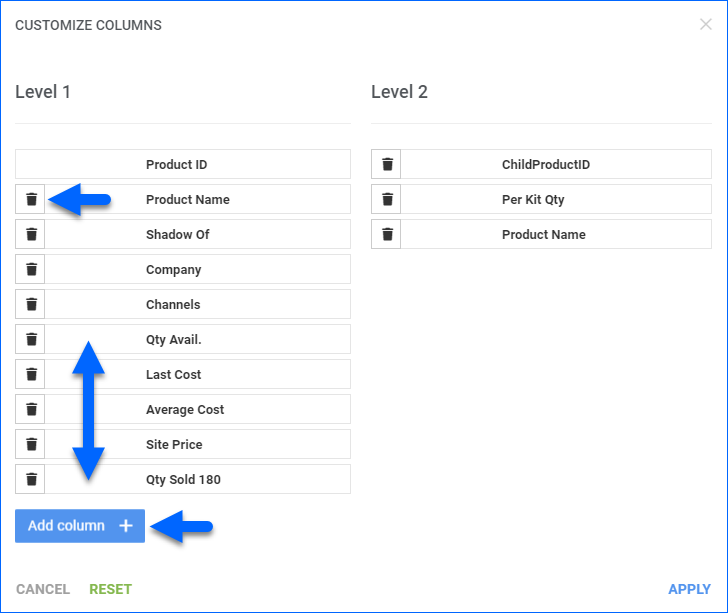
- Reorder columns by dragging them up or down in the list
- Hide columns by clicking the Trash icons
- Add columns by clicking Add column
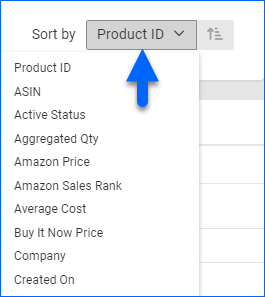
You can also sort the products in a different order based on a specific column using the Sort by drop-down menu.
Actions
The Manage Catalog page also offers a wide range of actions you can perform on one product at a time or in bulk. These actions help you quickly manage your products both within Sellercloud and in connected sales channels.
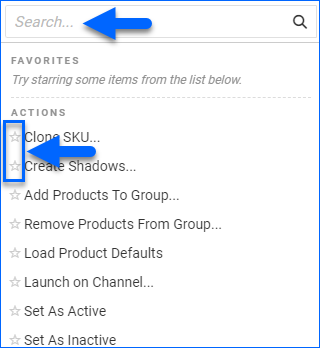
The Actions icon is located on the bottom right of the page. By default, it is a green plus icon that allows you to create a new product. When you select products from the search results by checking the boxes to their left, the icon turns blue. Once it’s blue, you can click it to perform actions on selected products.
![]()
You can use the search engine to find a specific action quickly. Click the Star icon next to any frequently used action to pin it to the top of the actions list for quick access.
Most of these actions will display a notification at the bottom of the screen when used, telling you that a Queued Job has been created. You can click the link to the queued job to view it. Make sure to refresh the page to update the job’s Status.
Descriptions
This section lists and defines all available elements on the Product Details page. This includes the filters for searching, the columns that display product data and sort results, and the actions you can perform on selected products. This article lists the elements by category for your convenience.
Filter Descriptions
Refer to the lists below for all Default/Custom filters and their descriptions.
Basic Information
| Filter | Description |
| Brand | Filter products by one or more Brands. |
| Company | Filter products by one or more Companies. |
| Created By | Show only products created by a specific Employee. |
| Manufacturer | Show products produced by one or more Manufacturers. |
| Manufacturer By Company | Show products produced by one or more manufacturers added to a specific company. You can see the company name along with the manufacturer while searching. |
| Product Group | Show products that are or are not in a specific Product Group. |
| Product Types | Show only products from one or more Product Types. |
| Conditions | Show products based on one or more Product Conditions. |
| Expirable | Show only products that are or are not Expirable. |
| Is Digital | Show only products that are or are not Digital. |
| Is Hazmat | Show only products that are or are not considered Hazardous. |
| Replenishable | Show products that are or are not Replenishable. |
| Images | Show products with or without Images. |
| Keyword | Show products based on text in their SKU or product name. |
| Priority | Show products based on their priority, from 0 to 10. |
| Rating | Show products based on their rating, from 0 to 10. |
| Dropship Modes | Show only products that are set to ship from the manufacturer, vendor, or site. |
| Fulfilled By | Show only products that are or are not Fulfilled by Amazon. |
| Restricted Type | Show only products that are or are not restricted on specific channels. |
| Restricted | Show only products that are restricted on one or more channels. |
Identifiers
| Filter | Description |
| SKU | Filter products by their Sellercloud Stock Keeping Unit (SKU). |
| Vendor SKUs | Filter products by Vendor SKU. |
| Manufacturer SKU | Filter products by Manufacturer SKU. |
| Master SKU | Filter products by Master SKU. |
| Merchant SKU | Filter products by Merchant SKU. |
| Has UPC | Show products with or without a Universal Product Code (UPC). |
| UPC | Filter products by UPC. |
| ASIN | Filter products by Amazon Standard Identification Number (ASIN). |
| Serial# | Filter products by Serial Numbers. |
| EAN | Filter products by European Article Number (EAN). |
| GTIN | Filter products by Global Trade Item Number (GTIN). |
| FNSKU | Filter products by Fulfillment Network Stock Keeping Unit (FNSKU). |
| Channel Listing ID | Filter products by a channel listing ID. |
Date and Time
| Filter | Description |
| Creation Date Range | Filter products by predefined creation time ranges. |
| Created On | Filter products by custom creation date ranges. |
| Last Aggregate Date Range | Filter products by predefined inventory aggregation time ranges. |
| Last Aggregate Date | Filter products by custom inventory aggregation date ranges. |
| Modified On | Show only products modified within a custom date range. |
| No Sale In Days | Show only products that haven’t been sold in predefined time ranges. |
| Sold In Days | Show only products that have been sold in predefined time ranges. |
Inventory and Purchasing
| Filter | Description |
| Active Status | Show only Active or Inactive Products. |
| Aggregate Qty Range | Show only products within a custom Available Qty range. |
| Back Order | Show only products within a custom Backorder quantity range. |
| Below Inventory Low Level | Show only products that are or are not below the Inventory Low Level. |
| Bin Ids | Show only products stored in specific Bin IDs. |
| Default Vendors | Show only products under one or more Default Vendors. |
| Disconnected From Channel | Filter products that are Disconnected from a channel. |
| Discontinued | Filter products to include or exclude Discontinued items. |
| FBA Shipment ID | Show only products that are in specific FBA Shipments. |
| Has Location Notes | Show only products with or without location notes. |
| Location Notes | Show only products that contain or don’t contain specific location notes. |
| Manual Reserves | Show only products with or without Manual Reserves. |
| On Order | Show only products that are or are not on order. |
| Physical Qty Range | Show only products within a custom Physical Inventory quantity range. |
| Picklist ID | Show only products that are on a specific Picklist. |
| PO IDs | Filter products by specific Purchase Order (PO) IDs. |
| Purchasers | Show only products bought by one or more purchasers. |
| Reserved Qty Range | Show only products within a custom Reserved inventory quantity range. |
| Vendors | Show only products sold by one or more Vendors. |
| Warehouses | Show only products in one or more Warehouses. Check the Consider Shadow & Parent Inventory box to get results based on the overall quantity of all related Shadows. |
Product Relationships
| Filter | Description |
| Include Related Kits | Filter products to include or exclude related Kits. |
| Include Related Shadows | Filter products to include or exclude related Shadows. |
| Kit | Show or exclude products based on whether they are or are not a Kit Parent or Kit Component. |
| Kit Type | Show only specific kit types – Independent, Main Component, or All Components. |
| Shadows | Show or exclude products based on whether they are or are not a Shadow or Shadow Parent. |
| Variations | Show or exclude products based on whether they are or are not a Variation Parent or Child. |
Cost and Pricing
| Filter | Description |
| Average Cost | Show only products whose Average Cost is within a specific range. |
| Last Cost | Show only products whose Last Cost is within a specific range. |
| Site Cost | Show only products whose Site Cost is within a specific range. |
| Site Price | Show only products whose Site Price is within a specific range. |
| MAP Price | Show only products whose MAP Price is within a specific range. |
| Rebate | Show only products with or without a Rebate. |
Channel-Specific Filters
This page also includes many channel-specific filters, most of which allow you to check which products are enabled or disabled for particular channels. Some of these filters can even show you additional details, such as whether a product is ready for posting or not, whether it has already been posted or not, and more.
| Filter | Description |
| Amazon Statuses | Filter products by Amazon status. |
| eBay Category | Filter products by eBay category. |
| eBay Item ID | Filter products by eBay Item ID. |
| eBay Statuses | Filter products by Amazon status. |
| eBay Store Category | Filter products by eBay Store category. |
| eBay Top Title | Filter products by eBay top title. |
| Lightspeed POS Status | Filter products by Lightspeed POS status. |
| Lightspeed POS ItemID | Filter products by Lightspeed POS ItemID. |
| NewEgg.com Business Status | Filter products by NewEgg.com Business status. |
| NewEgg.com Item# | Filter products by Newegg.com Item ID. |
| NewEgg.com Statuses | Filter products by Newegg.com statuses. |
| Walmart Marketplace ID | Filter products by Walmart Marketplace ID. |
| Walmart Marketplace Statuses | Filter products by Walmart Marketplace statuses. |
| Website Categories | Filter products by website categories. |
| Website Product IDs | Filter products by website product IDs. |
| Website Statuses | Filter products by website statuses. |
Column Descriptions
Refer to the lists below for all data columns and their descriptions. You can show or hide these columns by clicking the three dots in the top right and selecting Customize Columns. You can also sort your results based on these columns with the Sort by menu.
Basic Information
| Data Column | Description |
| Active Status | The product’s status, either Active or Inactive. |
| Product Name | The name of the product. |
| Channels | The various sales channels or platforms the product is enabled for. |
| Company | The name of the Company associated with the product. |
| Product Type | The Product Type for categorization. |
| Image | Shows a thumbnail of the primary Product Image that expands when you hover over it. |
| Condition | The Product Condition. |
| Created On | The date when the product was created. |
| Fulfilled By | The Fulfilled By Status that shows who fulfills the product – the merchant or Amazon. |
| Priority | A priority from 0 to 10 that indicates the product’s importance. |
| Rating | A rating from 0 to 10 associated with the product’s quality or performance. |
| Shadow Of | Indicates if the product is a Kit, Matrix, or Shadow. |
| Is Matrix | Shows the parent product when the product is part of a Matrix. |
| Description Template | Shows the product’s selected Description Template. |
| Amazon Condition | The product’s Amazon Condition. |
| Amazon Sales Rank | The product’s ranking within Amazon’s sales categories. |
| eBay Category | The product’s categorization within eBay’s classification system. |
| eBay Condition | The product’s eBay Condition. |
| eBay Store Category | The specific category within an eBay store where the product is placed. |
Identifiers
| Data Column | Description |
| Product ID | Sellercloud’s unique Stock Keeping Unit (SKU) assigned to the product. |
| UPC | The Universal Product Code (UPC), a barcode used for product identification. |
| ASIN | The Amazon Standard Identification Number (ASIN), a unique identifier for products on Amazon. |
| Amazon Merchant SKU | The product’s SKU on Amazon. |
| FNSKU | The Fulfillment Network SKU (FNSKU), a unique identifier for Amazon FBA products. |
| Manufacturer SKU | The SKU assigned by the manufacturer. |
| Vendor SKU | The SKU used by the Vendor. |
| Wayfair Merchant SKU | The product’s SKU on Wayfair. |
| Website Merchant SKU | The product’s SKU on a Sellercloud-integrated website. |
| ChildProductID | The SKU of a child product within the Kit. When there are multiple child SKUs, all of them will be listed. |
Inventory and Purchasing
| Data Column | Description |
| Qty Avail. | The quantity of the product currently available for purchase. |
| Aggregated Qty | The total available and reserved quantity of the product. |
| Physical Qty | The total inventory of a product across all warehouses. |
| Reserved Qty | The inventory reserved by open orders or manually reserved for channels. |
| Per Kit Qty | The quantity of the product included in each Kit. |
| Back Order | Indicates whether the product is on Backorder or not. |
| Location Notes | Notes or information about the product’s physical storage location. |
| Purchaser | The user email of the person responsible for product procurement. |
| Vendor | The Vendor providing the product. |
| Warehouse | The storage facility or location where the product is stored. |
| Qty Sold (15, 30, 60, 90, 180, 365) | The quantity of the product sold over specific time periods, such as 15, 30, 60, 90, 180, and 365 days. |
Cost and Pricing
| Data Column | Description |
| Average Cost | The Average Cost associated with purchasing the product over time. |
| Last Cost | The most recent amount you paid to buy the product. |
| Site Cost | The product’s cost, either on the last PO when it is received or based on the Average Cost. See Product Costs for more information. |
| Site Price | The default product price for all channels. |
| Amazon Price | The price of the product when listed on Amazon. |
| Buy It Now Price | The fixed price for immediate purchase on eBay. |
| Fixed Price Qty | The quantity available for immediate purchase at the fixed price. |
| MAP Price | The Minimum Advertised Price (MAP) set for the product. |
| Wholesale Price | The price at which the product is available for wholesale purchase. |
| Active Rebate | Shows if there is an active rebate associated with the product. |
| Website Price | Displays the current Website Price. |
Action Descriptions
Refer to the lists below for all actions and their descriptions.
General Product Management
| Action | Description |
| Add New Product | Adds a new product to the catalog. |
| Delete | Removes the product from the catalog. |
| Change Product SKU | Updates the product’s Stock Keeping Unit (SKU). |
| Clone SKU | Creates an exact Clone of the product with a new SKU. |
| Copy Product Data to Other SKU(s) | Copies product information to one or more other products. |
| Add Products To Group | Associates products with a specific Product Group. |
| Remove Products From Group | Disassociates products from a specific Product Group. |
| Load Product Defaults | Updates the selected products with defaults configured on the Company Settings > Defaults page. |
| Load Product Type Defaults | Updates the selected products with default settings and information configured a specific Product Type. |
| Resize Product Images | Adjusts the size or dimensions of the main Product Image. |
| Export Products (Catalog) | Allows you to use different methods to export specific product information in various formats. |
| Export Product Notes | Exports the product’s ITF-14 Barcodes to an Excel spreadsheet. |
| Export Sell Through | Exports an Excel spreadsheet with the product’s currently Available Qty and the Qty Sold for the last 7, 30, 60, 90, 120, 180, and 365 days. |
| Bulk Edit | Opens a modal that allows you to change certain product details for multiple SKUs at once. The modal displays the selected products, with an indication if any of them are Shadows. If any of the Fields to Edit are set as Shadow-Persistent, they will have an icon and tooltip to reflect this. If you edit a shadow-persistent field for a Shadow Parent, all related children will also be updated. Some of the available fields are Channel-specific categories, Default Vendor, Replenishable status, and Brand. |
Status and Data Manipulation
| Action | Description |
| Adjust Priority | Changes the priority level assigned to the product. |
| Adjust Rating | Changes the rating given to the product. |
| Set As Active | Activates the product within Sellercloud and, if set up, sends inventory to channels. |
| Set As Inactive | Deactivates the product within Sellercloud and sends 0 inventory to channels. |
| Set As Discontinued | Marks the product as discontinued and unavailable for purchase from vendors. |
| Set As Not Discontinued | Reverses the discontinued status of the product. |
| Convert Currencies | Converts existing product costs and prices to a different Currency. |
| Export ITF-14 Barcodes | Exports the ITF-14 Barcodes associated with the product to a PDF file. |
| Export ITF-14 Barcodes (Excel) | Exports ITF-14 Barcodes in Excel format. |
| Generate Predicted Purchase Data | Generates Predictive Purchasing data for the product. |
| Get Info From NewEgg.com | Retrieves product information from NewEgg.com based on the selected products’ UPC (or Manufacturer Name / Manufacturer SKU if there’s no UPC) and exports it to an Excel spreadsheet. |
| Get ASIN From UPC | Obtains Amazon Standard Identification Numbers (ASINs) based on the product’s Universal Product Codes (UPCs) in Sellercloud and Amazon. |
| Find ASIN | Searches and identifies Amazon Standard Identification Numbers (ASINs) for products. |
Product Relationships Management
| Action | Description |
| Create Shadows | Generates Shadow Products. |
| Unshadow From Parent | Separates a shadow product from its parent. |
| Break Kit/Unkit | Dissolves a Kit Product into separate products. |
| Disassemble Variations | Breaks down Product Variations into individual items. |
| Add to Kit | Assembles multiple products into a kit product. |
Order Management
| Action | Description |
| Add to Order | Starts creating a new order with the selected products in it. |
| View Orders | Accesses and displays existing orders with the selected products. |
| Print Labels | Generates and prints Product Labels. |
| Add to PO | Starts creating a new purchase order with the selected products in it. |
| Add to PO (With PO FBA Planning) | Incorporates the product into an existing or new purchase order along with an FBA Shipment. |
General Channel Management
| Action | Description |
| Launch on Channel | Initiates product listings on the selected sales channel. |
| Enable/Disable For Channel | Enables or disables a channel integration for the selected products. |
| Update Inventory on Channel | Adjusts the product’s stock levels on a channel based on the inventory available in Sellercloud. |
| Update Prices on Channel | Updates the product’s prices on a channel based on the prices set in Sellercloud. |
| Connect To Inventory | Links the product to the available inventory, allowing Sellercloud to send inventory updates to a channel. |
| Disconnect From Inventory | Disassociates the product’s connected inventory from a channel. |
| Disconnect From Price Update | It allows you to stop all pricing updates for selected products on Amazon, eBay, or Walmart Marketplace. |
| Update Images On Channel | Updates Product Images on the channel based on the images set in Sellercloud. |
| Export Channel Info | Exports channel-specific product information. |
| Restrict/Unrestrict For Channel | Imposes or removes Channel Product Restrictions. |
| End Listing On Channel | Removes the selected products’ listings from a channel. |
| Export Channel Missing Information | Exports an Excel spreadsheet file with data related to required and missing information on the channel. |
| Export Channel Category Suggestions | Export an Excel spreadsheet file with channel category suggestions. |
| Edit Prices | Opens the Price Manager pop-up modal, where you can edit and revise channel-specific prices. |
Amazon
| Action | Description |
| Get Info From ASIN | Retrieves information from Amazon listings based on ASIN and updates the selected Sellercloud products. See Get Info From Amazon for more information. |
| Get My Price From Amazon | Obtains the product’s price information from Amazon. |
| Update Shipping Template on Amazon | Updates the products’ Amazon Shipping Template. |
| Update Dimensions/Weight on Amazon | Updates product dimensions and weight on Amazon. |
| Switch to AFN (Don’t update Amazon) | Sets the product as Fulfilled by Amazon without updating Amazon. |
| Switch to AFN (Update Amazon) | Sets the product as Fulfilled by Amazon and updates Amazon accordingly. |
| Switch to MFN (Don’t update Amazon) | Sets the product as Fulfilled by Merchant without updating Amazon. |
| Switch to MFN (Update Amazon) | Sets the product as Fulfilled by Merchant and updates Amazon accordingly. |
| Generate Predicted Purchase Data (FBA) | Generates Predictive Restocking data for FBA products. |
| Remove Business Prices on Amazon | Submits a feed to Amazon to remove the Business price from Amazon. |
| Get Amazon BuyBox Prices | Retrieves prices associated with the BuyBox from Amazon listings based on ASIN. See Get Amazon Buy Box Price for more information. |
| Find Amazon Sales Rank | Identifies the product’s ranking within Amazon’s sales categories. |
| Add to FBA Inbound Shipment | Adds the product to an FBA Shipment to an Amazon Fulfillment Center. |
eBay
| Action | Description |
| Get Info From eBay | Imports product information from eBay. See Get Product Info From Ebay for more information. |
| Revise on eBay | Pushes any changes to Sellercloud products to their listings on eBay. |
| Relist on eBay | Re-lists products on eBay for sale. |
Walmart Marketplace
| Action | Description |
| Get Info From Walmart | Imports product information from Walmart. See Get Product Info From Walmart for more information. |
| Walmart Marketplace Competitive Pricing Optin | Opts products in to Walmart Marketplace’s Competitive Pricing program. |
| Walmart Marketplace Competitive Pricing Optout | Opts products out of Walmart Marketplace’s competitive pricing program. |
| Walmart Marketplace Connect to Price Update | Allows Sellercloud to start sending price updates to Walmart Marketplace. |
| Walmart Marketplace Disconnect to Price Update | Stops Sellercloud from sending price updates to Walmart Marketplace. |
| Associate Predefined Shipping Templates on Walmart Marketplace | Links predefined Walmart Shipping Templates to the product on Walmart Marketplace. |
| Disassociate Predefined Shipping Templates on Walmart Marketplace | Removes the association of predefined Walmart shipping Templates from the product on Walmart Marketplace. |
| Launch on Walmart Marketplace using Setup By Match | Posts product listings on Walmart Marketplace using the Setup By Match method. |
| Bulk Convert Walmart V3 Attributes to V4 | Converts Walmart V3 Product Attributes to V4 format in bulk. |
| Bulk Fix Walmart V4 Attributes | Corrects Walmart V4 product attributes in bulk after any V3 to V4 conversion issues. |
| Enable for WFS | Enables the product for Walmart Fulfillment Services (WFS). |
| Add to WFS Shipment | Adds the product to a WFS Shipment. |
| Generate Predicted Purchase Data (WFS) | Generates Predictive Restocking data for WFS products. |
| Assign Item To Repricer Strategy | Enables Repricing for the selected SKUs on Walmart Marketplace. |
| Unassign Item To Repricer Strategy | Disables Repricing for the selected SKUs on Walmart Marketplace. |
Other Channels
| Action | Description |
| Get Overstock SKU and Option SKU | Retrieves the Overstock SKU and Option SKU information associated with the product from Overstock. |
| Get Lightspeed POS Item IDs | Obtains the Lightspeed POS Item ID for the product from Lightspeed. |
| Update Listing Part on Website | Update a specific part of the selected product’s website listing, such as Categories, Description, Images Only, Inventory Cost, Metadata, Titles, or Variation Images. |
| Update Meta Fields on Shopify (Including Matrix Child) | Updates all meta fields on Shopify, including those for matrix child products. |
| Enroll Product in Returns Program For Wish | Enrolls the product in the Wish Returns Program. |
| Un-enroll Product in Returns Program For Wish | Removes the product from the Wish Returns Program. |
Related Client Settings
The following Client Settings control elements of the Manage Catalog page:
- Show Catalog Images In Manage Inventory – when enabled, your Catalog Product Images will be displayed as the product thumbnail on the Manage Inventory page.
- Show Large Product Images On Manage Catalog – when you enable this setting, the thumbnail image on the Manage Catalog page will become bigger. However, this will also decrease the number of products displayed without scrolling down.