Overview
Before you can start Dropshipping from Sellercloud, you must ensure that all settings are configured correctly for your account. Setting up your warehouses, products, vendor communication, and preferences is essential for your initial dropship configuration. You can also apply other additional settings to customize your dropship workflow.
To learn how to set up and automate your dropshipping operations in Sellercloud, simply follow the sections outlined below:
- Warehouse Management: Set up and manage dropship warehouses to track vendor inventory.
- Product Settings: Configure dropshipping preferences for individual products or in bulk, ensuring correct order processing.
- Vendor Preferences: Customize vendor settings, such as email communication templates, shipping methods, and dropshipping fees.
- Email Communication: Set up and automate email notifications to vendors using email templates and scheduled tasks, ensuring timely communication.
- Shipbridge Settings: Control importing dropship orders into Shipbridge.
- Workflow Personalization: Make Sellercloud fit your exact workflow by changing how dropshipping works with various Client Settings.
Automate Dropshipping
To enable the dropshipping process, go to Client Settings and enable Auto Create PO When Dropship Requested. Then, anytime you Dropship an Order, a related PO for the vendor will be created automatically.
Another way to automate the creation of dropship POs is with the Order Rule Engine. This method lets you create a PO for the vendor once specific conditions have been met for an order you want to dropship. To automate dropshipping with the Order Rule Engine, at the Add Actions step, set the Action Type to Create a Dropship PO. Then, next to Create A Dropship PO To A Vendor, select which vendor you want to dropship to – the product’s default vendor or a vendor you select here.
Warehouses
Warehouses in Sellercloud vary by Type. Setting a warehouse’s type to Dropship allows you to use it to track vendor inventory. You can set up as many dropship warehouses as required for your workflow.
Dropship Warehouses
To set up a warehouse for dropshipping:
- Go to Inventory > Warehouses > Manage Warehouses.
- Click a warehouse’s ID or Name.
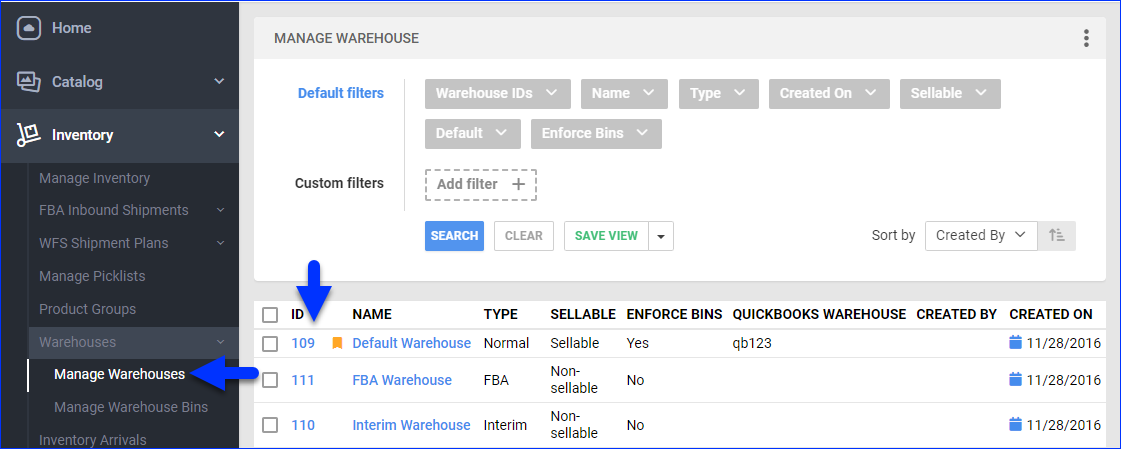
- Click Edit.
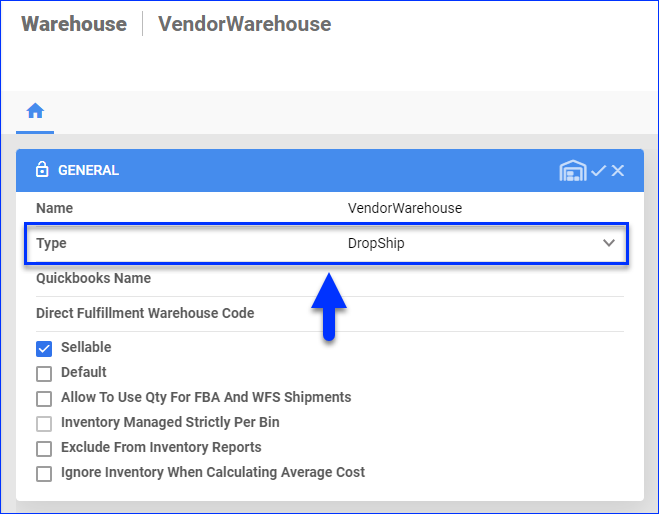
- Set the Type to DropShip.
- Click the checkmark icon to Save.
Default Dropship Warehouse
To select a default dropship warehouse per vendor:
- Go to Purchasing > Vendors > Manage Vendors.
- Click a vendor’s ID or Name.
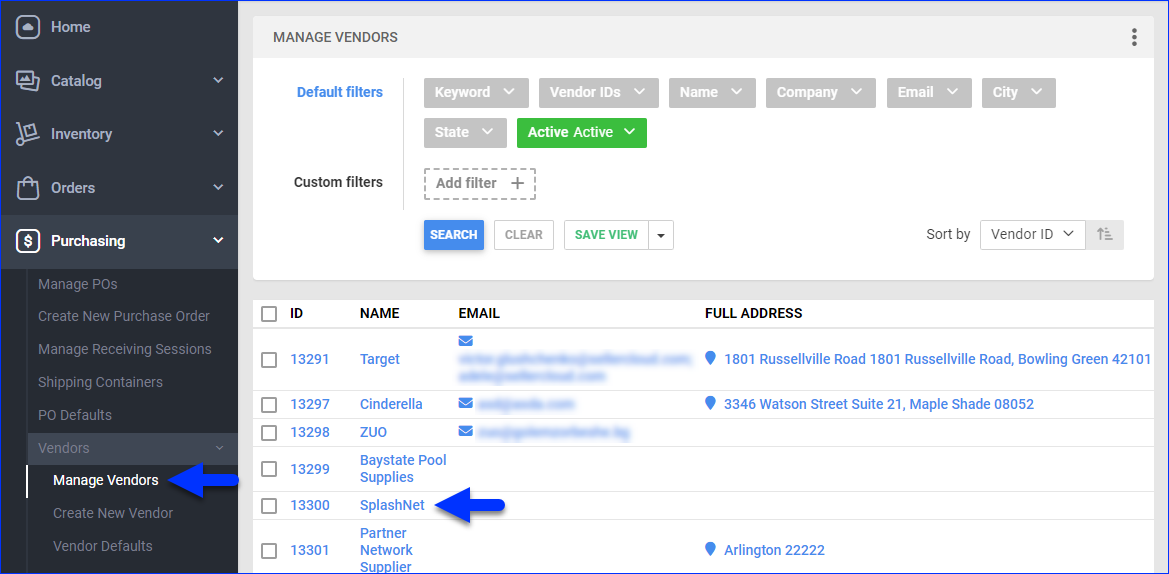
- Click Edit.
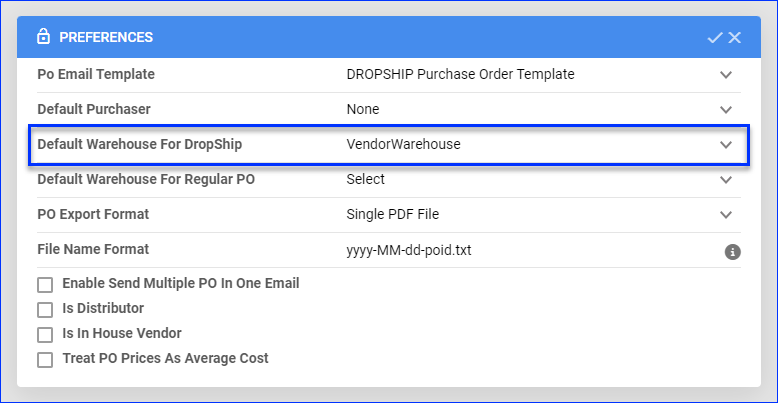
- In the Preferences panel, select the Default Warehouse For DropShip.
- Click Save.
Products
You can set up product preferences for dropshipping individually or in bulk. Based on the Auto Create PO When Dropship Requested Client Setting, any order for the same products will have its Dropship Status set to Pending and be linked to a dropship PO to the product’s Default Vendor or Manufacturer.
Individually
To enable a single product for dropshipping:
- Go to the Product Details Page.
- Click Toolbox and select Shipping Preferences.
- Click Edit.
- Set the DropShip Mode to Ship From Vendor or Ship From Manufacturer.
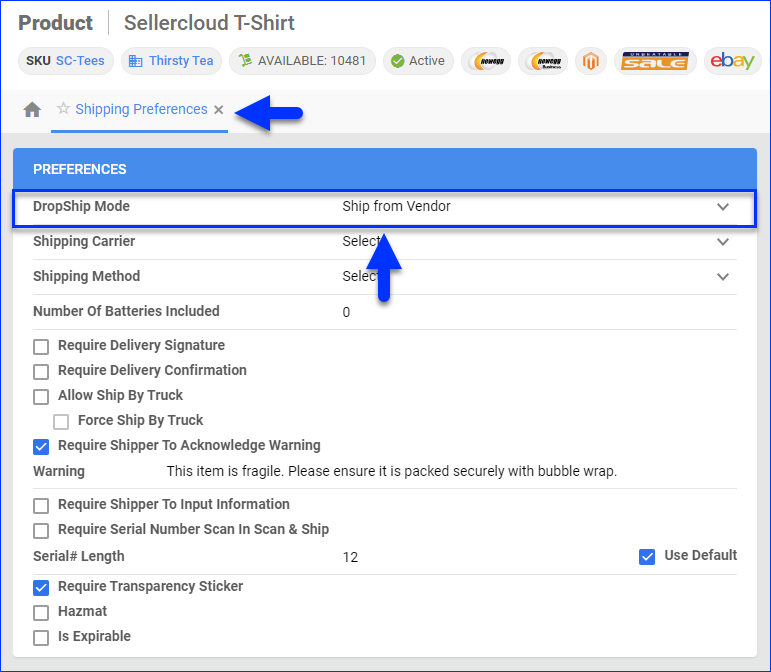
- Click Save.
In Bulk
To enable multiple products for dropshipping:
- Follow the steps to Bulk Update Products.
- Add the DropShipMode column header to your template.
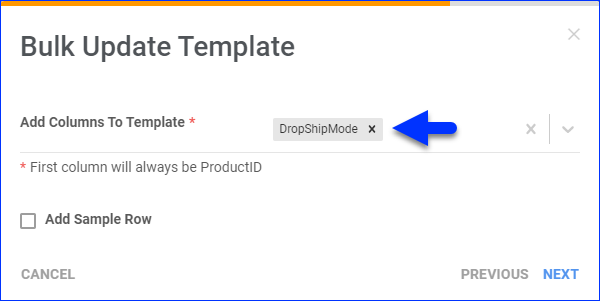
- In the DropShipMode column, enter:
- 1 – If you don’t want to dropship the product.
- 2 – To set the product to ship from a vendor.
- 3 – To set the product to ship from a manufacturer.
Vendor Communication
In Sellercloud, you can link each vendor to an email template and use the templates when you email purchase order information. You can email purchase orders to vendors manually or automatically.
Create an Email Template
You must create an email template to send dropship requests to your vendor.
To create a dropship email template:
- Go to Settings.
- Select Email > Email Templates.
- Click the blue Actions icon at the bottom right and select Add.

- In the Template Details panel:
- Enter a Template Name.
- Select the SMTP Profile to send from.
- Complete all email fields.
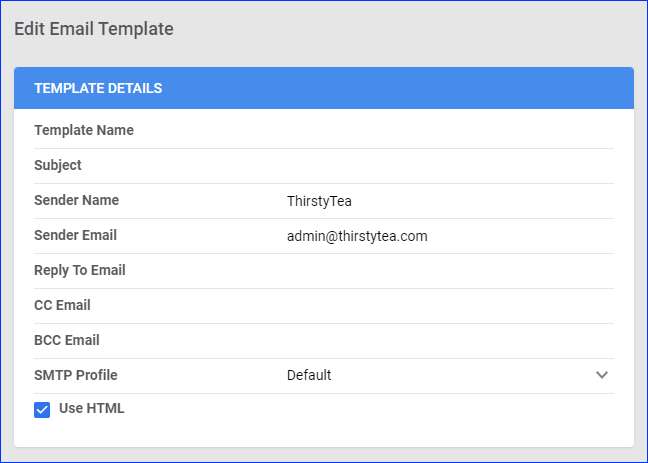
- Enter your message in the email body text field to the right.
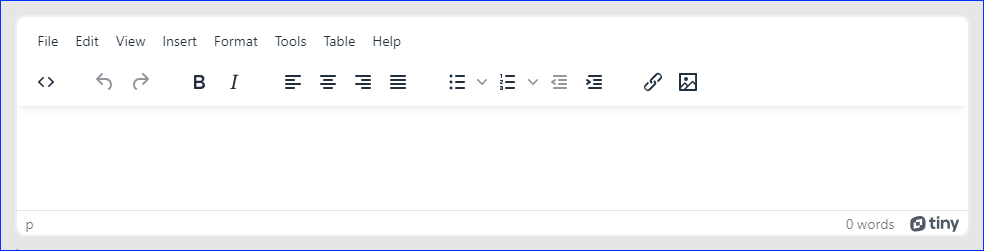
- To insert dynamic data, add Email Placeholders from the Placeholders panel. The placeholders will pull the corresponding information from the order you are requesting to dropship.

- To insert dynamic data, add Email Placeholders from the Placeholders panel. The placeholders will pull the corresponding information from the order you are requesting to dropship.
- Click Save Template.
Assign Template to Vendor
To link the email template to the vendor:
- Go to Purchasing > Vendors > Manage Vendors.
- Click a vendor’s ID or Name.

- Click Edit.
- In the Preferences panel, choose the template from the PO Email Template menu.
- Select a PO Export Format.
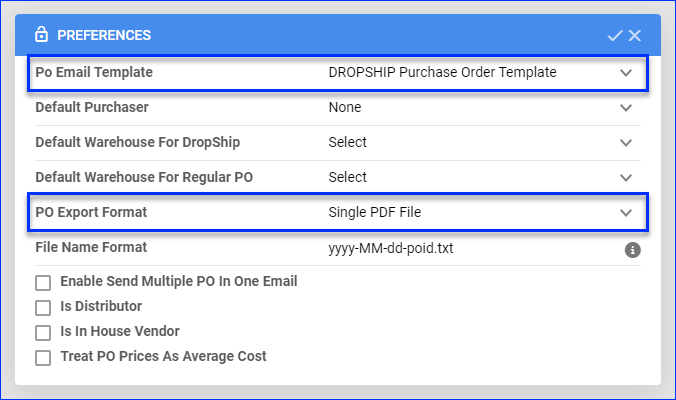
- Click Save.
Now, anytime you email a PO to this vendor, you will use the assigned email template.
Automate Email Notifications
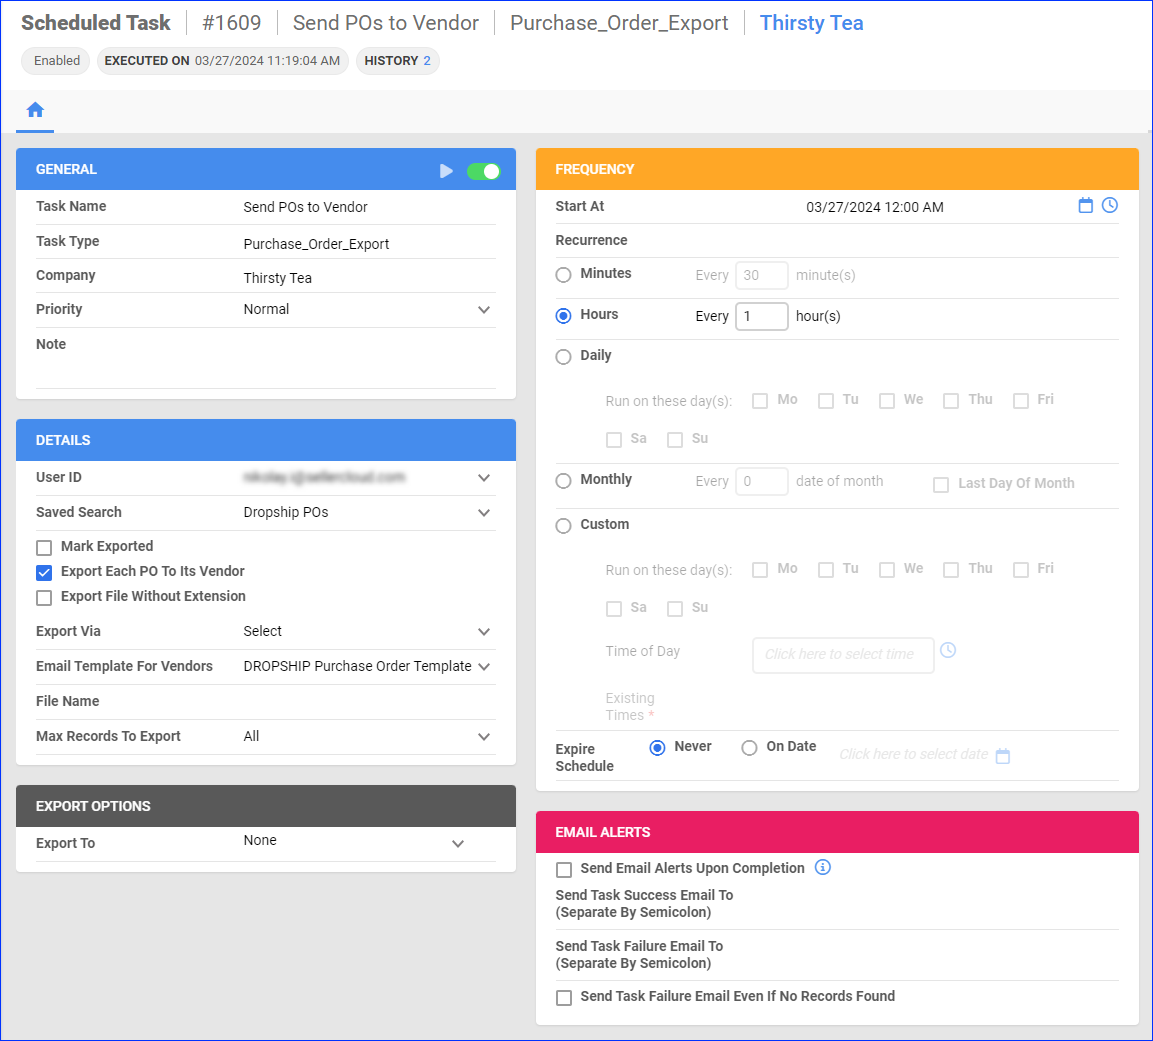
You can send POs to vendors automatically by setting up a Scheduled Task. The task will run on a regular basis and email each PO to its corresponding vendor based on an email template.
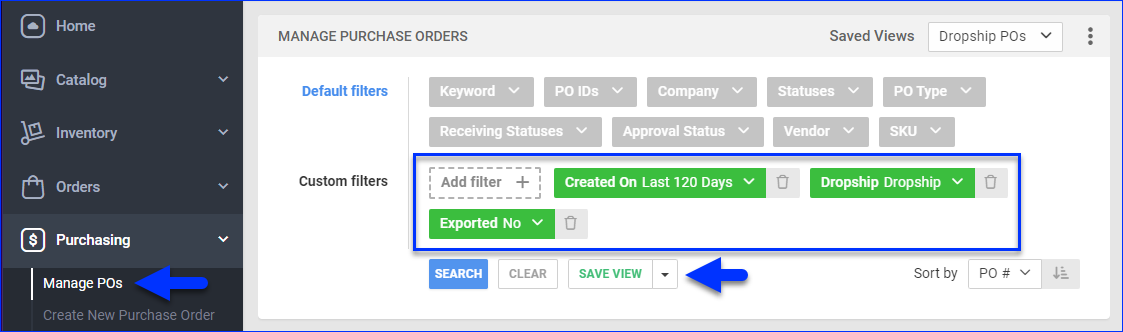
First, you must create a Saved Search for POs to target your dropship POs:
- Dropship – Dropship
- Exported – Not exported
To automate email sending:
- Go to Settings.
- Select Scheduled Tasks > Manage Scheduled Tasks.
- Click the green + icon: Create New Scheduled Task.
- Complete as follows:
- Click Task Type and select Purchase Order Export.
- Set the Task Name.
- Select the Company.
- Select the Start Time.
- Click CREATE.
- The following message appears at the bottom of your screen: “Scheduled task created successfully. Click Here to configure the task details.” – click the link.
- Click the Edit button on the top right.
- In the Details section:
- Click the User ID menu and select your account ID.
- Click the Saved Search menu and select the saved search you created to target POs.
- Check Mark Exported to mark orders as exported once the scheduled task is completed.
- Check Export Each PO To Its Vendor to email each PO’s corresponding vendor based on the vendor’s Assigned Template.
- Select an Email Template For Vendors to set a default template for vendors without an assigned template.
- If you have a plugin for this, select it from the Export Via menu.
- You can get the task to send an additional email with the Export Options. Set Export To to Email and then configure the fields below. Alternatively, you can export the POs to an FTP.
- In the Frequency section, specify the task frequency.
- In the General section, click the Enable toggle button.
- Click Save on the top right.
Vendor Preferences
You can configure dropshipping preferences per vendor:
- Go to Purchasing > Vendors > Manage Vendors.
- Click a vendor’s ID or Name.
- Click Toolbox and select Dropship Preferences.
- Click Edit and update these settings:
- DropShip Email Template – Select an Email Template to apply when sending POs to the vendor.
- Order # Prefix – Enter a prefix to be added to each Vendor dropship order number.
- Shipping Method – Select the default shipping method for orders you dropship to the vendor.
- Shipping Method (Rush) – Select the default shipping method for Rush Orders.
- DropShip Fee – If applicable, enter the dropshipping charge imposed by the vendor.
You can override the fee per order by enabling the Client Setting Enable override PO dropship fee. - General Shipping Instructions – Enter universal shipping instructions.
- Do Not Count Inventory For DropShip PO – Check to exclude the addition and deduction amounts associated with direct dropshipping from your products’ available inventory in Sellercloud.
- Enable Reminder Emails For Dropship Orders – Check to enable the use of dropshipping reminder emails and define:
- Reminder email template – Choose an email template from the dropdown menu.
- Send reminder in Days – Enter a set amount of days after which the reminder will be sent.
- Send Export PO Via FTP – Check for vendors that can receive POs via FTP and enter their FTP details below.
Shipbridge Preferences
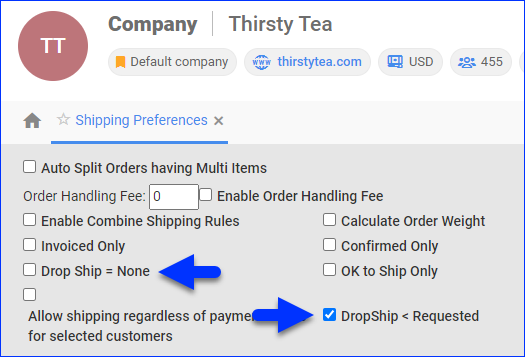
To control if dropship orders are imported Shipbridge:
- Go to Company Settings.
- Click Toolbox and select Shipping Preferences.
- On the newly opened page, check:
- Drop Ship = None to only allow orders with a Dropship Status of None to go into Shipbridge. Orders that are Pending or greater will not import into Shipbridge.
- DropShip < Requested to prevent orders with a dropship status of Requested from going into Shipbridge; however, orders with a dropship status of Pending and None will be imported.
Related Client Settings
The Client Settings listed and described below affect your dropship workflow.
Automatic Actions
- Auto Create PO When Dropship Requested – This will create a purchase order for the vendor upon requesting a dropship. Note that it will not email the PO to the vendor. Enabling this setting ensures that when a dropship request is received, a corresponding purchase order is automatically created to facilitate the ordering process with the supplier and ensure timely delivery to the customer.
- Update Cost On Order From Dropshipped PO – Automatically synchronize order costs such as shipping costs, taxes, extra totals, and more on dropship POs with order costs on their associated orders. Enable this option to allow changing dropshipped order costs by vendor prices in the related POs.
- Mark Dropship PO As Received Only When Dropship Acknowledged – Automatically mark the associated dropship PO as received once the vendor acknowledges your dropship request and the order’s Dropship Status is set to Acknowledged or Processed.
- Auto update PO when Product ID in Order Changed – Automatically update dropship POs according to updates on a related order items. For example, if the product quantity on the order increases from 1 to 2, this will also be reflected on its associated PO.
- Delete Related PO When Order Dropship Set To None – Automatically delete the Related PO when you change the Dropship Status of an order from any other status to None.
The Allow Editing Dropship Status On Order Details Statuses client setting should also be enabled to for you to be able to update the Dropship Status manually.
- Mark Order As Pending DropShip Only If Inventory Not Available – This setting helps you dropship only when you do not have an item in stock. If an order has a Related PO, when an order item does not have inventory in any vendor warehouse, the order’s Dropship Status will automatically be set to Pending.
- Only Receive Dropship PO When Order Is Fully Shipped – When an order is marked as Fully Shipped, automatically mark the related dropship PO as Received.
- Mark Dropship Pending When Linking To PO – Automatically change orders’ Dropship Status to Pending when you Link to a PO.
Manual Control and Customization
- Allow To Ignore Inventory in Purchase Order – Enable the action Disable Inventory Count in the Actions on the Manage POs page. After using this action, you will be able to receive dropship POs without actually updating the inventory on the SKUs.
- Allow Editing Dropship Status On Order Details Statuses – Enable the ability to edit the Dropship Status on the Order Details Page. With this setting disabled, you can only edit the Dropship Status through the Actions menu on the Manage Orders Page or through a related PO.
- Allow To Cancel Order With Dropship Status – Enable canceling orders with the Cancel/Issue Refund action regardless of their Dropship Status. If this setting is disabled and the Dropship Status of an order is different from None, you will get the error message “Order has DropShip status X. Can’t cancel this order!”
- Enable Dropship Fee – Allows you to configure a default shipping fee for all dropship orders in your Vendor Preferences. Once an order is dropshipped to a vendor, the Dropship Fee field will appear on the the Related PO and be populated with the value configured for that vendor.
- Stop Setting DropShip Status While Creating Orders – Disable the default automatic assignment of a Dropship Status to new orders. The setting is useful for custom workflows relying on plugins, where it’s possible to determine the dropship status based on certain conditions like location or channel.
Default and Configuration Settings
- Default Company for Dropship PO – Choose the default company for dropship POs.
- Do Not Copy Instructions To PO When Dropship Order – By default, if the shipping method (Default or Rush) is selected for an order, it will also be copied over to the dropship PO. When not selected, the order’s shipping method will be copied over to the PO’s Shipping Instructions. This setting disables the copying over to the PO’s Shipping Instructions.
- Send Product Master SKU to Webgistic Orders DropShip Request – When you use the Ship via Webgistix action from the Actions menu on the Order Details Page or on the Manage Orders Page, the Master SKU field on the Product Details Page will be sent in the ship request to Webgistix instead of the main SKU.
- Dropship Enter Tracking Default Ship Date To 2 Days Maximum Of Order Date – Calculate the default Ship Date for dropship orders by adding 2 days to the Time of Order, which is the order creation time on the integrated channel. If the resulting date exceeds the current date, the current date is used.
If the client setting EnableWarehouseBins is enabled and the warehouse is Bin-Enabled, the default Ship Date will always be set to the current date, regardless of the Time of Order.
Inventory Management
- Don’t Consider Dropship WH Qty As Available Qty For BackOrder Calculation – If this subsetting is enabled, product quantities in dropship warehouses will be excluded from Backorder calculations. The option can help when you import vendor inventory to a dropship warehouse and you do not want that quantity to be treated as available. This setting is enabled by default.
- Do Not Mark Drop Ship PO As Received When Order Shipped – By default, dropship POs are marked as Received when a related order is shipped by the supplier. If the setting is enabled, the PO’s status won’t change, and you need to manually trigger the receiving using the Actions on the PO.
Overview
Dropshipping is when a seller transfers a customer’s order and shipment details to a manufacturer rather than stocking their own goods. This takes away the need for picking, packing, shipping, and maintaining your inventory. This article explains how to configure your dropshipping.
Here’s how to enable and configure dropshipping:
- Settings > Client Settings > Auto create PO when dropship requested. This will create a purchase order for the vendor upon requesting a dropship; this will not send the PO to the vendor.
- Settings > Company Settings > Toolbox > Shipping.
- Enable DropShip < Requested and Drop Ship = None. These options will prevent all dropship orders from being imported into Shipbridge.
You must create a template to communicate dropship requests to a vendor.
- Settings > Company Settings > Toolbox > Email Settings > Email Templates > Add New Template.
- Complete the email headings and enter your message in the email body. For titles that will change based on customer product, order, etc., choose the appropriate placeholders. The placeholders will pull the corresponding info from the order you are requesting a dropship.
- Save Template.
- To link the email template with the vendor, Company Settings > Company > Toolbox > Vendors.
- Click a vendor to establish a dropship and select Dropship Preferences.
- Choose the template from the Dropship Email Template drop-down.
- Select a PO Export Format.
- You can enter a dropship fee to be added to the purchase order.
- Save Settings.
If applicable, you can send purchase orders automatically to vendors by setting up a scheduled task with the task type PO Export.
Related Client Settings
The table below lists the Client Settings related to dropshipping. You can enable them from Settings > Client Settings > General Client Settings.
| CLIENT SETTINGS | DESCRIPTION |
| Allow To Enter Vendor Order ID When Dropshipping Order | Enables user to enter Vendor Order ID when dropshipping. |
| Enable Preship Confirm | To update the Order Source as Shipped without a tracking number. |
| Set Pre-ship Confirm | Enable Preship Confirm must be enabled. |
| Mark Order for PreShip Confirmed When DropShipped | Could be found in the Fulfillment tab. Automatically updates the Order Source without the tracking number. |
| Allow Editing Dropship Status On Order Details Statuses | Could be found in the Orders tab. Allows you to edit the dropship status from the Order Details page. |
| Enable Dropship Fee | Could be found in the Orders tab. Allows you to set dropship fees. |
| Mark Order As Pending DropShip Only If Inventory Not Available | Could be found in the Orders tab. Dropship only when you do not have the item in stock. |
| Allow To Cancel Order With Dropship Status. | Could be found in the Orders tab. Allows you to cancel orders with dropship status. |
| Default Company for Dropship PO: Select | Could be found in the Purchasing tab. |
| Update Cost On Order From Dropshipped PO | Could be found in the Purchasing tab. Allows you to update the order cost from the related PO. |
| Do Not Copy Instructions To PO When Dropship Order | Could be found in the Purchasing tab. |
| Default Company Dropdown To Current User Company | Could be found in the UI tab. |
| Mark SrcUpdatedForShipping Instead Of SrcUpdatedForPreShipping | To prevent the Order Source from being updated again when the tracking number is entered into Sellercloud. |
| Allow To Ignore Inventory in Purchase Order | Could be found in the Purchasing tab. Will not count inventory for Dropship POs. |
| Breakup kit components when creating dropship PO | Puts the kit components SKUs in the POs rather than the kit parent SKU. |
| Delete related PO when Order Dropship set to None | Deletes the related PO if the order dropship status is set to None. |
| Mark dropship PO as received only when dropship acknowledged | Marks the dropship PO as received when the dropship is Acknowledged. |
| Only receive dropship PO when order is fully shipped | Marks the dropship PO as received when the order is fully shipped. |
| Mark order as Do not count inventory when dropshipped via Vendor | Removes inventory reserves for dropship orders from the workflow. |