Overview
Sellercloud’s Employee Management tools provide an easy-to-use interface to manage and track employee information, access, and attendance. It is a secure way to store employee data, such as contact information, account details, log-in history, and more.
Some of the key tools are Employee Permissions and Roles, time and attendance, and change logs.
Create an Employee
Before you add a new employee, it is important to understand the different Employee Permissions and Roles, as well as the security settings you can choose. Employee permissions in Delta are not transferrable to Alpha unless you are a Client Admin. They are configured differently, so ensure you are familiar with them first.
To add a new employee, navigate to:
- Settings > Employees > Manage Employees.
- Click on the green + icon at the lower-right corner.
- Populate the fields.
- First Name
- Last Name
- Email — The email the user will use to log into Sellercloud and Sellercloud-related apps like Skustack and Shipbridge. The employee should have a valid email address because there is a 2FA verification.
- Password — Sets a first-time password that the user can change once they log in.
- Company — Sets the default company for the employee. When the employee creates a product, an order, or a PO, it will be set in the selected company.
- Security Template — If applicable, select a template from the drop-down menu.
- Send Welcome Email — Sends welcome email to the user.
- Click Add.
- An employee is created. You can view and manage your employee from the Employee Details page.
- To view your Employee Details page, navigate to Settings > Employees > Manage Employees > Search for your employee > Select your employee.

Employee Details
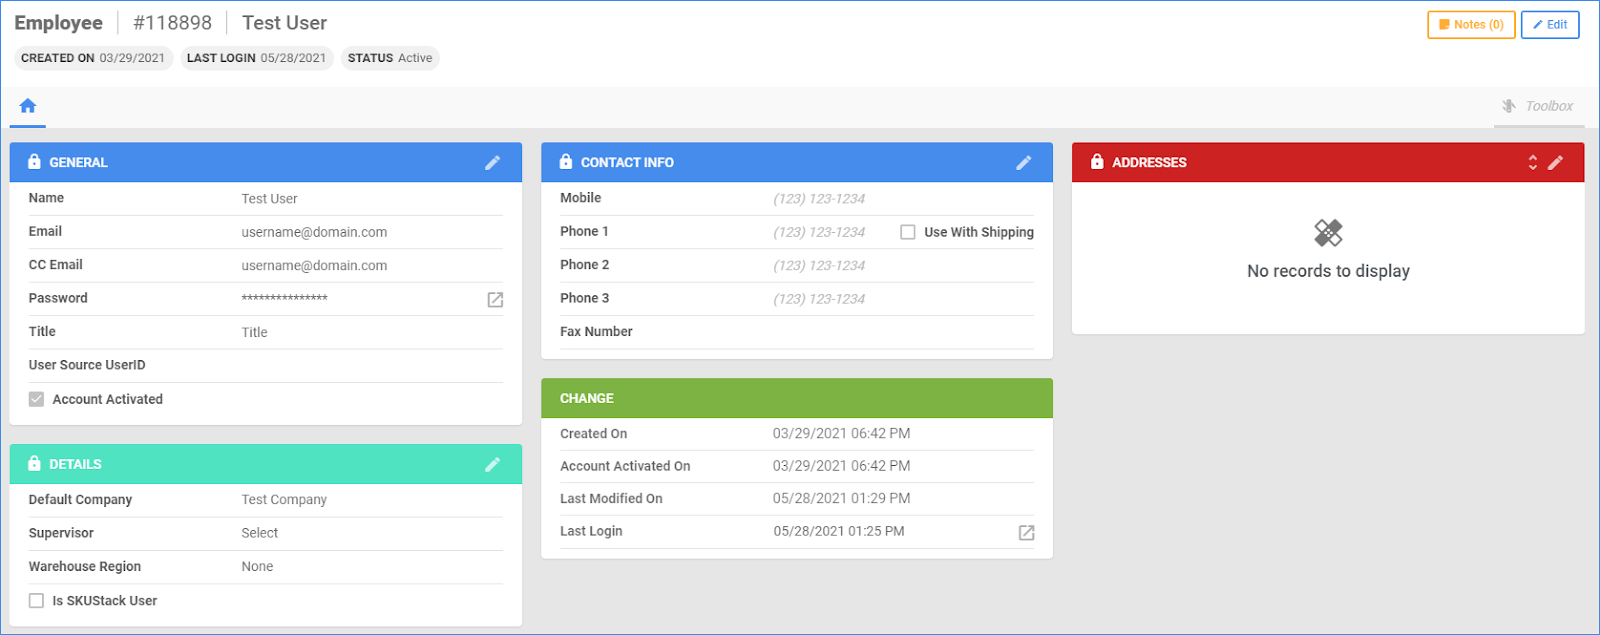
The Employee Details page displays basic information about each employee, such as their name, username, email address, job title, and access level. It also shows the date the employee was added to the system, their last login date, and their current status.
Additionally, you can Configure Buyers, set User Roles, create Employee Security Templates, and set IP filters for employee access. The page also allows you to set up employee permissions so you can control which areas of Sellercloud each employee has access to.
General Panel
| Field | Description |
| Name | Employee’s Name. |
| Employee’s Email Address. | |
| CC Email | Employee’s CC Email. |
| Password | Employee’s Password. |
| Title | Employee’s Job Title in Sellercloud. |
| User SourceID | Employee’s ID Number. |
| Account Activated | Indicates if the employee’s profile in Sellercloud is active. |
Details Panel
| Field | Description |
| Default Company | Employee’s default assigned company. |
| Supervisor | Employee’s direct manager, if applicable. |
| Warehouse Region | Employee’s assigned warehouse region, if applicable. |
| Is SKUStack User | Indicates if the employee is using Skustack, when applicable. |
| Sales Man | This is the email address of the Sales Representative for all incoming orders from the specific customer. |
| Sales Man Commission | Sales Representative’s commission percentage. |
Change Panel
| Field | Description |
| Created On | Date and Time when the Employee account was created. |
| Account Activated On | Date and Time when the Employee’s account was activated. |
| Last Modified On | Date and Time when the last changes were applied to the Employee’s account. |
| Last Login | Date and time of the Еmployee’s last login. |
| Device ID | Employee’s Device ID number. |
| Is Logged In | Indicates if the Employee is currently logged in. |
Contact Info and Addresses
Here, you can see Employee’s contact info, such as Name, Email Address, Password, Title, and Address. You can also edit the information in the different panels by clicking on the edit button in the upper-right corner of each panel.
Employee Toolbox
The Toolbox on the Employee’s Details page provides additional functionalities.
| Field | Description |
| Change Log | The Change Log shows all changes made to the Employee’s profile. Also, who initiated the edits and when. |
| Custom Columns | Contact Sellercloud Support to request Employee Custom Columns, if needed. |
| IP Filters | Displays IP-based filters. You can restrict access to specific IP locations for better security. You can also add IP Addresses by clicking on the + icon.
The Client Setting Enable IP Address Filter For Employee must be enabled. |
| Login History | Here you can see Employee’s log-in sessions. |
| Permissions | Here, you can configure Employee’s Permissions relating to which sections of Sellercloud they can access and what actions they can perform. |
| PO Limits | This page allows you to configure limitations on what Purchase Orders this employee can approve. For example, if you set a Max PO Total of 100, the user will receive an error if they try to approve a PO that has a grand total of over $100. The available options on the page are Max PO Total, Max Vendor Total, Max Qty Per Product, and Max Value in Stock.
Client Setting Enable Buyer Limits on Purchase Orders must be enabled. |
| REST API Logs | Shows All Rest API requests and responses. |
| Restricted Log-on Hours | You can set specific times of the day when the employee is allowed to log in and use Sellercloud.
Client Setting Enable Employees Login Hours Restriction must be enabled. |
Related Client Settings
- Enable IP Address Filter For Employee
- This setting allows you to configure a filter that requires incoming connections from employee logins to be from specific IP addresses.
- Hide Costs From Employees
- This setting allows you to hide cost information from employees, preventing them from seeing how much it costs to purchase the goods and services you are selling.
- Enable Employees Login Hours Restriction
- This setting allows you to set specific times of the day when the employee is allowed to log in and use Sellercloud.
- Enable Buyer Limits on Purchase Orders
- When enabled, the PO Limits toolbox page becomes available on the Employee Details page. There, you can set purchasing limitations for the employee.
- Hide Inactive Employees
- This setting allows you to hide employees who are no longer active in Sellercloud.
There are a few more client settings that are user-based:
- Force User To Enter Expected Delivery Date
- This setting requires users to enter an expected delivery date for each purchase order.
- Default Company Dropdown To Current User Company
- This client setting sets the default company selection in dropdown menus (for example, Order and Product search filters) to the company that the current user is associated with.
Overview
Sellercloud’s Employee Management tools provide an easy-to-use interface to manage and track employee information, access, and attendance. It is a secure way to store employee data, such as contact information, account details, log-in history, and more.
Some of the key tools are Employee Permissions and Roles, time and attendance, and change logs.
Create an Employee
Before you add a new employee, it is important to understand the different Employee Permissions and Roles, as well as the security settings you can choose.
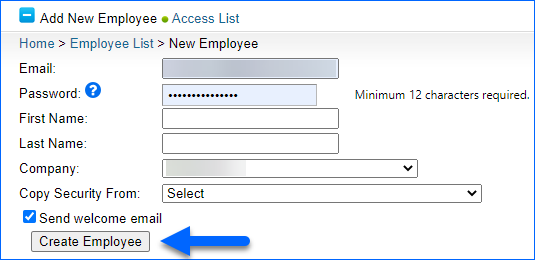
To add a new employee, navigate to:
- Employees > Add New Employee.
- Populate the fields.
- First Name
- Last Name
- Email — The email the user will use to log into Sellercloud and Sellercloud-related apps like Skustack and Shipbridge. The employee should have a valid email address because there is a 2FA verification.
- Password — Sets a first-time password that the user can change once they log in.
- Company — Sets the default company for the employee. When the employee creates a product, an order, or a PO, it will be set in the selected company.
- Copy Security From— This will copy the security settings from another employee under the selected company above.
- Send Welcome Email — Sends welcome email to the user.
- Click Create Employee.

- An employee is created. You can view and manage your employee from the Employee Details page.
- To view your Employee Details page, navigate to Employees > Search for your employee > Select your employee.
Employee Details
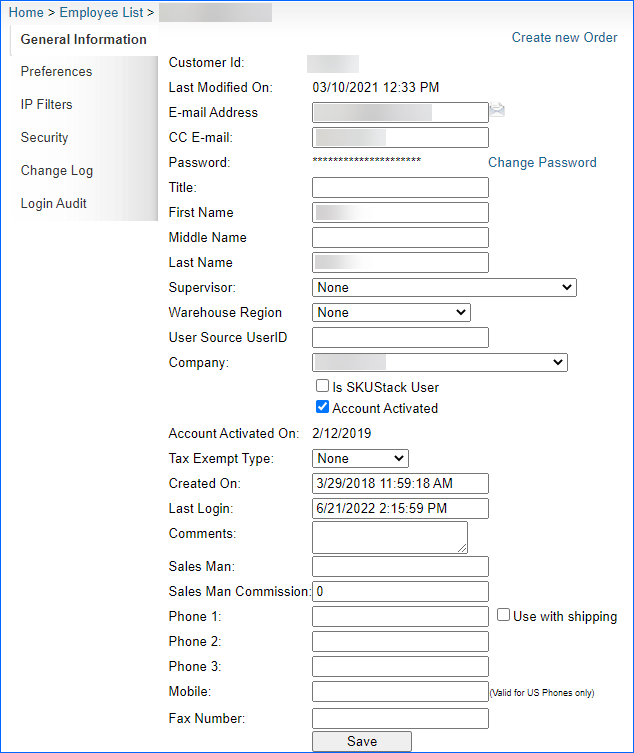
The Employee Details page displays basic information about each employee, such as their name, username, email address, job title, and access level. It also shows the date the employee was added to the system, their last login date, and their current status.
Additionally, you can Configure Buyers, set User Roles, create Employee Security Templates, and set IP filters for employee access. The page also allows you to set up employee permissions, so you can control which areas of Sellercloud each employee has access to.
General Information Page
| Field | Description |
| Customer ID | Unique Employee’s number. |
| Last Modified On | Date and Time when the last changes were applied to the Employee’s account. |
| Employee’s Email Address. | |
| CC Email | Employee’s CC Email. |
| Password | Employee’s Password. |
| Title | Employee’s Job Title in Sellercloud. |
| Name | Employee’s Name. |
| Supervisor | Employee’s direct manager, if applicable. |
| Warehouse Region | Employee’s assigned warehouse region, if applicable. |
| User SourceID | Employee’s ID Number. |
| Company | Employee’s default assigned company. |
| Is SKUStack User | Indicates if the employee is using Skustack, when applicable. |
| Account Activated | Indicates if the employee’s profile in Sellercloud is active. |
| Tax Exempt Type | Employee’s Tax-exempt status, if applicable. |
| Created On | Date and Time when the Employee account was created. |
| Last Login | Date and time of the Еmployee’s last login. |
| Comments | You can leave any related comments for the employee in the dedicated field. |
| Sales Man | This is the email address of the Sales Representative for all incoming orders from the specific customer. |
| Sales Man Commission | Sales Representative’s commission percentage. |
| Phone | Employee’s Phone Number. |
| Mobile | Employee’s Mobile Number. |
| Fax Number | Employee’s Fax Number. |
 Employee Toolbox
The Toolbox on the Employee’s Details page provides additional functionalities.
| Field | Description |
| Preferences | You can edit Employee’s Inventory View Mode, Homepage Type, Default Warehouse, and more. |
| IP Filters | Displays IP-based filters. You can restrict access to specific IP locations for better security. You can also add IP Addresses by clicking on the + icon.The Client Setting Enable IP Address Filter For Employee must be enabled. |
| Security | Here, you can edit Employee’s Permissions and Roles, Restricted Log-on hours, accesses, and more.
You can set specific times of the day when the employee is allowed to log in and use Sellercloud. Client Setting Enable Employees Login Hours Restriction must be enabled. |
| Change Log | The Change Log shows all changes made to the Employee’s profile. Also, who initiated the edits and when. |
| Login Audit | Here you can see Employee’s log-in sessions. |
Related Client Settings
- Enable IP Address Filter For Employee
-
-
- This setting allows you to configure a filter that requires incoming connections from employee logins to be from specific IP addresses.
-
- Hide Costs From Employees
-
-
- This setting allows you to hide cost information from employees, preventing them from seeing how much it costs to purchase the goods and services you are selling.
-
- Enable Employees Login Hours Restriction
-
-
- This setting allows you to set specific times of the day when the employee is allowed to log in and use Sellercloud.
-
- Hide Inactive Employees
-
- This setting allows you to hide employees who are no longer active in Sellercloud.
There are a few more client settings that are user-based:
- Force User To Enter Expected Delivery Date
-
-
- This setting requires users to enter an expected delivery date for each purchase order.
-
- Default Company Dropdown To Current User Company
-
- This client setting sets the default company selection in dropdown menus (for example, Order and Product search filters) to the company that the current user is associated with.