Overview
With Sellercloud, you can manage the following product prices across multiple Sales Channels:
- Site/Retail Price – The default product price for all channels.
- Standard/List Price – The field used to set the MSRP or STP.
- Wholesale Price – The price for Wholesale Customers.
- Local Store Price – The in-store price.
- Minimum Advertised Price (MAP) – The manufacturer’s minimum price at which you are allowed to sell a product.
- Manufacturer’s Suggested Retail Price (MSRP) – The manufacturer’s suggested price.
- Strikethrough Price (STP) – The original price before a discount, displayed with a strikethrough.
- Channel-Specific Prices – The selling price for a specific marketplace.
You can manage prices per product, in bulk, with Custom Plugins, and even with Repricing Software.
Manage Prices
You can manage product prices individually or in bulk.
Individually
To update prices per product:
- Go to a Product Details Page.
- Click Edit on the top right of the page or the Pricing panel.
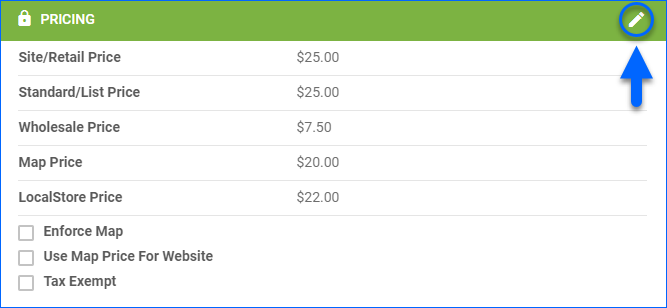
- Update prices and settings:
- Site/Retail Price – Set the default product price for all sales channels, including Website.
- Standard/List Price – Note down the MSRP or use it for the STP. Learn more about MSRP and STP.
- Wholesale Price – Set the price for wholesale customers.
- Map Price – Set the MAP. In some cases, you can also use this field to set the STP. Learn more about MAP and STP.
- LocalStore Price – Set the in-store price.
- Enforce Map – Make the MAP Price the selling price on all enabled channels.
- Use Map Price For Website – Set the MAP Price as the selling price on the Website channel.
- Tax Exempt – Exclude the product from tax calculations.
- Click Save to apply updates. Changes appear in the Change Log.
In Bulk
To update multiple products’ prices:
- Follow the steps to Bulk Update Products.
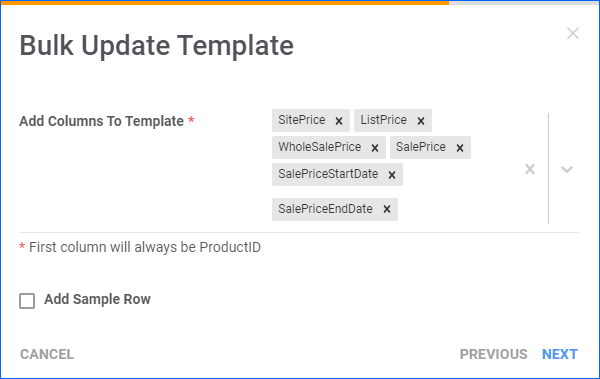
- Use the following Column Headers in your Template:
- SitePrice – The default product price for the Website and other sales channels.
- ListPrice – Set the MSRP or, in some cases, STP.
- WholeSalePrice – Set the price for wholesale customers.
- SalePrice – The price of your product when you run a sale
- SalePriceStartDate – The start date of your sale
- SalePriceEndDate – The end date of your sale
Manage Channel-Specific Prices
In addition to the general product prices described in the previous section, you can also manage product prices for specific sales channels:
Individually
To update channel-specific prices per product:
- Go to a Product Details Page.
- Click Toolbox and select the respective Channel Properties page.
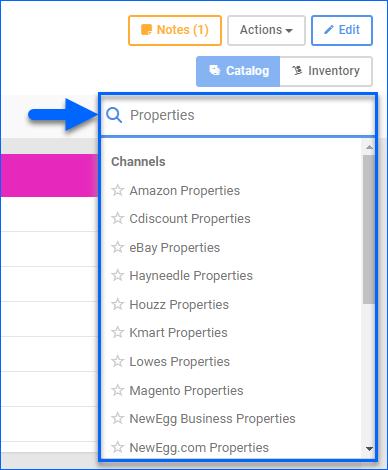
- Click Edit on the top right.
- Update prices in the Pricing panel.
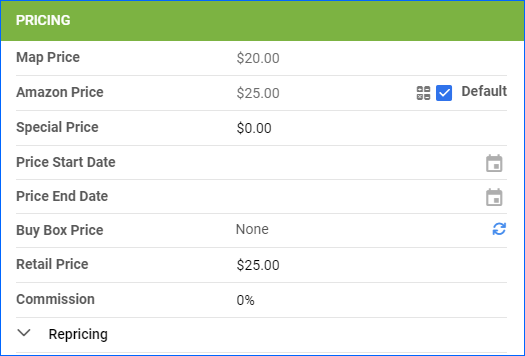
- You can link the channel price to the Site Price by checking Default. Any future changes to the Site Price will update the channel price as long as the Default checkbox is enabled.
- Save the changes.
In Bulk
When setting prices in bulk:
- List prices in US dollars, without a $ sign, commas, text, or quotation marks.
- Note that they don’t include taxes, shipping costs, rebates, coupons, or bulk discounts.
- Their value must be equal to or greater than the cost.
- You can enter up to 5 digits before the decimal point and two after.
- The minimum standard price is 0.02
To update channel-specific prices for multiple products:
- Follow the steps to Bulk Update Products.
- Use the following Column Headers in your Template:
Amazon
- EnableAmazonPriceUpdate – Set to TRUE to include the product in price feeds to Amazon.
- AmazonPrice – Set the product’s Amazon Price.
- AmazonPriceUseDefault – Set to TRUE to default the Amazon Price to the Site Price.
- AmazonSpecialPrice – Set the Special Price for an Amazon sale that runs through a specified date range.
- AmazonSpecialPriceStartDate – Enter the start date of the Special Price.
- AmazonSpecialPriceEndDate – Enter the end date of the Special Price.
- StopLossPrice – Enter the minimum price at which to sell a product when using a repricer.
- UseStopLossPrice – Set to TRUE to enable the Stop Loss Price.
Bed Bath & Beyond
- BedBathAndBeyondPrice – Set the product’s price on Bed Bath & Beyond.
- BedBathAndBeyondUseDefault – Set to TRUE to default the Bed Bath & Beyond price to the Site Price.
Best Buy
- BestBuyPrice – Set the product’s price on Best Buy.
- BestBuyPriceUseDefault – Set to TRUE to default the Best Buy price to the Site Price.
Bonanza
- BonanzaBuyItNowPrice – Set the product’s Buy It Now price on Bonanza.
- BonanzaBuyItNowPriceUseDefault – Set to TRUE to default the Bonanza price to the Site Price.
- BonanzaInstantOfferPriceNegotiable – Set to TRUE to list a product as OBO (or best offer) where your listing price is considered negotiable and is based on the product’s BonanzaInstantOfferPrice.
- BonanzaInstantOfferPrice – The Instant Offer Price is used as a floor level to auto-accept a higher or equal offer.
Buy.com
- BuyDotComPrice – Set the product’s price on Buy.com.
- BuyDotComPriceUseDefault – Set to TRUE to default the Buy.com price to the Site Price.
eBay
- BuyItNowPrice – Set the Buy It Now price offered in both Fixed Price format and as an option in the Auction format.
- eBayPriceUseDefault – Set to TRUE to default the Buy It Now price to the Site Price.
- StartPrice – Sets the value used for eBay listings of the Auction format. It is actually needed even for Fixed Price listings to be considered eBay-ready
- BestOfferAutoAcceptLimit -Set the minimum offer price at which an eBay item sale will be automatically approved.
- BestOfferAutoRejecttLimit – Set the maximum offer price at which eBay item sale will be automatically rejected.
- SecondChanceMinPrice – Set the minimum acceptable bid amount at which the Second Chance Offer will be sent.
- ReservePrice – Set the hidden price a bidder must meet to win the auction. If not met, the bidder will receive a message “reserve not met.”
- eBayEnableStrikeThroughPrices – Set to TRUE to enable STP.
- MAPPricingTreatment -Set to MAP to only show the MAP Price. Set to STP to show the Standard/List Price (MSRP, not your eBay price) with a strike-through in addition to the eBay Price. If the eBay price is lower than the MAP Price, the eBay price will not display.
- MAPPriceExposure – Set to 0 to display the MAP Price pre-checkout or 1 to display it during checkout.
Etsy
- EtsyPrice – Set the product’s price on Etsy.
- EtsyPriceUseDefault – Set to TRUE to default the Etsy price to the Site Price.
Google Shopping
- GoogleExpressPrice – Set the product’s price on Google Shopping.
- GoogleExpressUseDefault – Set to TRUE to default the Google Shopping price to the Site Price.
- GoogleExpressSalePrice – Set the product’s special Sale Price on Google Shopping.
- GoogleExpressSalePriceStartDate – Enter the beginning date for the Sale Price.
- GoogleExpressSalePriceEndDate – Enter the end date for the Sale Price.
Groupon
- GroupOnGoodsPrice – Set the product’s price on Groupon.
- GroupOnGoodsPriceUseDefault – Set to TRUE to default the Groupon price to the Site Price.
Hayneedle
- HayneedlePrice – Set the product’s price on Hayneedle.
- HayneedleUseDefault – Set to TRUE to default the Hayneedle price to the Site Price.
Houzz
- HouzzPrice – Set the product’s price on Houzz.
Jet
- JETPrice – Set the product’s price on Jet.
- JETPriceUseDefault – Set to TRUE to default the Jet price to the Site Price.
Magento
- MagentoSpecialPrice – Set the product’s Special Price for a limited-time sale on Magento.
- MagentoSpecialPriceFromDate – Enter the beginning date for the Special Price
- MagentoSpecialPriceToDate – Enter the ending date for the Special Price.
NewEgg.com
- NewEggDotComPrice – Set the product’s price on NewEgg.com.
- NewEggDotComPriceUseDefault – Set to TRUE to default the NewEgg.com price to the Site Price.
- NewEggDotComSubsidyEnabled – Set to TRUE to add a subsidy for the product.
- NewEggDotComSubsidyAmount – Set the amount credited to the profit and loss.
- NewEggDotComSubsidyFromDate – Set the date from which the subsidy starts.
- NewEggDotComSubsidyToDate – Set the date from which the subsidy ends.
- NewEggDotComEnableVolumeDiscount – Set to TRUE to enable discounts with optional free shipping based on specific ordered quantities.
- NewEggDotcomVolumeDiscount1Qty – Set the quantity that must be ordered to apply discount #1.
- NewEggDotcomVolumeDiscount1Price – Set the discounted price for the specific item quantity of discount #1.
- NewEggDotcomVolumeDiscount1FreeShipping – Set to TRUE to include free shipping for discount #1.
- NewEggDotcomVolumeDiscount2Qty – Set the quantity that must be ordered to apply discount #2.
- NewEggDotcomVolumeDiscount2Price – Set the discounted price for the specific item quantity of discount #2.
- NewEggDotcomVolumeDiscount2FreeShipping – Set to TRUE to include free shipping for discount #2.
- NewEggDotcomVolumeDiscount3Qty – Set the quantity that must be ordered to apply discount #3.
- NewEggDotcomVolumeDiscount3Price – Set the discounted price for the specific item quantity of discount #3.
- NewEggDotcomVolumeDiscount3FreeShipping – Set to TRUE to include free shipping for discount #3.
NewEgg Business
- NewEggPrice – Set the product’s price on NewEgg Business.
- NewEggPriceUseDefault – Set to TRUE to default the NewEgg Business price to the Site Price.
- NewEggBizVolumeDiscount1Qty – Set the quantity that must be ordered to apply discount #1.
- NewEggBizVolumeDiscount1Price – Set the discounted price for the specific item quantity of discount #1.
- NewEggBizVolumeDiscount1FreeShipping – Set to TRUE to include free shipping for discount #1.
- NewEggBizVolumeDiscount2Qty – Set the quantity that must be ordered to apply discount #2.
- NewEggBizVolumeDiscount2Price – Set the discounted price for the specific item quantity of discount #2.
- NewEggBizVolumeDiscount2FreeShipping – Set to TRUE to include free shipping for discount #3.
- NewEggBizVolumeDiscount3Qty – Set the quantity that must be ordered to apply discount #3.
- NewEggBizVolumeDiscount3Price – Set the discounted price for the specific item quantity of discount #3.
- NewEggBizVolumeDiscount3FreeShipping – Set to TRUE to include free shipping for discount #3.
Overstock
- OverStockPrice – The price Overstock is paying you for the item. Overstock then resells items to customers at their own determined price. The price on the order will reflect the OverStockPrice.
- OverStockUseDefaultPrice – Set to TRUE to default the Overstock price to the Site Price.
- OverStockSuggestedSellingPrice – A Suggested Price for OverStock to resell to customers.
- OverStockStreetPrice – Sets the Overstock Street Price.
Reverb
- ReverbPrice – Set the product’s price on Reverb.
- ReverbPriceUseDefault – Set to TRUE to default the Reverb price to the Site Price.
Sears
- SearsPrice – Set the product’s price on Sears.
- SearsUseDefaultPrice – Set to TRUE to default the Sears price to the Site Price.
- SearsSalePrice – Set the product’s special Sale Price on Sears.
- SearsSaleStartDate – Start date of the Sale Price.
- SearsSaleEndDate – End date of Sale Price.
ShopHQ
- ShopHQPrice – Set the product’s price on ShopHQ.
- ShopHQPriceUseDefault – Set to TRUE to default the ShopHQ price to the Site Price.
Target
- TargetPrice – Set the product’s price on Target.
- TargetPriceUseDefault – Set to TRUE to default the Target price to the Site Price.
TopHatter
- TopHatterStartingBid – Set the product’s auction Starting Bid price on TopHatter.
- TopHatterStartingBidUseDefault – Set to TRUE to set the Starting Bid price to the default Starting Bid defined on the TopHatter > General Settings company settings page.
- TopHatterBuyItNowPrice – Set the product’s auction Buy Now price on TopHatter.
- TopHatterBuyItNowPriceUseDefault – Set to TRUE to set the Buy Now price to the product’s default Site Price.
Walmart Marketplace
- WalmartAPIPrice – Set the product’s price on Walmart Marketplace.
- WalmartAPIPriceUseDefault – Set to TRUE to default the Walmart Marketplace price to the Site Price.
Wayfair
- WayfairPrice – Set the product’s price on Wayfair.
- WayfairPriceUseDefault – Set to TRUE to default the Wayfair price to the Site Price.
Website
- WebSitePrice – Set the product’s price on your Integrated Website.
- WebSitePriceUseDefault – Set to TRUE to default the website price to the Site Price. Any prices lower than the Map Price will be adjusted to the Map Price.
Wish
- WishPrice – Set the product’s Wish Price.
- WishPriceUseDefault – Set to TRUE to default the Wish Price to the Site Price.
Update Channels
Updating your product prices on channels works differently per channel:
- Automatic combined Price and Quantity updates (Such as Bonanza, Etsy, and NewEgg.com)
- Automatic separate Price and Quantity updates (Such as Amazon, Walmart Marketplace, Sears)
- No automatic Price updates, but manual updates are allowed – (Such as Google Shopping)
- No price updates of any kind (Such as Wayfair, Home Depot, Target)
For Bonanza, Google Shopping, NewEgg.com, and Etsy listings, the prices are included in the inventory feed and cannot be disconnected from it. Make sure you have the correct prices configured for these channels. You can use the bulk-update option for that.
Note that if you disconnect a listing for these channels from inventory updates, Sellercloud will stop sending both the inventory and the price.
For many channels, after you save price changes, you must push them manually.
To push a specific product’s price changes to a specific channel:
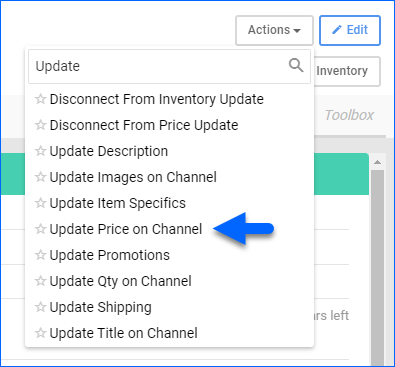
- On the Product Details Page, click Toolbox and select a Channel Properties page.
- Click Actions and select Update Price on Channel.
To push multiple products’ price changes to one or more channels:
- Go to Manage Catalog.
- Find and select the products you want to update.
- Click the Actions icon and select Update Prices on Channel.
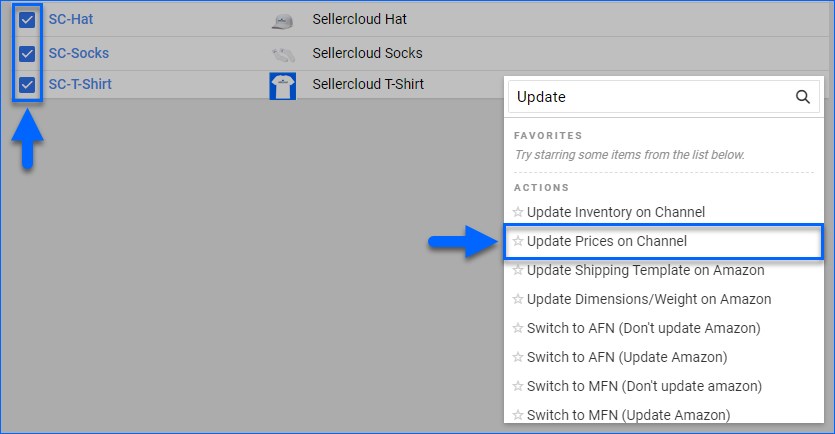
- Select the channel(s) and click Update.
- This action will schedule a Queued Job. Once processed, the prices will be updated.
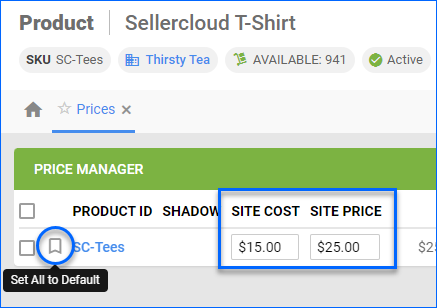
Price Manager
With Sellercloud’s Price Manager, you can manage a product’s Site Cost, Site Price, and prices for multiple channels at once.
To select channels to display in the Price Manager:
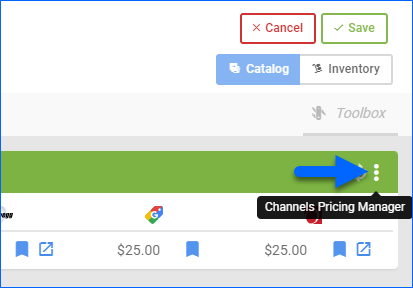
- On the Product Details Page, click Toolbox and select Prices.
- Click Edit.
- Click Channels Pricing Manager (the three dots icon).
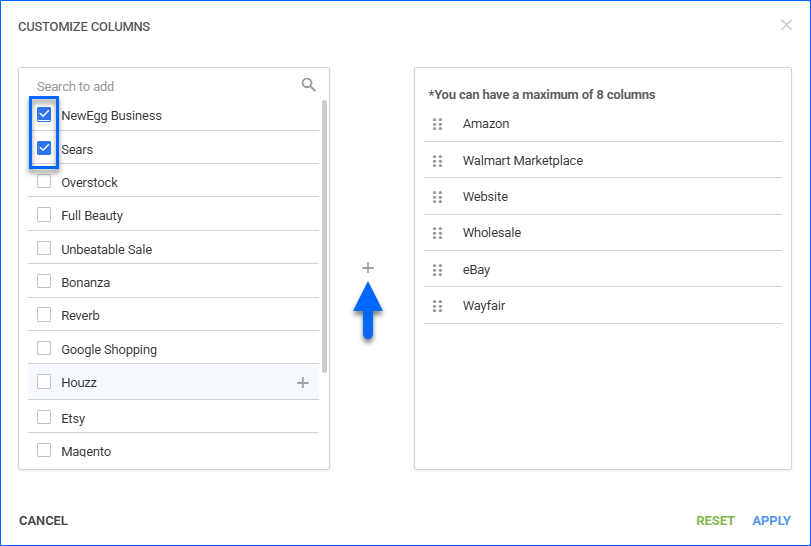
- Select up to 8 channels on the left:
- Amazon, Walmart Marketplace, Website, Wholesale, eBay, NewEgg, Wayfair, Overstock, Magento, NewEgg Business, Sears, Full Beauty, UnbeatableSale, Bonanza, Houzz, Reverb, Google Shopping, Local Store, and Etsy.
- Click the Plus icon in the middle.
- Click Apply.
To use the Price Manager:
- The Price Manager grid shows the SKU under the Product ID column and its price on the previously selected channels. If there are shadow SKUs, you’ll see them below the parent SKU.
- Click Edit.

- First, you may want to update the Site Cost and Site Price fields.
- The Set All to Default option on the left will set the Site Price as the selling price for all channels.
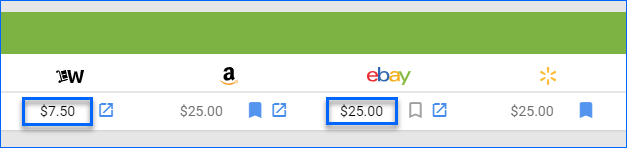
- To use the Site Price only for selected channels, click the Use Default icon below the channel.
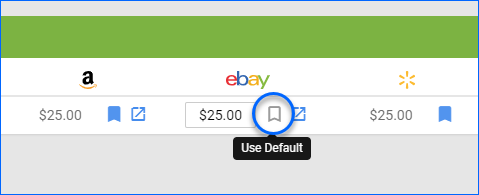
- Alternatively, enter a channel-specific price into each channel’s price field.
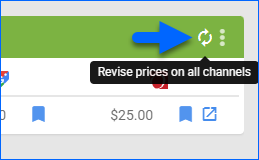
- When ready, click the Revise prices on all channels icon on the top right.
Bulk Price Manager
The Price Manager is also available as a bulk action, allowing you to update and revise channel prices for up to 50 products at once.
To access the bulk Price Manager:
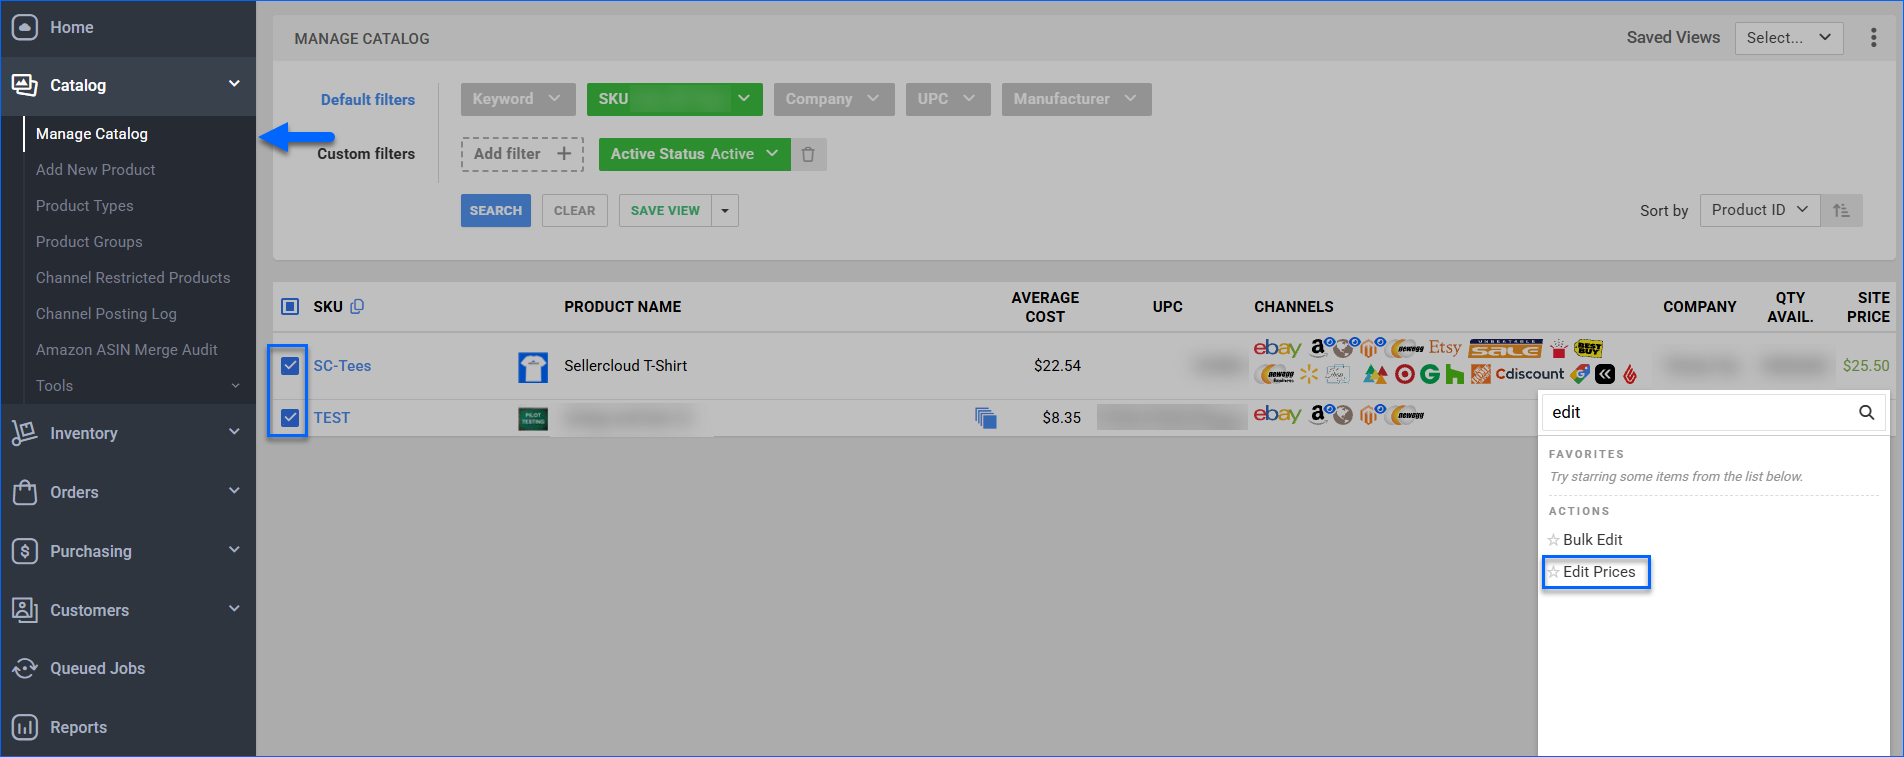
- Go to the Manage Catalog page.
- Load up a search and select up to 50 SKUs from the results grid.
- Click the Actions menu icon in the bottom right corner.
- Click Edit Prices.
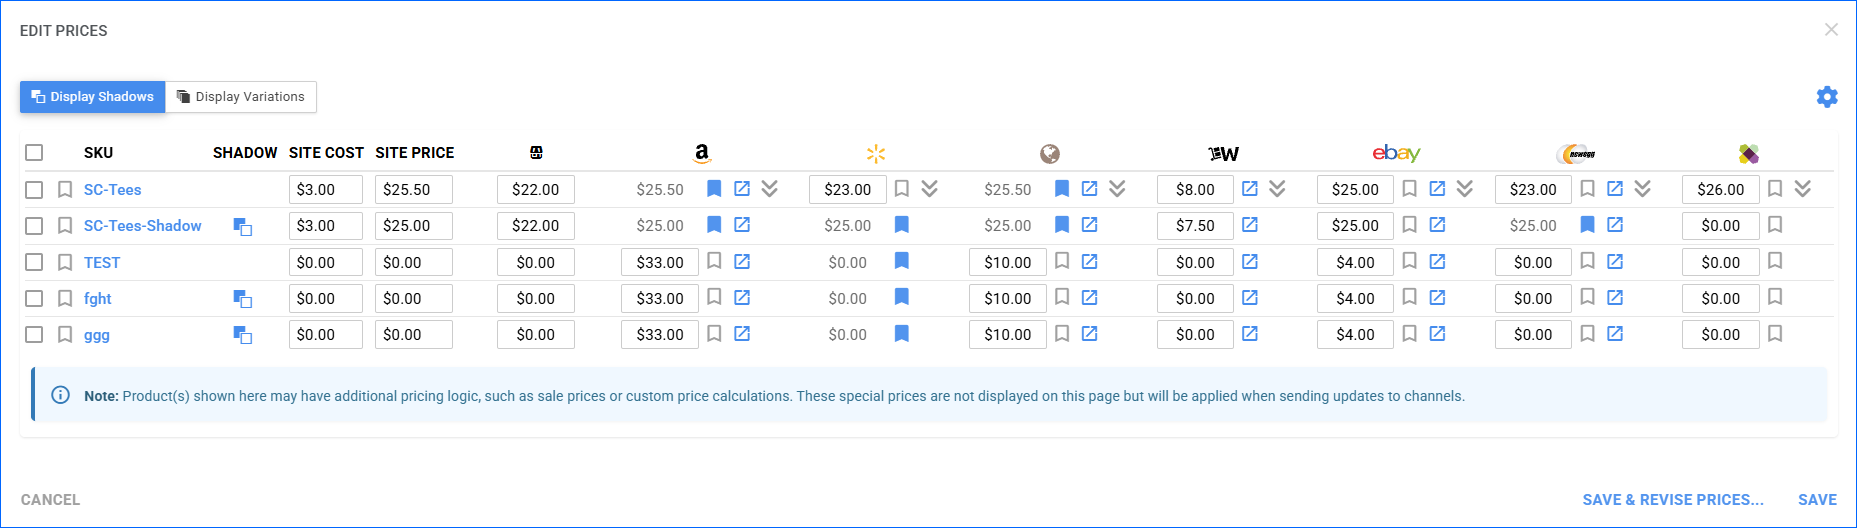
- The pop-up modal mimics the Prices tab of the Product Details page. You can:
- Select up to 8 channels to display and update.
- Manually update prices or change the Use Default setting.
- Revise prices on the selected channels.
- View and edit the Shadows or Variations of your selected SKUs.
Pricing-Related Client Settings
You can configure the following pricing-related Client Settings:
Site Cost
- Put Order On Hold If Selling Price Is Less Than % of SiteCost – Compares the channel’s selling price to the product’s Site Cost based on a percentage you specify. If an order comes in with a selling price lower than the percentage of the Site Cost, the order will be put on hold.
- Validate Selling Price is greater than % of SiteCost – Requires products’ selling price to be at least a set percentage above the Site Cost. For example, to require the selling price to be at least 10% above the Site Cost, set this to 110%. If this is enabled, you can use the Sell Below Cost field on the Product Details page of a SKU to exclude it from this validation.
Site Price
- Require To Set Default Price When Creating Product – Makes the Default Price a required field when creating a new product. This field sets the product’s Site/Retail Price.
- Put Order On Hold If Selling Price Is Less Than % of SitePrice – Compare the channel’s selling price to the product’s Site Price based on a percentage you specify. If an order comes in with a selling price lower than the percentage of the Site Price, the order will be put on hold.
- Set Customer Status ‘Require Attention’ instead of updating OrderStatus to OnHold – This is a subsetting of the setting above. The same rules apply; however, instead of putting the order On Hold, it will be marked as Requires Attention.
- Use Site Price When Splitting Orders – Whenever an order is Split, the child order will use the Site Price of a product SKU if it has its Site Price displayed.
- Add Flag to Inventory Arrivals Page – Shows a flag on the Inventory Arrivals page after the product’s Average Cost changes. Hovering over the flag shows the original and new values, prompting you to adjust the Site Price accordingly.
eBay
- Enable Default Price for eBay – Enables the Display Use default Site Price as eBay BIN price setting to appear within the Company Settings > eBay > General Settings. After enabling the company setting, you will see a checkbox on the eBay Product Properties page that allows you to default the Buy It Now Price to the Site Price.
- Force Buy it now price to SitePrice when using Default Price for EBay – Enabled to force the Site Price to be the Buy It Now Price for all eBay products.
Amazon
- Automated Product Publishing Auto Update Site Price From Amazon Price – Automatically updates products’ Site Price based on their Amazon Price.
- Restrict Enabling Stop Loss Price – Only allows Sellercloud users with the Client Admin Role to enable the Min Selling Price for Amazon.
- Do Not Allow Stop Loss Price Below – Prevents products’ Min Selling Price for Amazon, which is the narrowest margin of profit you are willing to accept, from being set below a specific percentage of their Site Cost.
Wholesale
- Auto Save WholeSale Prices When Order Is Created – Enable to automatically save the Wholesale Prices on orders and apply them to future wholesale orders from the same customer. This setting doesn’t change any previously existing wholesale orders.
- Enable Cost Plus Based Wholesale Prices – Shows the Enable Cost-Based Pricing checkbox on the Customer page > Order Options panel > Discounted Price Options. When you check this box and enter a Percent To Add, Sellercloud uses the Site Cost, Last Cost, or Average Cost and generates the price accordingly. For example, if you set it to 10% and use an Average Cost that is 150, the price will be 150 + 15 (10% of 150) = 165.
- Enable SitePrice Based Wholesale Discount – Enable to show the Enable SitePrice-Based Discount checkbox on the Wholesale Customer > Order Options panel > Discounted Price Options. This will discount all products for the customer. The discount will be applied to the Site Price.
Custom
- Enable Custom Price Calculation for [Channel Name] – Enables a Custom Price Calculation for a specific channel.