Overview
The FBA Partnered Carrier Program (PCP) gives you access to Amazon-negotiated rates for approved third-party carriers and shipping services. It allows you to streamline your shipping processes while generating labels and tracking directly from Seller Central via API.
Alternatively, you can use a non-partnered carrier outside the PCP network, such as FedEx, UPS, or another carrier of your choice. The main difference is that instead of using the Amazon-provided account and rates, you would use your own. There are many reasons why you might prefer to do this, such as:
- If you are shipping Hazmat Products. Read more about the FBA Hazardous Material Policy.
- Your own negotiated shipping rates are more cost-effective than the Amazon-partnered ones.
- Your products must be shipped with a specialized service (e.g., fragile items, special handling, or temperature control).
Select Non-Partnered vs. Partnered Carriers
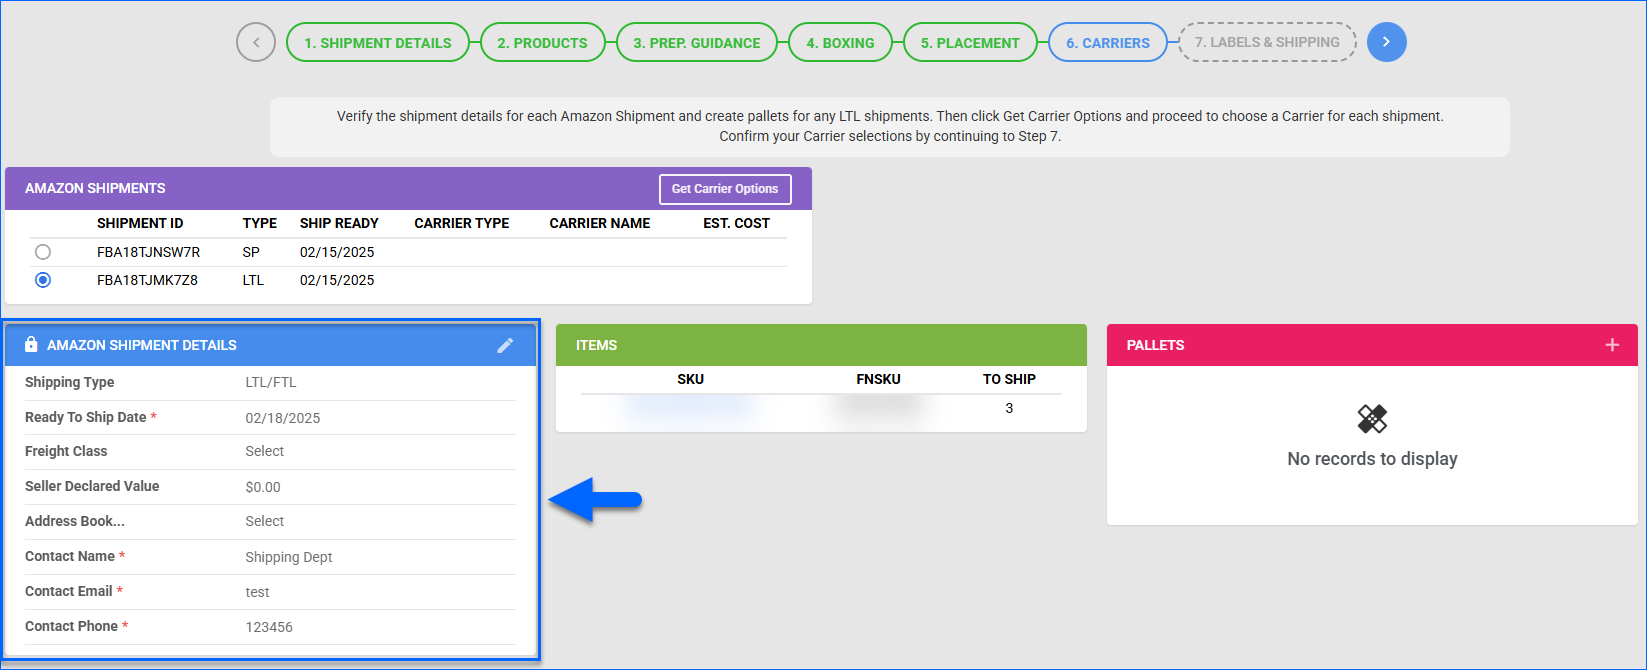
Carrier selection happens in Step 6: Carriers of the FBA Inbound Shipment Wizard, after you have chosen placement options and the shipments have been confirmed by Amazon. You can access the full list of partnered and non-partnered carriers available in Seller Central. You can also choose Other and manually fill in a carrier and service not provided in the list.
- If you select a Parnered carrier, you can generate the tracking directly from the FBA Inbound Shipment Wizard.
- If you select a Non-Partnered carrier connected to your Sellercloud account via the Shipping API Settings company page, you can generate tracking from the FBA Inbound Shipment Wizard or input the information manually.
- If you select a Non-Partnered carrier that is not integrated with your Sellercloud account, you must input the racking information manually.
To select a partnered or non-partnered career for your FBA Shipment:
- Go to Step 6: Carriers of the FBA Inbound Shipment Wizard.
- If you have multiple Amazon Shipments within the plan, toggle between them and ensure they all have a Ready to Ship Date.
- If any of the shipments are LTL/FTL, configure the Pallet information. To use a Partnered carrier, you must provide Freight Class and Seller Declared Value as well.
- If any of the shipments are LTL/FTL, configure the Pallet information. To use a Partnered carrier, you must provide Freight Class and Seller Declared Value as well.
- After ensuring you have provided all the necessary details, click the Get Carrier Options button in the Amazon Shipments panel header.
- We will pull all available partnered and non-partnered carrier options from Amazon via API.

- We will pull all available partnered and non-partnered carrier options from Amazon via API.
- Select a Shipment ID and click Choose Carrier.

- In the pop-up modal, Estimated Cost is only available for partnered carriers.
- You can toggle off the Partnered Carriers Only setting to see the non-partnered options.
- Toggle on the Display Less Popular Carriers for a full list of all options received from Amazon.
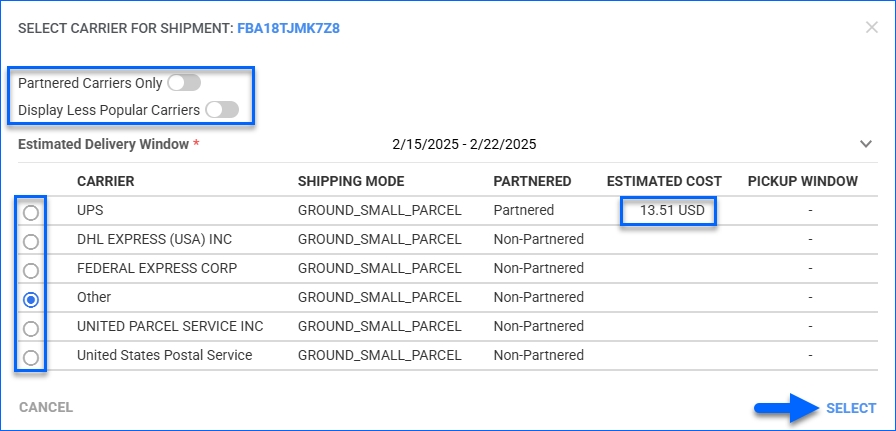
- Choose an option and click Select.
- Repeat the process for each shipment.
Per Amazon’s requirements, you must select and confirm Carriers for all shipments within a plan. Additionally, all Small Parcel shipments must be sent with the same carrier.
- (Optional) You can click the rotating arrows button in the Amazon Shipments panel header to reverse the carrier selections. This allows you to adjust the shipment details or pallet information before requesting a new list of carrier options.
