Overview
Sellercloud’s Product Group feature lets you easily organize and manage your inventory by grouping similar products together, facilitating the launch of auction Campaigns on eBay, generating comprehensive reports based on product groups, and more.
In this article, you will learn how to create product groups manually and in bulk, assign products to these groups, export product group information, and discover various use case scenarios.
Manage Product Groups
In Sellercloud, you can modify, export, or delete your product groups, as described below. To view and manage Product Groups:
- Go to Catalog > Product Groups.
- Select Filters:
- SKU – when you use this filter, the results grid will display all the Product Groups the SKU is currently part of.
- Created On – filter by the creation date of Product Groups.
- Modified On – filter by the last modified date of your Product Groups.
- Group Name – search by specific Product Group Names. This filter allows multiple selections.
- Click Search.
The results grid includes the following columns:
- Group Name – the specific name of your Product Group. This can be edited on the Product Group details page.
- Total Products – the number of SKUs currently in the group.
- Modified On – the last edit date.
- Modified By – username of the Employee who last edited the group.
Click on the three-dot menu at the top right corner of the page to customize wich columns are displayed in the grid.
Create Product Groups
You can create a new product group individually or in bulk.
Individually
To create a single product group, navigate to:
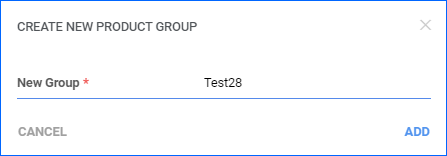
- Catalog > Product Groups.
- Click on the green Plus icon, enter the Product Group Name, and click Add.
In Bulk
To create multiple product groups at once, navigate to:
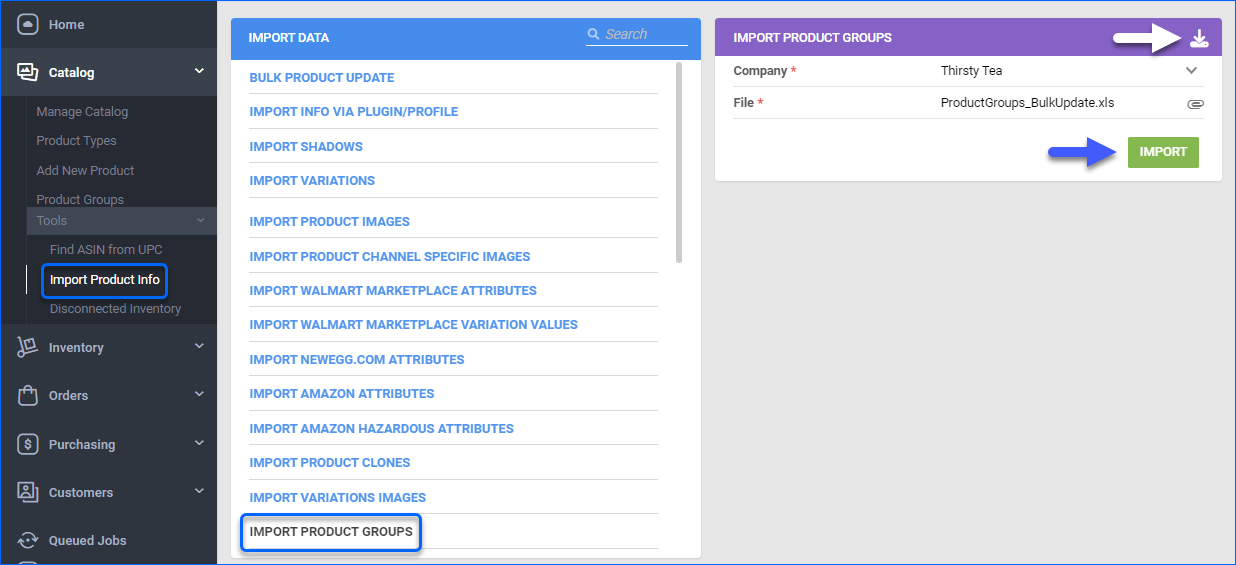
- Catalog > Tools > Import Product Info.
- Import Product Groups > Download the Template.
- Populate ProductID and ProductGroupName and save the file.
- Return to Sellercloud, upload the newly created template, and click Import.
Alternatively, navigate to Catalog > Select your products > Action Menu > Add Products to group. Select New Group and enter a unique name. Click Add and the new group will be created.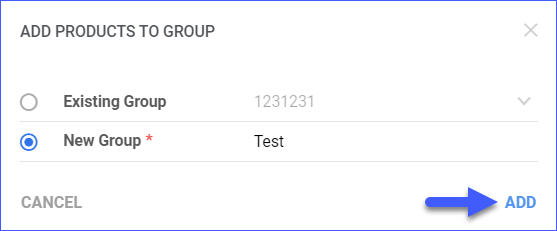
Delete Product Groups
If you no longer need a product group you created, you can easily delete it.
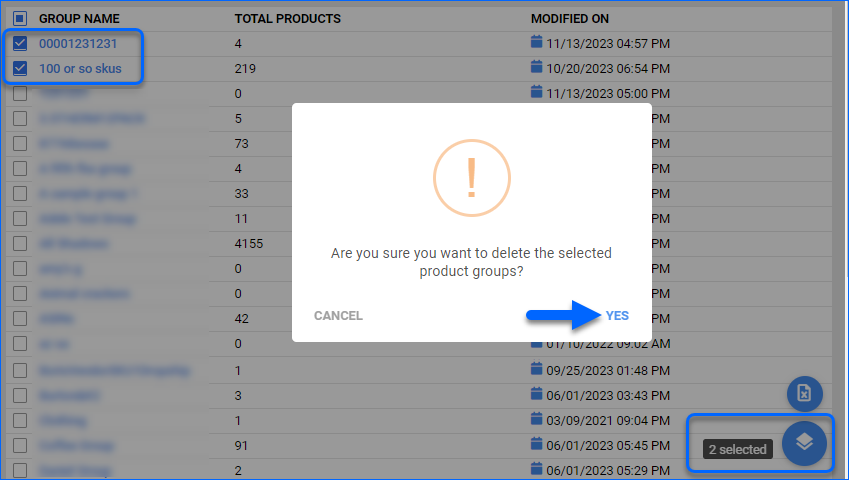
- Navigate to Catalog > Product Groups.
- Select a group or more and navigate to the Action Menu at the bottom of the screen.
- Click Delete.
- A confirmation message will appear > Click Yes.
Add Products to Groups
After creating a product group, you can modify its contents by adding or removing SKUs. This can be done either individually or in bulk.
Individually
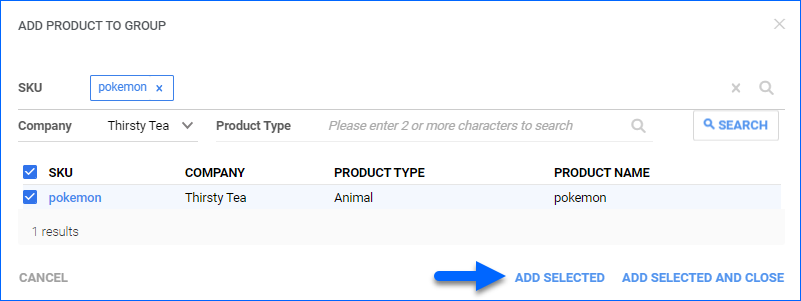
To add products individually, navigate to:
- Open an existing Product Group and navigate to the Products Panel.
- Click on the Plus icon.
- Find and select your SKU and click Add Selected.
In Bulk
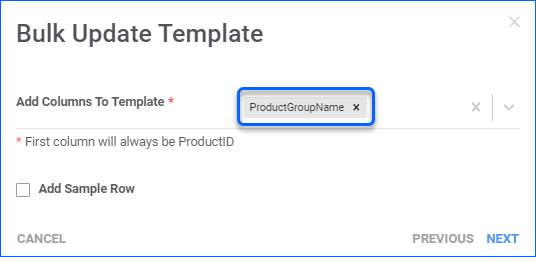
To add a product to groups in bulk, navigate to:
- Catalog > Tools > Bulk Product Update.
- Generate a Template with the ProductGroupName column.
- Populate the ProductID and the ProductGroupName columns, and save the file.
- Return to Sellercloud, upload the newly created template, and click Import.
To add the same product to more than one group simultaneously, you need to enter the product on separate lines for each product group it should be added to.
Delete Products from Groups
You can delete SKUs from Product Groups individually or in bulk.
Individually
To delete a SKU from a Product Group, navigate to:
- Catalog > Product Groups.
- Open an existing Product Group and navigate to the Products Panel.
- Select the bin icon to remove the SKU from the product group.
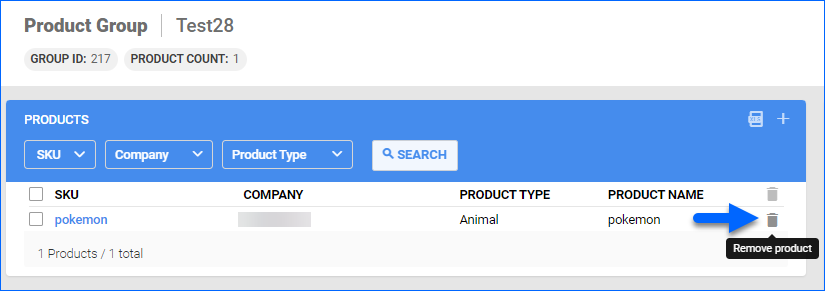
- Click Confirm on the pop-up message.
In Bulk
To delete multiple products from product groups, navigate to:
- Catalog > Tools > Import Product Info.
- Import Product Groups > Download the Template.
- Populate ProductID and ProductGroupName under Action type DELETE, then save the file.
- Return to Sellercloud, upload the newly created template, and click Import.
Alternatively, navigate to Catalog > Select your products > Action Menu > Remove Products from Group. Select the group and then click Remove.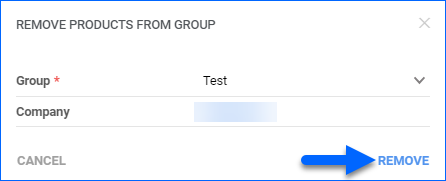
Export Product Groups
You can export product groups individually or in bulk.
Individually
To export a Product Group, navigate to:
- Catalog > Product Groups > Open a Product Group.
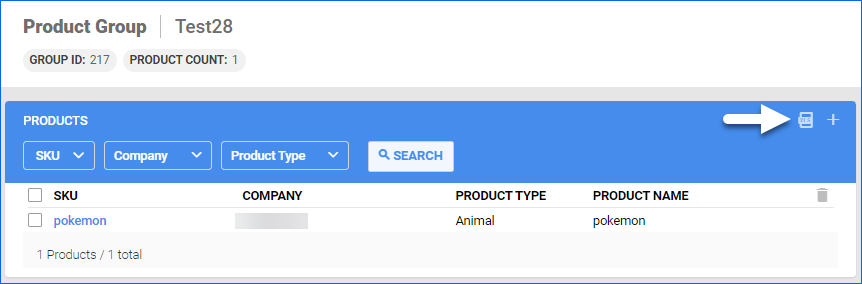
- Navigate to the Products Panel and click on the Export button next to the Add Product button.
In Bulk
To export Product Groups in bulk, navigate to:
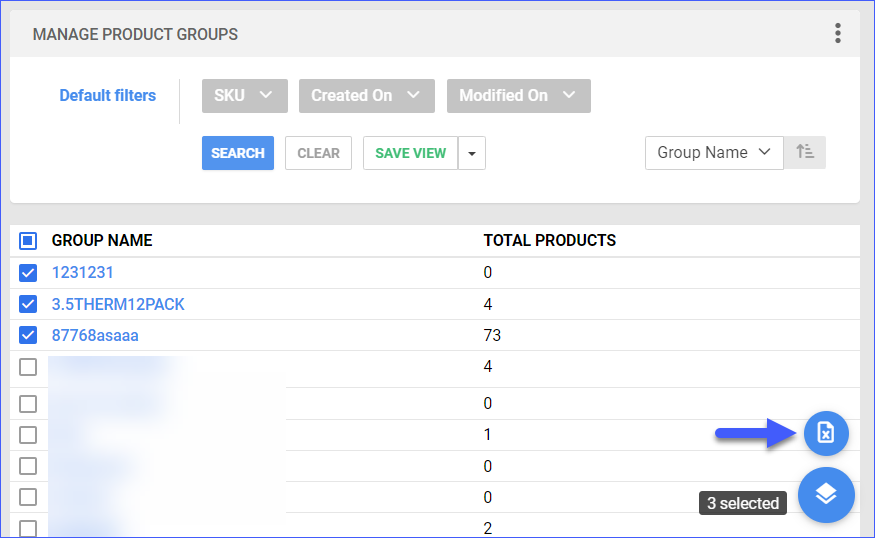
- Catalog > Product Groups > Select your groups.
- Click on the Export icon above the Actions Menu.
Use Cases
You can manage your product groups in various ways. After creating your product groups, you can configure them for eBay Auction Listings, integrate them into rules within our Order Rule Engine, or filter products by groups on the Manage Catalog page.
eBay Auctions
In Sellercloud, you can easily manage your eBay auction schedules, allowing you to post auctions individually or in organized product groups.
For more detailed information, refer to our comprehensive guide on eBay Auctions.
Order Rule Engine
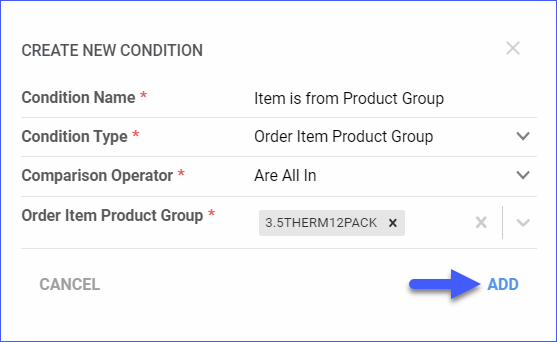
You can configure product groups as a condition in the Order Rule engine.
- Go to Settings > Orders > Rule Engine > Manage Rules.
- Create New Rule with Name > Click the plus button and select the Condition Type to be Order Item Product Group.
- Fill in the rest of the fields and click Add.
Filter by Product Group
You can search for products by product groups and also filter reports by product groups.
To filter products by group:
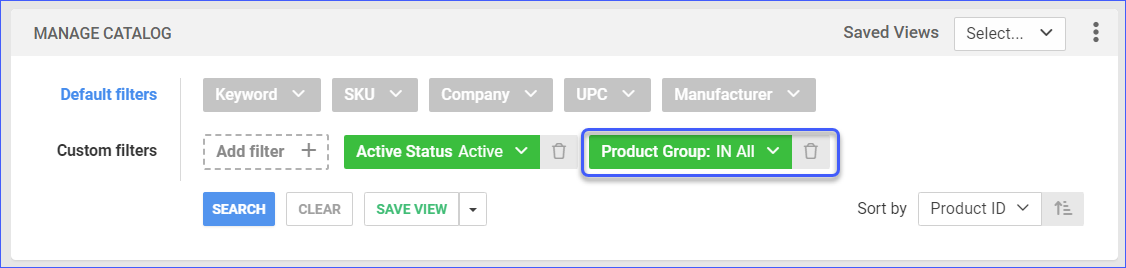
- Navigate to Catalog > Manage Catalog.
- Configure your filters and click Search.
- You can configure the filter to search for products either across all groups or within specific groups.
- You can configure the filter to search for products either across all groups or within specific groups.
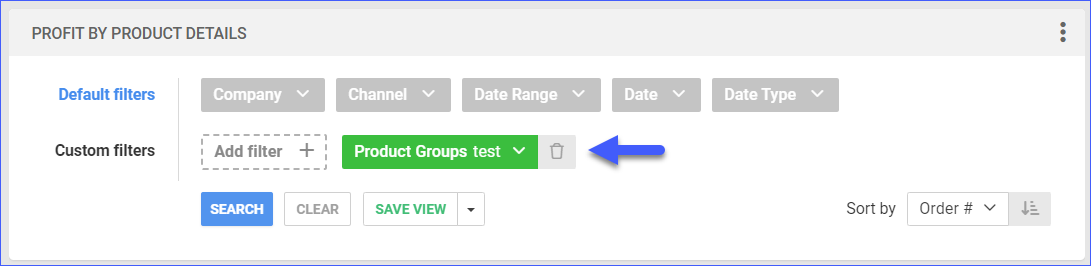
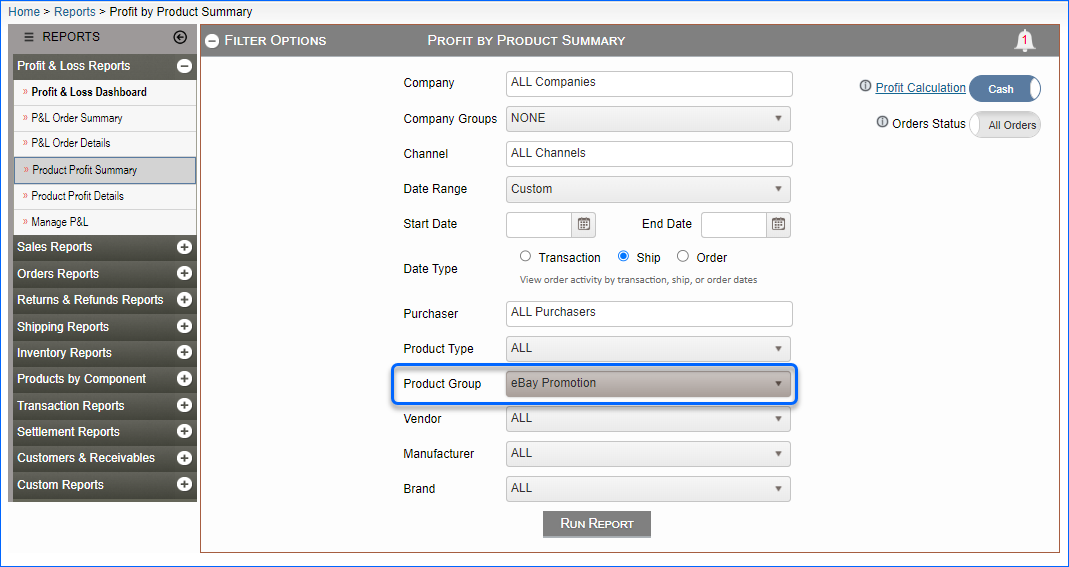
To filter reports by groups:
- Navigate to Reports.
- Choose a Report and add a Product Group from the custom filters.
Relevant Client Settings
The following client setting is available:
- Add Shadows To Product Group When Parent Is Added – Enable this setting for Sellercloud to automatically add the Shadow Products to the Product Group when you’re adding the Parent SKU.
Overview
Sellercloud’s Product Group feature lets you easily organize and manage your inventory by grouping similar products together, facilitating the launch of auction Campaigns on eBay, generating comprehensive reports based on product groups, and more.
In this article, you will learn how to create product groups manually and in bulk, assign products to these groups, export product group information, and discover various use case scenarios.
Manage Product Groups
In Sellercloud, you can modify, export, or delete your product groups, as described below.
Create Product Groups
You can create a new product group individually or in bulk.
Individually
To create a single product group, navigate to:
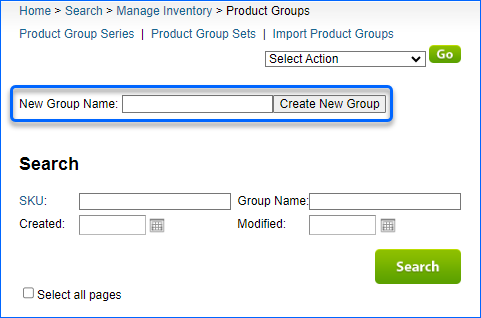
- Inventory > Product Groups.
- Enter a New Group Name and click Create New Group.
In Bulk
To create multiple product groups at once, navigate to:
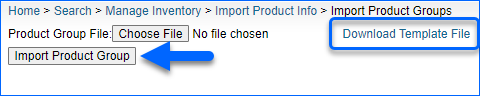
- Inventory > Import Product Info > Import Product Groups.
- Click on Download Template File.
- Populate ProductID and ProductGroupName and save the file.
- Return to Sellercloud, upload the newly created template, and click Import Product Group.
Alternatively, navigate to Inventory> Select your products > Action Menu > Add Products to group > Go. Select New Group and enter a unique name. Click Save and the new group will be created.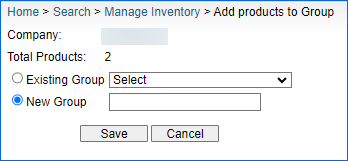
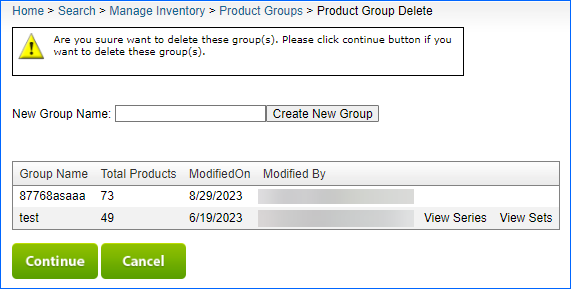
Delete Product Groups
If you no longer need a product group you created, you can easily delete it.
- Navigate to Inventory > Product Groups > Search.
- Select a group or more > Action Menu > Delete Groups.
- A confirmation message will appear > Click Continue to confirm the deletion.
Add Products to Groups
Once you create a product group, you can add new SKUs or remove existing ones.
Add SKUs to Product Groups
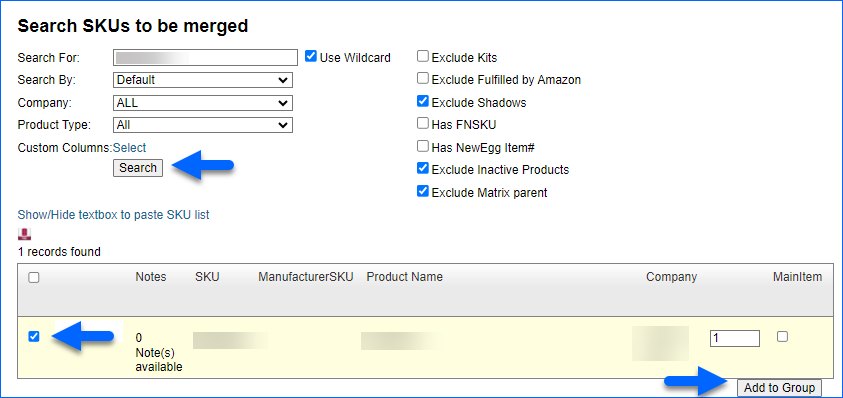
You can add products to an existing product group individually or in bulk.
Individually
To add products individually, navigate to:
- Open an existing Product Group and navigate to the Search SKUs to be merged section.
- Enter SKU and click Search.
- Find and select your SKU and click Add to Group.
In Bulk
To add a product to groups in bulk, navigate to:
- Inventory > Bulk Product Update.
- Click on Get Template File and select ProductID and the ProductGroupName columns, then save the file.
- Return to Sellercloud, upload the newly created template, and click Submit.
To add the same product to more than one group simultaneously, you need to enter the product on separate lines for each product group it should be added to.
Delete SKUs from Product Groups
You can delete SKUs from Product Groups individually or in bulk.
Individually
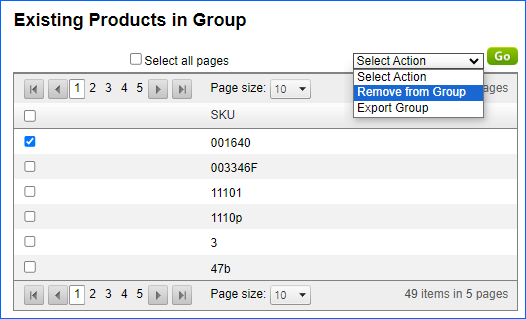
To delete a SKU from a Product Group, navigate to:
- Inventory > Product Groups.
- Open an existing Product Group and navigate to the Existing PRoducts in Group section.
- Select the SKU > ActionMenu > Remove From Group > Go.
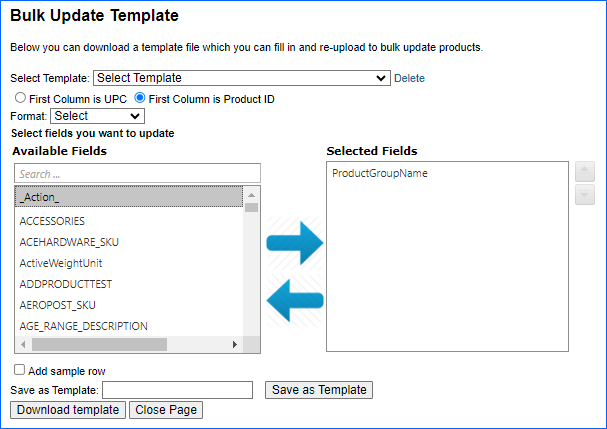
In Bulk
To delete multiple products from product groups, navigate to:
- Inventory > Bulk Update Products.
- Click on Get Template File.
- Choose columns ProductID, ProductGroupName, Action, and under Action type DELETE, then save the file.
- Return to Sellercloud, upload the newly created template, and click Submit.
Alternatively, navigate to Inventory > Select your products > Action Menu > Remove Products from Group. Select the group and then click Remove From Group.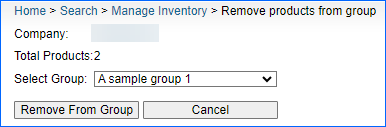
Export Product Groups
You can export product groups individually or in bulk.
Individually
To export a Product Group, navigate to:
- Inventory > Product Groups > Open a Product Group.
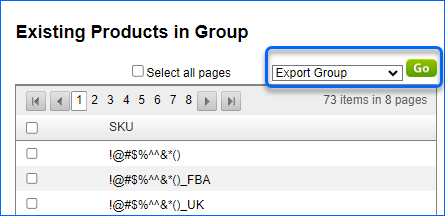
- Navigate to the Existing Products in Group Panel > Action Menu.
- Select Export Group > Go.
In Bulk
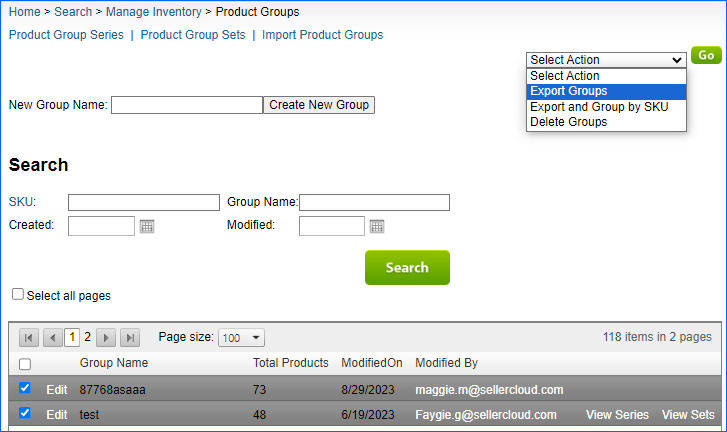
To export Product Groups in bulk, navigate to:
- Inventory > Product Groups > Select your groups.
- Action menu > Export Groups > Go.
Use Cases
You can manage your product groups in various ways. After creating your product groups, you can configure them for eBay Auction Listings or filter products by groups on the Manage Catalog page.
eBay Auctions
In Sellercloud, you can easily manage your eBay auction schedules, allowing you to post auctions individually or in organized product groups.
For more detailed information, refer to our comprehensive guide on eBay Auctions.
Filter by Product Group
You can search for products by product groups and also filter reports by product groups.
To filter products by group:
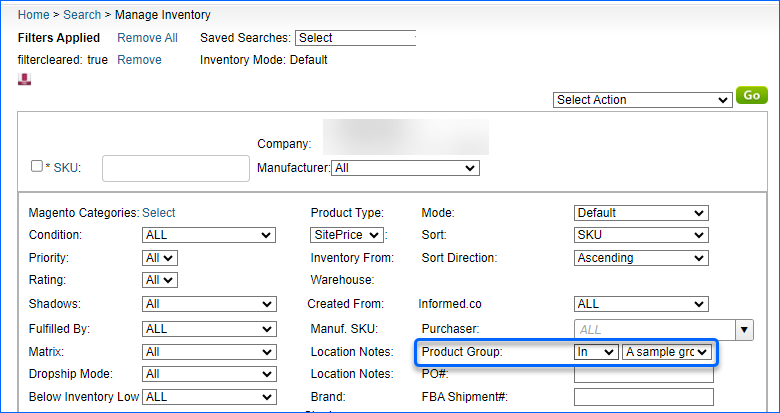
- Navigate to Inventory > Advanced Filters > Configure your Product Group filter.
- Click Search.
- You can configure the filter to search for products either across all groups or within specific groups.
- You can configure the filter to search for products either across all groups or within specific groups.
To filter reports by groups:
- Navigate to Reports.
- Choose a Report and add a Product Group from the custom filters.
Relevant Client Settings
The following client setting is available:
- Add Shadows To Product Group When Parent Is Added – Enable this setting for Sellercloud to automatically add the Shadow Products to the Product Group when you’re adding the Parent SKU.