Overview
A Universal Product Code (UPC) is a 1-dimensional barcode displayed as a series of black bars and white spaces corresponding to a 12-digit number. Each digit in the UPC number is represented by a unique pattern of bars and spaces. UPCs are printed on retail packaging to simplify scanning, identifying, and tracking products.
While UPCs are prevalent in the US, Canada, and many other countries, some regions may use slightly different barcode standards, like the European Article Number (EAN) system, which is an extension of the UPC and is used internationally.
Some sales channels require products to have a UPC. For example, Amazon needs barcodes to be in UPC or EAN format. UPCs are often used in Electronic Data Interchange (EDI), allowing seamless communication.
With Sellercloud, you can:
- Add a single UPC for your SKUs to use across multiple channels
- Set different UPCs per channel for specific channels
- Validate your UPCs’ accuracy and prevent duplicates
- Use UPCs when posting or printing Product Labels
UPC Validation
With UPC validation enabled, when you assign a UPC to a product, Sellercloud will verify that it:
- Is between 12-15 characters.
- Is not assigned to a product in the same Company. You can assign existing UPCs to products under other companies.
- Is valid by checking the last digit, known as the “check digit”, confirming the UPC’s accuracy with a special algorithm.
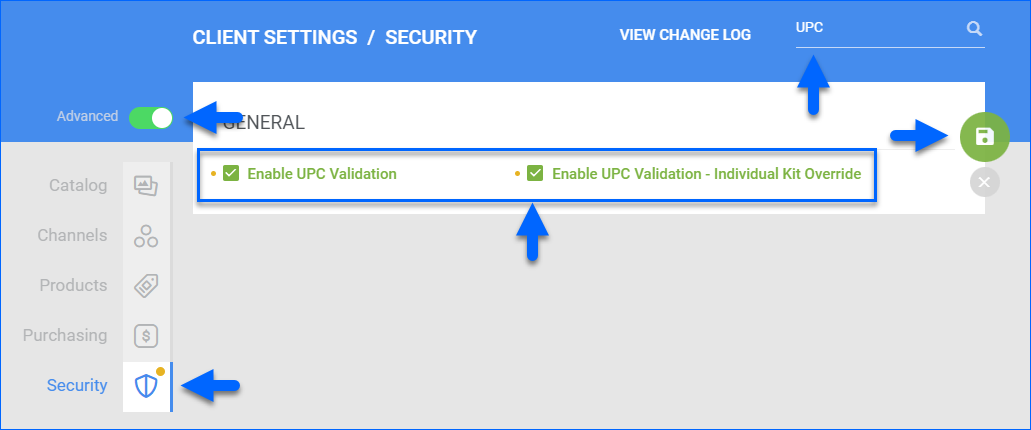
To enable the UPC validation workflow:
- Go to Client Settings.
- Toggle the Advanced button.
- Search for UPC.
- Select Security.
- Check Enable UPC Validation.
- To allow duplicate UPCs for Independent Kit parents, check Enable UPC Validation – Individual Kit Override. This is necessary because Independent Kit parents are recognized as separate products from their components, while they physically consist of the same products with the same UPCs.
- Click Save.
Manage UPCs
You can assign UPCs manually per product or in bulk.
Assign Individually
To assign a UPC to product:
- Go to a Product Details Page.
- Click Edit.
- In the Identifiers panel, update the UPC field.
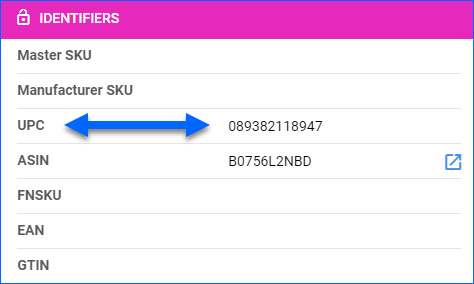
- Click Save.
Assign In Bulk
To bulk-upload UPCs:
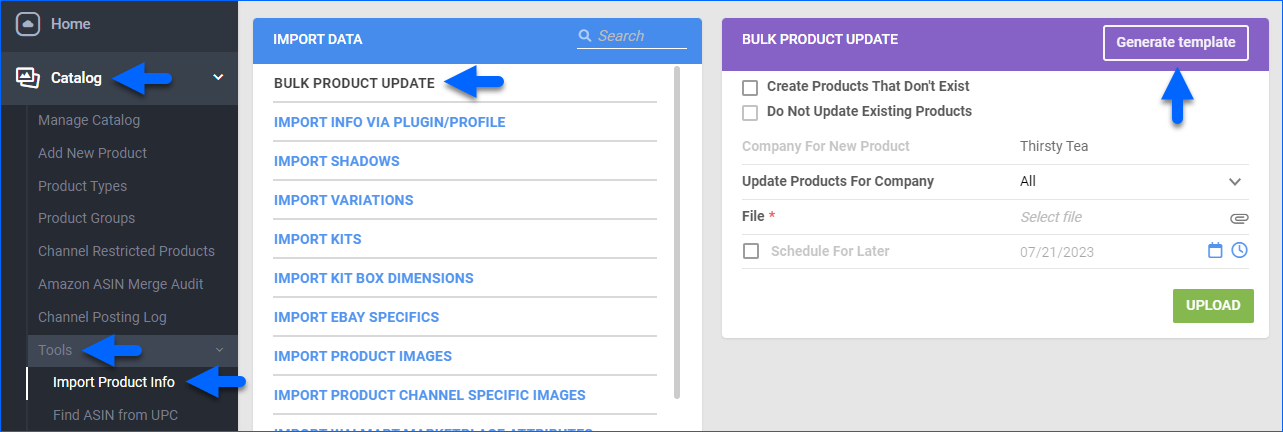
- Go to Catalog > Tools > Import Product Info.
- With Bulk Product Update selected, click Generate Template on the right.
- Select Create New Template and click Next.
- Choose a Format and click Next.
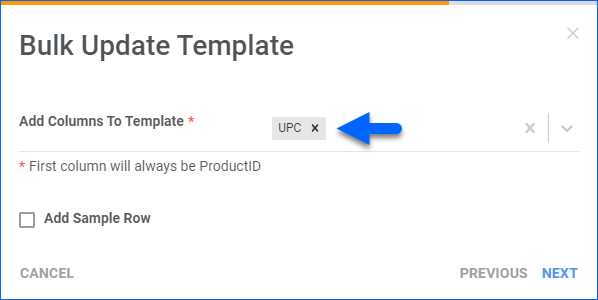
- In the Add Columns To Template menu, select UPC and click Next.
- Optionally, check Save Template and give it a Name.
- Click Download.
- Update the template file with your products’ SKUs and UPCs and save it.
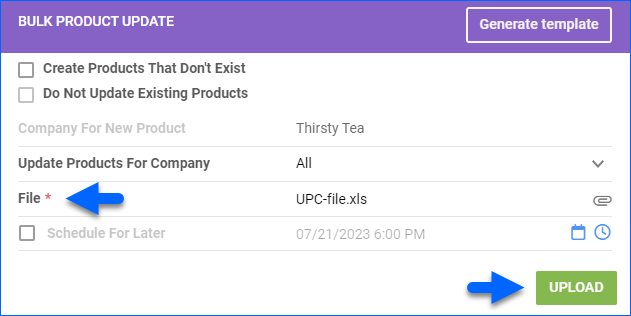
- Click File to select the updated file from your device.
- Click Upload.
Assign UPC per Channel
Your products can have different UPCs per channel for the following channels:
- Amazon
- eBay
- Newegg
- Sears
- Walmart Marketplace
Learn how to Use Different UPCs for Channels.
Unassign in Bulk
To unassign UPCs in bulk:
- Go to Client Settings and disable Do not remove UPC in Bulk Update process.
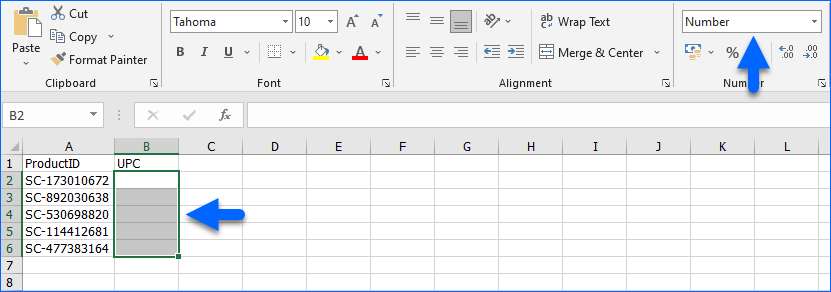
- Follow the steps in the Assign in Bulk section above, but when you update the template:
- Leave the cells under the UPC header blank.
- Format the blank UPC cells as Numbers.
Client Settings
To update UPC-related settings:
- Go to Client Settings.
- Toggle the Advanced button.
- Search for UPC.
Refer to the table below for setting descriptions.
| Setting | Description |
| Enable UPC Copy On Product Clone (Simple) | When Cloning SKUs, automatically copy the original product’s UPC to the clone product. |
| Assign Read Only Access Rights To The UPC Code | Only employees with the Client Admin Role can edit UPCs. |
| Send UPC As Item Specific When Listing On EBay | eBay will place the UPC into the Item Specifics section on the listing. |
| Send EAN Or GTIN To Shopify If UPC Is Empty | If a product does not have a UPC, Shopify will use the EAN (European Article Number) or GTIN (Global Trade Item Number) instead. |
| Do Not Remove UPC In Bulk Update Process | When Bulk Updating Products, leaving UPC cells blank will not result in unassigning UPCs. |
| Allow To Edit UPC And Weight When Receiving PO | Enables the option to update products’ UPC when Receiving Purchase Orders. |
| Show ASIN And UPC In PO Grid | Enables the UPC field in Purchase Orders. |
| Enable UPC Validation | Enables UPC validation. Check the UPC Validation section of this article for more information. |
| Enable UPC Validation – Individual Kit Override | Allows Independent Kit parents to have duplicate UPCs. Check the UPC Validation section of this article for more information. |
Overview
When adding a new product to your catalog you can validate the UPC or EAN by enabling the client setting (Settings > Client Settings) Enable UPC Validation. When saving the UPC to the product this process will:
- Verify that another product in the same company does not have an identical UPC. (It will not check another company under the same client.)
- Verify that the UPC is between 12-15 characters.
- Validate the accuracy of the UPC. The validity of the UPC is established if the last digit of the UPC, known as the “check digit”, confirms the accuracy of the UPC by means of a special algorithm.
To allow UPC duplication on a parent product of Independent kits, enable the sub-setting Enable UPC Validation – Individual Kit Override. This is necessary because kits with an Independent dependency are recognized as a separate product from the individual components, while they physically consist of the same products with the same UPCs.
You can use a different UPC for the same product on these channels:
- Amazon
- eBay
- Newegg
- Sears
- Walmart Marketplace
You can manually enter a different UPC for each product per these channels, or import a populated spreadsheet to bulk-update a different UPC for several products per these channels. After you set a product to use a different UPC, that UPC is used instead of the default UPC on the main Product Summary.
Prerequisite: This is not a default option. To activate, click Settings > Client Setting > General Settings > Enable UPC for Channel.
Manually entering different products UPCs
- In the Product Summary > Toolbox > Channel Properties > Enter the different UPC in the UPC for Channel field > Save. When posting products to that channel, this UPC is now prioritized and sent.
- Repeat for other products as desired.
Updating multiple products UPCs in bulk
- Click Inventory > Import Product Info > Update UPC for Channel.

- Click Download Template.
- Populate the columns > Save.

- When done, click Choose File > Select your saved spreadsheet.
- Click Update UPCs for channel. Your import is now scheduled. When posting those products to those channels, these UPCs are now prioritized and sent.
Important! Enter each channel name exactly as follows without spaces to process the update correctly: Amazon, eBayOrder, Sears, Newegg, or Walmart_Marketplace.
