Overview
Shipping Package Types refer to the different packaging options, such as envelopes or boxes, that help you protect, ship, and track your products. With package types in Sellercloud, you can ensure the use of appropriate packaging during order fulfillment and easily calculate shipping costs. Our templates let you define key shipping characteristics, including weight, dimensions, and handling fees, which you can later apply to your Product Shipping Preferences.
Create Package Types
Sellercloud allows you to create new package types individually or in bulk.
Individually
To create a single package type:
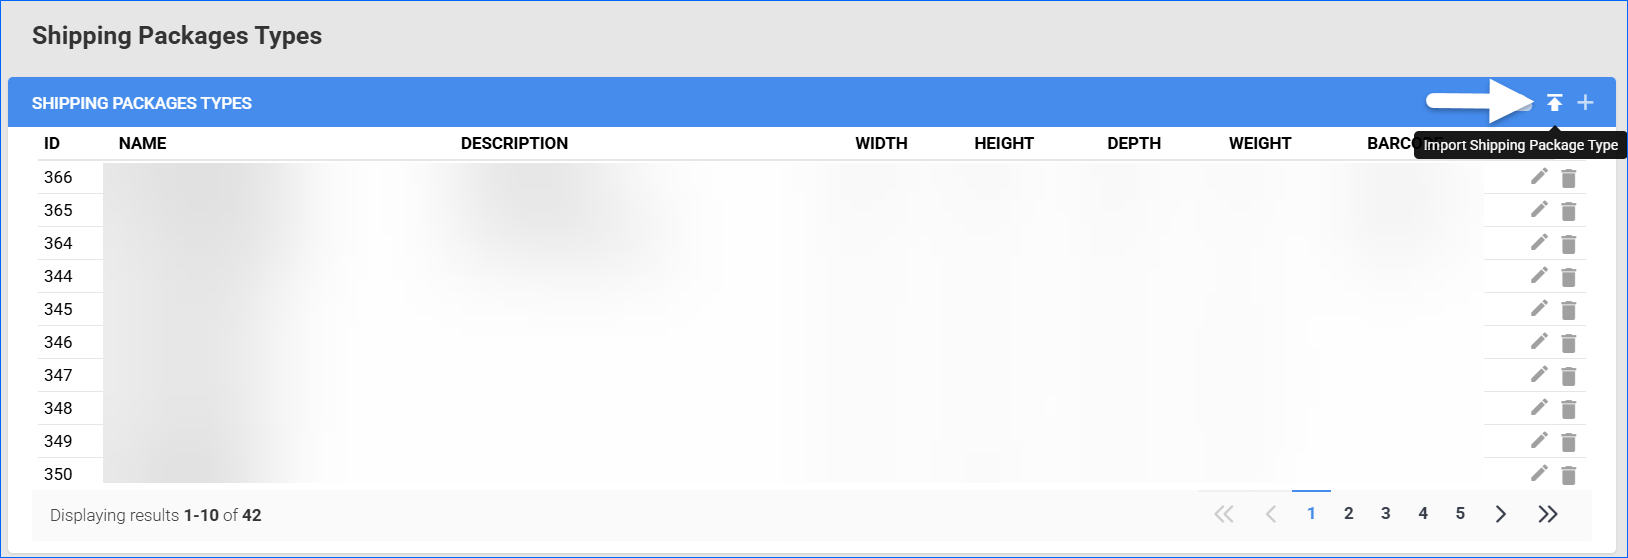
- Go to Settings > Shipping > Shipping Package Types.
- Click the + icon in the Shipping Package Types panel to add a new package type.
- Enter the following package details:
- Name – The new package type name, e.g. Small Envelope;
- Description – An optional description for additional visibility;
- Width (Inches) – The width of the package in inches;
- Height (Inches) – The height of the package in inches;
- Depth (Inches) – The depth of the package in inches;
- Weight (lbs) – The weight of the package in inches;
- Barcode – The package type barcode number;
- Box Fee – The fee for the package;
- Base Fee – The base fee for the package;
- Additional Fee – Any additional fees for the package.
- Click Save.

In Bulk
To create multiple package types simultaneously:
- Go to Settings > Shipping > Shipping Package Types.
- Click Import Shipping Package Type.
- Choose a format and download the template.
- Fill in the template columns:
- ID – Leave this blank for an ID to be automatically generated upon creation. Only add existing package type IDs to update the values;
- Name – The new package type name (max 50 characters);
- Description – The package’s description (max 254 characters);
- Width – The width of the package in inches;
- Height – The height of the package in inches;
- Depth – The depth of the package in inches;
- Weight – The weight of the package in lbs;
- Barcode – The barcode for the package;
- BoxFee – The fee for the package;
- BaseFee – The base fee for the package;
- AdditionalFee – Additional fees for the package.
- Click File, select the populated template file, and click Upload.

Edit and Delete Package Types
You can execute additional actions on each Shipping Packages Type.
Edit
To Edit an already existing package type:
- Navigate to Settings > Shipping > Shipping Package Types.
- Click the Pencil icon to edit.
- Once you make the necessary changes, click Save.

Delete
To Delete a package type:
- Navigate to Settings > Shipping > Shipping Package Types.
- Click the Thrash Bin icon.
- Click Confirm in the additional window in order to delete the package type.

Set Default Package for Products
Sellercloud’s Order Rule Engine enables you to configure rules that automatically update an order’s package type based on conditions such as product type, shipping carrier, channel, and other criteria. When these conditions are met, the system triggers the Update Package Type action, ensuring the correct package type is applied without manual intervention. To create such a rule:
- Navigate to Settings > Orders > Rule Engine > Manage Rules.
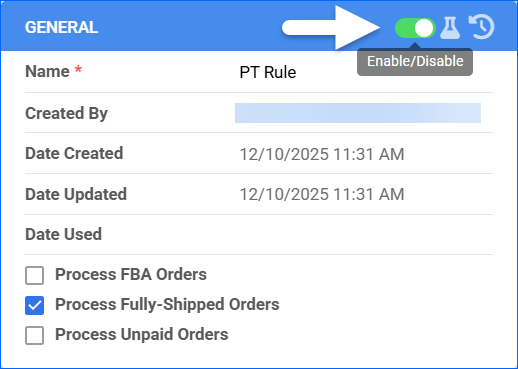
- Click Add New Rule and enter the Rule Name.
- By default, the rules will not be run on certain types of orders. Enable the following checkboxes to include those orders when running the order rule:
- Process FBA Orders;
- Process Fully Shipped Orders;
- Process Unpaid Orders.
- Click Add Conditions, enter the Condition Name, and select a Condition Type. You can also add a Sublevel Condition controlled by the top-level condition. Once done, click Add.
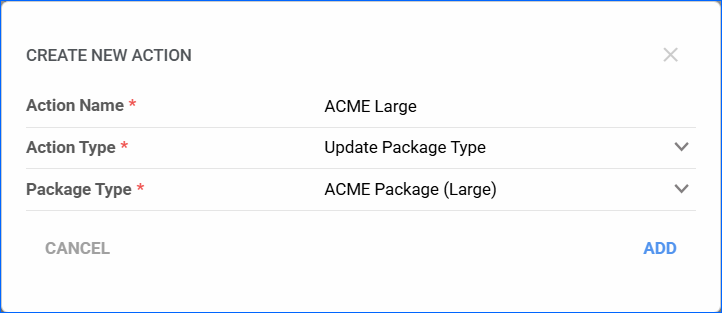
- Click Add Action, enter the Action Name, and select Update Package Type from the Action Type dropdown.
- Choose a Package Type to be applied by the rule and click Add.
- Click the Green Flag to create the new rule, and be sure to enable it.
You can also manually define a default package type for products individually or in bulk.
Individually
To set a default package for a single product, follow the steps below:
- Go to the Catalog > Manage Catalog > select a product > Toolbox > Shipping Preferences.
- Click the Edit button.
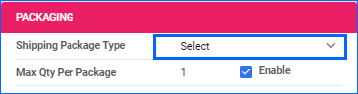
- Select Shipping Package Type from the drop-down of the Packaging panel.
- Click Save.
In Bulk
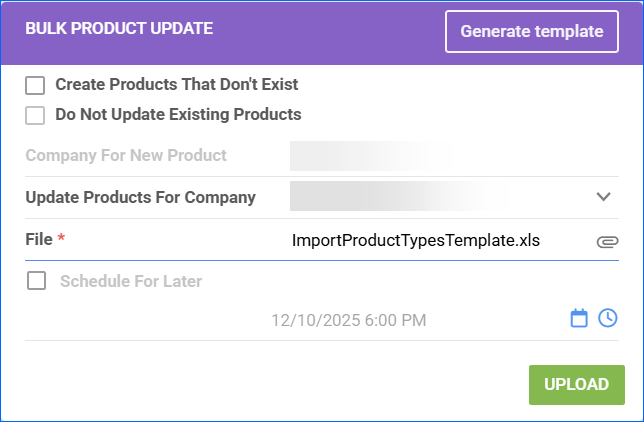
To set a default package type for multiple products in bulk, you can use the Bulk Update Products tool:
- Navigate to Catalog > Tools > Import Product Info.
- From the Import Data panel, choose Bulk Product Update.
- Click Generate template > Create New Template > Next.
- Select the file format – either Excel, CSV, or Tab Delimited.
- Find and add the following columns:
- ShippingPackageTypeID;
- MaxQtyPerShippingPackageEnabled;
- MaxQtyPerShippingPackage.
- Populate the required columns and save your file.
- Click File, select the populated template, and click Upload.
Package Types in Shipbridge
Sellercloud gives you the option to utilize existing package types for your order fulfillment in Shipbridge. With the package type automation, you can quickly assign shipping properties to both single and multi-item orders.
Auto-Populate Package Types in Shipbridge
Once you have created a package type in Sellercloud and assigned it to a product in your catalog, we will automatically populate the package type along with the related Weight and Dimensions in Shipbridge when you receive an order for that product. To see your selection, locate the PackageType (CWA) field in the main order grid. Pre-populated package types allow you to use the Ship and Print feature directly, eliminating the need to define any shipping properties to the order.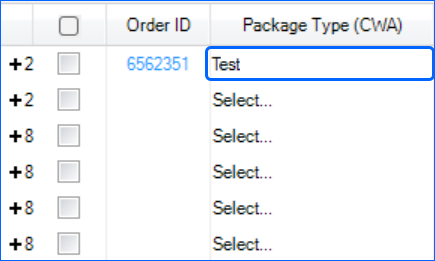
Select Package Types in Scan and Ship
You can manually select pre-existing Sellercloud package types for an order when using Scan and Ship in Shipbridge.
To choose a package type for an order, follow the steps below:
- Select one or more orders from the order grid and choose Scan & Ship from the shipping options.
- On the Print & Ship step, select your preferred package type from the CWA Package Type dropdown. We will automatically fill in the values in the Weight and Pkg Dimensions fields.

Once you ship an order, a new Package Type field will automatically appear in the Packages panel of an order in Sellercloud, which will display your selection. The package type you select in Shipbridge will be further used for reporting purposes. To locate the field in Sellercloud:
- Go to Orders > Manage Orders > Search Orders > Open an Order.
- Toolbox > Shipping > Packages.

Additional Shipbridge Settings
You can further customize your package types workflow in Shipbridge with the following settings:
- Prompt for CWA packaging selection – If enabled, Shipbridge will return a prompt message to select a CWA Package Type during Scan & Ship if not yet selected.
- Prompt only when any dimension is missing – If enabled and any shipping dimension is missing on the Print & Ship page, Shipbridge will return a prompt message to choose a Package Type from the dropdown.
- Add CWA packaging type weight to order – If enabled, we will automatically populate the weight on the order in addition to the dimensions when you select a package type in Scan & Ship.
- Require barcode scan for package type dims and weight – If enabled, we will gray out the Pkg Dimensions field and it will be mandatory to scan the barcode of a CWA Package Type and populate it in the Barcode Check field for the weight and dimensions to populate on the order.
- Require barcode scan for package type – If enabled, it will be mandatory to scan the barcode of a CWA Package Type and populate it in the Barcode Check field during Scan & Ship for the weight and dimensions to populate on the order.
- Track additional expenses/fees on orders – If enabled, the Box Fee, Base Fee, and Additional Fee of the CWA Package Type will be considered and saved as an additional fee on the order.