Overview
Temu is an emerging e-commerce marketplace that connects global consumers with a wide range of affordable products sourced directly from manufacturers and suppliers. Leveraging its streamlined supply chain and vast product catalog, Temu aims to provide a cost-effective and seamless shopping experience across various categories, including fashion, electronics, and home goods.
Integrating Sellercloud with Temu allows you to import orders, export tracking information, and synchronize inventory data. The integration works through API, transmitting information between the two services.
Prerequisites
Before you can integrate Temu into Sellercloud, complete the following requirements:
- Open a ticket with Sellercloud Support and request the Temu Website Cart Plugin to be installed on your server.
Obtain API Credentials
For this integration, you will need the API credentials from Temu. To get them:
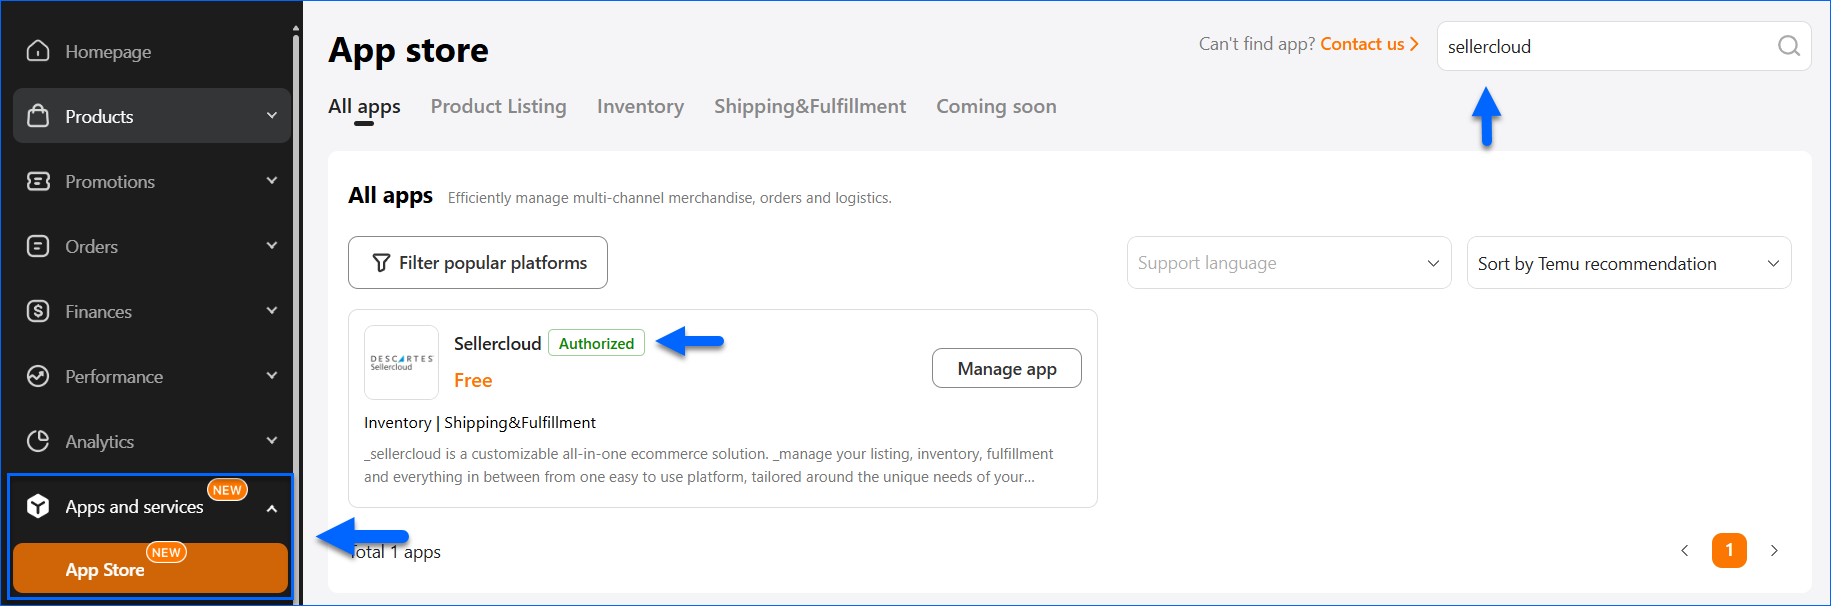
- Log in to your Temu Seller Account.
- On the left-hand side menu, click Apps and services > App Store.
- In the top right, search for Sellercloud.
- Click Authorize.
- Ensure that all Permissions for the App are selected and the duration is One Year.
- Note down the Access Token.
Temu Account Integration
Before you can start managing your inventory and shipping orders through Sellercloud, you must set up the integration:
- Navigate to Settings > Companies > Manage Companies.
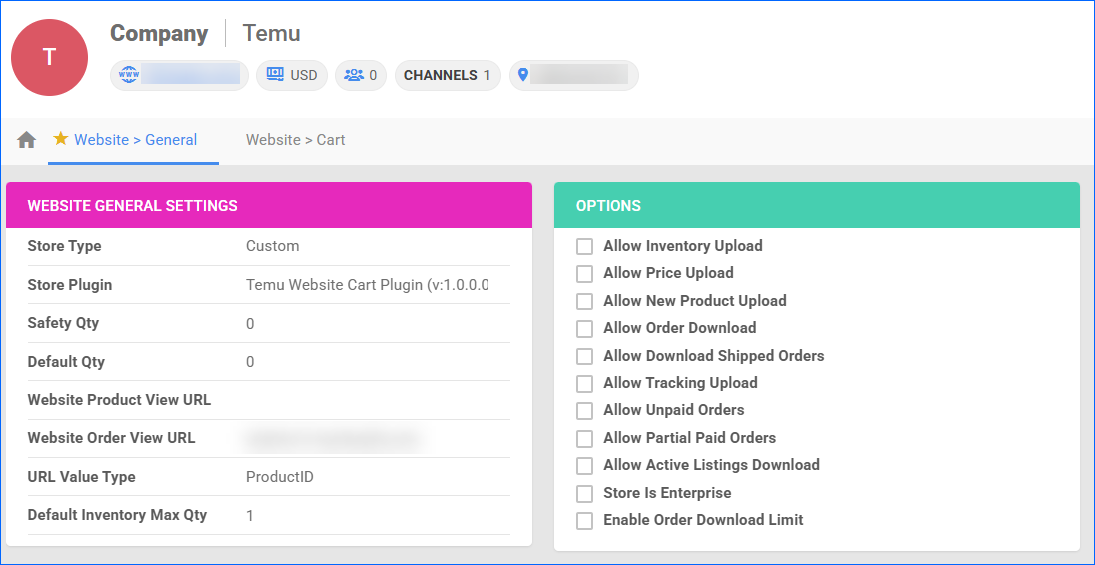
- Then, open your Temu Company > Toolbox > Website General Settings.
- For Store Type, select Custom, then from the Store Plugin dropdown, choose the Temu Website Cart Plugin.
- Click Save and refresh the page to ensure the changes have been applied.
Next, set up your Cart Settings:
- In the same Company, go to Toolbox > Website Cart General Settings.
- Click Edit.
- In the Options panel, fill in your Access_token.
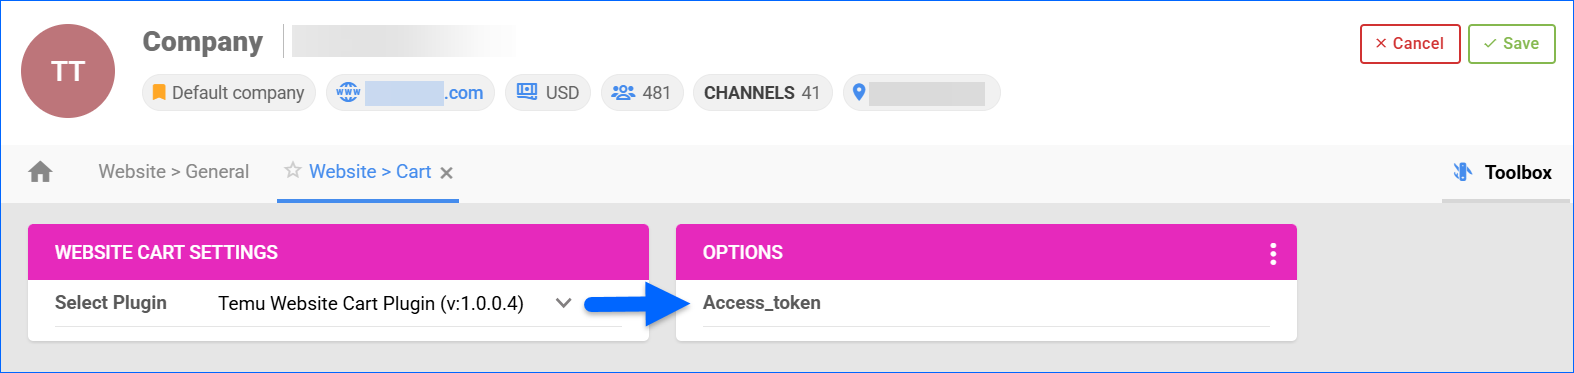
- Click Save.
- Click on the three-dots menu in the Options panel header > Test Settings.

Configure Integration Options
By automating key processes and customizing your workflow, you can not only save valuable time but also enhance overall efficiency. To open the Temu General Settings:
- Go to Company Settings.
- Open the Toolbox and select Website > General.
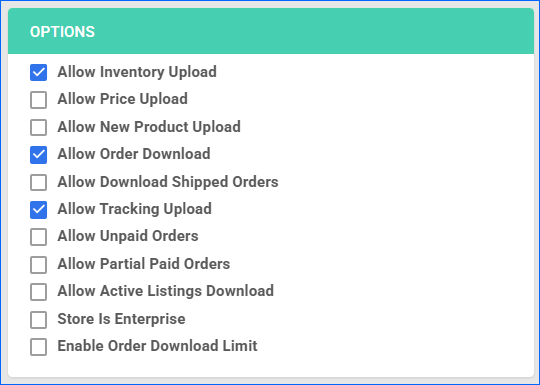
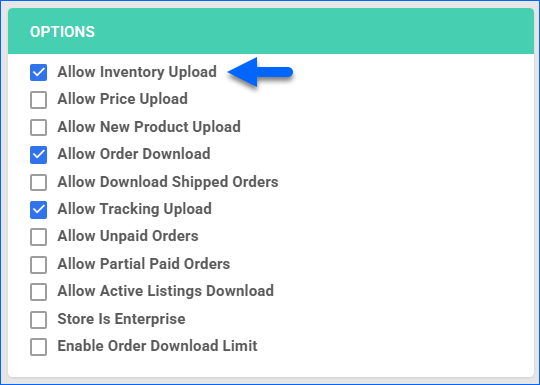
- Click Edit and enable:
- Allow Inventory Upload – enables Sellercloud to send automatic updates for the inventory of Temu products regularly.
- Allow Order Download – enables Sellercloud to automatically download new orders placed on Temu.
- Allow Tracking Upload – enables Sellercloud to automatically upload shipping and tracking for orders on Temu.
Orders Overview
With the integration established, you may need to download your existing Temu Orders manually. Go to the company’s Website General Settings > Actions > Import Orders. This will create a Queued Job, and all recent orders will be created in Sellercloud. All subsequent orders will be downloaded automatically.
When a new order is imported, the plugin tries to match the order item by Website Product ID (Goods ID) and Website Product Variant ID (SKU ID). You must ensure you have Mapped your Products before you start importing orders. If no match is found, the order is created with an Unknown product.
Temu Orders will be created with Order Source: Website. You can Search for them on the Manage Orders Page with filters for Company and Channel.
Tracking Upload
The Temu Website Cart Plugin automatically sends tracking information for Fully Shipped orders under your Temu-integrated company. After a successful tracking update, the Source Updated for Shipping order property is automatically changed to True.
If you will be using multiple warehouses to fulfill Temu orders, you must create the addresses in Temu and map them to their corresponding local warehouses in Sellercloud. If there is no mapping, we will send the default address configured on Temu.
To create an Address and map it to a Sellercloud warehouse:
- Log in to your Temu Seller Account.
- On the left-hand side menu, click My account > Shipping settings.
- Click + Add a new Address.
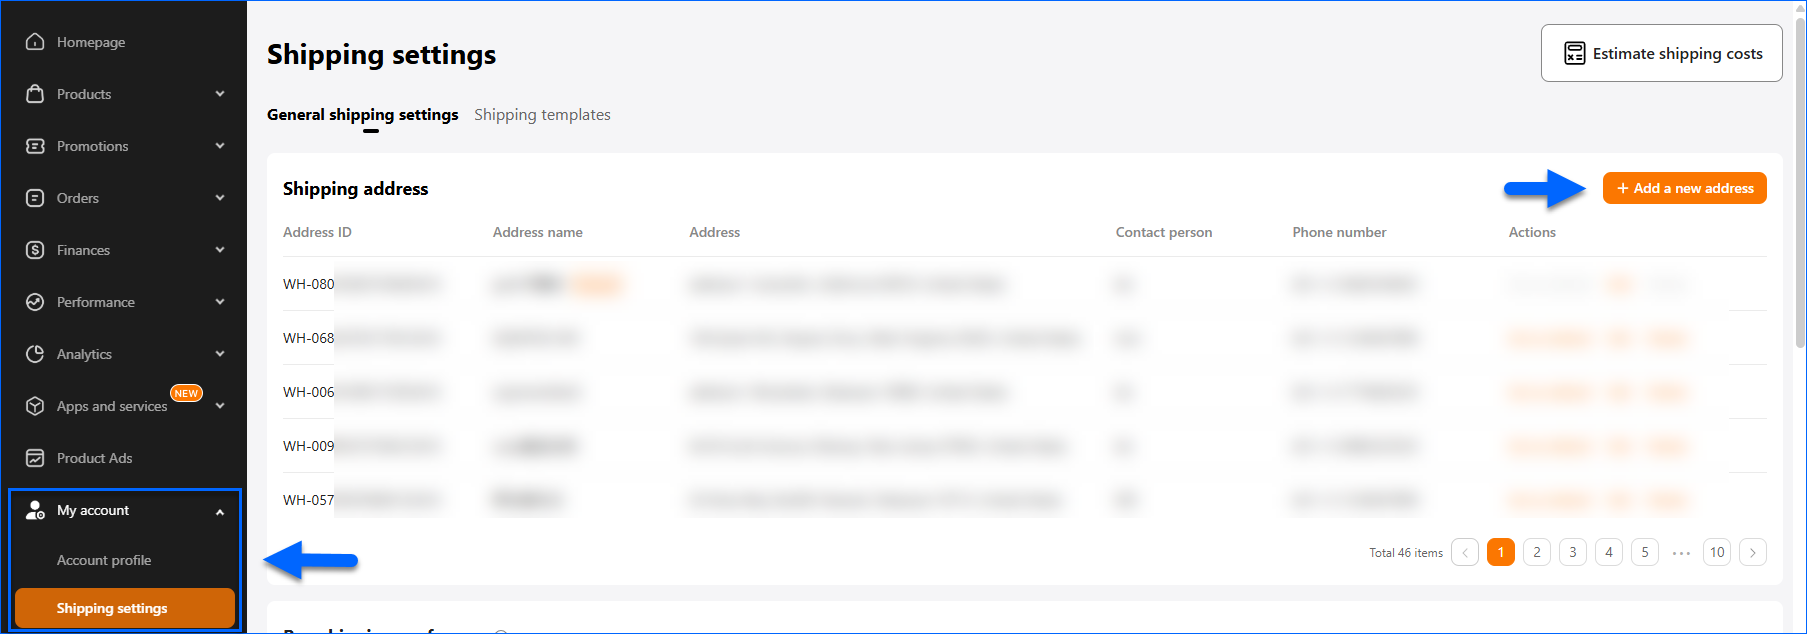
- Fill in the information and click Save.
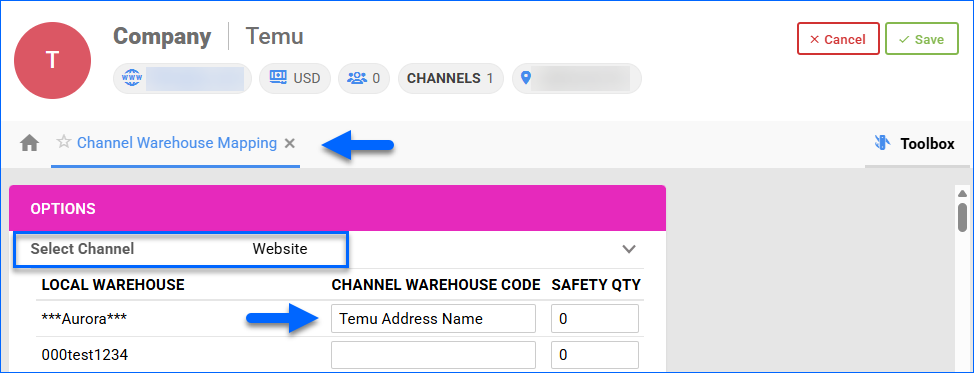
- Then, go to Sellercloud.
- Open the company designated for your Temu integration.
- From the Toolbox, click Channel Warehouse Mapping.
- Click Select Channel > Website.
- Click Edit.
- Find the local warehouse you want to use and fill in the Temu Address Name in the corresponding Channel Warehouse Code field. Then, click Save.
Cancellation Import
If an order is imported into Sellercloud and is later cancelled on Temu, the plugin will update the local Sellercloud order to Cancelled. However, if the order is cancelled before the initial import into Sellercloud, the plugin won’t create it locally. In case the order is already Fully or Partially Shipped, the plugin will add an order note, but will not change the General Order Status in Sellercloud.
Listings Management
Temu is categorized as a Website Integration within Sellercloud. This means that if your Default Company already has an integrated Website or any plugin integration, you will need to set up Temu under a New Company that has no SKUs. In such cases, we advise creating Shadow Products linked to the SKUs in your default company to ensure proper inventory management.
The available inventory in Sellercloud is calculated based on the Current Aggregate Sellable Quantity minus the Safety Quantity configured on the Website Product Properties page. If the Use Default box is checked, we use the company Safety Quantity instead.
Map Products
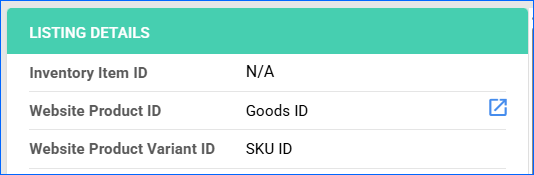
To ensure successful inventory level updates, your Sellercloud products must be mapped to your Temu listings. We use two identifiers:
- Website Product ID – This Sellercloud website property corresponds to the Goods ID on Temu.
- Website Product Variant ID – This Sellercloud website property corresponds to the SKU ID on Temu.
You can configure your local SKUs individually or in bulk. To update a single product:
- Go to Manage Catalog and open a product.
- From the Toolbox, click Website Properties.
- Click Edit and update the Website Product ID and Website Product Variant ID fields.
- Click Save.
You can also import these values for your whole catalog using our Bulk Product Update Tool. The columns you need are WebsiteProductID and WebsiteProductIDVariantID.
Update Inventory on Temu
You can send inventory updates to Temu automatically and manually.
To initiate regular automatic Temu listing updates:
- Go to Company Settings.
- Click Toolbox and select Website > General Settings.
- Click Edit.
- In the Options panel, check Allow Inventory Upload.
- Click Save.
To manually update the inventory of a single listing:
- Go to the Product Details Page.
- Click Toolbox and select Website Properties.
- Click Actions, and select Update Inventory to Website.

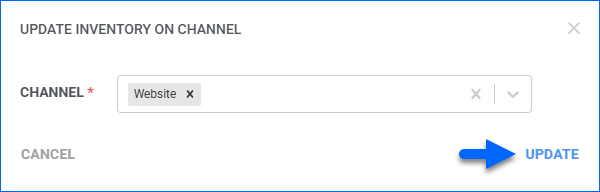
To update Temu listings in bulk:
- Go to the Manage Catalog page.
- In the results grid, select the products you want to update.
- Click the Actions icon in the bottom-right corner, and select Update Inventory on Channel.
- In the pop-up modal, select Website and click Update.