Overview
TikTok is a popular short-form video platform that has rapidly evolved into a thriving marketplace where brands and sellers can showcase their products to a massive and highly engaged audience. We have built a new integration that supports listing upload, order management, and inventory updates.
Integrating Sellercloud with TikTok Shop opens up exciting opportunities for e-commerce businesses looking to expand their reach and tap into the vast and dynamic world of social commerce. This integration streamlines the process of listing, managing, and selling products on TikTok, enabling businesses to leverage the platform’s immense potential for driving sales and brand visibility.
Sellercloud has partnered with TikTok to ensure prioritized onboarding and approval. To request a TikTok Seller Account, fill out this form.
Prerequisites
Open a ticket with Sellercloud Support to install the latest version of the Tiktok 202309 OpenApi Website Cart Plugin onto your server. If you don’t yet have an active TikTok Seller Account, fill out this form to have Sellercloud expedite the account approval process.
If you already have active listings on TikTok Shop prior to integrating Sellercloud, you can use the Tiktok Product Import Plugin to create the products in Sellercloud.
Integrate TikTok Shop
Before you can start listing products and shipping your orders through Sellercloud, you must set up the integration. If your company already has an integrated Website or another plugin integration, you must create a new Company.
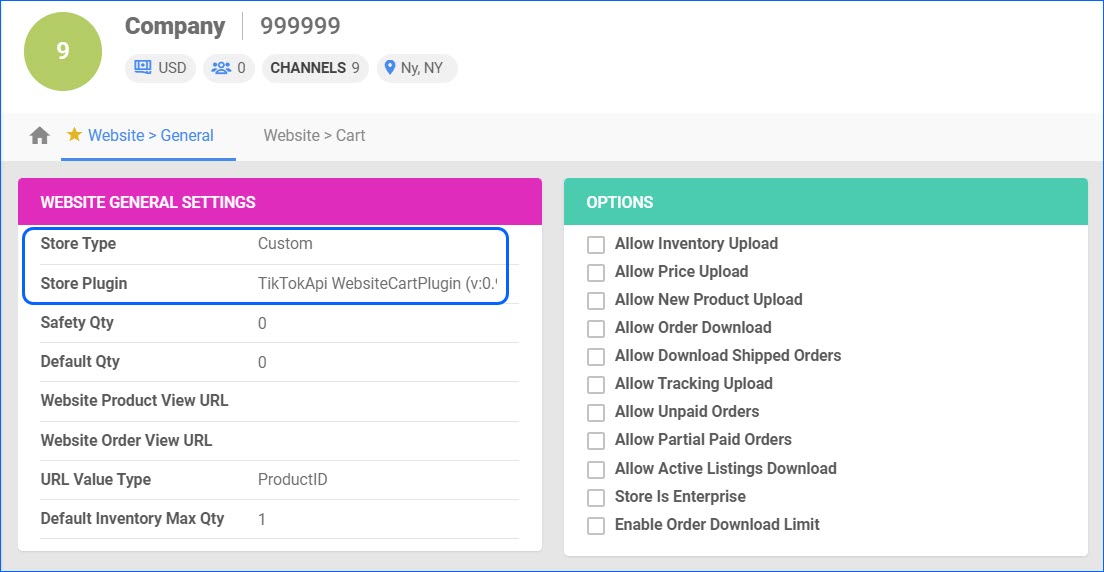
- Log in to Sellercloud and navigate to Settings > Companies > Manage Companies.
- Then, open your TikTok Company > Toolbox > Website General Settings.
- For Store Type, select Custom, then from the Store Plugin Dropdown, choose the Tiktok 202309 OpenApi Website Cart Plugin.
- Click Save.
 Next, set up your Cart Settings:
- In the same Company, go to Toolbox > Website Cart General Settings.
 To connect to TikTok Shop UK, you must click Edit and enable the UK Store? setting and fill in your shop_id during this step. Click Save and proceed with the instructions below.
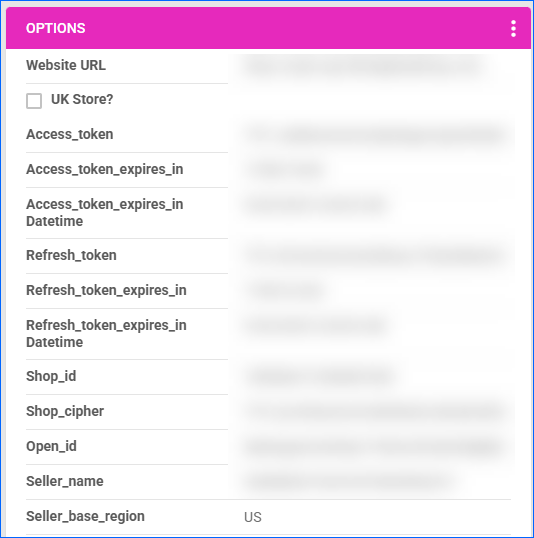
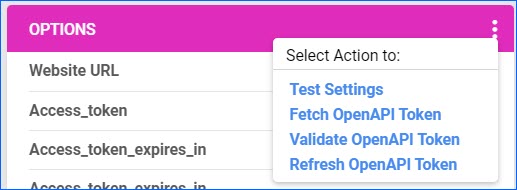
 - Then, click the three dots on the Options Panel to see the Actions Menu. Click Fetch OpenAPI Token. A pop-up window will open. Select the Account, click Next, and then click Authorize. The action will populate the following fields:
- Access_token
- Access_token_expires_in
- Access_token_expires_in datetime
- Seller_name
- Seller_base_region
- From the same menu, click Fetch Refresh OpenAPI Token. This action will populate the rest of the corresponding fields.
- To finalize the setup, open the Action Menu again and click Test Settings. This will ensure the tokens are valid and auto-populate the Shop ID field.
Configure Integration Options
Once the connection has been established, you should configure the integration parameters. In the Company Website General Settings, enable the following:
- Allow Inventory Upload – Enables Sellercloud to send automatic updates for the Inventory of TikTok-enabled products regularly.
- Allow Price Upload – Enables Sellercloud to send automatic updates for the Price of TikTok-enabled products regularly.
- Allow Order Download – Enables Sellercloud to download new orders placed on TikTok Shop automatically. Replacement Orders will also be downloaded and a system-generated Note will indicate the original order.
- Allow Tracking Upload – Enables Sellercloud to automatically upload shipping and tracking for orders placed on TikTok Shop.
You can configure more optional settings on both the Website General Settings page and the Cart General Settings page. These settings determine the kind of information that will be transmitted between Sellercloud and TikTok Shop.
TikTok Shop Orders
With the integration established, you may need to download your existing TikTok Orders manually. Go to the company’s Website General Settings > Actions > Download Orders. This will create a Queued Job, and all recent orders will be created in Sellercloud. All subsequent orders will be downloaded automatically.
TikTok Orders will be created with Order Source: Website. You can Search for them on the Manage Orders Page with filters for Company and Channel.
Sellercloud also periodically imports Settlement Data from TikTok Shop and applies it to your existing orders. Please note that there may be a delay in importing the Settlements, subject to availability at TikTok Shop.
Order Shipping
Once the orders are downloaded into Sellercloud, you can ship them and generate carrier and tracking information. This can be achieved via Shipbridge or any other shipping software you have integrated. The tracking information will then be sent back to TikTok, updating the order status on the channel.
We are not able to generate tracking via the TikTok API. If you ship an order externally, you would have to manually add the tracking information in Sellercloud to mark the order as Shipped and Completed. Alternatively, you can enable the Website Cart General Setting Query Shipping Change in your company settings. When enabled, Sellercloud will periodically query tracking information from TikTok Shop.
Fulfilled by TikTok
Fulfilled by TikTok (FBT) is a service provided by TikTok Shop to sellers to help them grow their business. With this program, the channel is responsible for warehousing your inventory, processing orders, and handling returns. Once you have integrated TikTok with your Sellercloud account, your FBT orders will be included in the general import.
FBT orders are initially created with Shipping Status: Unshipped and the Fulfilled by TikTok Order Subtype. Once shipped from a TikTok Fulfillment Center, we will bring in the tracking information and mark the order as Completed. You must enable the Query Shipping Change setting on the Website Cart General Setting page in your integrated company to ensure shipping information is imported automatically.
Cancellations and Refunds
You can cancel or refund an order from the Action Menu on the Order Details page. Our TikTok integration supports cancelling and refunding TikTok orders, with some notes:
- Orders paid using an Online Payment Method can be refunded from Sellercloud, subject to the rules prescribed by TikTok.
- If the Order payment is done via PayPal or Apple Pay, the refund should be issued directly on TikTok.
- Order cancellation requests will be sent to TikTok. You can only cancel orders that are Unpaid and Awaiting Shipment on TikTok Shop.
You can also import cancellations initiated on TikTok:
- Navigate to the Website Cart Settings of your integrated Company > enable Query Order Status Change > Save.
- Then, you need to re-import the Cancelled Order:
- Navigate to Orders > Download Orders From Channel > Download Orders From Website Plugin.
- Select the Tiktok 202309 OpenApi Website Cart Plugin from the dropdown > choose your TikTok integrated company > add a Date Range that includes the cancelled orders.
When you click Download, all cancellations within that date range will be imported, provided that the corresponding Sellercloud orders are In Process and UnShipped.
TikTok Shop Listings Management
TikTok Shop is categorized as a Website Integration within Sellercloud. This means that if your Default Company already has an integrated Website or any plugin integration, you will need to set it up under a New Company that has no SKUs. In such cases, we advise creating Shadow Products linked to the SKUs in your default company to ensure proper inventory management.
Our TikTok Shop Integration supports both posting products and importing them into Sellercloud. If you already have active listings, you can use the TikTok Product Import Plugin for a one-time download. Contact our Support Team to ensure the plugin is installed on your server. The imported SKUs must be created under the TikTok Integrated Company. If it is not your Default Company, you can later Create a Shadow Relationship between the TikTok active listings and your active Sellercloud Products.
To download your Active Listings:
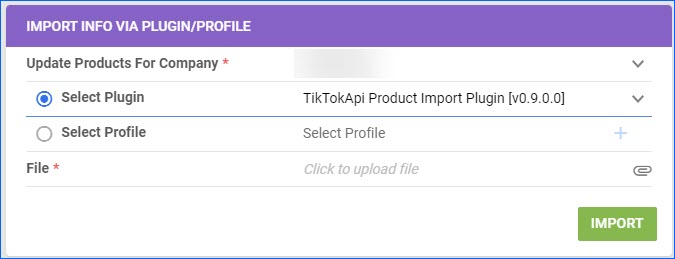
- Navigate to Catalog > Tools > Import Product Info.
- Select Import Info Via Plugin/Profile.
- In the panel on the right-hand side, choose TikTok Product Import Plugin from the dropdown.
- Select your TikTok Company in the Update Products For Company field.
- You will be required to upload a file. This particular plugin does not require a list of SKUs, so you can use an empty CSV or Excel file.
- Click Import.
When you import your catalog from TikTok Shop, we match the active listings to Sellercloud SKUs by Merchant SKU and Website Product ID. If there is a Variation Parent in the import, we only match it by Website Product ID.
Product Categories and Attributes
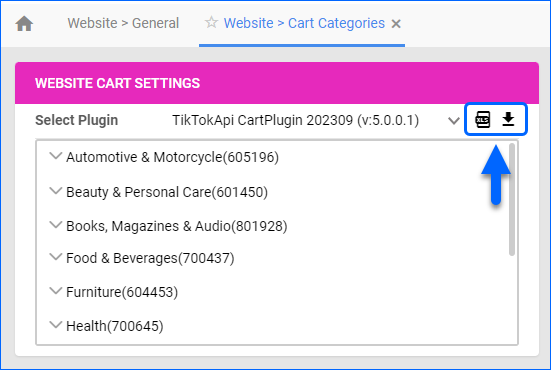
Before you can configure any products for posting, you will need to download the existing TikTok categories. To use the V2 (L7) category list and details, you must enable Category Version Is V2 on the Website > Cart General settings page of your integrated company. To download the latest list of product categories:
- Go to the integrated Company > Toolbox.
- Select Website Cart Categories > Click on the icon to Re-Download Categories.
Once the Categories are downloaded to Sellercloud, you can click the Export icon to download an Excel spreadsheet that contains all the available category and parent category names and IDs. You can later use this to bulk update your SKUs and prepare them for posting.
Then, make sure to bring in the Product Attributes as well:
- Navigate to Settings > Companies > Manage Companies.
- Then, open your TikTok Company > Toolbox > Website Cart General Settings.
- Click on the three dots menu of the Options panel header > Download attributes.
Once these two actions are done, you will be ready to start preparing your products.
Ready a Product
In order to post a new product on TikTok Shop, it first needs to be Ready for Website.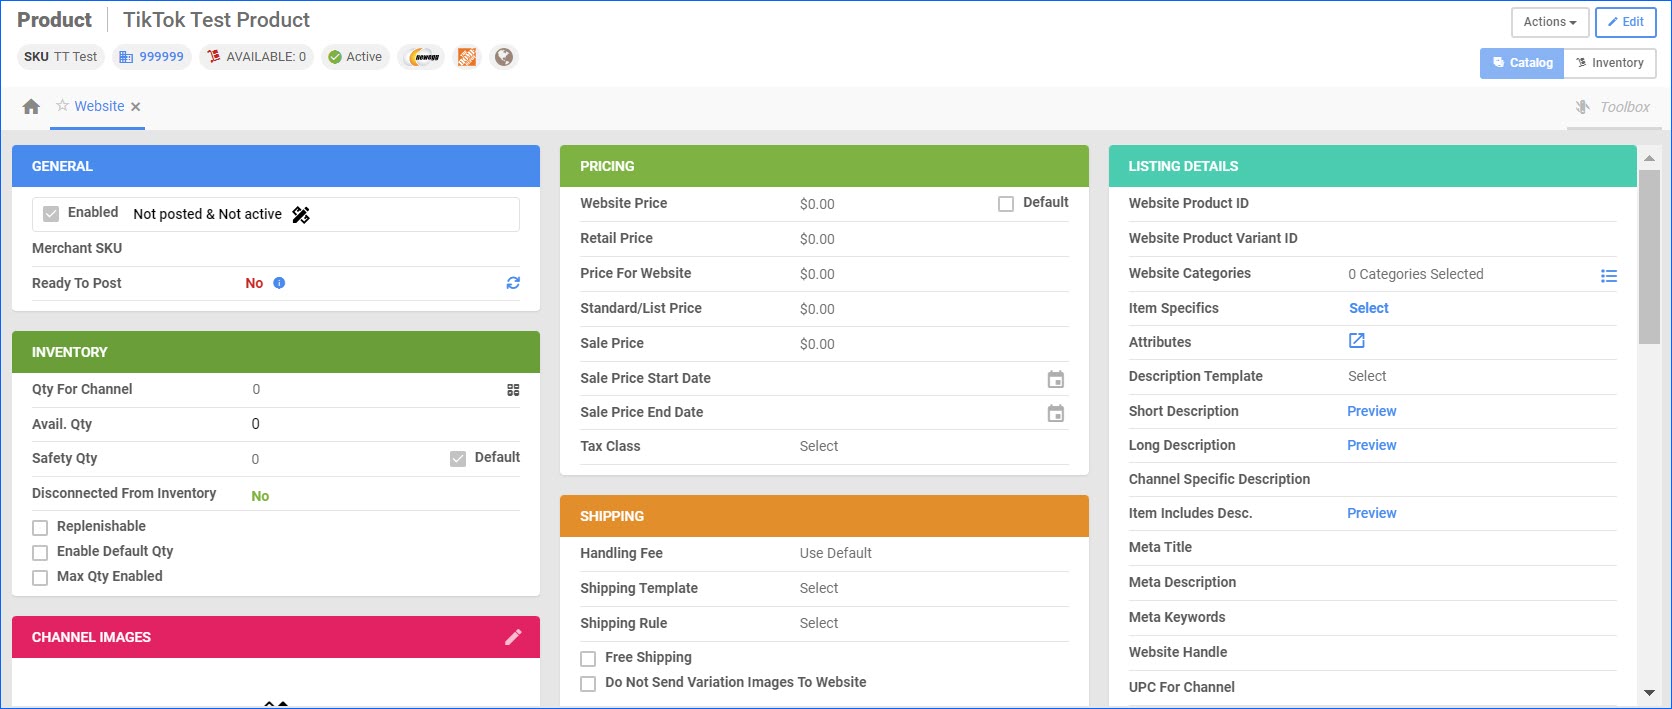
- Navigate to Catalog > Manage Catalog > Open your Product.
- Click on Toolbox > Website Properties > Click Edit and configure the following:
-
- Click the checkbox for Enabled.
- Add a Website Price.
- Add Long and Short Descriptions. If there is no TikTok-specific description, we will send the product’s main Long Description from the Product Details Page.
- On Channel Images, add a Gallery Image and Main Description Image. TikTok Shop requires that images have a 1:1 aspect ratio. The minimum is 600:600, and the maximum is 20000 * 20000. Images cannot be over 5MB in size. You can see additional information regarding Images and Videos below.
- Select one Category and configure Product Attributes. The Category you select must be a leaf category, meaning it cannot be the parent of other categories.
- Add a Shipping Weight and Package Dimensions. These fields are required.
- You can also configure a Brand, which is not a required field. When brand information is sent, TikTok checks it against the Product Category, and if there is an issue, the whole product post/update will fail. You can opt not to send brand information at all by disabling Product Export: Send Brand Info setting on the Website Cart General Settings of the company.
-
- Configure a Product Identifier (GTIN, EAN, UPC, or ISBN):
1. Must be a numeric value.
2. The number of characters needs to meet the following requirements:
GTIN: 14 digits.
EAN: 8, 13, or 14 digits.
UPC: 12 digits.
ISBN: 13 digits.
3. You cannot set the same GTIN code to multiple SKUs. - Click Save.
We can only send one product identifier when posting a product to TikTok. If your SKUs have multiple (for example, a UPC and a GTIN), you can configure the priority of each identifier. To do this, go to the TikTok integrated Company > Toolbox > Website Cart General Settings. Of the Identifiers configured for each product, we will send the one with the highest priority.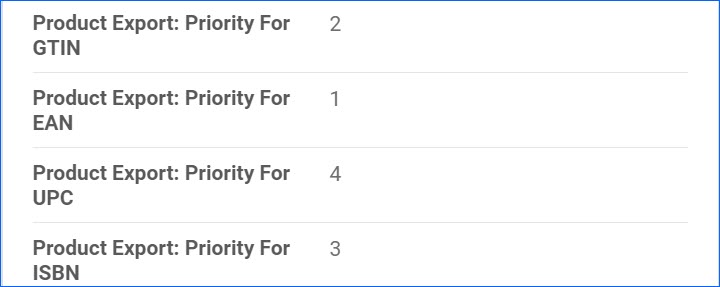
Product Images and Videos
TikTok Shop has provided guidelines and restrictions regarding Product Images and Videos, which should also be followed when listing your products from Sellercloud:
- All images must be at least 600 x 600 pixels.
- For all images, the product must be in color, not obscured, blurry, or pixelated.
- Each image must show a different side of the product. The supplemental images must show the back and sides of the item, as well as other details or accessories.
- You may upload up to 9 images per item.
Each product must have appointed a Main Image, which will be the first one displayed to users:
- The Main Image must show the front of the product.
- The Main Image must show the entire product: the product must not be cropped or only shown in part.
- The product should take up at least 60% of the image frame.
- The Main Image background must be in solid color. White is recommended.
You can also post a Product Video:
- You can include one video per listing.
- Videos must not exceed 5MB in size.
Product Documents
TikTok has certain restrictions on products for categories like:
- Jewelry, watches, and accessories
- Beauty, cosmetics, and personal care products
- Electricals and electronics
- Children’s products and toys
- Pet food
- Food and drink high in fat, salt, or sugar
These restrictions often aim to ensure compliance with safety standards and regulations. To prepare such products, you must provide the relevant certifications and documentation. Typically, each document should be tagged with the specific certification or labeling requirement it fulfills:
- US Certificate of Conformity
- Declaration of Conformity
- Cosmetics Packaging Labeling
- FCC Certification
- Food Labeling
- Product Testing Reports
- Children’s Product Certificate
- Tracking Information Labeling
- Pet Food Labeling
- Test Report
- Drug Labeling
- UKCA / CE mark
- UK / EU Declaration of Conformity
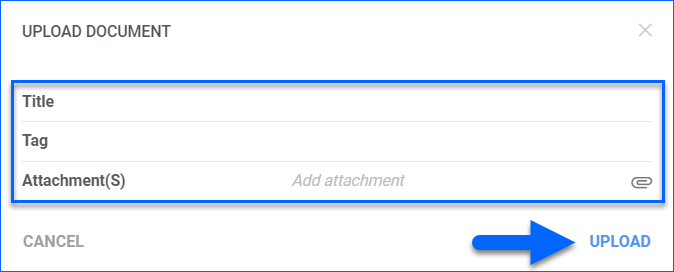
See Product Documents for step-by-step instructions on how to upload the required files.
Post and Update Listings
Once your products are ready, you can post and update them manually or automatically.
To list a new product:
- Open the Website Product Properties of a Product that is Enabled and Ready to Post.
- Open the Action Menu and click Post Product.
- If the item is listed, a success message will pop up, or an error message if something is missing.
To update Existing Listings Manually:
- Open the Website Product Properties of a Product that is Posted and Active.
- Open the Action Menu and click Update Inventory on Website or Update Price on Website.
- You can also use the action Update Listing part to website to do a partial update to an existing listing, including product title and category.
Sellercloud also sends automatic Inventory and Price updates to TikTok. Ensure the Website General Company Settings Allow Inventory Upload and Allow Price Upload are enabled and your Products are Enabled for Website.
Variation Products
Our TikTok Shop Integration supports listing Variation Products. To successfully post your variations, ensure that:
- The Matrix Parent is fully set up and Ready to Post on Website, as described in the section above.
- The Variation Children you want to post must also be Ready for Website. Keep in mind their Categories.
- Currently, there are no restrictions regarding the types and number of Dimensions allowed on TikTok Shop. However, you are only allowed up to 100 variations per item.
- To post each variation with a unique Image, ensure you enable Product Export: Send Matrix Image in the Website Cart General Company Settings.
- When all your products are configured, go to the Matrix Parent > Website Properties > Actions > Post on Website. You only need to list the parent; the variations will be posted automatically.
- If you are importing an active listing from TikTok that already has a variation relationship, the plugin will import the parent and children and automatically configure them as a Matrix.