Overview
Tradefull provides a complete e-commerce solution for businesses of all sizes that includes multiple services related to dropshipping, warehousing, fulfillment, and access to integrated marketplaces. They only charge transaction fees, so they don’t make money unless you do.
You can integrate your Sellercloud account with Tradeful, which allows you to automatically:
- Import orders from Tradefull’s platform into Sellercloud
- Send tracking information from Sellercloud to Tradefull
- Send product inventory updates from Sellercloud to Tradefull
Prerequisites
You must have a Tradefull account. If you don’t have one, you can contact them to sign up now.
You also need to contact Tradefull to:
- Get help with setting up an SFTP connection. They will provide the credentials.
- Get an Order Import, Tracking Export, and Inventory Export templates with all required column headers for the mapping profile in Sellercloud.
Contact Sellercloud Support and request a custom product column Tradefull_Enabled to be added to your account. You can use it to filter and send only specific products to Tradefull with your inventory exports. Once they add the column, make sure to follow the steps in the Product Custom Columns section of the Custom Columns article to enable it. Check the Unnamed and Dashboard boxes when following the steps. To add more custom columns for other functionality, check with Sellercloud Support.
When you complete the above, you are ready to set up the integration. The setup consists of two parts: creating mapping profiles and setting up scheduled tasks.
Create Profiles
You need to map three profiles in total using Sellercloud’s Import Mapping Tool and Export Mapping Tool. Note that to do the mapping, you need the templates from Tradefull that we mentioned in the Prerequisites section.
For the two Export Profiles:
- In Sellercloud, click Settings.
- Select Mapping Tools > Manage Export Mapping Profiles.
- Click the blue Actions icon on the bottom right and select Create.
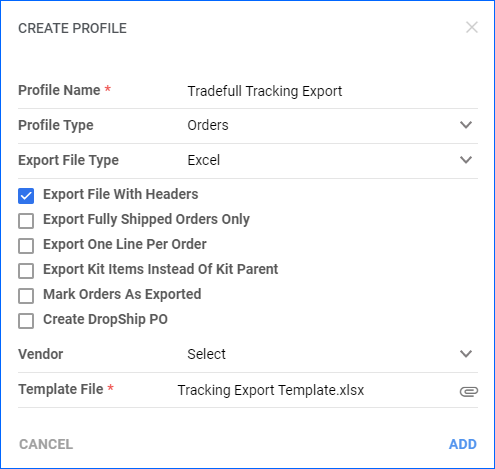
- Enter the following:
- Profile Name – type Tradefull Tracking Export for the first mapping and Tradefull Inventory Export for the second.
- Profile Type – select Orders for the first mapping and Product for the second.
- Export File Type – select Excel.
- Check Export File With Headers (CSV/TXT Only).
- Click Template File. Find and select the Tracking Export and Inventory Export templates from your device. Click here to download the Tracking Export template. Click here to download the Inventory Export template.
- Click Add.
For the Import Profile:
- In Sellercloud, click Settings.
- Select Mapping Tools > Manage Import Mapping Profiles.
- Click the blue Actions icon on the bottom right and select Create.
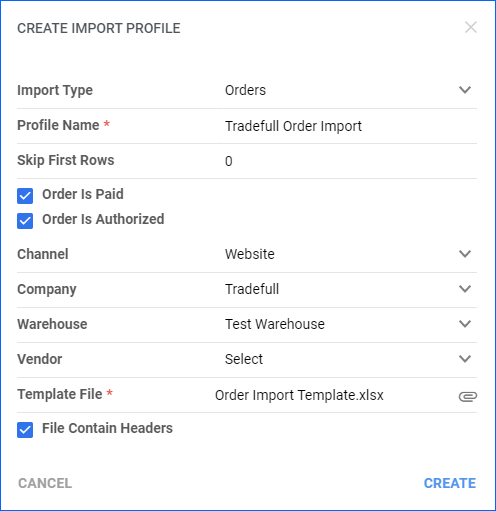
- Enter the following:
- Import Type – select Orders.
- Profile Name – type Tradefull Order Import.
- Skip First Rows – set to 0.
- Check Order is Paid and Order is Authorized.
- Channel – set to Website.
- Company – choose the new Tradefull-designated company you created.
- Warehouse – select the warehouse from which you will fulfill your Tradefull Orders.
- Click Template File. Find and select the Order Import template you got from Tradefull’s support team.
- Check File Contain Headers.
- Click Create.
Map Order Import Profile Fields
Go to Settings > Mapping Tools > Manage Import Profiles > Open the Tradefull Order Import profile > Click Edit > Here are some of the fields you will likely need to map:
- Order_OrderSourceOrderID – map to OrderNumber
- Order_TimeOfOrder – map to OrderDate
- Order_Item_ProductID – map to Style
- Order_Item_SalePrice – map to Price
- Order_Item_Qty – map to Quantity
- Order_BillingFirstName – map to BuyerName
- Order_BillingStreetLine1 – map to FullAddress
- Order_BillingStreetLine2 – map to AddressLine1
- Order_BillingCity – map to City
- Order_BillingStateCode – map to State
- Order_BillingPostalCode – map to Zip
- Order_BillingCountryCode – map to Country
- Order_BillingPhoneNumber – map to Select
- Order_ShippingFirstName – map to BuyerName
- Order_ShippingStreetLine1 – map to AddressLine1
- Order_ShippingStreetLine2 – map to AddressLine2
- Order_ShippingCity – map to City
- Order_ShippingStateCode – map to State
- Order_ShippingPostalCode – map to Zip
- Order_ShippingCountryCode – map to Country
Map Tracking Export Profile Fields
Go to Settings > Mapping Tools > Manage Import Profiles > Open the Tradefull Tracking Export profile > Click Edit > Map the following fields:
- Order Number – map to bvc_Order.UniqueOrderSourceOrderID
- Tracking Number – map to bvc_Order.TrackingNumber
Map Inventory Export Profile Fields
Go to Settings > Mapping Tools > Manage Import Profiles > Open the Tradefull Inventory Export profile > Click Edit > Map the following fields:
- MPN – map to bvc_Product.ID
- AggregateQty – map to bvc_Product.AggregateQty
Create Scheduled Tasks
To ensure seamless integration, you must automate the data transfer by creating Scheduled Tasks for each Profile.
Order Import Task
To create a Scheduled Task that regularly imports orders from Tradefull to Sellercloud:
- Navigate to Settings > Scheduled Tasks > Manage Scheduled Tasks.
- Click the green + icon: Create New Scheduled Task.
- Complete as follows:
- Click Task Type and select Import Orders.
- Set the Task Name to Tradefull Order Import.
- Select the Company.
- Select the Start Time.
- Click CREATE.
- The following message appears at the bottom of your screen: “Scheduled task created successfully. Click Here to configure the task details.” – click the link.
- Click the Edit button on the top right.
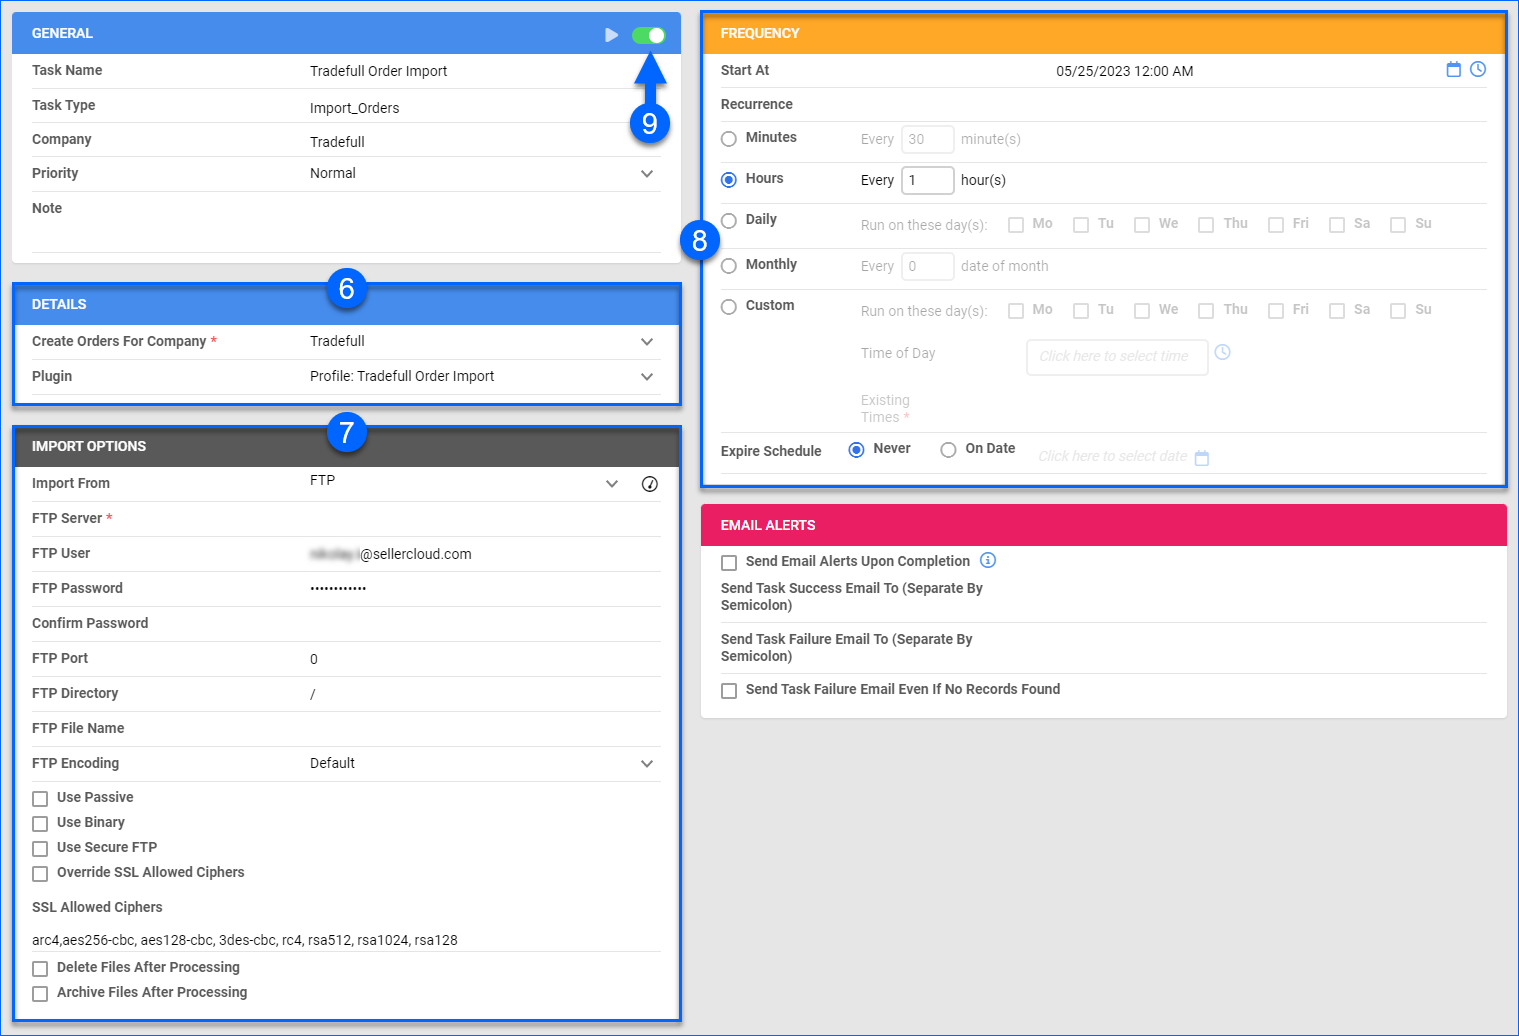
- In the Details section:
- Click the Create Orders For Company menu and select the company you designated for this integration.
- Click the Plugin menu and select Profile: Tradefull Order Import.
- In the Import Options section, set Import From to FTP and enter your SFTP credentials into the fields below. Check Use Secure SFTP. If there are multiple folders/directories, enter the Remote Folder where the file will be exported with a forward slash “/” before the folder name.
- In the Frequency section, specify the task frequency. For optimal performance, select a range between thirty minutes and one hour.
- In the General section, click the Enable button.
- Click Save on the top right.
Tracking Export Task
Tracking information for orders fulfilled through Sellercloud will be sent to Tradefull on a regular basis.
Before you move on, create a Saved View for orders filtered by:
- Company – Choose the Tradefull company
- Order Status – InProcess Or Completed
- Shipping Status – FullyShipped
- Payment Status – Charged
- Tracking Uploaded – No

To create a Scheduled Task that regularly exports order tracking from Sellercloud to Tradefull:
- Navigate to Settings > Scheduled Tasks > Manage Scheduled Tasks.
- Click the green + icon: Create New Scheduled Task.
- Complete as follows:
- Click Task Type and select Export Orders.
- Set the Task Name.
- Select the Company.
- Select the Start Time.
- Click CREATE.
- The following message appears at the bottom of your screen: “Scheduled task created successfully. Click Here to configure the task details.” – click the link.
- Click the Edit button on the top right.
- In the Details section:
- Click the User ID menu and select your ID.
- Click the Saved Search menu and select the saved view you created earlier.
- Click the Export Via menu and select Export Profile: Tradefull Tracking Export..
- Check This Is Tracking Export.
- In the Export Options section, set Export To to FTP and enter your SFTP credentials into the fields below. Check Use Secure SFTP. If there are multiple folders/directories, enter the Remote Folder where the file will be exported with a forward slash “/” before the folder name.
- In the Frequency section, specify the task frequency. For optimal performance, select a range between thirty minutes and one hour.
- In the General section, click the Enable toggle button.
- Click Save on the top right.
![]()
Inventory Export Task
You can export the inventory of selected products and send them to Tradefull. This task type requires a Saved View for products.
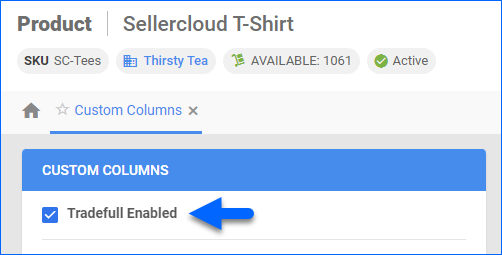
If you chose to enable only specific products for Tradefull, set their Tradefull_Enabled Custom Column for Products to True:
- For one product at a time: go to the Product Details Page > click Toolbox and select Custom Columns > click Edit, update the Tradefull_Enabled column, and Save.
- For multiple products in bulk: follow the steps to Bulk Update Products and use the Tradefull_Enabled column – set it to True for all products you want to enable.
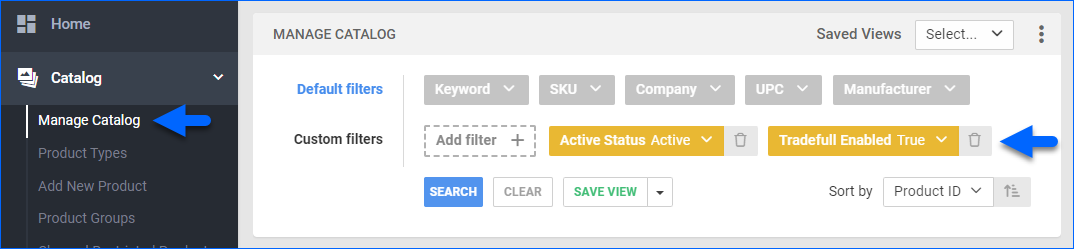
Then create a Saved Search for products filtered by Tradefull_Enabled – True. Optionally, you can add more filters to the search. You can also add more filters and custom columns based on your preference.
To create a Scheduled Task that regularly exports inventory to Tradefull:
- Navigate to Settings > Scheduled Tasks > Manage Scheduled Tasks.
- Click the green + icon: Create New Scheduled Task.
- Complete as follows:
- Click Task Type and select Export Products.
- Set the Task Name to Tradefull Inventory Export.
- Select the Company.
- Select the Start Time.
- Click CREATE.
- The following message appears at the bottom of your screen: “Scheduled task created successfully. Click Here to configure the task details.” – click the link.
- Click the Edit button on the top right.
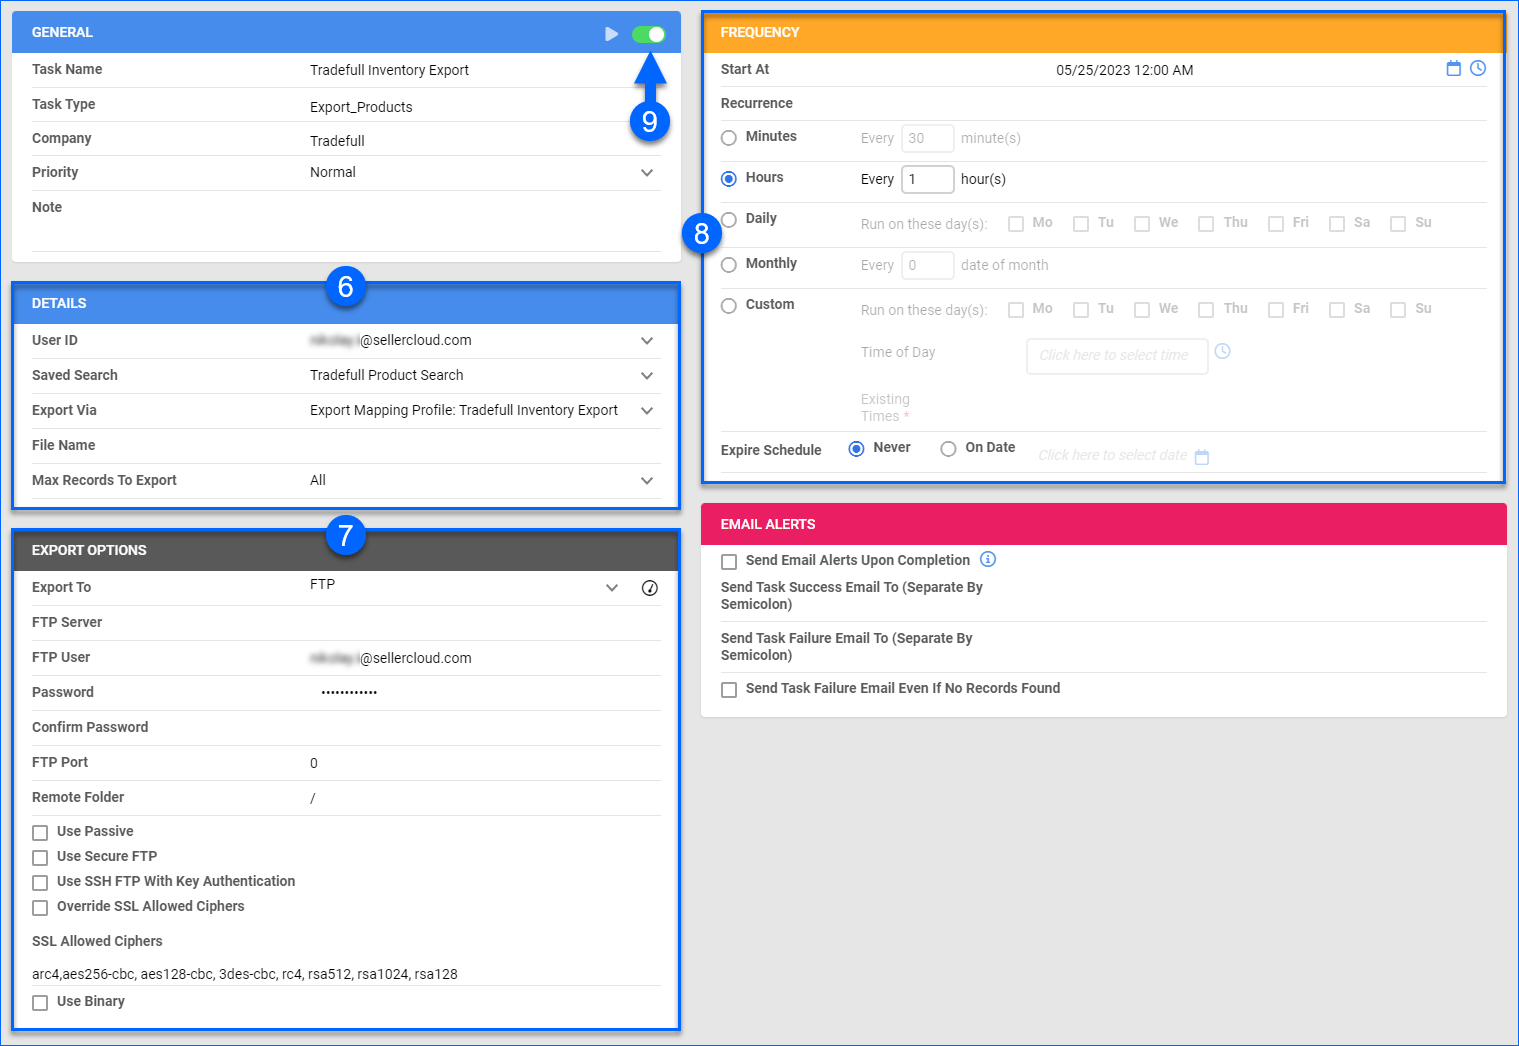
- In the Details section:
- Click the User ID menu and select your ID.
- Click the Saved Search menu and select the saved view you created earlier.
- Click the Export Via menu and select the mapping created earlier. In this menu, it’s called Export Mapping Profile: Tradefull Inventory Export.
- In the Export Options section, set Export To to FTP and enter your SFTP credentials into the fields below. Check Use Secure SFTP. If there are multiple folders/directories, enter the Remote Folder where the file will be exported with a forward slash “/” before the folder name.
- In the Frequency section, specify the task frequency. For optimal performance, select a range between thirty minutes and one hour.
- In the General section, click the Enable button.
- Click Save on the top right.