Overview
GunBroker is an online marketplace where individuals and businesses can buy and sell firearms, ammunition, and accessories. It operates as an auction platform similar to eBay, offering a wide range of firearms and related products, including both new and used items. The site facilitates transactions between private sellers and buyers, following applicable laws and regulations.
Integrating GunBroker into your Sellercloud account allows you to seamlessly import orders, upload tracking information, create listings, and ensure your GunBroker store is always up-to-date with the latest inventory data. The integration works through API, transmitting information between the two services via plugins and Scheduled Tasks.
If necessary, you can open a ticket with Sellercloud Support to request additional customizations or other plugins for this integration. Any such modifications will be billable.
Prerequisites
Before you can integrate GunBroker with Sellercloud, complete the following requirements.
Sellercloud Support
Open a ticket with Sellercloud Support and request that the following plugins be installed on your server:
- GunBroker API Order Import Plugin – Imports orders from GunBroker to Sellercloud.
- GunBroker API Set Status Canceled Order Export – Sets orders as cancelled on GunBroker.
- GunBroker API Order Tracking Export – Exports tracking information to GunBroker.
- GunBroker API Product Export Plugin – Exports inventory to GunBroker.
- GunBroker API List Product Export Plugin – Creates product listings on GunBroker.
- GunBroker API Update Product Export Plugin – Updates product listing details on GunBroker.
Custom Company Settings
Create the following Custom Company Settings in the company designated for the integration:
- GunBrokerUsername – Enter your GunBroker username.
- GunBrokerPassword – Enter your GunBroker password.
- GunBrokerUseTestAPI – To use a test environment, set this to True, then change to False when you are ready to go into production. This setting defaults to True when not specified.
- (Optional) GunBrokerDefaultStandardTextID – Integer, used if the Custom Product Column GunBroker_StandardTextID is empty or 0.
- GunBrokerPaymentMethods – Enter a comma-separated list of payment methods to accept. The expected values are:
- SeeItemDesc
- Check
- VisaMastercard
- COD
- Escrow
- Amex
- Discover
- PayPal
- CertifiedCheck
- USPSMoneyOrder
- MoneyOrder
- FreedomCoin
- GunBrokerShippingClassesSupported – Enter a comma-separated list of the shipping classes you want to use. The expected values are:
- Overnight
- TwoDay
- ThreeDay
- Ground
- FirstClass
- Priority
- InStorePickup
- AlaskaHawaii
- Other
- GunBrokerWhoPaysForShipping — Determine how to handle shipping charges for all GunBroker listings. You must configure further details related to this setting directly on GunBroker. Enter only one of these expected values: 1, 2, 4, 8, or 16.
- 1 – See item description
- 2 – Seller pays for shipping
- 4 – Buyer pays for actual shipping cost
- 8 – Buyer pays fixed amount
- 16 – Use shipping profile
- GunBrokerWillShipInternational – Enter a default value for your products’ WillShipInternational property. By setting this to True, all products exported by the GunBroker API List Product Export Plugin will be allowed to ship internationally.
Custom Product Columns
Create the following Custom Product Columns:
- GunBroker_ItemID – The product’s SKU at GunBroker. This column’s value is entered by the Listing Creation plugin when the product is successfully listed on GunBroker. Set the Data Type to String.
- GunBroker_StandardTextID – Sends a StandardTextID to GunBroker. If this column is empty or set to 0, the value of the Custom Company Setting GunBrokerDefaultStandardTextID will be used. If the company setting is not configured either, no value will be sent. Set the Data Type to Integer.
- GunBroker_CategoryID – The product category. Set the Data Type to Integer.
- GunBroker_IsFFLRequired – Set the Data Type to Boolean.
- GunBroker_ListedOn – This column’s value is set to the current date and time by the Listing Creation plugin when the product is successfully listed on GunBroker. Set the Data Type to DateTime.
- GunBroker_ShippingProfileID – Set the Data Type to Integer.
- GunBroker_Price – By default, Sellercloud sends the Site Price to GunBroker. If you populate this setting, it will be used instead of the Site Price. Set the Data Type to Decimal.
- GunBroker_CollectTaxes – Set the Data Type to Boolean.
- GunBroker_SafetyQty – A Safety Quantity for products on GunBroker. Set the Data Type to Integer.
- GunBroker_Description – By default, Sellercloud sends the Long Description to GunBroker. If you populate this setting with the name of a Description Template, it will be used instead of the Long Description. Set the Data Type to String.
- (Optional) GunBroker_Enabled – Mark specific products as enabled for GunBroker. Set to True for any products you want to send with the Inventory Export plugin. Set the Data Type to Boolean.
Custom Order Columns
Create the following Custom Order Column:
- CanceledOnGunBroker – When the order status in GunBroker is successfully set to Cancelled, the Order Cancellation plugin sets this column to True. Set the Data Type to Boolean.
Order Import
The GunBroker API Order Import Plugin imports order data from GunBroker to Sellercloud. The plugin matches products in the two services as follows:
- First, it matches Gunbroker’s itemID to Sellercloud’s GunBroker_ItemID
- If the above values don’t match, it matches Gunbroker’s SKU to Sellercloud’s GunBroker_MerchantSKU
- If the above values don’t match, it matches Gunbroker’s SKU to Sellercloud’s ProductID (SKU)
Automate Order Import
To create a Scheduled Task that imports orders:
- Navigate to Settings > Scheduled Tasks > Manage Scheduled Tasks.
- Click the green + icon: Create New Scheduled Task.
- Complete as follows:
- Click Task Type and select Import Orders.
- Set the Task Name.
- Select the Company.
- Select the Start Time.
- Click CREATE.
- The newly created Scheduled Task Details page will open automatically. Click the Edit button at the top right corner.
- In the Details panel:
- Click Create Orders For Company and select the company designated for this integration.
- Click the Plugin menu and select GunBroker API Order Import Plugin.
- In the Import Options panel, set Import From to None.
- In the Frequency panel, specify the task frequency. For optimal performance, select a range between thirty minutes and one hour.
- In the General panel, click the Enable button.
- Click Save.

Order Cancellation
The GunBroker API Set Status Canceled Order Export plugin sets orders with a Cancelled status in Sellercloud as cancelled on GunBroker, and then changes the value of the Custom Order Column CanceledOnGunBroker to True.
Before you move on, create a Saved Search for orders filtered by:
- Company – The company you created for the integration
- Order Status – Cancelled
- CanceledOnGunBroker – False
- Order Ack (Accept) – No

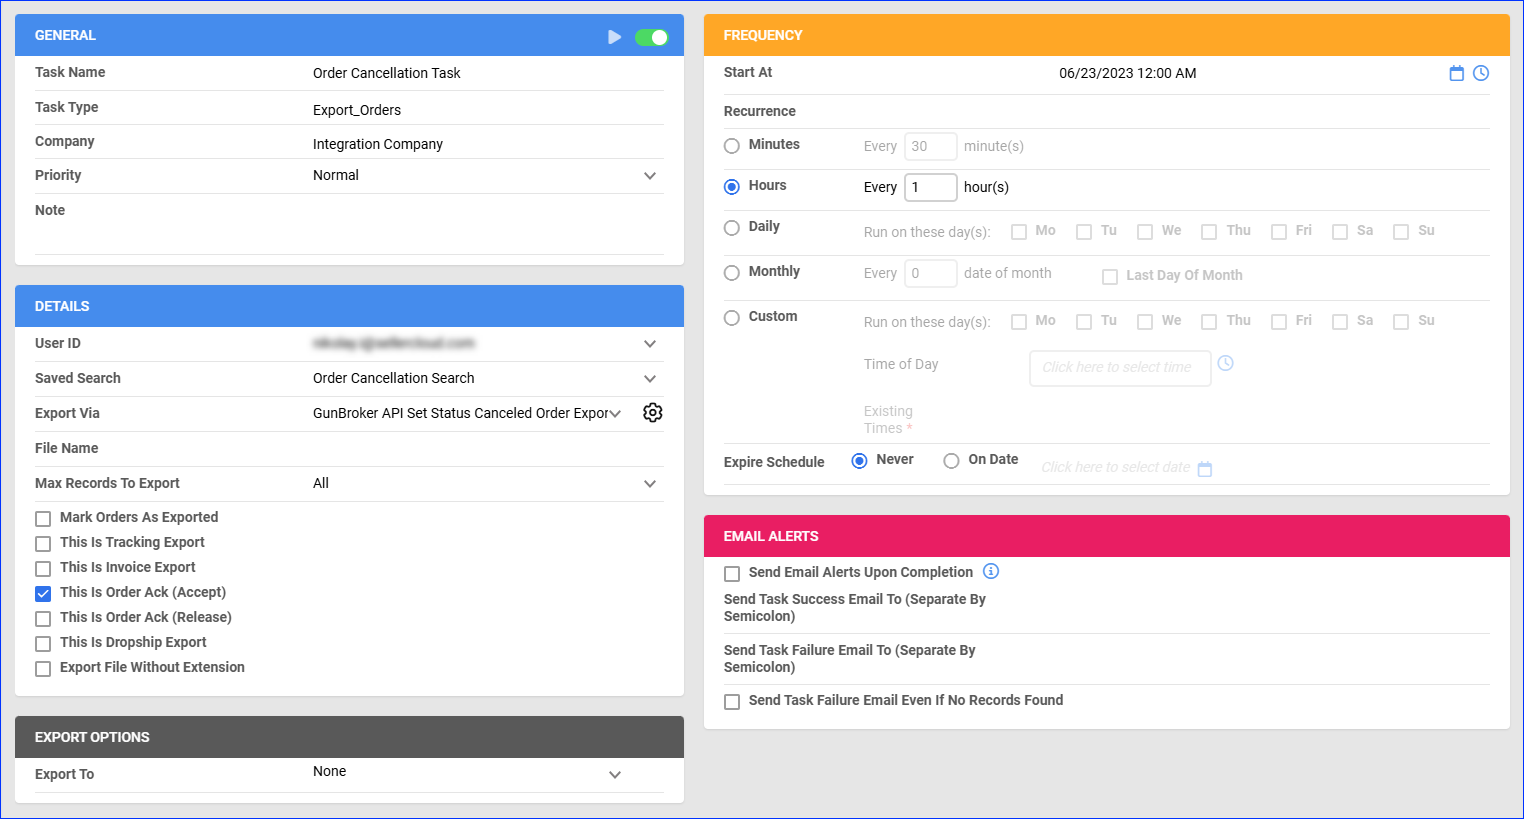
Automate Order Cancellation
To create a Scheduled Task that sends order acknowledgment:
- Navigate to Settings > Scheduled Tasks > Manage Scheduled Tasks.
- Click the green + icon: Create New Scheduled Task.
- Complete as follows:
- Click Task Type and select Export Orders.
- Set the Task Name.
- Select the Company.
- Select the Start Time.
- Click CREATE.
- On the Scheduled Task page, click the Edit button at the top right corner.
- In the Details panel:
- Click the User ID menu and select your email.
- Click the Saved Search menu and select the saved search you created earlier.
- Click the Export Via menu and select GunBroker API Set Status Canceled Order Export.
- Check This is Order Ack (Accept).
- In the Export Options panel, set Export To to None.
- In the Frequency panel, specify the task frequency. For optimal performance, select a range between thirty minutes and one hour.
- In the General panel, click the Enable toggle button.
- Click Save.
Tracking Export
The GunBroker API Order Tracking Export plugin sends tracking and shipping carrier details from Sellercloud to GunBroker and changes the OrderShipped status on GunBroker to True.
Before you move on, create a Saved Search for orders filtered by:
- Company – The company you created for the integration
- Order Status – InProcess Or Completed
- Shipping Status – FullyShipped
- Payment Status – Charged
- Tracking Uploaded – No
![]()
Automate Tracking Export
To create a Scheduled Task that exports order tracking:
- Navigate to Settings > Scheduled Tasks > Manage Scheduled Tasks.
- Click the green + icon: Create New Scheduled Task.
- Complete as follows:
- Click Task Type and select Export Orders.
- Set the Task Name.
- Select the Company.
- Select the Start Time.
- Click CREATE.
- On the Scheduled Task page, click the Edit button at the top right corner.
- In the Details panel:
- Click the User ID menu and select your email.
- Click the Saved Search menu and select the saved search you created earlier.
- Click the Export Via menu and select GunBroker API Order Tracking Export.
- Check This Is Tracking Export.
- In the Export Options panel, set Export To to None.
- In the Frequency panel, specify the task frequency. For optimal performance, select a range between thirty minutes and one hour.
- In the General panel, click the Enable toggle button.
- Click Save.
![]()
Inventory Export
The GunBroker API Product Export Plugin exports inventory from Sellercloud to GunBroker.
The Custom Product Column GunBroker_ItemID plays an important role in this plugin’s functionality:
- The GunBroker API List Product Export Plugin populates it when listing products.
- Before updating a product’s inventory, the plugin checks if the column requires an update and updates it if necessary.
- If the product is not found, the plugin clears the column’s value so the product can be relisted.
- If the product has no inventory, the plugin clears the column’s value and deletes the listing on GunBroker.
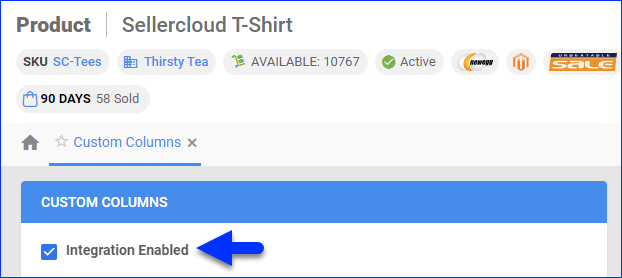
Optionally, you can enable only specific products for GunBroker by setting their GunBroker_Enabled Custom Product Column to True:
- For one product at a time: go to the Product Details Page > click Toolbox and select Custom Columns > click Edit, update the GunBroker_Enabled column, and Save.
- For multiple products in bulk: follow the steps to Bulk Update Products and use the GunBroker_Enabled column – set it to True for all products you want to enable.
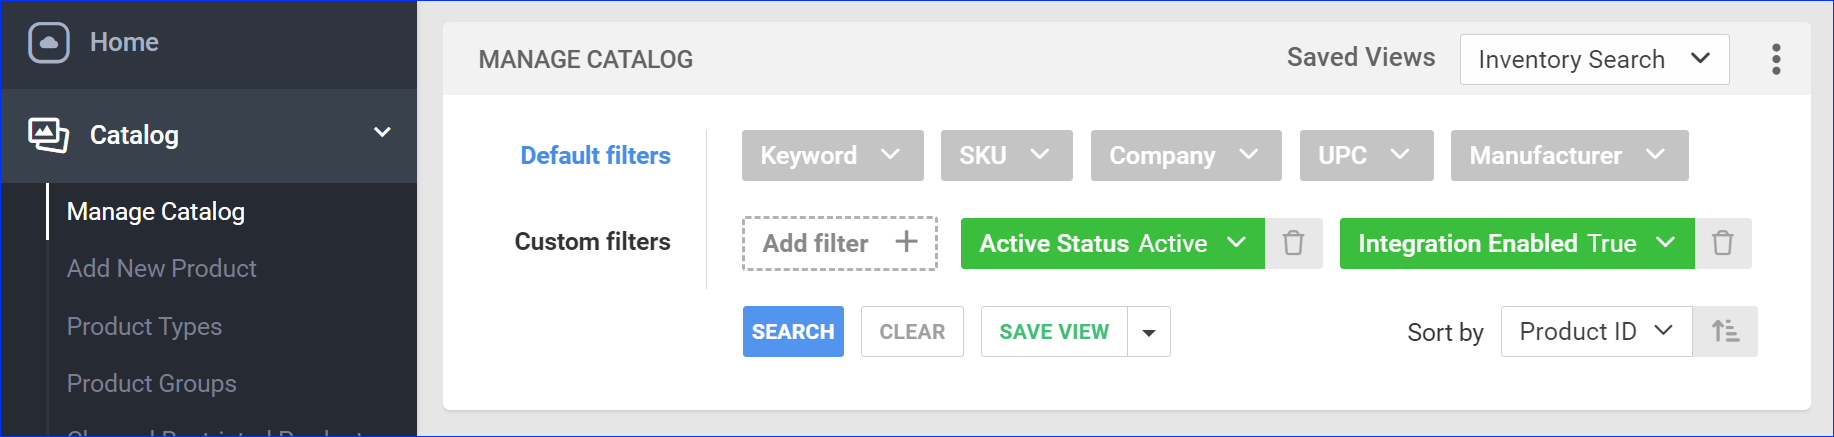
Before you move on, create a Saved Search for products filtered by GunBroker_Enabled – True. Optionally, you can add more filters to the search to narrow down the export further.
Unlike core integrations, plugin integrations don’t require products to be in the company where the scheduled tasks are set up. The export will include the products you select with your Saved Search.
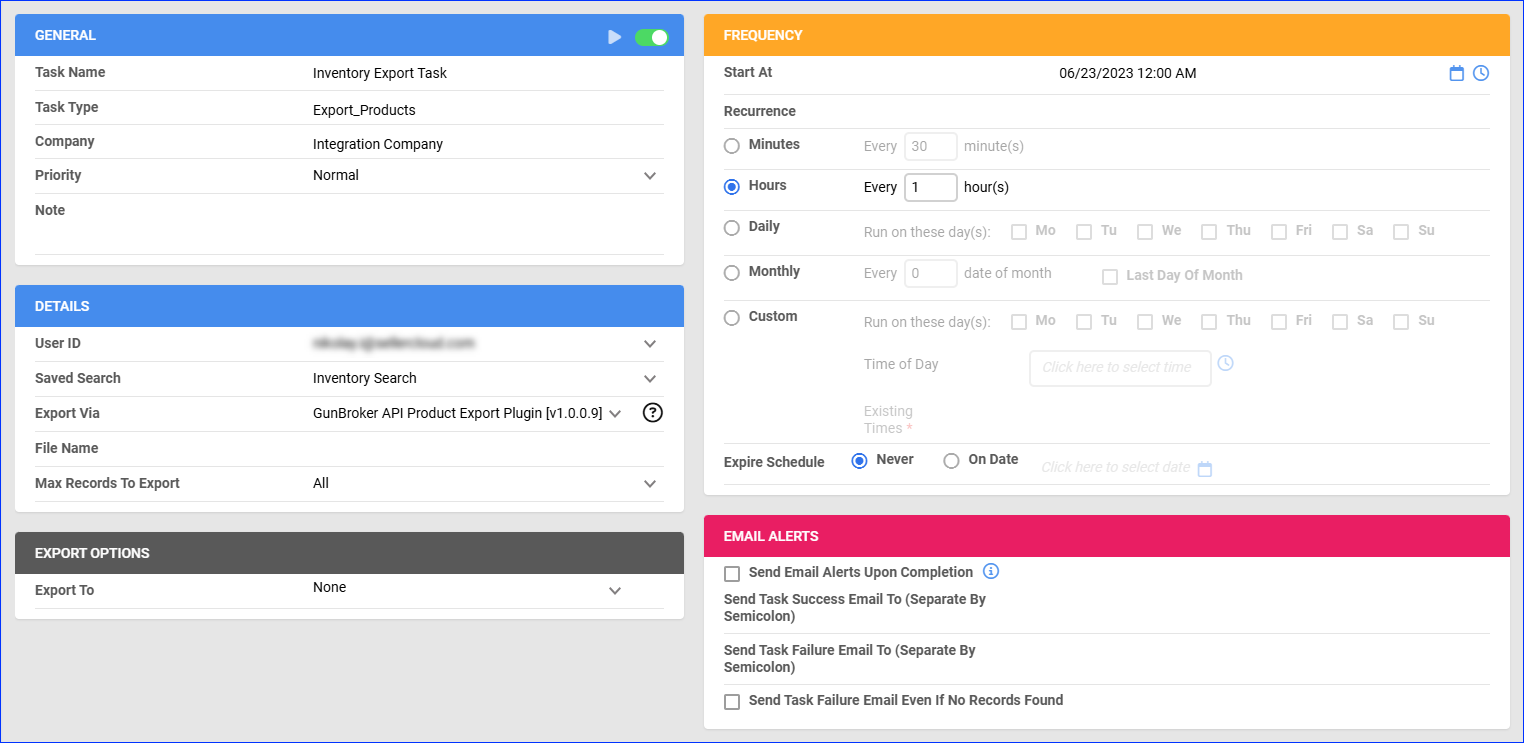
Automate Inventory Export
To create a Scheduled Task that exports inventory:
- Navigate to Settings > Scheduled Tasks > Manage Scheduled Tasks.
- Click the green + icon: Create New Scheduled Task.
- Complete as follows:
- Click Task Type and select Export Products.
- Set the Task Name.
- Select the Company.
- Select the Start Time.
- Click CREATE.
- On the Scheduled Task page, click the Edit button at the top right corner.
- In the Details panel:
- Click the User ID menu and select your email.
- Click the Saved Search menu and select the saved search you created earlier.
- Click the Export Via menu and select GunBroker API Product Export Plugin.
- In the Export Options panel, set Export To to None.
- In the Frequency panel, specify the task frequency. For optimal performance, select a range between thirty minutes and one hour.
- In the General panel, click the Enable toggle button.
- Click Save.
Listing Export
In addition to all of the above, there are two plugins you can use to create listings and update listing details when needed. You can either automate them by creating Scheduled Tasks similar to the one described in the Automate Inventory Export section or run them manually as described below. These plugins use your Custom Product Columns, applying the following logic:
- If the GunBroker_ShippingProfileID is 0, the plugins will try to send the GunBrokerShippingClassesSupported.
- If the GunBroker_ShippingProfileID is not 0, the plugin will not send GunBrokerShippingClassesSupported, and GunBrokerWhoPaysForShipping must be 16.
- If GunBrokerWhoPaysForShipping is 16, the GunBroker_ShippingProfileID must have a value.
- If GunBrokerWhoPaysForShipping is not 16, the GunBroker_ShippingProfileID must be 0.
Create Listings
The GunBroker API List Product Export Plugin creates new product listings on GunBroker.
All of the following Custom Product Columns must exist. However, not all of them must be populated for you to update a product:
- GunBroker_ItemID – The plugin enters this column’s value when a product is listed.
- GunBroker_Price
- GunBroker_CategoryID
- GunBroker_CollectTaxes
- GunBroker_IsFFLRequired
- GunBroker_ListedOn
- GunBroker_ShippingProfileID
- GunBroker_SafetyQty
- (Optional) GunBroker_Description
- (Optional) GunBroker_StandardTextID
The plugin also sends the following fields to GunBroker:
- (Required) Title – The Product Name on the Product Details Page.
- (Required) Condition – The plugin sends the Condition on the Product Details page. The accepted values are Factory New, New Old Stock, or Used.
- (Required) CountryCode – The Country Of Origin on the Product Details page.
- (Required) MfgPartNumber – The Manufacturer SKU on the Product Details page.
- (Required) PostalCode – The ZIP Code from the Company Address on the Company Settings page.
- AutoRelist – Hardcoded to Relist Fixed Price.
- CanOffer – Hardcoded to False.
- Description – The plugin sends the Long Description by default, but it will send the GunBroker_Description instead if it is populated with the name of a Description Template.
- FixedPrice – The plugin sends the GunBroker_Price by default, but if not populated, it will send the Site Price instead.
- ExcludeStates – This field is sent with no value.
- GTIN – The GTIN on the Product Details page.
- ListingDuration – Hardcoded to 90.
- PaymentPlan – Hardcoded to 0.
- PictureURLs – The Gallery Image from the Product Images page.
- Prop65Warning – The Proposition 65 Warning Message on the Product Details page.
- Quantity – The Available Qty on the Product Details page minus the Safety Quantity from the GunBroker_SafetyQty Custom Product Column (if configured).
- UseDefaultSalesTax – Hardcoded to True.
- SKU – The SKU (ProductID) on the Product Details Page.
- UPC – The UPC on the Product Details Page.
- Weight – The Product Weight on the Product Details Page.
Since the GunBroker API Product Export Plugin unlists SKUs with 0 available inventory and clears the GunBroker_ItemID, you can set up the GunBroker API List Product Export Plugin so that it automatically creates new listings once you receive inventory again. To do this, set up a Scheduled Task as described in the Automate Inventory Export section, but use a Saved Search with these filters:
- GunBroker_Enabled – True.
- GunBroker_ItemID – Is Null
- Inventory Available – Not Available
To create listings on GunBroker manually:
- Go to Catalog > Manage Catalog.
- Set up the filters to find the right products or apply your Inventory Saved Search.
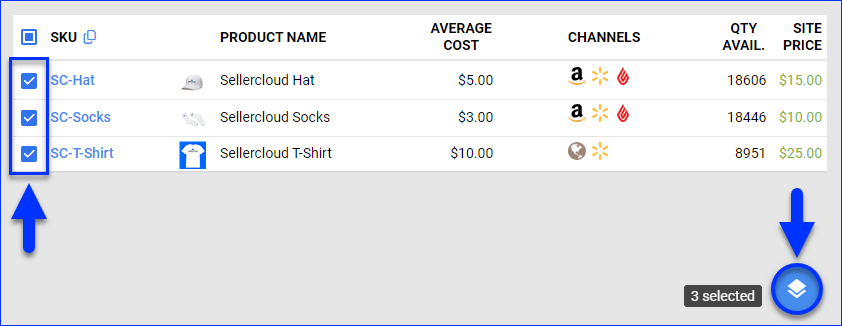
- Select the products.
- Click the blue Actions icon at the bottom right and select Export Products (Catalog).
- Select Plugin and set it to GunBroker API List Product Export Plugin.
- Click Export. This action creates a Queued Job. Once the job is completed, you will receive a Notification.
Update Listing Details
The GunBroker API Update Product Export Plugin updates product listing details on GunBroker.
All of the following Custom Product Columns must exist. However, not all of them must be populated for you to update a product:
- GunBroker_ItemID – The Listing Creation plugin enters a value when a product is listed.
- GunBroker_Price
- GunBroker_ListedOn
- (Optional) GunBroker_Description
- (Optional) GunBroker_StandardTextID
The plugin also sends the following fields to GunBroker:
- (Required) Title – The Product Name on the Product Details Page.
- (Required) MfgPartNumber – The Manufacturer SKU on the Product Details page.
- (Required) PostalCode – The ZIP Code from the Company Address on the Company Settings page.
- CanOffer – Hardcoded to False.
- Description – The plugin sends the Long Description by default, but it will send the GunBroker_Description instead if it is populated with the name of a Description Template.
- FixedPrice – The plugin sends the GunBroker_Price by default, but if not populated, it will send the Site Price instead.
- GTIN – The GTIN on the Product Details page.
- Prop65Warning – The Proposition 65 Warning Message on the Product Details page.
- Quantity – The Available Qty on the Product Details Page.
- SKU – The SKU (ProductID) on the Product Details Page.
- StandardTextID – The GunBroker_StandardTextID Custom Product Column.
To update listings on GunBroker manually:
- Go to Catalog > Manage Catalog.
- Set up the filters to find the right products or apply your Inventory Saved Search.
- Select the products.
- Click the blue Actions icon at the bottom right and select Export Products (Catalog).
- Select Plugin and set it to GunBroker API Update Product Export Plugin.
- Click Export. This action creates a Queued Job. Once the job is completed, you will receive a Notification.