Overview
Macy’s is one of the largest and oldest department store chains in the United States. The company features a wide range of clothing, accessories, home goods, gifts, food, and more. As a seller, you can collaborate with Macy’s to offer your products through its stores and online platforms by becoming a Vendor Partner.
Integrating Macy’s into your Sellercloud account allows you to seamlessly import orders, upload tracking information, ensure your listings are always up-to-date with the latest inventory data, and more. The integration works through EDI documents, transmitting information between the two services via plugins and Scheduled Tasks. The document exchange goes through Rithum, previously known as CommerceHub.
If necessary, you can open a ticket with Sellercloud Support to request additional customizations or other plugins for this integration. Any such modifications will be billable.
Prerequisites
Before you can integrate Macy’s with Sellercloud, complete the following requirements.
Rithum Support
Contact Rithum Support and request:
- A Supplier Test Plan and a Supplier Guide. Prior to production deployment, the entire test plan must be completed according to the documented procedures, including submission of a test transaction for each test order.
- Test and production credentials. Once you complete all test cases outlined in the test plan document, the platform will provide you with the production SFTP details: Server Name, Username, and Password. You will need them when setting up the scheduled tasks to automate the plugins. Also, make sure to ask for their ISA ID and Vendor Number – you will need those when populating the custom company settings.
Sellercloud Support
Open a ticket with Sellercloud Support and request that the following plugins be installed on your server:
- Macys via CH EDI850 OrderImport With 997 – Imports orders from Macy’s to Sellercloud in EDI 850 format and sends back acknowledgment via EDI 997.
- Macys via CH EDI856 Order Export – Exports tracking information from Sellercloud to Macy’s in EDI 856 format.
- (Optional) Macys via CH using SOIP EDI856 Order Export – Exports tracking information from Sellercloud to Macy’s in EDI 856 format using SOIP transaction hierarchy instead of SOPI.
- Macys via CH EDI810 Order Invoice Export – Exports invoices from Sellercloud to Macy’s in EDI 810 format.
- Macys via CH EDI 846 Product Inventory Export – Exports inventory from Sellercloud to Macy’s in EDI 846 format.
- Macy’s And Bloomingdale’s Packing Slip – Generates a printable PDF packing slip in a format that complies with Macy’s requirements.
Custom Company Settings
Create the following Custom Company Settings.
On your Default company:
- ISAControlNumber
- GSControlNumber
- STControlNumber
- (Optional) UseUPCFromCustomColumn – Defaults to False. If set to True, Custom Product Column MacysCH_UPC will be used instead of the product’s default UPC value.
On the company created for the integration:
- Macys_CustomerISAID – Your ISA ID. Enter a unique phone number that you don’t use for any other EDI integration.
- MacysCH_IDInterchangeQualifier – Your Qualifier. Set to ZZ.
- MacysCH_IDRecieverQualifier – Macy’s’ Qualifier. Typically, it’s 12. Contact Rithum to confirm the value of this setting.
- MacysCH_ISAID – Macy’s’ ISA ID. Contact Rithum to confirm the value of this setting.
- MacysSendOTHRasDefaultShipCode – Used by Macys via CH EDI856 Order Export plugin. If enabled, it sends OTHR as the shipping code. If the shipping code cannot be matched, it sends UPSN.
- (Optional) MacysCH_997UploadFolder – Enter the path to the folder where the 997 files will be uploaded. Set the Data Type to String.
- (Optional) MacysCH_LockShippingMethod – Used by Macys via CH EDI850 OrderImport With 997 plugin. If set to True, prevents the Shipping Method from being changed by any plugins or other automation you may have set in Sellercloud.
- MacysCH_ShippingRequiresThirdParty – This is an optional but recommended setting, which is enabled by default if you don’t create it. With this setting, orders will be imported with Third-Party Shipping required. To disable this setting, create it and set it to False.
- CompanyIDToUseForWarehouseBreakdown – Used by Macys via CH EDI 846 Product Inventory Export plugin. The company ID entered here will be used instead of the Default company when looking at warehouse breakdowns. Controls the following settings:
- (Optional) SendProductAsUnavailableWhenQtyIsZero – Used by Macys via CH EDI 846 Product Inventory Export plugin. Defaults to False. If enabled, it marks the product as unavailable once the quantity reaches 0. Set the Data Type to Boolean.
- (Optional) UseMultipleWarehouseForCHExport – Used by Macys via CH EDI 846 Product Inventory Export plugin. Defaults to False. If enabled, it allows for multiple warehouses to be under the same code. Set the Data Type to Boolean.
- (Optional) MultipleWarehouseCode – Enter the warehouse code you want to send to Rithum. Set the Data Type to String.
- (Optional) MultipleWarehouseIDs – Enter any number of warehouses to use the MultipleWarehouseCode code, comma-separated. Example: “123,456,789“. Set the Data Type to String.
- (Optional) UseReplenishableQty – Used by Macys via CH EDI 846 Product Inventory Export plugin. Defaults to False. If enabled, the plugin checks the MacysFixedPriceQty Custom Product Column. If the value is above 0, it sends the quantity entered in MacysFixedPriceQty. Set the Data Type to Boolean.
- UseCustomSettingWHMapping – Used by Macys via CH EDI 846 Product Inventory Export plugin. Defaults to False. Enable the following setting and logic instead of the channel warehouse mapping. Set the Data Type to Boolean.
- WarehouseMappingForCH – Required if UseCustomSettingWHMapping is enabled. Enter a comma-separated list of ‘SCWHID_CHCode’ pairs to map the information. Example: “119_California,135_Weston”. Set the Data Type to String.
Custom Order Columns
Create the following Custom Order Columns:
- SALES_DIVISION – Used and populated by Macys via CH EDI850 OrderImport With 997 plugin. Set the Data Type to String.
- SOURCE_CODE – Used by Macys via CH EDI850 OrderImport With 997 and Macy’s And Bloomingdale’s Packing Slip plugins to categorize orders. Valid values for Macy’s are 11, 13, 15, and 16. Valid values for Bloomigdale’s are 00, 21, 23, 25, and 26. Set the Data Type to String.
- RETURNS_CODE – Used by Macys via CH EDI850 OrderImport With 997 and Macy’s And Bloomingdale’s Packing Slip plugins. Valid values are NV, NN, NM, NX, BT, SV, SN, and SM. Orders with a different or no returns code will be skipped since no relevant returns message can be assigned. Set the Data Type to String.
- RESERVATION_NUMBER – Used by Macys via CH EDI850 OrderImport With 997 and Macy’s And Bloomingdale’s Packing Slip plugins. This is the Reservation Number on the invoice. Set the Data Type to String.
- REGISTRY_NUMBER – Used by Macy’s And Bloomingdale’s Packing Slip plugin. This is the Gift Registry number on the invoice. Set the Data Type to String.
- IsShipToStore – Used by Macys via CH EDI850 OrderImport With 997 plugin. Set the Data Type to Boolean.
- (Optional) Email – Used by Macys via CH EDI850 OrderImport With 997 plugin. Set the Data Type to String.
Custom Product Columns
Create the following Custom Product Columns:
- (Optional) MacysCH_UPC – The product’s UPC at Macy’s. Set the Data Type to String.
- (Optional) Macys_Enabled – Enable only specific products for Macy’s. Set to True for any products you want to send with the Inventory Export plugin. Set the Data Type to Boolean.
- (Optional) MacysCH_SafetyQty – The Safety Quantity, which is to be subtracted from the Available Quantity to prevent overselling on Macy’s. Defaults to 0. Set the Data Type to Integer.
- (Optional) MacysFixedPriceQty – Used by Macys via CH EDI 846 Product Inventory Export. The plugin checks if UseReplenishableQty is enabled. If the value is above 0, it sends the value entered here as quantity. Set the Data Type to Integer.
Order Import
The Macys via CH EDI850 OrderImport With 997 plugin imports order data from Macy’s to Sellercloud in EDI 850 format. It ensures that the correct transactions are matched with the unique MacysCH_ISAID and senderID.
Automate Order Import
To create a Scheduled Task that imports orders:
- Navigate to Settings > Scheduled Tasks > Manage Scheduled Tasks.
- Click the green + icon: Create New Scheduled Task.
- Complete as follows:
- Click Task Type and select Import Orders.
- Set the Task Name.
- Select the Company.
- Select the Start Time.
- Click CREATE.
- On the Scheduled Task page, click the Edit button at the top right corner.
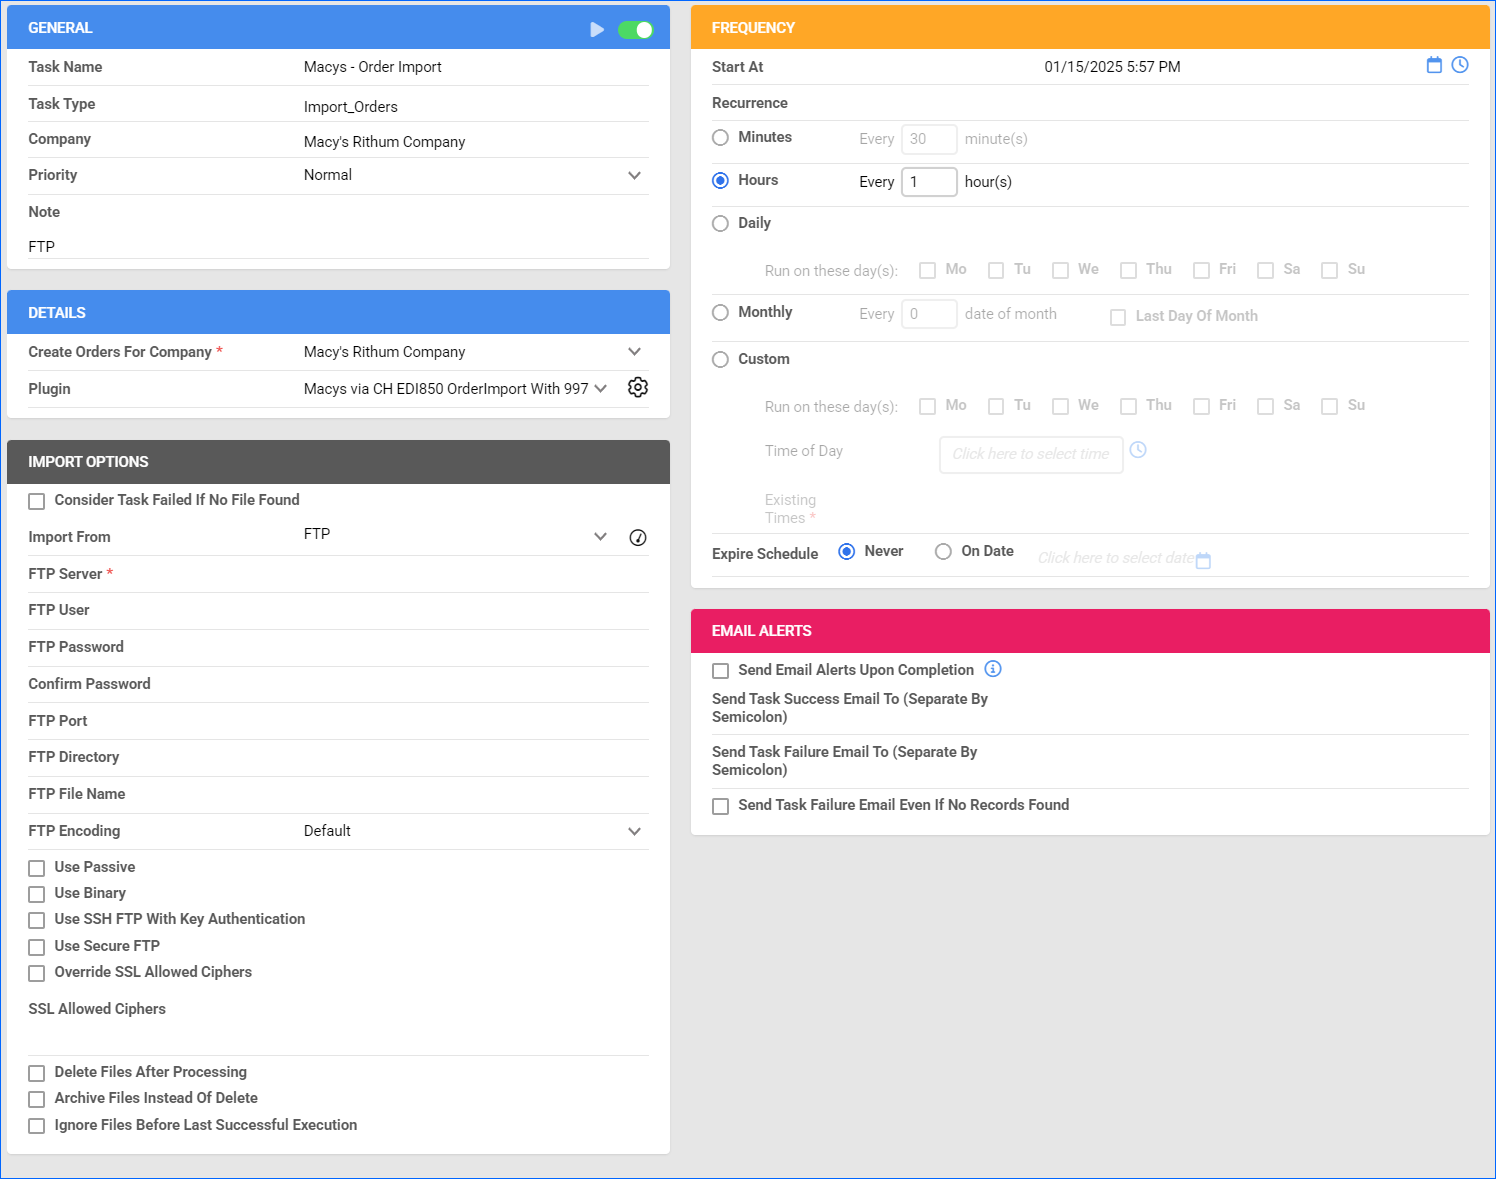
- In the Details panel:
- Click the Create Orders For Company menu and select the company designated for this integration.
- Click the Plugin menu and select Macys via CH EDI850 OrderImport With 997.
- In the Import Options panel:
- Set Import From to FTP and fill out your FTP credentials.
- Set the FTP Directory to /outgoing/intchg.
- Make sure to check Use Passive and Use Secure FTP.
- In the Frequency panel, specify the task frequency. For optimal performance, select a range between thirty minutes and one hour.
- In the General panel:
- Fill in FTP in the Note field.
This is a requirement for the 997 transactions.
- Click the Enable button.
- Fill in FTP in the Note field.
- Click Save.
Tracking Export
The Macys via CH EDI856 Order Export plugin exports tracking from Sellercloud to Macy’s in EDI 856 format.
Both regular orders and parent orders are supported. Child orders will not be exported individually, but if their parent orders are exported, the child order’s items will be included in the parent order’s items. For a parent order to be exported, all child orders and their parents must be Fully Shipped.
When exporting the orders’ shipping details, if a shipping code cannot be matched, the plugin will default to sending UPSN. However, if the custom company setting MacysSendOTHRasDefaultShipCode is set to True, the plugin will send OTHR as the default shipping code instead.
This plugin uses the SOPI (Shipment-Order-Packing-Items) transaction hierarchy.
If needed, you can request the Macys via CH using SOIP EDI856 Order Export (Shipment-Order-Item-Packing) transaction hierarchy plugin from Sellercloud Support.
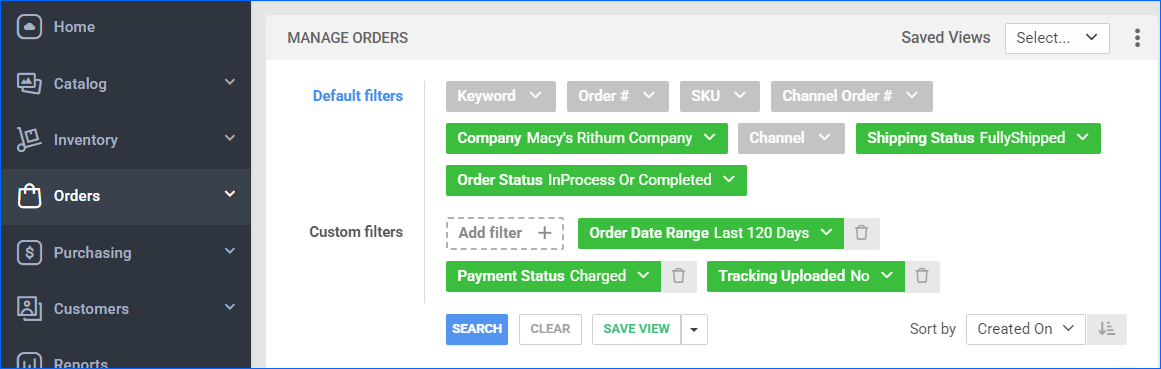
Before you move on, create a Saved Search for orders filtered by:
- Company – The company you created for the integration
- Order Status – InProcess Or Completed
- Shipping Status – FullyShipped
- Payment Status – Charged
- Tracking Uploaded – No
Automate Tracking Export
To create a Scheduled Task that exports order tracking:
- Navigate to Settings > Scheduled Tasks > Manage Scheduled Tasks.
- Click the green + icon: Create New Scheduled Task.
- Complete as follows:
- Click Task Type and select Export Orders.
- Set the Task Name.
- Select the Company.
- Select the Start Time.
- Click CREATE.
- On the Scheduled Task page, click the Edit button at the top right corner.
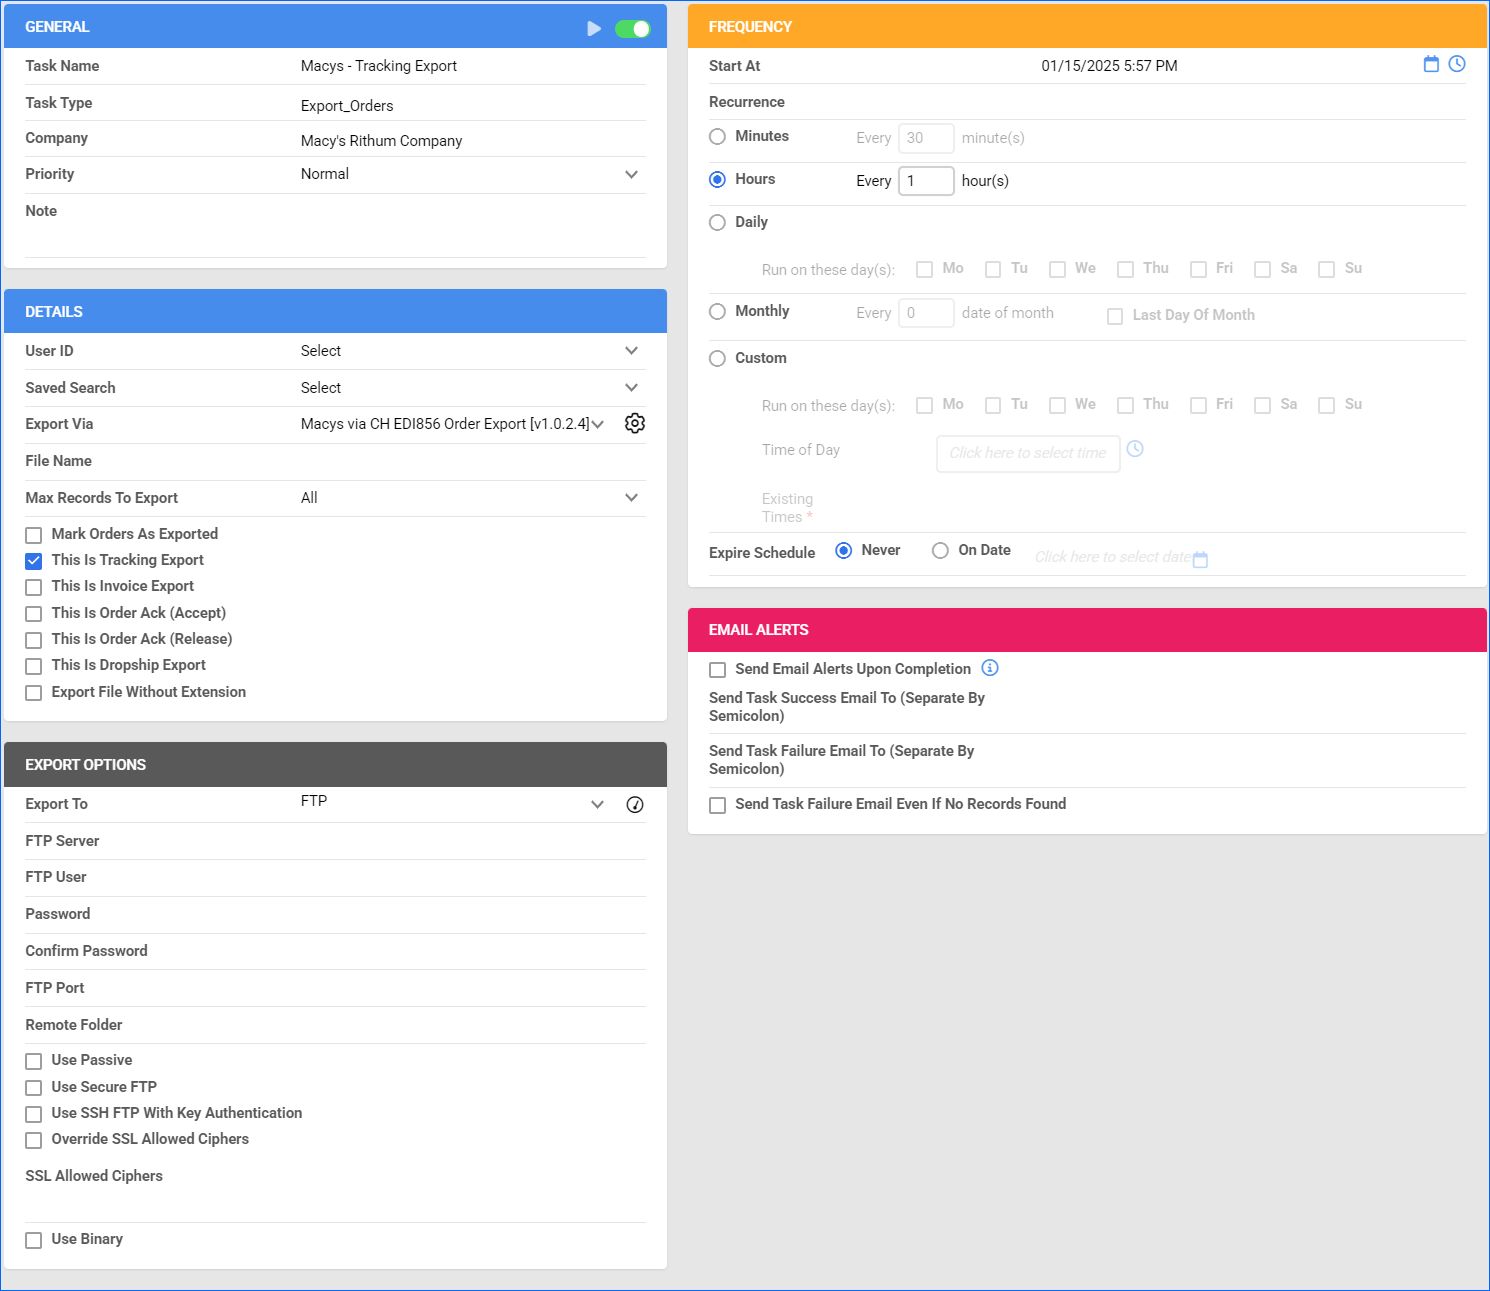
- In the Details panel:
- Click the User ID menu and select your email.
- Click the Saved Search menu and select the saved search you created earlier.
- Click the Export Via menu and select Macys via CH EDI856 Order Export.
- Check This Is Tracking Export.
- In the Export Options panel:
- Set Export To to FTP and fill out your FTP credentials.
- Set the Remote Folder path to /incoming/intchg.
- Make sure to check Use Passive and Use Secure FTP.
- In the Frequency panel, specify the task frequency. For optimal performance, select a range between thirty minutes and one hour.
- In the General panel, click the Enable button.
- Click Save.
Invoice Export
The Macys via CH EDI810 Order Invoice Export plugin exports invoices from Sellercloud to Macy’s EDI 810 format.
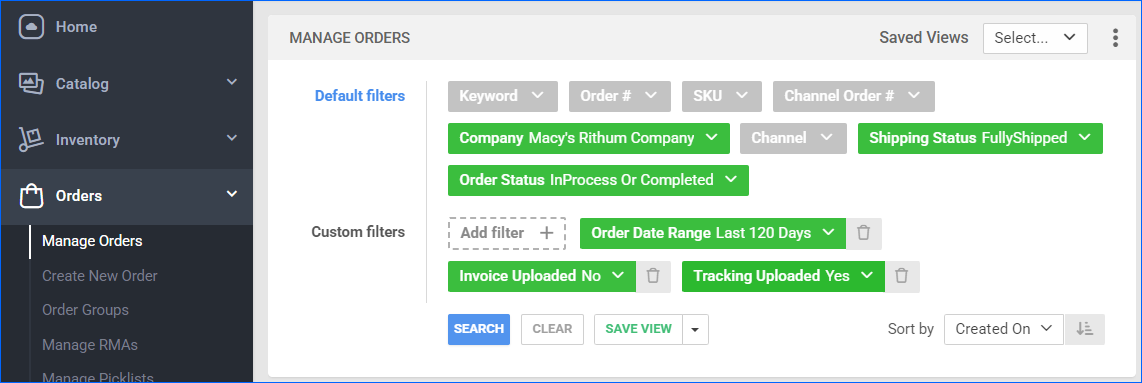
Before you move on, create a Saved Search for orders filtered by:
- Company – The company you created for the integration
- Shipping Status – Fully Shipped
- Order Status – InProcess Or Completed
- Invoice Uploaded – No
- Tracking Uploaded – Yes
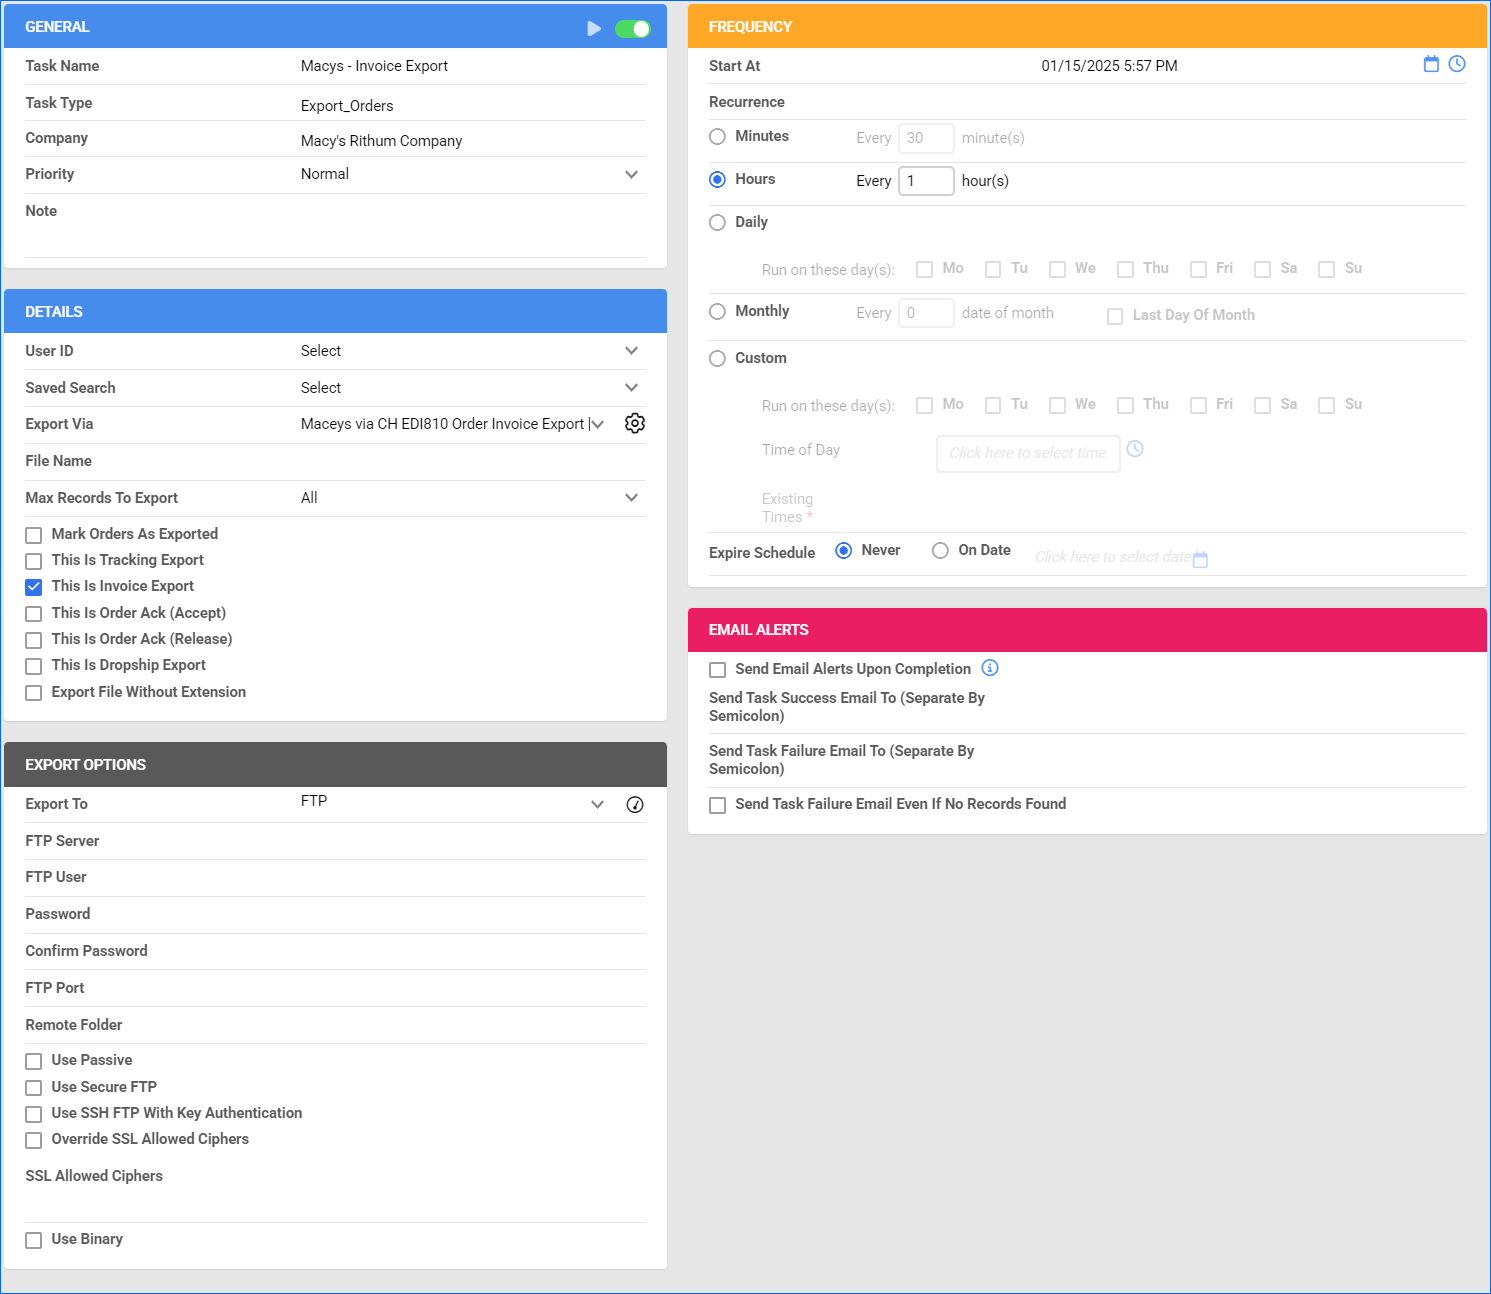
Automate Invoice Export
To create a Scheduled Task that regularly exports invoices from Sellercloud to Macy’s:
- Navigate to Settings > Scheduled Tasks > Manage Scheduled Tasks.
- Click the green + icon: Create New Scheduled Task.
- Complete as follows:
- Click Task Type and select Export Orders.
- Set the Task Name.
- Select the Company.
- Select the Start Time.
- Click CREATE.
- On the Scheduled Task page, click the Edit button at the top right corner.
- In the Details panel:
- Click the User ID menu and select your email.
- Click the Saved Search menu and select the saved search you created earlier.
- Click the Export Via menu and select Macys via CH EDI810 Order Invoice Export.
- Check This Is Invoice Export.
- In the Export Options panel:
- Set Export To to FTP and fill out your FTP credentials.
- Set the Remote Folder path to /incoming/intchg.
- Make sure to check Use Passive and Use Secure FTP.
- In the Frequency panel, specify the task frequency. For optimal performance, select a range between thirty minutes and one hour.
- In the General panel, click the Enable toggle button.
- Click Save.
Inventory Export
The Macys via CH EDI 846 Product Inventory Export plugin exports inventory from Sellercloud to Macy’s in EDI 846 format. By default, it checks the Channel Warehouse Mapping page of your Default company to determine inventory availability for Macy’s. If Custom Company Setting CompanyIDToUseForWarehouseBreakdown exists and has a value, the plugin will use that instead of the Default company. If you have any other Website integrations within that company, you may want to enable the UseCustomSettingWHMapping logic instead, which is applied based on the following rules:
- If the UseCustomSettingWHMapping setting is set to True, warehouses fetched are mapped to warehouses listed in ‘WarehouseMappingForCH‘.
- If UseMultipleWarehouseForCHExport is set to True, warehouses in MultipleWarehouseIDs are mapped to the ID in MultipleWarehouseCode (using a different logic).
- If UseMultipleWarehouseForCHExport is set to False, only the mapping from ‘WarehouseMappingForCH‘ is used, and only sellable warehouses are fetched.
- If the UseCustomSettingWHMapping setting is set to False, warehouses fetched are mapped to warehouses in the ChannelWarehouseMapping table for the specified company (e.g., Company 225).
- If UseMultipleWarehouseForCHExport is set to False, only the mapping from ChannelWarehouseMapping is used, and only sellable warehouses are fetched.
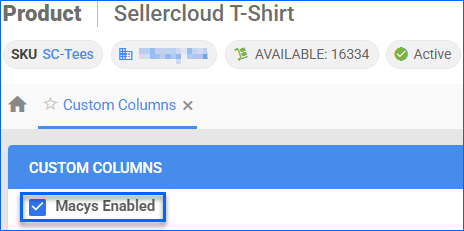
Optionally, you can enable only specific products for Macy’s by setting their Macys_Enabled Custom Product Column to True:
- For one product at a time: go to the Product Details Page > click Toolbox and select Custom Columns > click Edit, update the Macys_Enabled column, and Save.
- For multiple products in bulk: follow the steps to Bulk Update Products and use the Macys_Enabled column – set it to True for all products you want to enable.
Unlike core integrations, plugin integrations don’t require products to be in the company with the scheduled tasks. The export will include the products you select with your Saved Search.
Next, create a Saved Search for products filtered by Macys_Enabled – True. Optionally, you can add more filters to the search to narrow down the export further.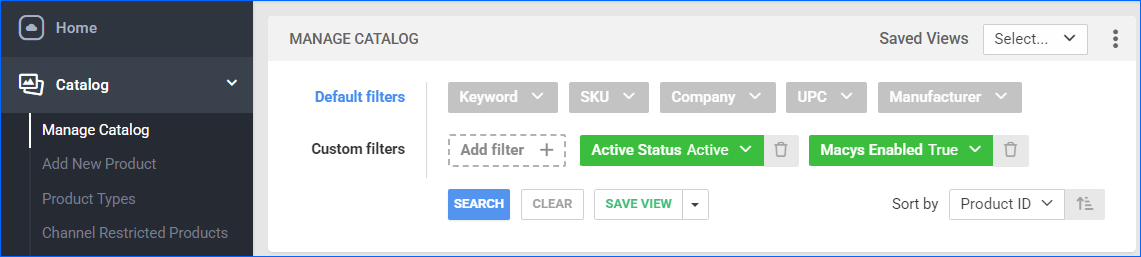
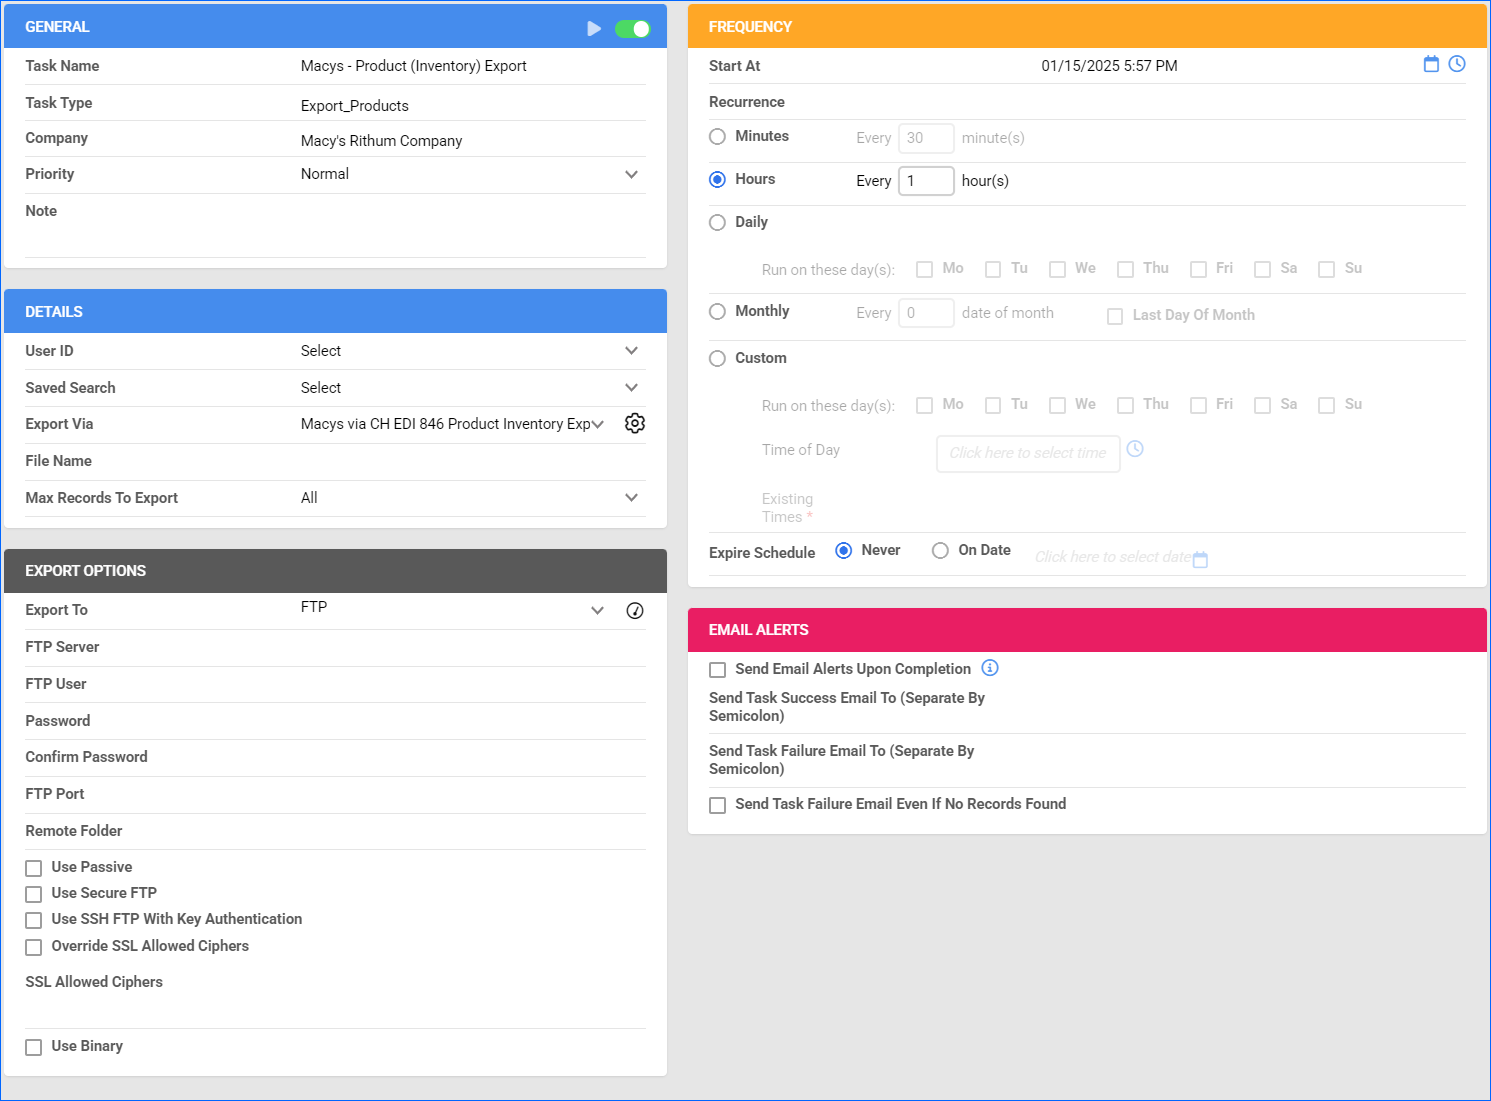
Automate Inventory Export
To create a Scheduled Task that exports inventory:
- Navigate to Settings > Scheduled Tasks > Manage Scheduled Tasks.
- Click the green + icon: Create New Scheduled Task.
- Complete as follows:
- Click Task Type and select Export Products.
- Set the Task Name.
- Select the Company.
- Select the Start Time.
- Click CREATE.
- On the Scheduled Task page, click the Edit button at the top right corner.
- In the Details panel:
- Click the User ID menu and select your email.
- Click the Saved Search menu and select the saved search you created earlier.
- Click the Export Via menu and select Macys via CH EDI 846 Product Inventory Export.
- In the Export Options panel:
- Set Export To to FTP and fill out your FTP credentials.
- Set the Remote Folder path to /incoming/intchg.
- Make sure to check Use Passive and Use Secure FTP.
- In the Frequency panel, specify the task frequency. For optimal performance, select a range between thirty minutes and one hour.
- In the General panel, click the Enable toggle button.
- Click Save.
Configure PDF Invoices
With the Macy’s And Bloomingdale’s Packing Slip plugin set up under your designated company, you can print PDF invoices with information about your Macy’s orders and the products they include through Sellercloud or Shipbridge.
To set up the invoice plugin:
- Go to the Company Settings of the company you created for the integration.
- Click Toolbox and select Invoice Settings.
- Click Per Channel Preferences.
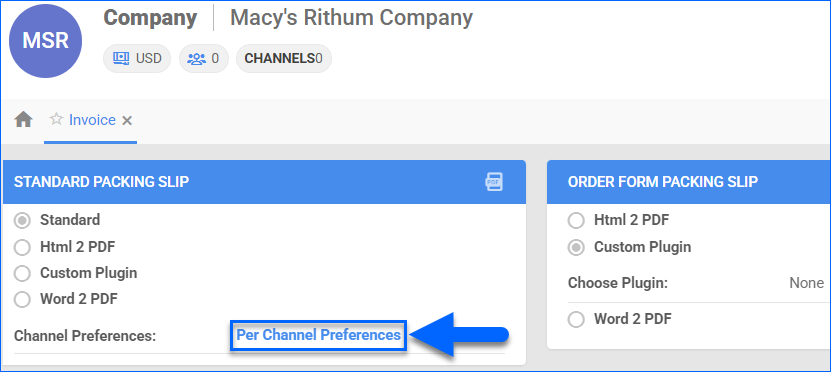
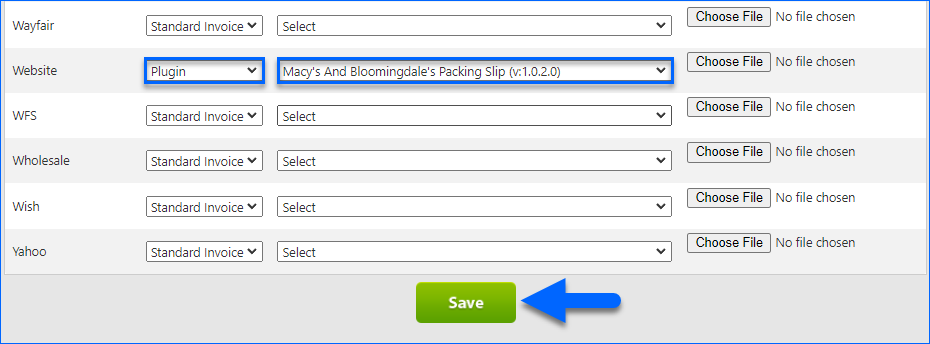
- For Website > select Plugin > Macy’s And Bloomingdale’s Packing Slip.
- Click Save.
Configure UPS Prepaid Labels for Macy’s orders in Shipbridge
Macy’s will require you to use a prepaid UPS account to ship out Macy’s orders. You need to enable the MacysCH_ShippingRequiresThirdPartyBilling setting under the company’s Custom Company Settings page to ensure that Shipbridge will not allow you to ship these orders with your own carrier account, and Third-Party Billing will be enforced.
Prior to being able to ship, the configuration for the account itself has to be completed in the carrier portal. Learn more about how to add and verify a third-party account here –UPS.com-Verification Doc-PIN.
Next, proceed with the account configuration in Shipbridge.
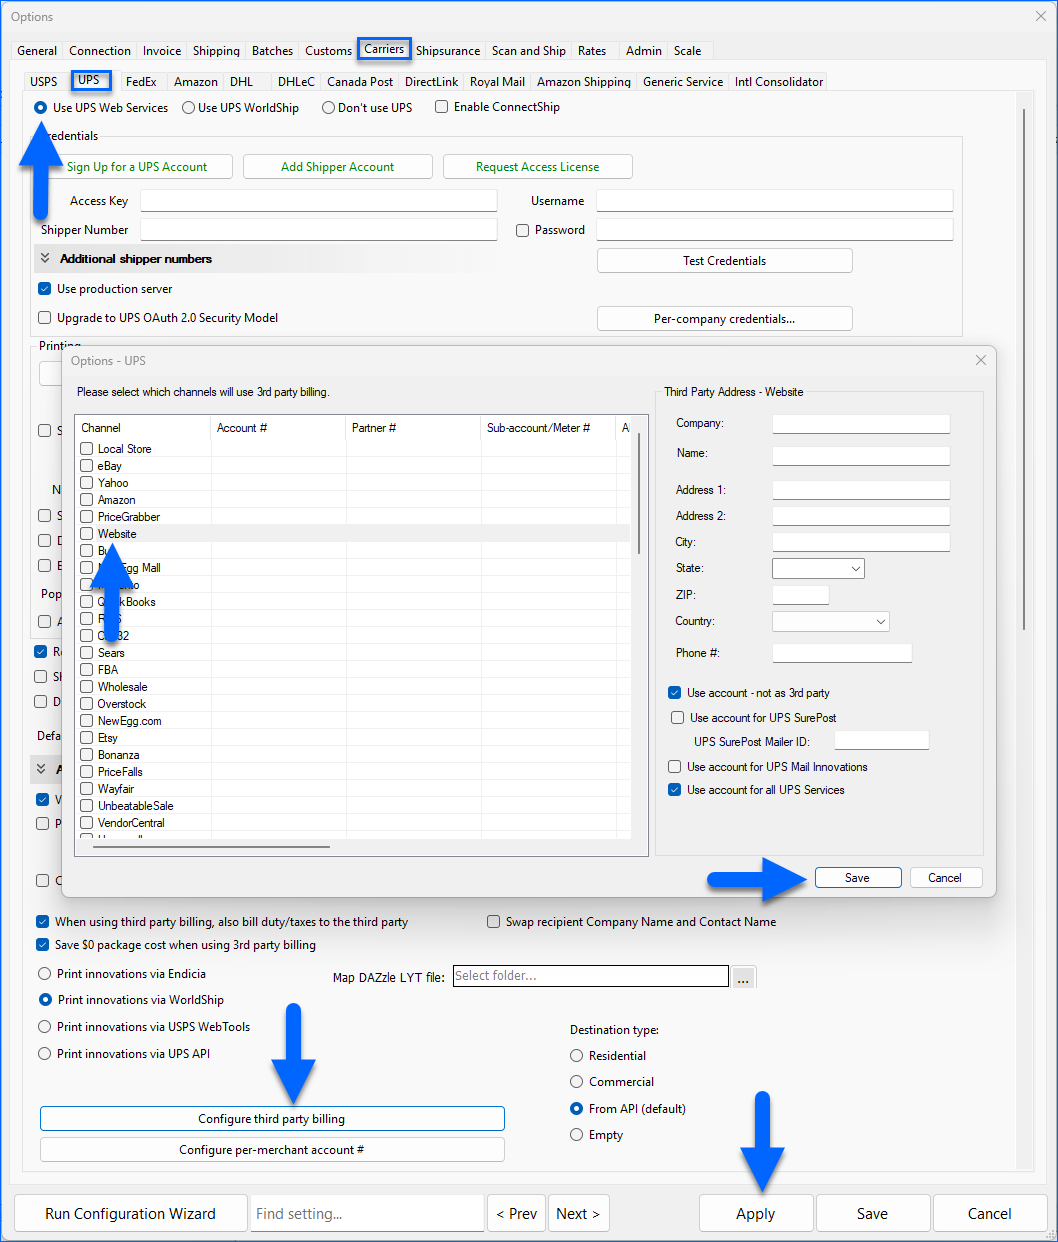
- Open Shipbridge and navigate to Menu > Options > Carriers > UPS.
- Click Configure third party billing > Find your Macy’s designated Company > Select Configure next to it > Click Website.
- Populate the UPS Account number provided by Macy’s and fill out the required address information.
- Make sure to check Use account – not as 3rd party and Use account for all UPS services.
- Click Save.