Overview
Invoices typically contain essential details about your orders and the products they include. Sellercloud provides various options for generating invoices tailored to your needs, offering flexibility in displaying or concealing certain product and order information.
Invoice settings are configured at the company level and automatically apply to orders from all connected sales channels by default. You can choose from various formats, including Standard Invoice, Channel-Specific, Word to PDF, or custom plugin options.
Invoice Types
There are a few different types of invoices in Sellercloud. You can customize your Standard Invoice settings, select a Custom Plugin, or design templates using HTML2PDF and Word2PDF formats. Once an Invoice Type type is selected, it automatically becomes the default format for all orders within the company unless different Per Channel Preferences are specified.
To select your preferred Invoice Type:
- Go to Settings > Companies > Manage Companies > Open a company.
- Toolbox > Invoice Settings.
- In the Invoice Type field, select the type of invoice you want to apply.
- Select or deselect settings in order to display or hide parameters on the invoice.
- Click Save.

Standard Invoices
To gain a comprehensive understanding of the Standard Invoice settings and their intended use, refer to the descriptions below: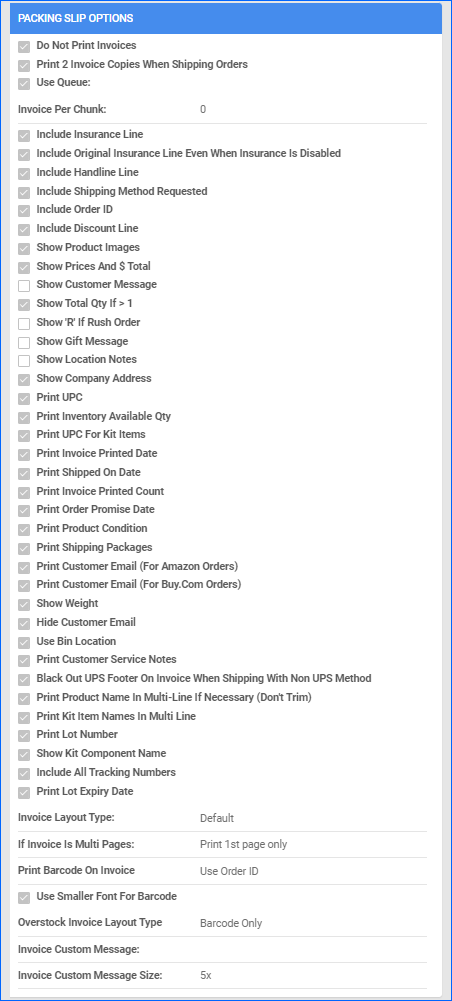
- Do not print invoices – Select this to prevent the automatic printing of invoices.
- Print 2 invoice copies when shipping orders – Select this to generate two copies of the invoice when fulfilling orders.
- Use Queue: Invoice Per chunk: This setting will hold invoices in a queue until the specified number is reached, then generate a PDF.
- Include “Insurance” line – Include an insurance line for the order on the invoice document.
- Include “Original Insurance” line even when insurance is disabled – This setting will include the Original Insurance line on the invoice, even if it’s disabled.
- Include shipping service – Displays the shipping service information on the invoice document.
- Include “Handling” line – This will include order handling information on the invoice document.
- Include Shipping method requested – Displays information about the requested shipping method.
- Include Order ID – Displays Order ID on the invoice.
- Include “Discount” line – When enabled, this will include discount information on the invoice.
- Show Product images – Available Product Images will be printed on the invoice.
- Show Prices and $ total – Include the prices and the total amount in dollars on the invoice.
- Show Customer Message – Display any messages from the customer on the printed document.
- Show Total Qty if > 1 – Show the total quantity if it is greater than one.
- Show ‘R’ if Rush order – Indicate with ‘R’ if the order is marked as a rush order.
- Show Gift Message – Include the gift message on the printed material.
- Show Location Notes – Display notes related to the location on the printed document.
- Show Company Address – Include the company address on the invoice.
- Print UPC – Show the product UPC on the invoice.
- Print UPC for Kit Items – Select to show the UPC for Kit Items.
- Print Inventory Available Qty – Display the available inventory quantity on the printed document.
- Print Invoice Printed Date – Show the date when the invoice was printed on the document.
- Print Invoice Printed Count – Include the count of how many times the invoice has been printed on the document.
- Print Shipped On Date – Display the date when the order was shipped.
- Print Order Promise Date – Include the promise date for the order, if such is available.
- Print Product Condition – Enable this to include selected product condition on the invoice
- Print Shipping Packages – Shows shipping packages count on the invoice document.
- Print Customer Email (for Amazon Orders) – Include the customer’s email for Amazon Orders.
- Print Customer Email (for Buy.com Orders) – Include the customer’s email for Buy.com Orders.
- Show Weight – Print Order Weight on the invoice document.
- Hide Customer Email – Do not show the customer’s email address on the invoice document.
- Use Bin Location – Select to show Bin Location on the invoice, if applicable.
- Print customer service notes – Select this to include any customer service notes, if applicable.
- Black out UPS footer on invoice when shipping with non UPS method – Hide UPS footer information if the order is shipped using a non-UPS method.
- Print product name in multi-line if necessary (don’t trim) – Display product names in multiple lines without trimming.
- Print kit item names in multi line – Show kit item names in multiple lines on the printed material.
- Show Kit Component Name – Include the name of kit components on the printed document.
- Print Lot Number – Display the lot number on the printed material.
- Include all tracking numbers – Include all tracking numbers associated with the order on the printed document.
- Print Lot Expiry Date – Show the expiry date of the lot on the invoice.
- Invoice Layout Type – Select between Default and Simplified
- If invoice is multi pages – Select which pages to be printed
- Print Barcode on invoice – Select either Use Order ID or Use Order Source ID
- Use smaller font of barcode – This setting reduces the size of the barcode by half.
- Overstock Invoice Layout type – Select between Barcode only and Barcode + picklist
- Invoice Custom Message – Enter Custom Message to be printed on the invoice document.
- Invoice Custom Message Size – Select the size of the message.
Word2PDF Invoices
With Word2PDF Invoices in Sellercloud, you have the flexibility to design your personalized invoice template using Microsoft Word and convert it into a PDF. Choose one of Sellercloud’s default templates or create your unique custom design.
HTML2PDF Invoices
You can select HTML2PDF invoice type to tailor specific fields in your document. Customize your template by incorporating various information using the placeholders provided on the right. Upon saving, these changes will be applied to orders within the specified company.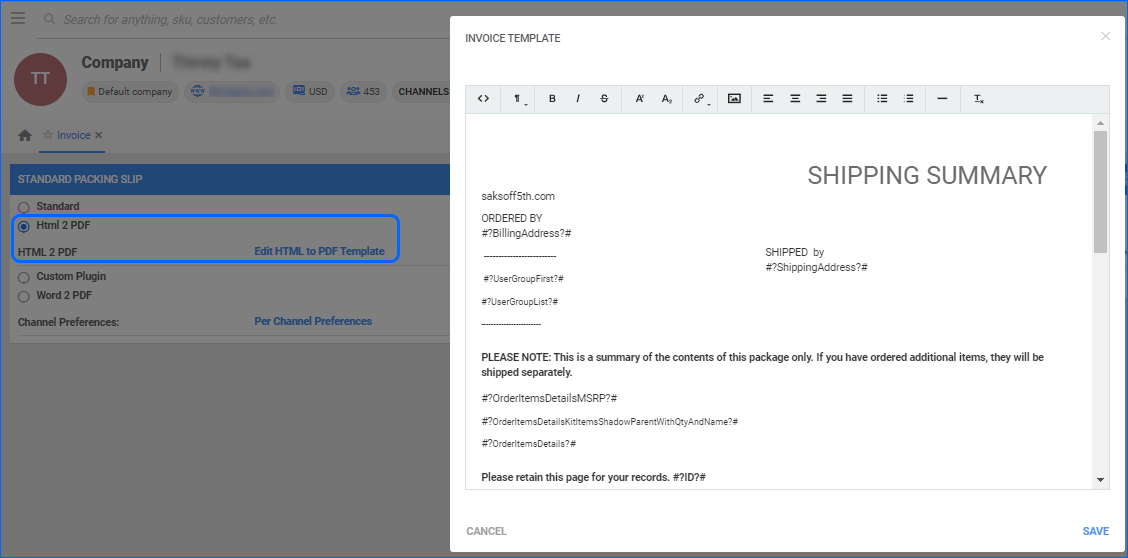
Wholesale Invoices
You can configure wholesale invoices:
- For all Wholesale Orders under a specific company.
- For specific Wholesale Customers individually. This configuration takes priority over the company-level setting.
Company-Wide
To configure invoices for all wholesale orders of a specific company:
- Go to your Company Settings.
- Click Toolbox and select Invoice Settings.
- Click Edit.
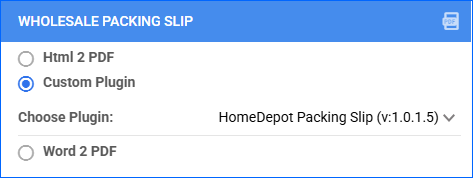
- Select your invoice type in the Wholesale Packing Slip panel.
- Click Save.
Customer-Specific
To configure invoices for a specific wholesale customer:
- Go to Customers > Manage Customers.
- Search and click the customer’s ID to open their details page.
- Click Edit.
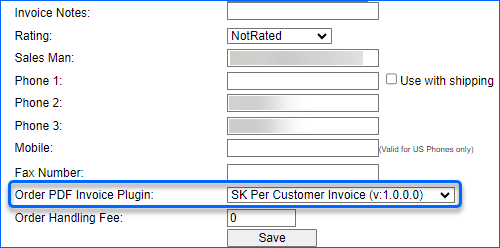
- Click to expand the Invoice Options in the Order Options panel.
- Select the Order PDF Invoice Plugin.
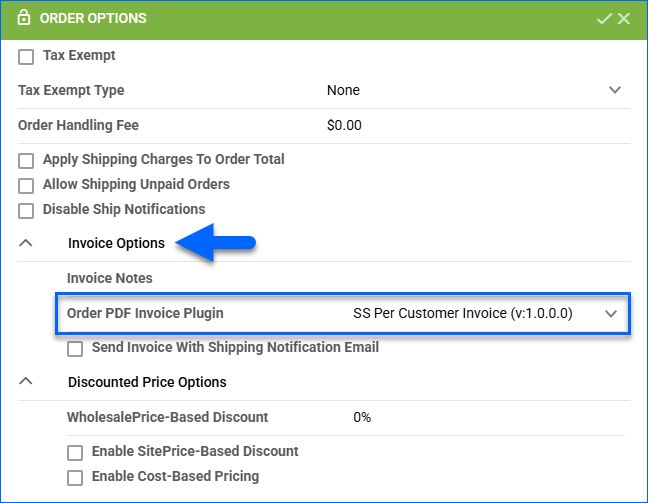
- Click Save.
Email Wholesale Invoices
If your Company-Wide configuration uses a Plugin to generate invoices for wholesale orders, you can email the invoices to your customers directly from Sellercloud.
Complete the following prerequisites:
- Go to Company Settings > Invoice Settings > Wholesale Packing Slip and select a Custom Plugin. This plugin’s invoices will be attached to the emails you send to your customers.
The Generic Send Invoice Email To Customer plugin bypasses Customer-Specific configurations and always uses the Company-Wide plugin configuration.
- Add an SMTP Profile so Sellercloud can connect and send from your email address.
- Create an Email Template, which is the email message sent along with each invoice. You can add the Email Placeholder #?OrderID?# to your email template’s Subject to show the order number. In addition, you can add the following placeholders to the Message Body:
- #?OrderID?#
- #?GrandTotal?#
- #?TrackingNumber?#
- #?ShippedOn?#
- #?OrderSourceOrderId?#
- #?TrackingURL?#
- #?OrderItemsDetails?#
- #?FooterInfoCompany?#
- #?ShippingAddressHtml?#
- Create a new Custom Company Setting called EmailTemplateFor_GenericSendInvoiceEmailToCustomer_Plugin and enter your Email Template’s name as the custom setting’s value, indicating that the plugin should use that template.
Once you have completed the prerequisites, follow the steps below to email invoices.
Per Order
To email an invoice for a single order:
- Open the Order Details Page.
- Click Actions and select Export Order.
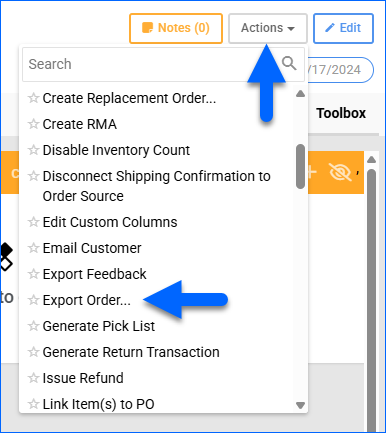
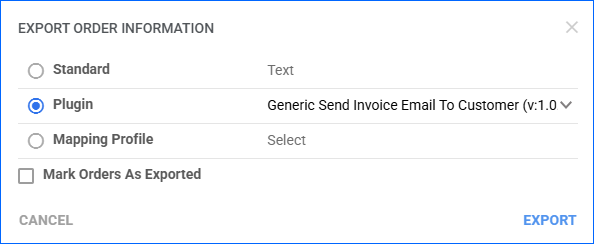
- Select Plugin, set it to Generic Send Invoice Email To Customer, and click Export.
- When the Queued Job finishes, you will receive a Notification.
For Multiple Orders
To email invoices for multiple orders:
- Open the Manage Orders Page.
- Search and then select the orders.
- Click the blue Actions icon at the bottom right and select Export > More Options.
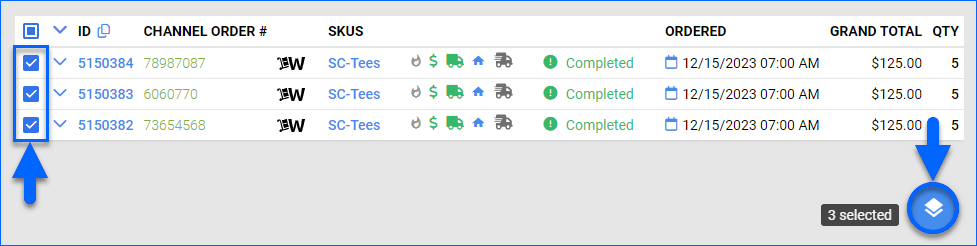
- Select Plugin, set it to Generic Send Invoice Email To Customer, and click Export.
- When the Queued Job finishes, you will receive a Notification.
Automatically
To email invoices automatically:
- Optionally, create a Saved Search targeting only those orders for which you want to email invoices.
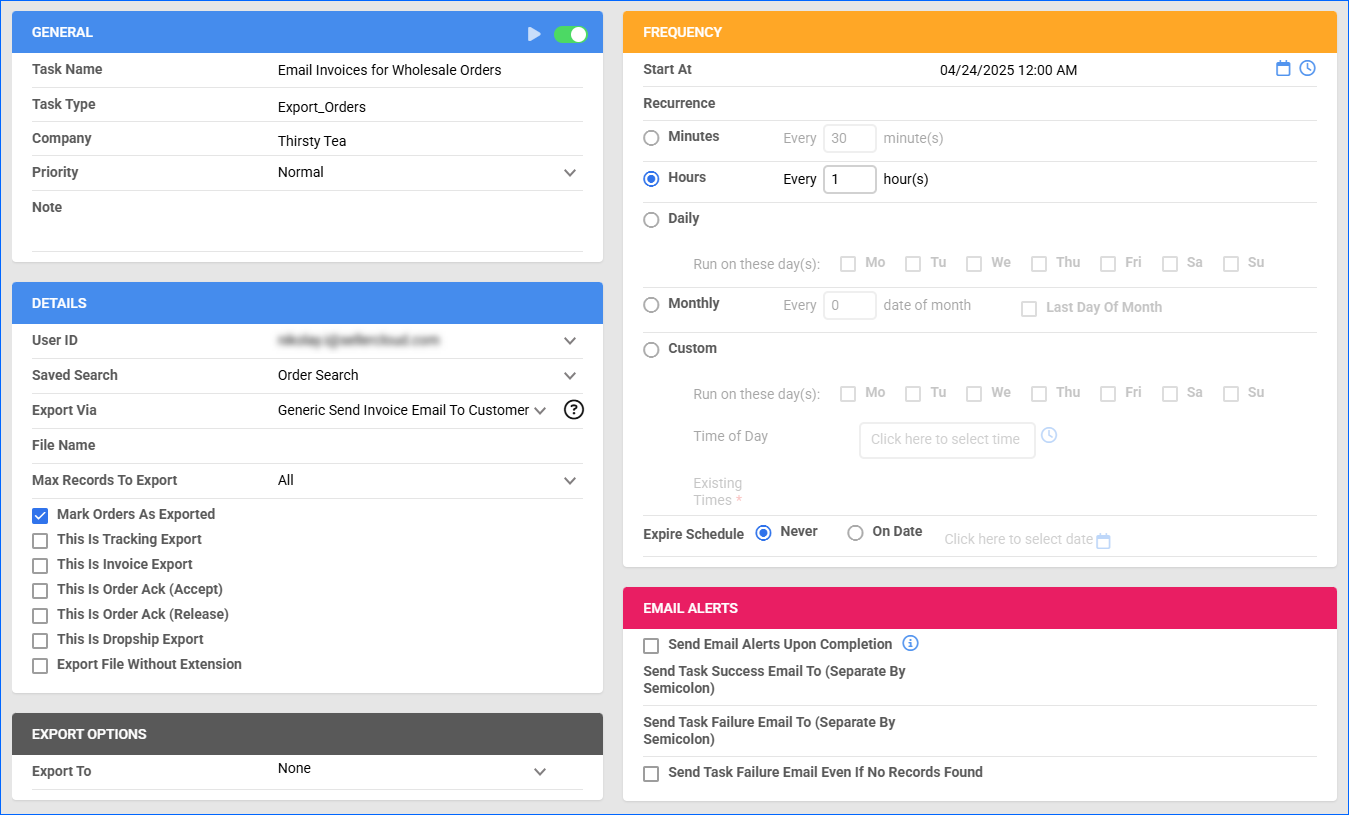
- Create a Scheduled Task and set the Task Type to Export Orders.
- In the Details panel:
- Click the User ID menu and select your email.
- Click the Saved Search menu and select the saved search you created earlier.
- Set Export Via to Generic Send Invoice Email To Customer.
- Optionally, check Mark Orders As Exported. If your Saved Search has the Exported filter set to Not Exported, this prevents orders from being processed more than once.
- In the Export Options panel, set Export To to None.
- In the Frequency panel, specify the task frequency. For optimal performance, select a range between thirty minutes and one hour.
- In the General panel, click the Enable toggle button.
- Click Save.
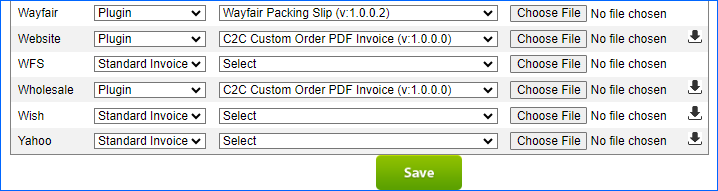
Per Channel Preferences
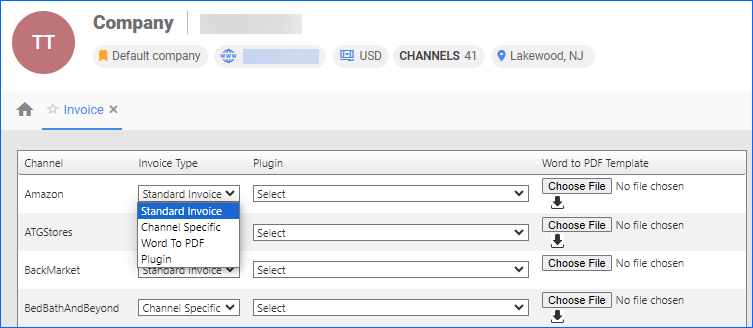
You can apply channel-specific adjustments on invoices. You can select between, Standard Invoice, Channel Specific, Word to PDF, or a plugin from the Invoice Type dropdown.
- Go to Settings > Companies > Manage Companies > Open a company.
- Toolbox > Invoice Settings.
- Click Per Channel Preferences.
- Scroll down and navigate to the requested channel.
- Select the Invoice Type.
- Standart Invoice – Selecting this option will use the Standard Invoice configuration.
- Channel Specific – Choose this option when the channel requires a printed packing slip to be inserted into the shipping package along with the order. This is usually used for fulfillment channels, such as Wayfair.
- Word2PDF – Select the Arrow Icon to upload your invoice template.
- Plugin – You can select the applicable invoice plugin from the dropdown.
- Click Save.
Invoices in Shipbridge
Regardless of your Invoice Settings configuration in Sellercloud, you have the flexibility to tailor and customize your Shipbridge Invoice Options independently or apply the same set of settings uniformly. To configure your invoice settings in Shipbridge, go to Menu > Options > Invoice. Here, you can fine-tune various preferences and specifications within the dedicated Invoice tab.
Refer to the Configure Shipbridge Options article to read more about our General Invoice Options in Shipbridge.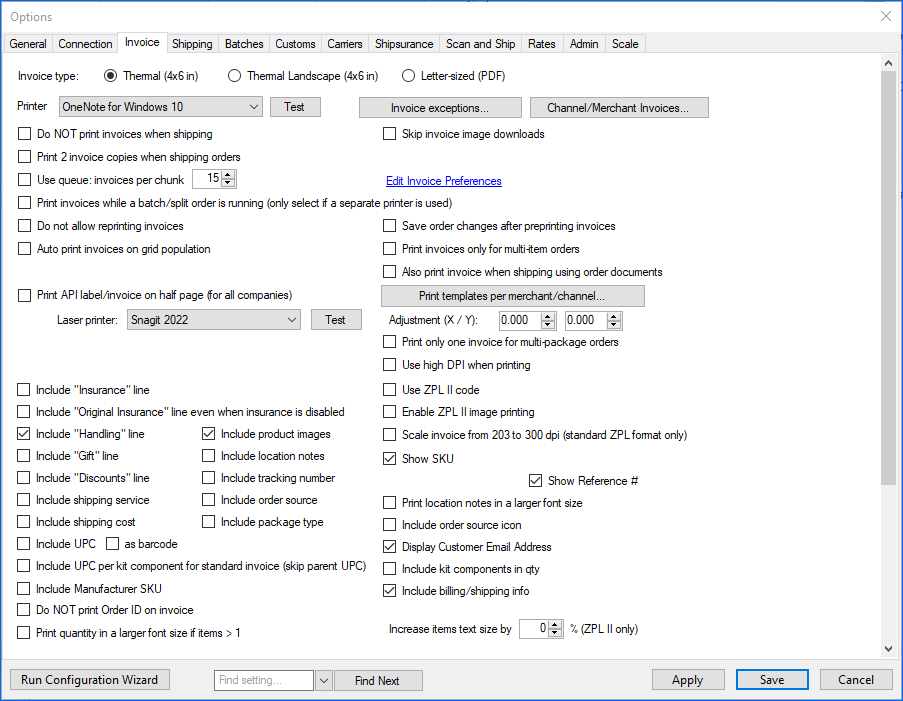
Related Client Settings
The following Client Settings are available:
- Enable Wholesale and Order Form Invoice Options – Enables you to choose different invoice plugins for Order Forms and Wholesale Invoice Types.
- Enable Per Channel Based PDF Invoices – This client setting allows you to generate individual PDF invoices for each channel integrated under your company.
- Allow to hide prices on WholeSale order Invoice – When enabled, the price on Wholesale Orders will be hidden.
Overview
Invoices typically contain essential details about your orders and the products they include. Sellercloud provides various options for generating invoices tailored to your needs, offering flexibility in displaying or concealing certain product and order information.
Invoice settings are configured at the company level and automatically apply to orders from all connected sales channels by default. You can choose from various formats, including Standard Invoice, Channel-Specific, Word to PDF, or custom plugin options.
Invoice Types
There are a few different types of invoices in Sellercloud. You can customize your Standard Invoice settings, select a Custom Plugin, or design templates using HTML2PDF and Word2PDF formats. Once an Invoice Type type is selected, it automatically becomes the default format for all orders within the company unless different Per Channel Preferences are specified.
To select your preferred Invoice Type:
- Go to Settings > Companies > Open a company.
- Toolbox > Invoice Settings.
- In the Invoice Type field, select the type of invoice you want to apply.
- Select or deselect settings in order to display or hide parameters on the invoice.
- Click Save.
Standard Invoices
To gain a comprehensive understanding of the Standard Invoice settings and their intended use, refer to the descriptions below:
- Do not print invoices – Select this to prevent the automatic printing of invoices.
- Print 2 invoice copies when shipping orders – Select this to generate two copies of the invoice when fulfilling orders.
- Use Queue: Invoice Per chunk: This setting will hold invoices in a queue until the specified number is reached, then generate a PDF.
- Include “Insurance” line – Include an insurance line for the order on the invoice document.
- Include “Original Insurance” line even when insurance is disabled – This setting will include the Original Insurance line on the invoice, even if it’s disabled.
- Include shipping service – Displays the shipping service information on the invoice document.
- Include “Handling” line – This will include order handling information on the invoice document.
- Include Shipping method requested – Displays information about the requested shipping method.
- Include Order ID – Displays Order ID on the invoice.
- Include “Discount” line – When enabled, this will include discount information on the invoice.
- Show Product images – Available Product Images will be printed on the invoice.
- Show Prices and $ total – Include the prices and the total amount in dollars on the invoice.
- Show Customer Message – Display any messages from the customer on the printed document.
- Show Total Qty if > 1 – Show the total quantity if it is greater than one.
- Show ‘R’ if Rush order – Indicate with ‘R’ if the order is marked as a rush order.
- Show Gift Message – Include the gift message on the printed material.
- Show Location Notes – Display notes related to the location on the printed document.
- Show Company Address – Include the company address on the invoice.
- Print UPC – Show the product UPC on the invoice.
- Print UPC for Kit Items – Select to show the UPC for Kit Items.
- Print Inventory Available Qty – Display the available inventory quantity on the printed document.
- Print Invoice Printed Date – Show the date when the invoice was printed on the document.
- Print Invoice Printed Count – Include the count of how many times the invoice has been printed on the document.
- Print Shipped On Date – Display the date when the order was shipped.
- Print Order Promise Date – Include the promise date for the order, if such is available.
- Print Product Condition – Enable this to include selected product condition on the invoice
- Print Shipping Packages – Shows shipping packages count on the invoice document.
- Print Customer Email (for Amazon Orders) – Include the customer’s email for Amazon Orders.
- Print Customer Email (for Buy.com Orders) – Include the customer’s email for Buy.com Orders.
- Show Weight – Print Order Weight on the invoice document.
- Hide Customer Email – Do not show the customer’s email address on the invoice document.
- Use Bin Location – Select to show Bin Location on the invoice, if applicable.
- Print customer service notes – Select this to include any customer service notes, if applicable.
- Black out UPS footer on invoice when shipping with non UPS method – Hide UPS footer information if the order is shipped using a non-UPS method.
- Print product name in multi-line if necessary (don’t trim) – Display product names in multiple lines without trimming.
- Print kit item names in multi line – Show kit item names in multiple lines on the printed material.
- Show Kit Component Name – Include the names of kit components on the printed document.
- Print Lot Number – Display the lot number on the printed material.
- Include all tracking numbers – Include all tracking numbers associated with the order on the printed document.
- Print Lot Expiry Date – Show the expiry date of the lot on the invoice.
- Invoice Layout Type – Select between Default and Simplified
- If invoice is multi pages – Select which pages to be printed
- Print Barcode on invoice – Select either Use Order ID or Use Order Source ID
- Use smaller font of barcode – This setting reduces the size of the barcode by half.
- Overstock Invoice Layout type – Select between Barcode only and Barcode + picklist
- Invoice Custom Message – Enter Custom Message to be printed on the invoice document.
- Invoice Custom Message Size – Select the size of the message.
Word2PDF Invoices
With Word2PDF Invoices in Sellercloud, you have the flexibility to design your personalized invoice template using Microsoft Word and convert it into a PDF. Choose one of Sellercloud’s default templates or create your unique custom design.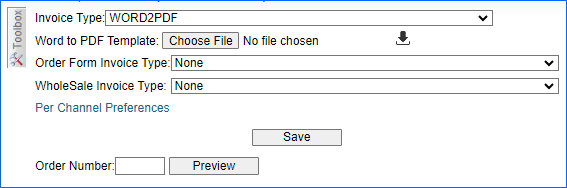
HTML2PDF Invoices
You can select HTML2PDF invoice type to tailor specific fields in your document. Customize your template by incorporating various information using the placeholders provided on the right. Upon saving, these changes will be applied to orders within the specified company.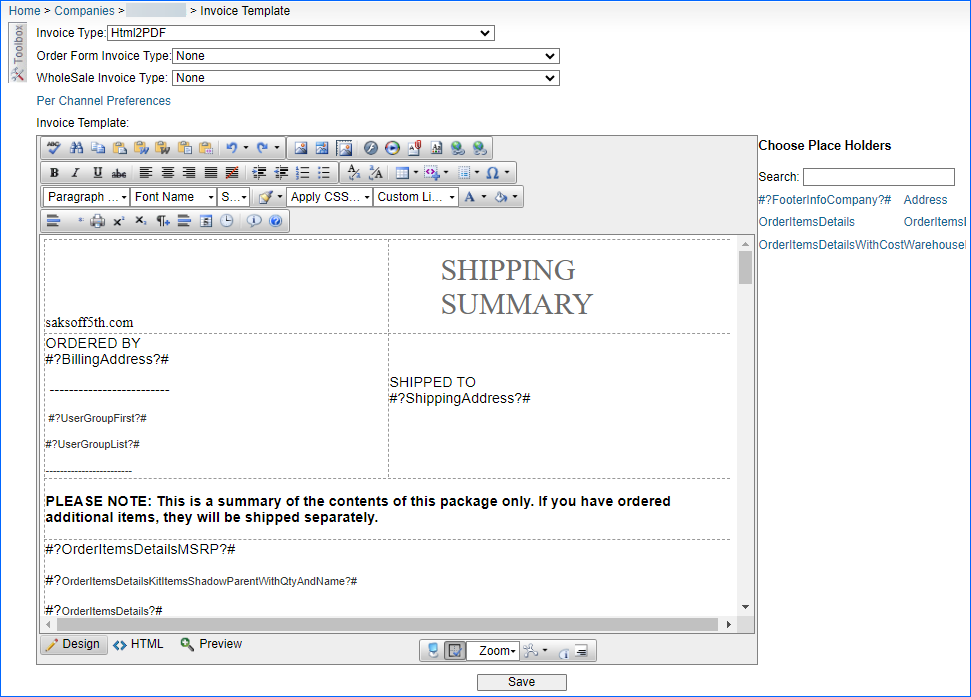
Wholesale Invoices
You can configure individual invoices for each wholesale customer or, alternatively, use a unified plugin for all Wholesale orders. Once the appropriate plugin is placed on your server, follow the steps below to set the Invoice Type per customer.
Customer Wide
- Go to Customers > Open the customer.
- Scroll down and select the requested plugin In the Order PDF Invoice Plugin field.
- Click Save.
Company Wide
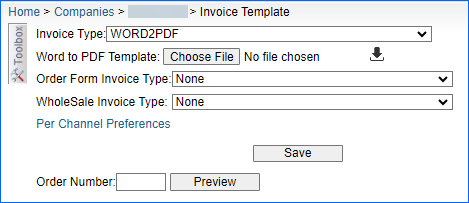
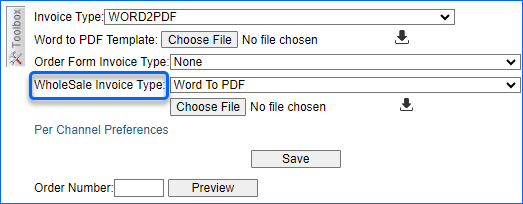
To configure your invoice settings for all wholesale orders under a company, follow the steps described below.
- Go to Settings > Open a company.
- Toolbox > Invoice Settings.
- Navigate to WholeSale Invoice Type > Select your desired format from the dropdown.
- Click Save.
Per Channel Preferences
You can apply channel-specific adjustments on invoices. You can select between, Standard Invoice, Channel Specific, Word to PDF, or a plugin from the Invoice Type dropdown.
- Go to Settings > Open a company.
- Toolbox > Invoice Settings.
- Click Per Channel Preferences.
- Scroll down and navigate to the requested channel.
- Select the Invoice Type.
- Standart Invoice – Selecting this option will use the Standard Invoice configuration.
- Channel Specific – Choose this option when the channel requires a printed packing slip to be inserted into the shipping package along with the order. This is usually used for fulfillment channels, such as Wayfair.
- Word2PDF – Select the Arrow Icon to upload your invoice template.
- Plugin – You can select the applicable invoice plugin from the dropdown.
- Click Save.
Invoices in Shipbridge
Regardless of your Invoice Settings configuration in Sellercloud, you have the flexibility to tailor and customize your Shipbridge Invoice Options independently or apply the same set of settings uniformly. To configure your invoice settings in Shipbridge, go to Menu > Options > Invoice. Here, you can fine-tune various preferences and specifications within the dedicated Invoice tab.
Refer to the Configure Shipbridge Options article to read more about our General Invoice Options in Shipbridge.
Related Client Settings
The following Client Settings are available:
- Enable Wholesale and Order Form Invoice Options – Enables you to choose different invoice plugins for Order Forms and Wholesale Invoice Types.
- Enable Per Channel Based PDF Invoices – This client setting allows you to generate individual PDF invoices for each channel integrated under your company.
- Allow to hide prices on WholeSale order Invoice – When enabled, the price on Wholesale Orders will be hidden.