Overview
In Sellercloud, you can use Purchase Orders to track new inventory coming in from your vendors. The workflow covers creating new POs, processing them, and updating inventory levels and costs.
This article covers the main aspects of a PO lifecycle and how to manage them in Sellercloud. To learn more about the available advanced PO features, refer to Purchase Order – Additional Functionalities.
Manage a Purchase Order
You can create new Purchase Orders and update the details of existing ones at any point of the process. This includes changing the ordered products, their costs and quantity, as well as specifics such as shipping and billing information.
Create a Purchase Order
To create a new Purchase Order:
- Go to the Create New Purchase Order page by using any of the paths below:
- Purchasing > Create New Purchase Order.
- Purchasing > Manage POs > click the plus icon in the bottom right corner.
- Purchasing > Vendors > Manage Vendors > Vendor > Toolbox > Purchase Orders > click the plus icon in the upper right corner of the Purchase Orders panel.
- Additionally, you can create a new PO from the Purchasing tab of the Product Details page, the Actions menu of the Manage Catalog page, or directly from the Predictive Purchasing Report.
- Specify the Company and Vendor. Click the + icon if you need to create a new Vendor.
- (Optional) Select the Receiving Warehouse where the purchased items will be delivered.
- (Optional) Indicate the Payment Terms within which this PO must be completed.
- Click the Expected Delivery box, and select the estimated date of product arrival.
- You can log offers from vendors without actually buying them by creating a Purchase Order and selecting Vendor Offer as the Purchase Order Type.
- Click the blue arrow to proceed to the next step.

- Click Add Products. For details, refer to the section below.
- Click the blue arrow to proceed. Provide all required information about the Billing and Shipping Addresses. Alternatively, select one from the Saved Addresses dropdown list.

- Once completed, click the green flag icon.
Import Purchase Orders
You can also create new Purchase Orders and update existing ones via a file import. To do that, follow the steps below:
- Go to Purchasing > Tools > Import Purchase Info.
- Select the Import Purchase Orders option.

- To download a template, click the download icon on the Import Purchase Orders panel header.
- Complete the columns. Save.
- Return to the Import Purchase Orders panel. Select the appropriate file. Fill in the required fields.
- (Optional) You can use a custom plugin for import. Contact the Support Team to request this plugin.
- (Optional) Check the Create New PO Numbers box to allow the system apply the automatic numbering to the newly added POs. When left unchecked, the new PO ID will be the same as the one provided in the file.
- (Optional) Select the Create As Credit Memo checkbox to create Credit Memos instead of regular POs.
- (Optional) Item Action – Here you can choose to Merge or Overwrite the PO products.
- (Optional) Treat Zero Prices As Zero – Allows you to import a product price of $0.
- Click Import.

- The import will be submitted as a Queued Job. Once processed, the new Purchase Orders will appear on the Manage POs page.
Add Products to a Purchase Order
When adding products to a Purchase Order using the wizard, follow the steps below:
- At the second step of the PO creation wizard, click Add Products.

- Optionally, you can click the SKU List Mode toggle button on the top right and then quickly search for products by entering one per row. You can also enter the quantity and unit price. Then click Search, and once the products show up, check the boxes to select them and click Add & Close.
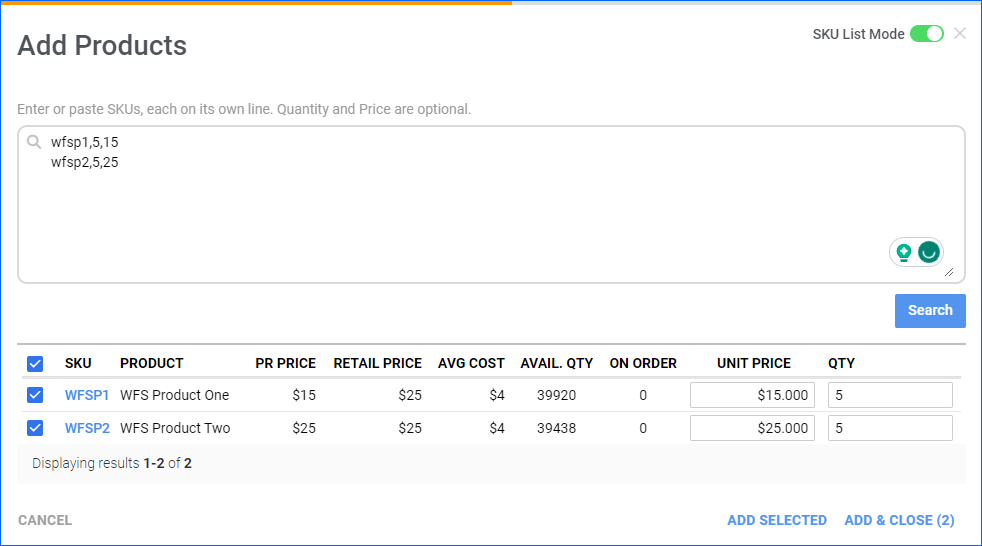
- Without SKU List Mode enabled, you can just search for products and specify the Unit Price and Quantity.
- Check the boxes next to products to select them and then click Add & Close.

- Specify information on ordered quantities, price, and discounts.
- Alternatively, you can add products via file upload. To do that, click the Upload Products icon in the upper right of the Products panel (see figure below).

For more information on adding products to Purchase Orders, refer to Add Products to PO.
Approve and Email a PO to Vendor
The next step in the PO workflow is to notify your vendor about purchased products.
When PO approval is configured as required, a notification will appear if try to email an unapproved Purchase Order. To approve a PO:
- Go to Purchasing > Manage POs.
- Open a Purchase Order.
- In the upper right corner, click Actions, and select the Approve Purchase Order.
To email an approved Purchase Order to your Vendor:
- Go to Purchasing > Manage POs.
- Open a Purchase Order.
- In the upper right, click Actions, and select the Send PO via Email.

- In the General panel, specify the Vendor Email, Subject, Sender Name, and Sender Email.
- You can opt to use a pre-configured email template or to compose a message on your own.

- Once the email is completed, click Send.

Manage Shipping Labels
Depending on your workflow, you may want to generate Shipping Labels for your PO and send them to the Vendor. You can only create labels for carriers you have integrated in the Company Shipping API page.
To manage the PO Shipping Labels:
- Go to the PO Details Page.
- From the Actions menu, select Manage Shipping Labels.
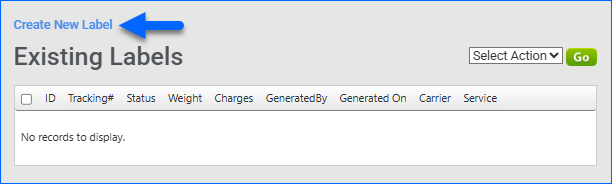
- On this page, you can Void existing labels.
- To generate a new label, click Create New Label.
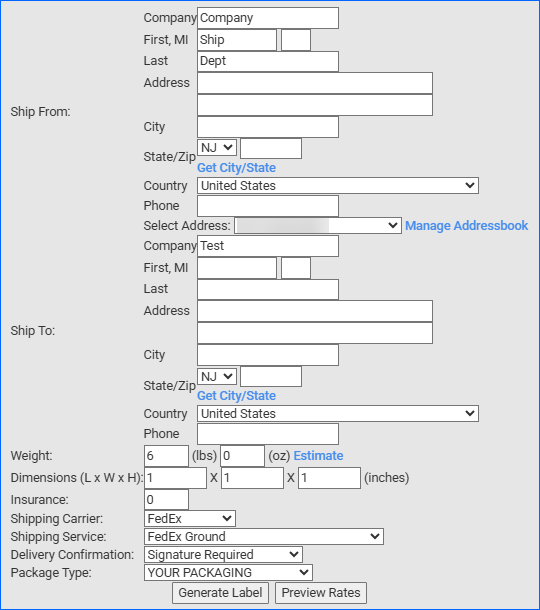
- On the next page, fill in the Ship From information. Alternatively, click Manage Addressbook to choose an existing address, or create an Address Book entry for the Vendor.
- Populate the Ship To details.
- Complete the following shipping specifics:
- Weight (lbs) (oz) of the returned products. Click Estimate to automatically calculate the total weight of the package.
- Dimensions (L x W x H) of the shipped package.
- Insurance – Determine shipping insurance.
- Shipping Carrier – Select a shipping provider.
- Shipping Service – Choose a Shipping Carrier service from the dropdown menu.
- Delivery Confirmation – Pick a method of delivery verification (None, Signature Required, or Adult Signature Required).
- Package Type – Select a shipping package type from the dropdown menu.
- (Optional) Select Preview Rates to see available rates.
- Click Generate Labels.
- The Shipping label(s) generated successfully message should appear at the top of the page. In case of unsuccessful label generation, you will receive a fail message with error details.
- Select the Click here to download hyperlink to review the created label in your Existing Labels list. You can choose a label file type to download – pdf, JPG, or for a thermal printer. You also have the option to Download the API Requests and Responses, sent to and received from the shipping carrier for troubleshooting purposes.

Update PO Shipping Details
To update the PO Shipping Details:
- Access Purchasing > Manage POs.
- Open a Purchase Order.
- In the upper-right corner of the page, click Actions and select Update Shipping. For more instructions on updating shipping data on a PO, refer to Purchase Order – Shipment details.

- Alternatively, the PO Shipping data can be updated with receiving Shipping Containers.
To get detailed instructions on how to receive shipments in containers with multiple POs, refer to Purchase Orders – Shipping Containers.
Receive a Purchase Order
The next step in the PO workflow is to receive purchased items. To log a complete or partial shipment on a PO:
- Access Purchasing > Manage POs.
- Open a Purchase Order.
- In the upper-right corner, click Actions, and select either Receive Whole PO or Receive Shipment to receive a part of a Purchase Order. For more instructions on how to manage receiving sessions, refer to Purchase Orders – Receive PO.

Cancel or Delete PO
In some cases, when the Vendor cannot ship the products or you no longer need them, you have the option to Cancel or completely Delete a PO. You can do this in bulk by selecting POs in the Manage POs page > Actions > Delete/Change Status. You can also open the Actions menu on the Purchase Order Details page and click Delete PO/Cancel PO.
If the PO is linked to a Sales Order as part of the Dropship workflow, you will be prompted to confirm you want to break that link. If you do so, the Order’s Dropship status will automatically change to None. This safeguard is present when updating a single PO and performing the bulk actions.
Update PO Status
You can update PO Status individually by opening the PO and navigating to the Statuses panel, or in bulk by selecting multiple POs and choosing the Change Status action from the Action Menu.
Payment Status
You can pay for purchased products before or after shipping the items. To record a payment, select Make Payment from the PO’s Actions menu.
 You can manually add a payment to a Purchase Order or apply your previous payments to that vendor for the requested purchase order. For more information on managing vendor invoices, refer to Manage Vendor Invoices.
Once the PO is paid in full, you can mark your Purchase Order as Paid and close it. To close a PO, select the Close option from the PO’s Actions menu.
General Status
Refer to the descriptions provided below for information regarding each status:
- Saved – The PO is saved and is awaiting further action.
- Cancelled – POs with the status cancelled will not be shipped by the supplier.
- Completed – The PO has been shipped, received, and invoiced.
- Ordered – This status indicates that the PO is awaiting shipment.
- Pending – The PO is created but not approved or processed yet.
- Received – Indicates the PO inventory has been received into your warehouse.