Overview
Nebraska Furniture Mart (NFM) is one of the largest home furnishing stores in North America, offering a wide range of products, including furniture, mattresses, appliances, electronics, and flooring. In addition to its physical locations, NFM also provides customers with a seamless shopping experience through its online platform, making it a go-to destination for home goods.
Integrating NFM into Sellercloud allows you to import your NFM orders, update the inventory levels of your listings, and more. The integration works through EDI documents, transmitting information between the two services via plugins and Scheduled Tasks.
If necessary, you can open a ticket with Sellercloud Support to request additional customizations or other plugins for this integration. Any such modifications will be billable.
Prerequisites
Before you can integrate NFM with Sellercloud, complete the following requirements.
NFM Support
Contact NFM’s support team for the following:
- SFTP details: Server Name, Username, and Password. You will need them when setting up the scheduled tasks to automate the plugins.
- NFM’s ISA ID, Qualifier, and Internal Vendor Number.
- Provide NFM with your Customer ISA ID and Qualifier.
Sellercloud Support
Open a ticket with Sellercloud Support and request that the following plugins be installed on your server:
- NFM Order Import EDI 850 – Imports orders from NFM to Sellercloud in EDI 850 format.
- NFM Order Export EDI 855 – Sends order acknowledgment to NFM in EDI 855 format.
- NFM Tracking Export 856 EDI – Exports tracking information to NFM in EDI 856 format.
- NFM Invoice Export EDI 810 – Exports invoices to NFM in EDI 810 format.
- NFM Inventory Export EDI 846 – Exports inventory to NFM in EDI 846 format.
Custom Company Settings
Create the following Custom Company Settings.
On your default company:
- STControlNumber
- GSControlNumber
- ISAControlNumber
- NFM_InternalVendorNumber – Contact NFM’s support team for the value of this setting.
- NFM_WarehouseID – Enter the ID of a Sellercloud Warehouse to send its address to NFM. The Inventory Export plugin will export the total available quantity of all NFM-enabled products.
On the company created for the integration:
- NFM_ISAID – Set to NEFURNMART. It’s best to verify with NFM that this value is currently valid.
- NFM_CustomerISAID – Enter a unique phone number that you don’t use for any other integration.
- NFM_IDInterchangeQualifier – Set to ZZ.
- NFM_IDRecieverQualifier – Set to ZZ.
- NFM_997_FTP_Directory – Enter the path to the folder on your FTP where the 997 files will be uploaded.
- NFM_IsInProduction – Set to True when the integration is ready to go live. Otherwise, Sellercloud will send T for testing.
- NFM_AlwasySendProductIDRequested – Set to True to enable exporting the NFM_SKU or the ProductIDRequested if available.
- NFM_CompanyName
- NFM_NetTerm_Days
- NFM_NetTermPercentage
- (Optional) NFM_RemitCode – If this code is not provided, elements N103 and N104 of the EDI 810 Invoice will be skipped.
- NFM_CoOpCreditPercentage – Determines the percent used in SAC05 when SAC02 is B210. If this setting is missing or its value is 0, the SAC05 will be skipped.
- NFM_DefectiveAllowancePercentage – Determines the percent used in SAC05 when SAC02 is C000. If this setting is missing or its value is 0, the SAC05 will be skipped.
Custom Product Columns
Create the following Custom Product Columns:
- (Optional) NFM_Enabled – Enable only specific products for NFM. Set to True for any products you want to send with the Inventory Export plugin.
- NFM_SKU – The product’s SKU at NFM.
- EXPECTED_AVAILABLE_DATE – The product’s estimated availability date. If the inventory in the warehouse is below 0, use this custom setting. Otherwise, the expected available date will be set to 30 days from the Inventory Export.
Custom Order Columns
Create the following Custom Order Columns:
- NFMORDERTYPE – Stores the code specifying the type of Purchase Order. Populated automatically for each order by the 850 Order Import plugin. The following codes are available: CN – Consigned Order; DR – Direct Ship; QS – Quick Ship; SA – Stand-alone Order. Set the Date Type to String.
- NFM_DUNS_NUMBER – Set the Date Type to Integer.
- NFM_REQUIRED_BY_DATE – Set the Date Type to DateTime.
- NFM_DELIVERY_REQUESTED_DATE – Set the Date Type to DateTime.
- NFM_REQUESTED_FOR_SHIPMENT_DATE – Set the Date Type to DateTime
- NFM_REQUESTED_FOR_DELIVERY_DATE – Set the Date Type to DateTime
- NFM_IsOrderRejected – Automatically set to False on orders for which you have sufficient inventory. Set the Date Type to Boolean.
Order Import
This plugin imports order data from NFM to Sellercloud in EDI 850 format and then sends an EDI 997 order acknowledgment file. Orders are imported with the Channel set to Wholesale, and the Customer Email is always [email protected].
Automate Order Import
To create a Scheduled Task that imports orders:
- Navigate to Settings > Scheduled Tasks > Manage Scheduled Tasks.
- Click the green + icon: Create New Scheduled Task.
- Complete as follows:
- Click Task Type and select Import Orders.
- Set the Task Name.
- Select the Company.
- Select the Start Time.
- Click CREATE.
- On the Scheduled Task page, click the Edit button at the top right corner.
- In the Details panel:
- Click Create Orders For Company and select the company designated for this integration.
- Click the Plugin menu and select NFM Order Import EDI 850.
- In the Import Options panel, set Import From to FTP and fill out the FTP fields.
- In the Frequency panel, specify the task frequency. For optimal performance, select a range between thirty minutes and one hour.
- In the General panel, click the Enable button.
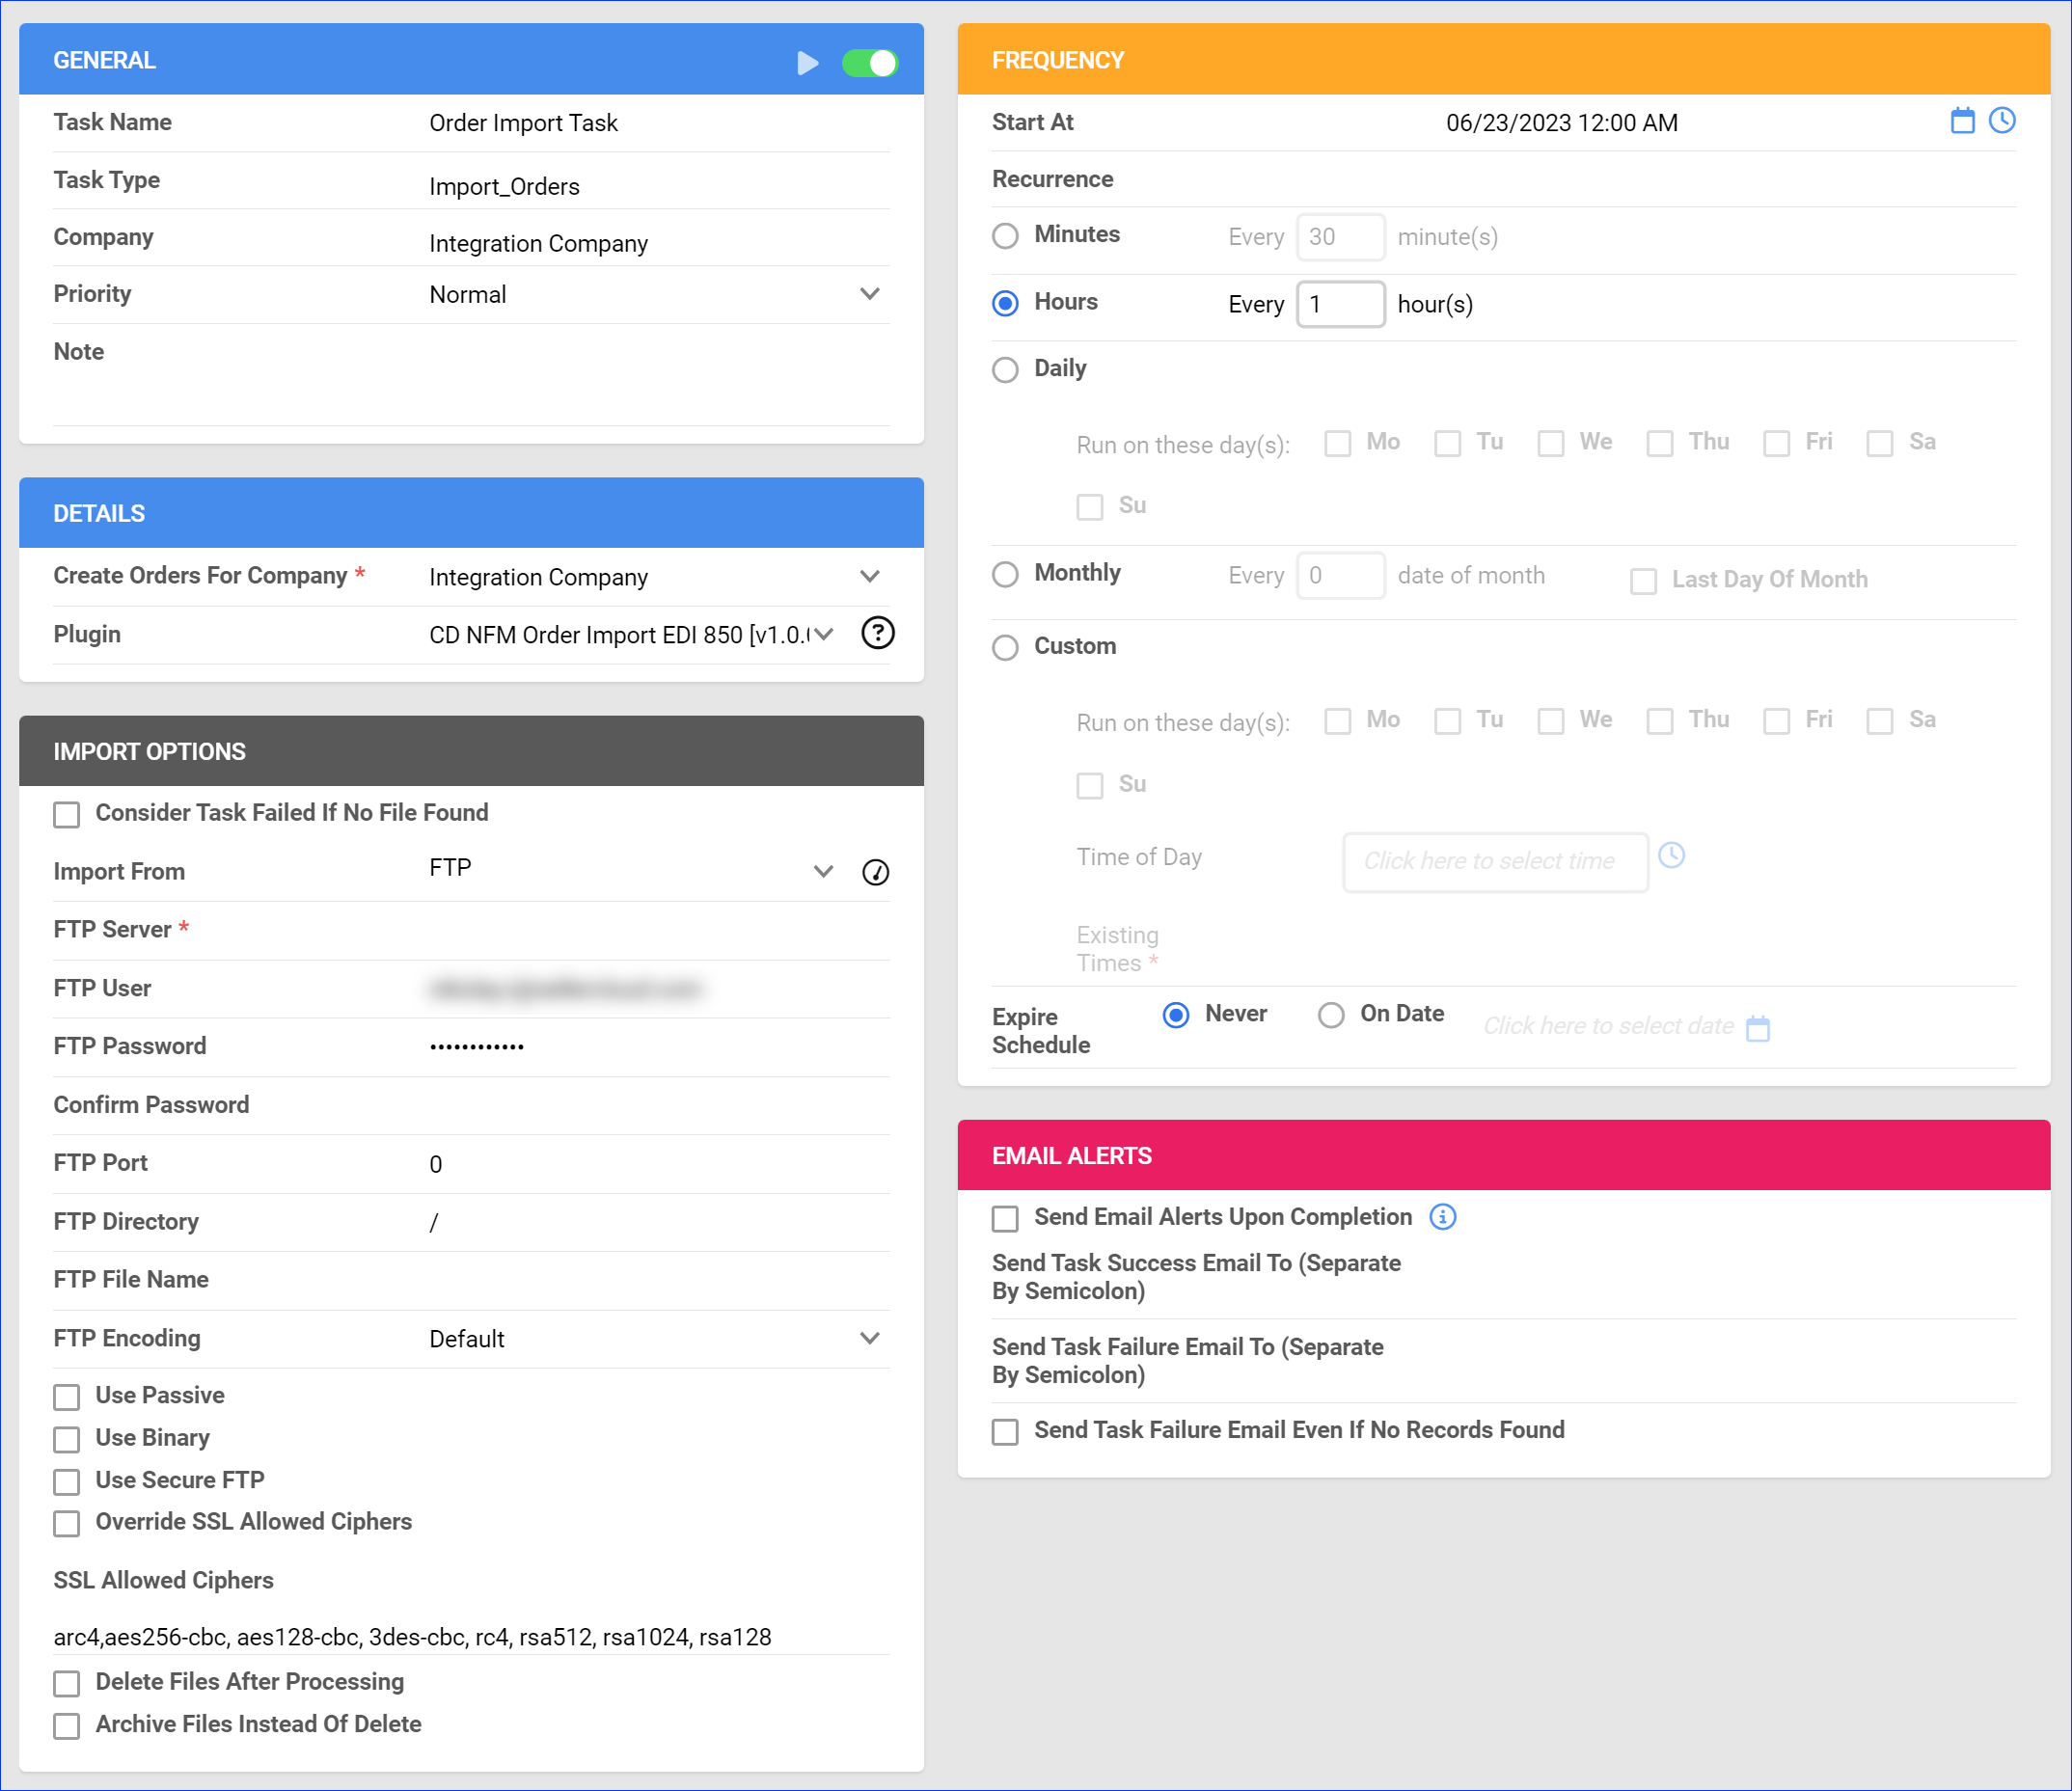
- Click Save.
Order Acknowledgment
This plugin sends order acknowledgment to NFM following the 855 EDI format and marks orders as acknowledged after export.
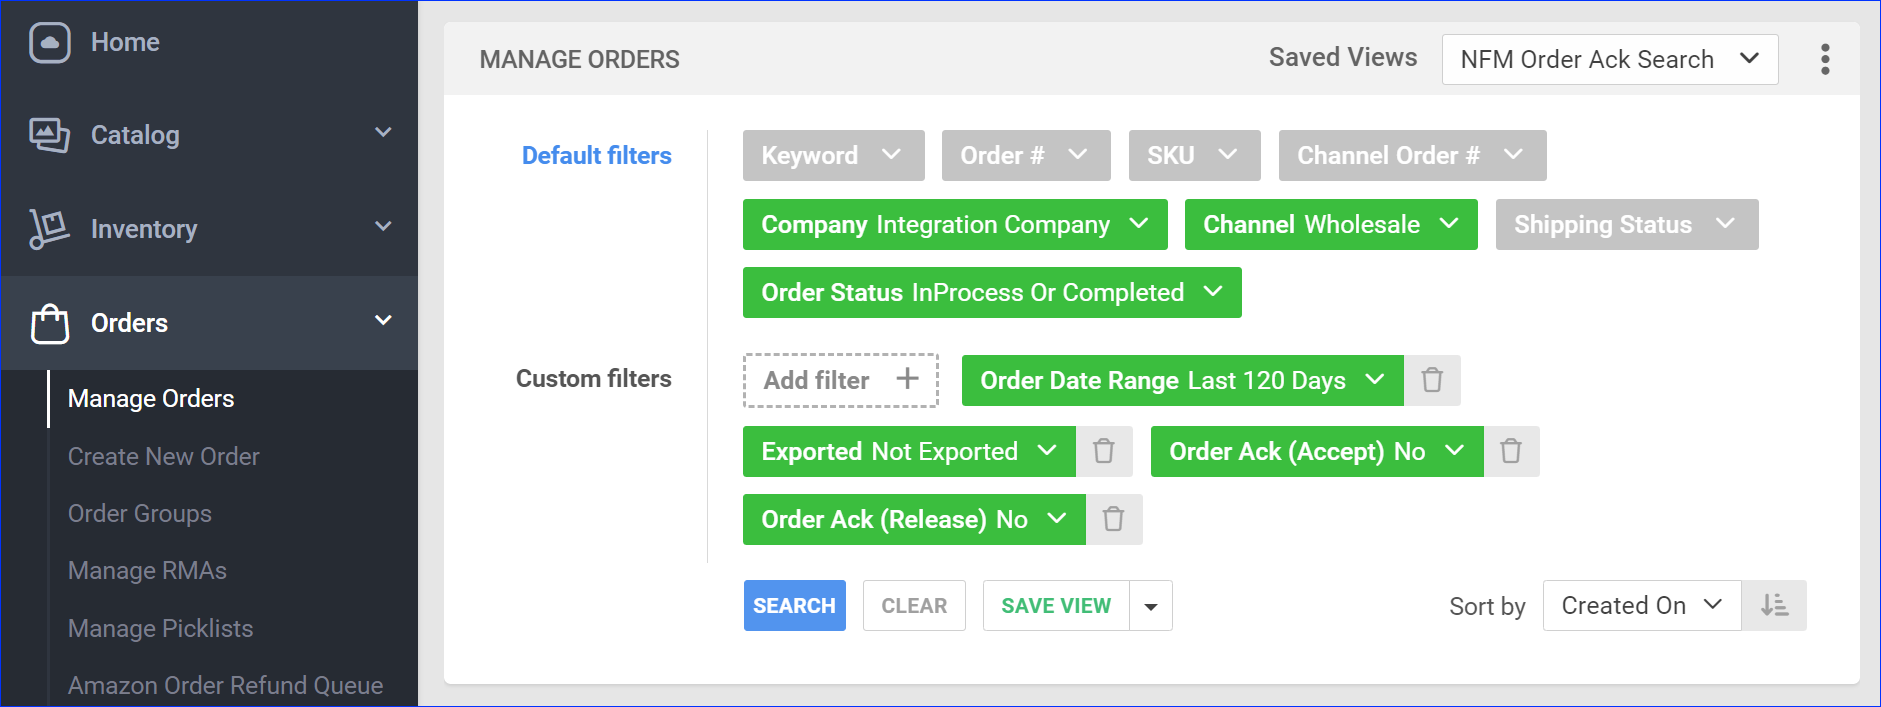
Before you move on, create a Saved Search for orders filtered by:
- Company – The company you created for the integration
- Channel – Wholesale
- Order Status – InProcess Or Completed
- Exported – Not Exported
- Order Ack (Accept) – No
- Order Ack (Release) – No
Automate Order Acknowledgment
To create a Scheduled Task that sends order acknowledgment:
- Navigate to Settings > Scheduled Tasks > Manage Scheduled Tasks.
- Click the green + icon: Create New Scheduled Task.
- Complete as follows:
- Click Task Type and select Export Orders.
- Set the Task Name.
- Select the Company.
- Select the Start Time.
- Click CREATE.
- On the Scheduled Task page, click the Edit button at the top right corner.
- In the Details panel:
- Click the User ID menu and select your email.
- Click the Saved Search menu and select the saved search you created earlier.
- Click the Export Via menu and select NFM Order Export EDI 855.
- Check Mark Orders As Exported.
- Check This is Order Ack (Accept).
- Check This is Order Ack (Release).
- In the Export Options panel, set Export To to FTP and fill out the FTP fields.
- In the Frequency panel, specify the task frequency. For optimal performance, select a range between thirty minutes and one hour.
- In the General panel, click the Enable toggle button.
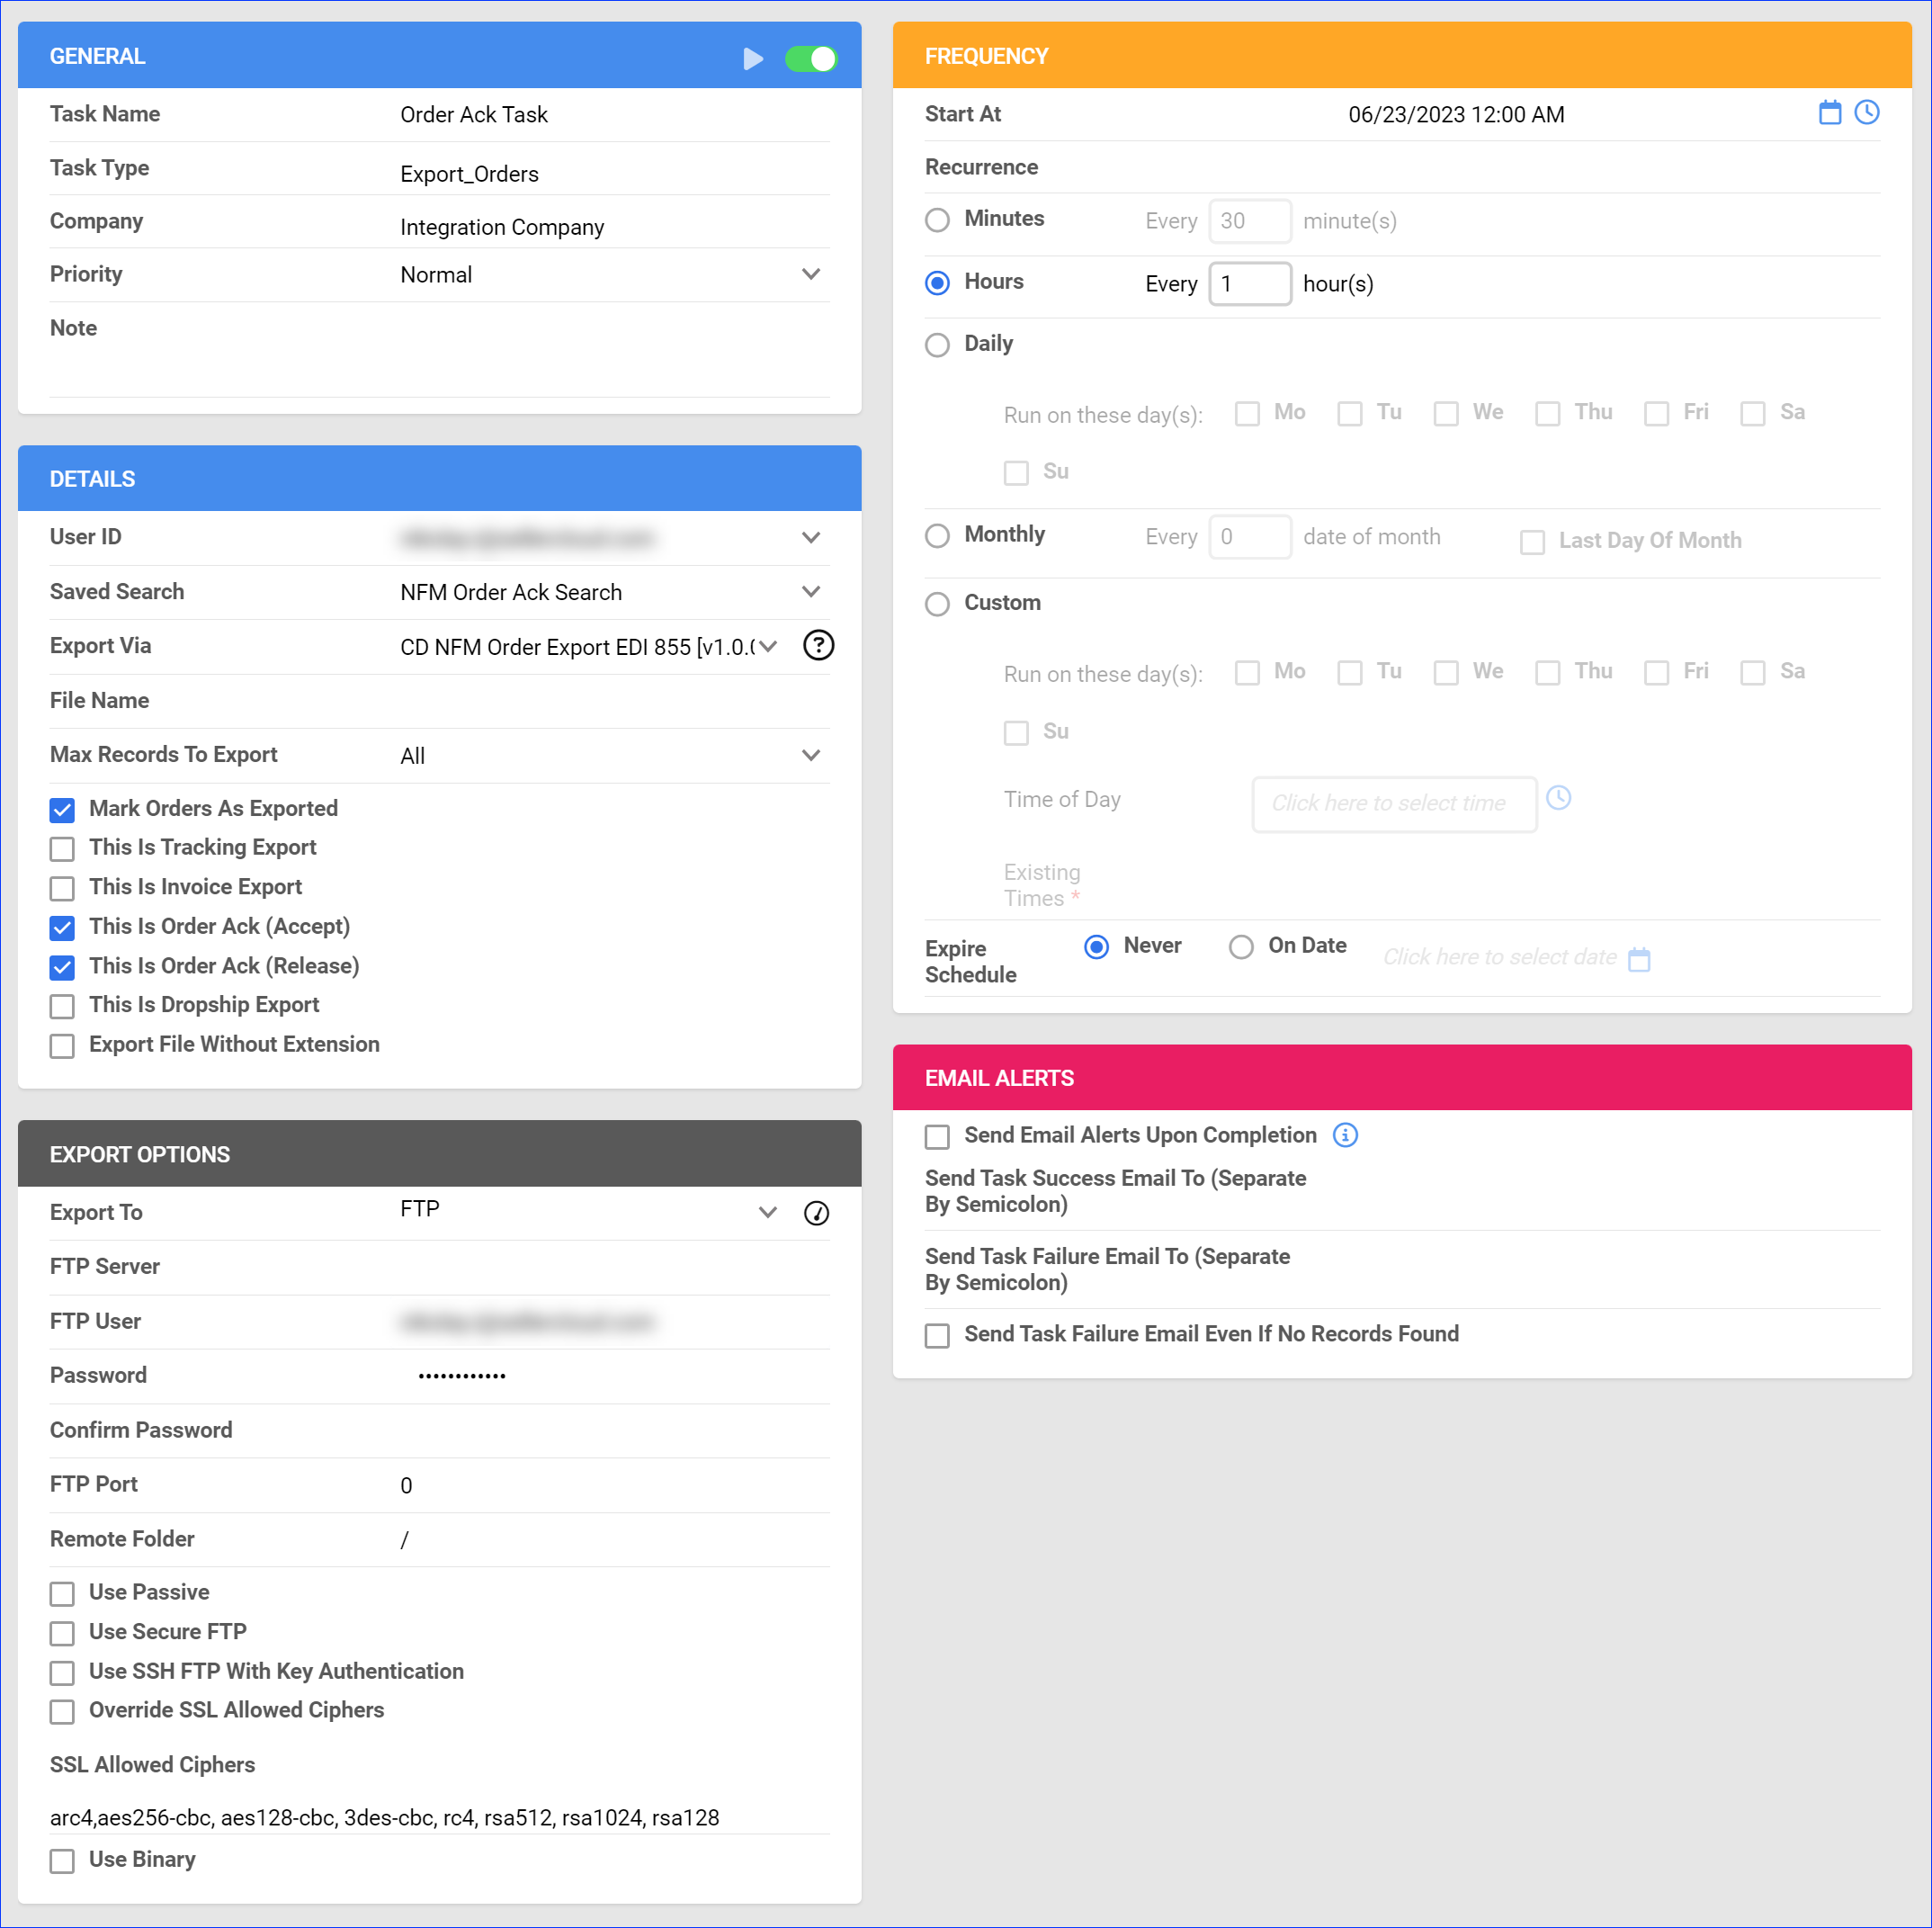
- Click Save.
Tracking Export
This plugin exports tracking from Sellercloud to NFM following the 856 EDI format.
Before you move on, create a Saved Search for orders filtered by:
- Company – The company you created for the integration
- Channel – Wholesale
- Order Status – InProcess Or Completed
- Shipping Status – FullyShipped
- Payment Status – Charged
- Tracking Uploaded – No
![]()
Automate Tracking Export
To create a Scheduled Task that exports order tracking:
- Navigate to Settings > Scheduled Tasks > Manage Scheduled Tasks.
- Click the green + icon: Create New Scheduled Task.
- Complete as follows:
- Click Task Type and select Export Orders.
- Set the Task Name.
- Select the Company.
- Select the Start Time.
- Click CREATE.
- On the Scheduled Task page, click the Edit button at the top right corner.
- In the Details panel:
- Click the User ID menu and select your email.
- Click the Saved Search menu and select the saved search you created earlier.
- Click the Export Via menu and select NFM Tracking Export 856 EDI.
- Check This Is Tracking Export.
- In the Export Options panel, set Export To to FTP and fill out the FTP fields.
- In the Frequency panel, specify the task frequency. For optimal performance, select a range between thirty minutes and one hour.
- In the General panel, click the Enable toggle button.
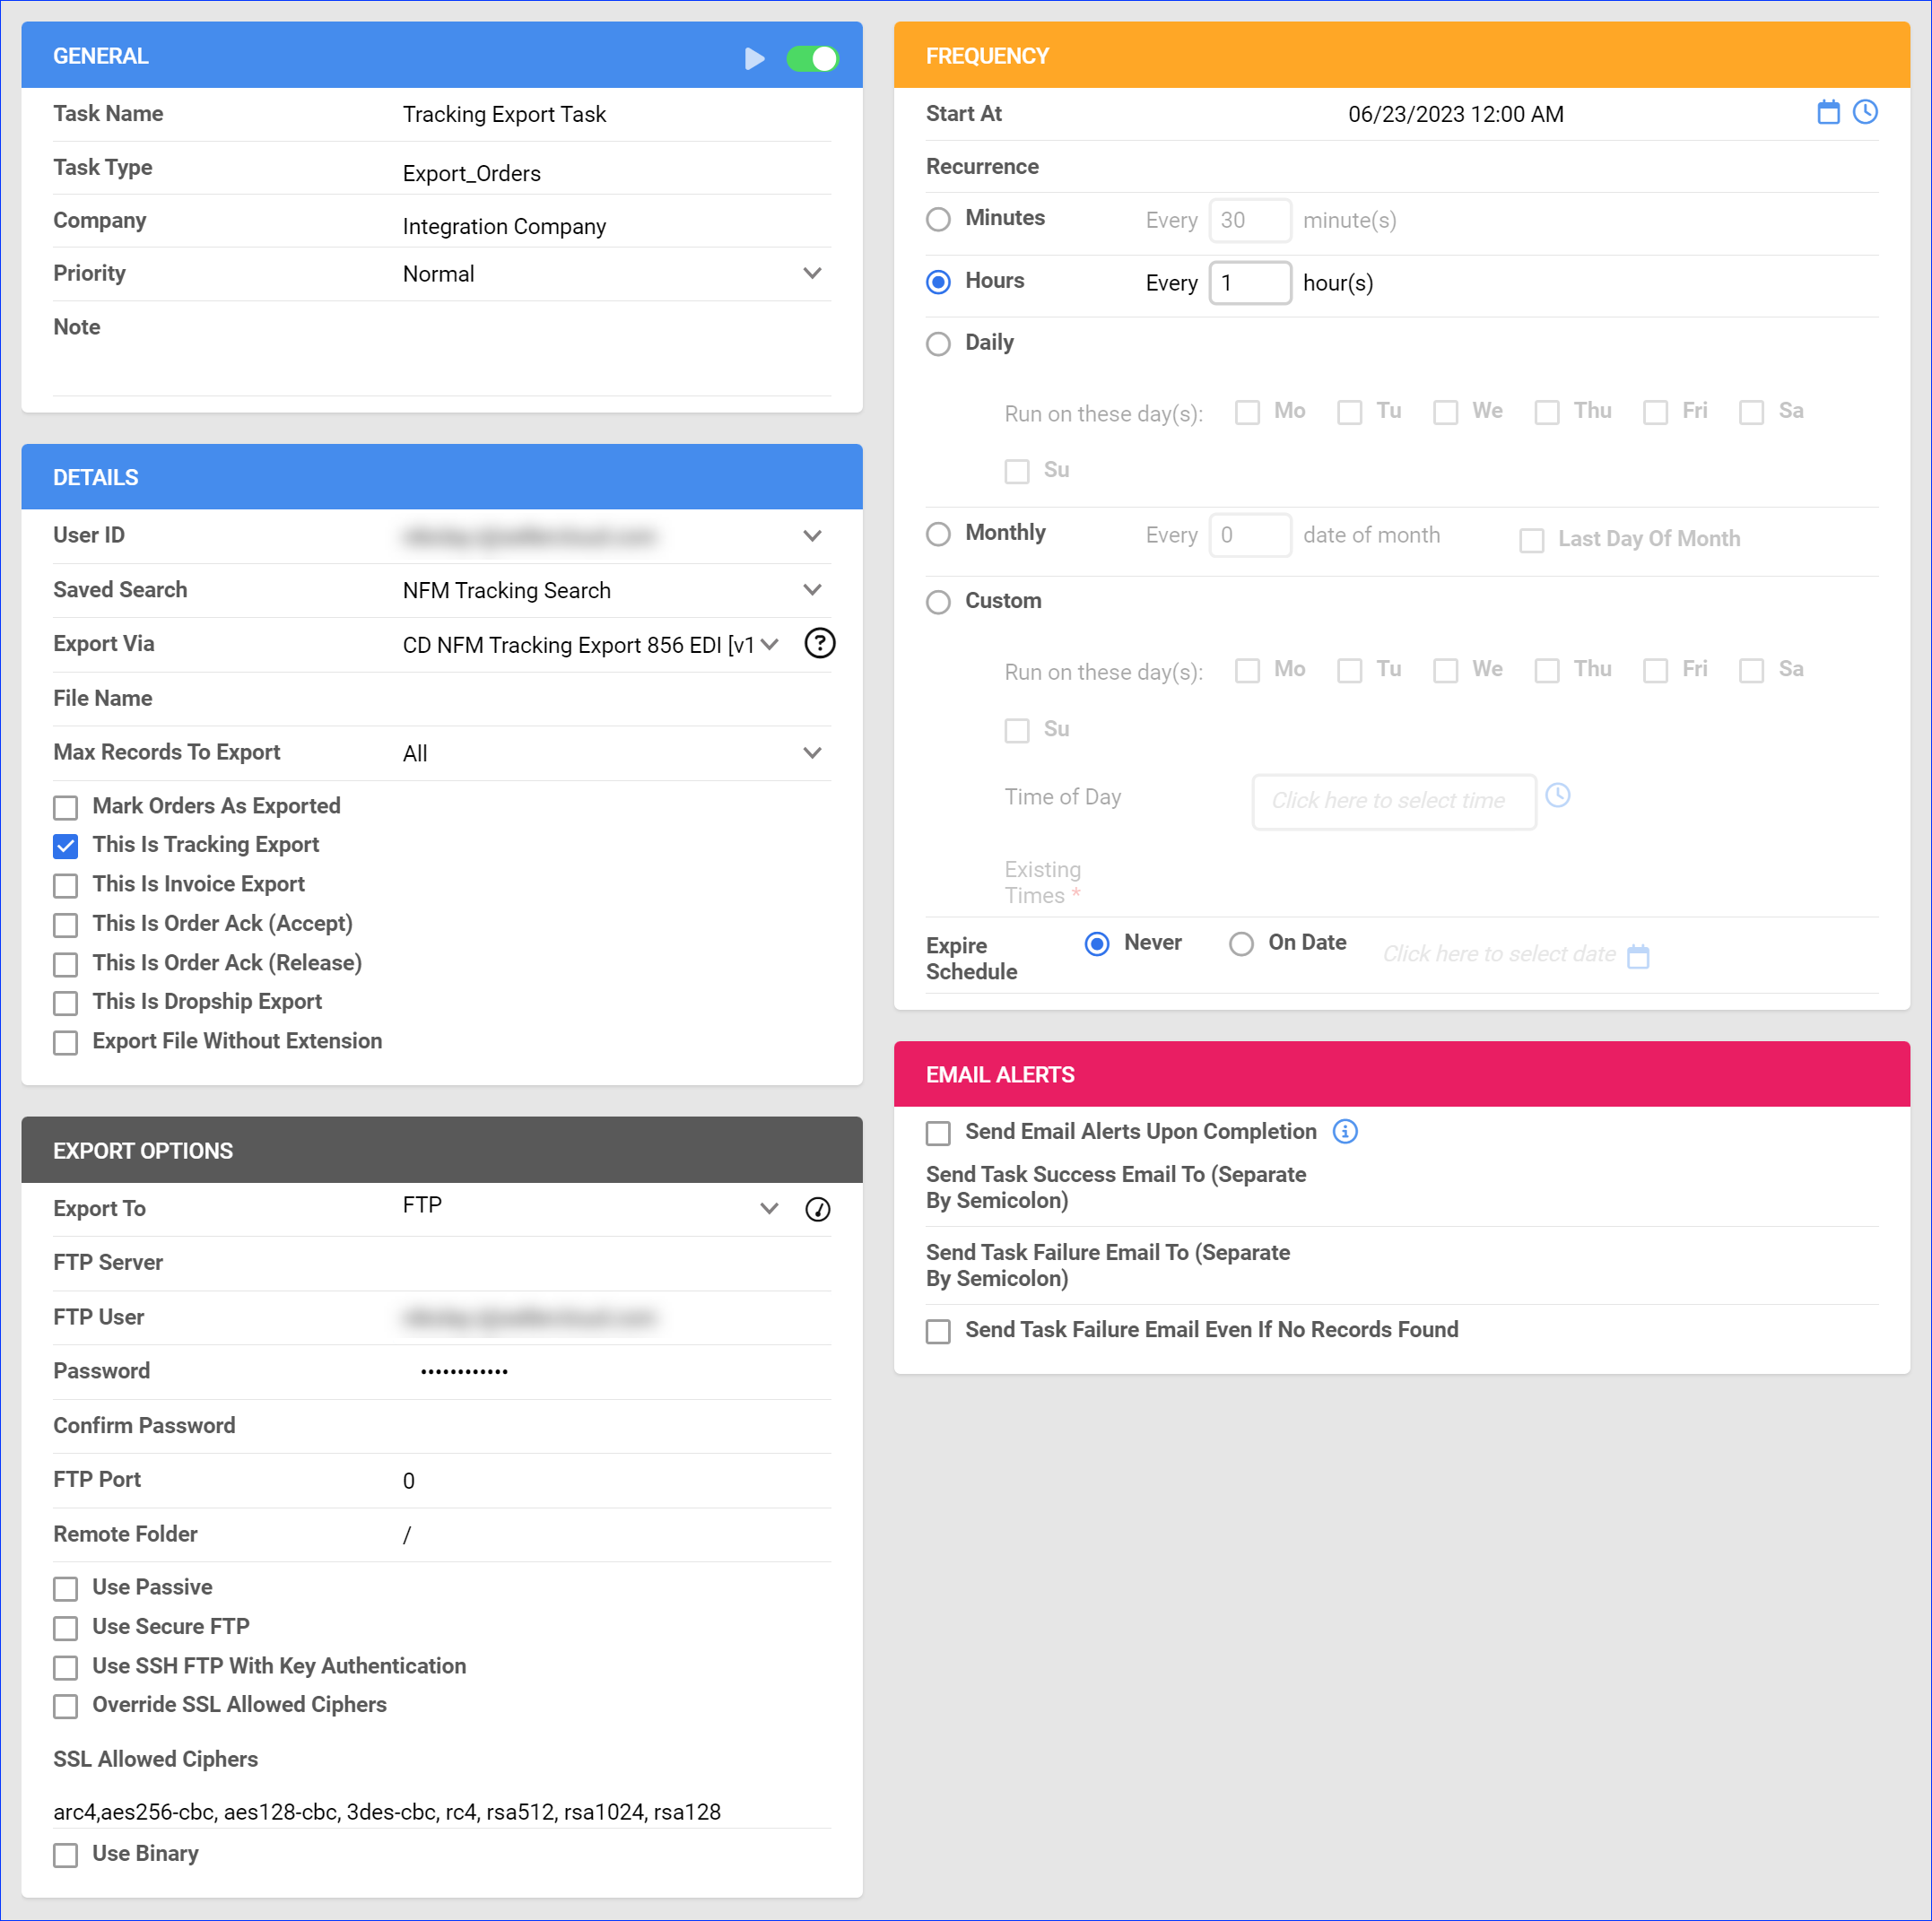
- Click Save.
Invoice Export
This plugin exports invoices from Sellercloud to NFM in EDI 810 format.
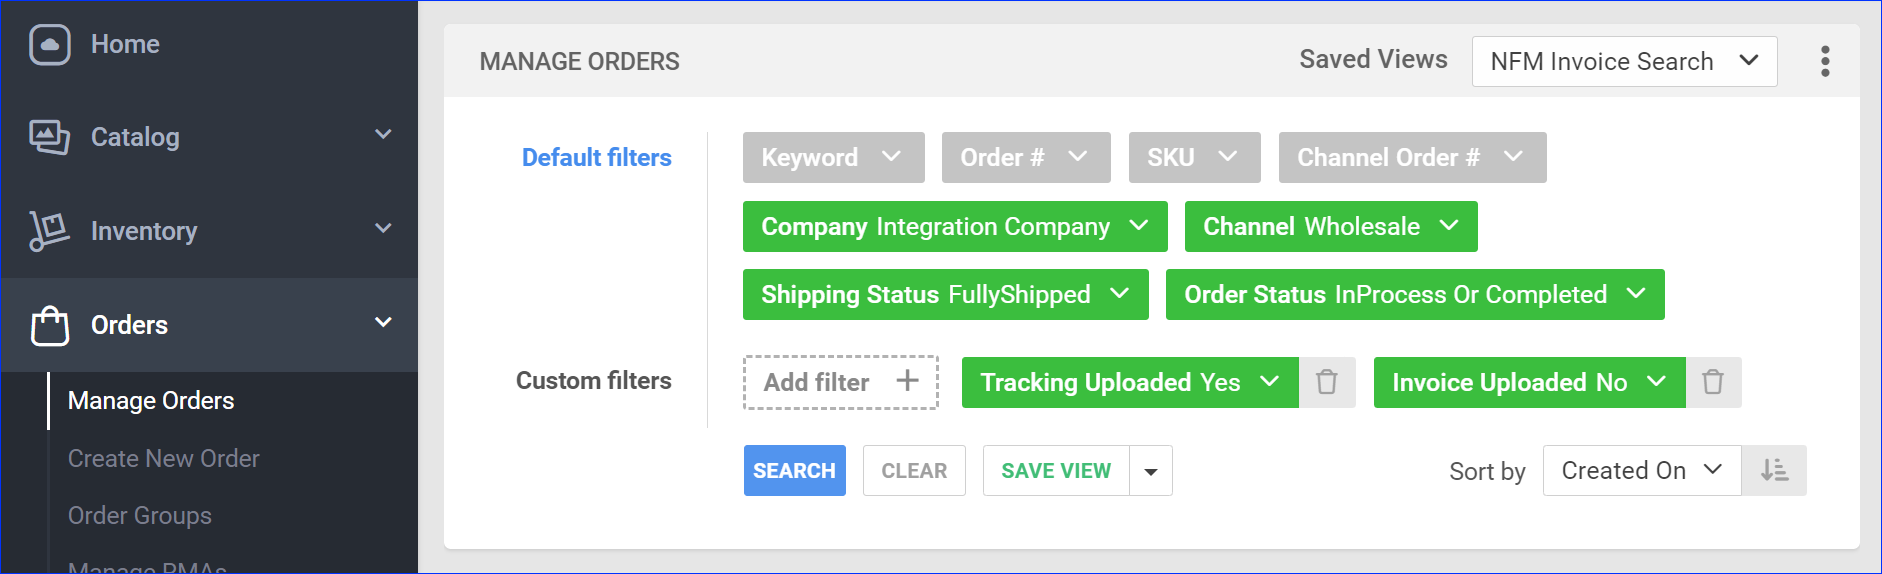
Before you move on, create a Saved Search for orders filtered by:
- Company – The company you created for the integration
- Channel – Wholesale
- Shipping Status – Fully Shipped
- Order Status – InProcess Or Completed
- Invoice Uploaded – No
- Tracking Uploaded – Yes
Automate Invoice Export
To create a Scheduled Task that exports invoices:
- Navigate to Settings > Scheduled Tasks > Manage Scheduled Tasks.
- Click the green + icon: Create New Scheduled Task.
- Complete as follows:
- Click Task Type and select Export Orders.
- Set the Task Name.
- Select the Company.
- Select the Start Time.
- Click CREATE.
- On the Scheduled Task page, click the Edit button at the top right corner.
- In the Details panel:
- Click the User ID menu and select your email.
- Click the Saved Search menu and select the saved search you created earlier.
- Click the Export Via menu and select NFM Invoice Export EDI 810.
- Check This Is Invoice Export.
- In the Export Options panel, set Export To to FTP and fill out the FTP fields.
- In the Frequency panel, specify the task frequency. For optimal performance, select a range between thirty minutes and one hour.
- In the General panel, click the Enable toggle button.
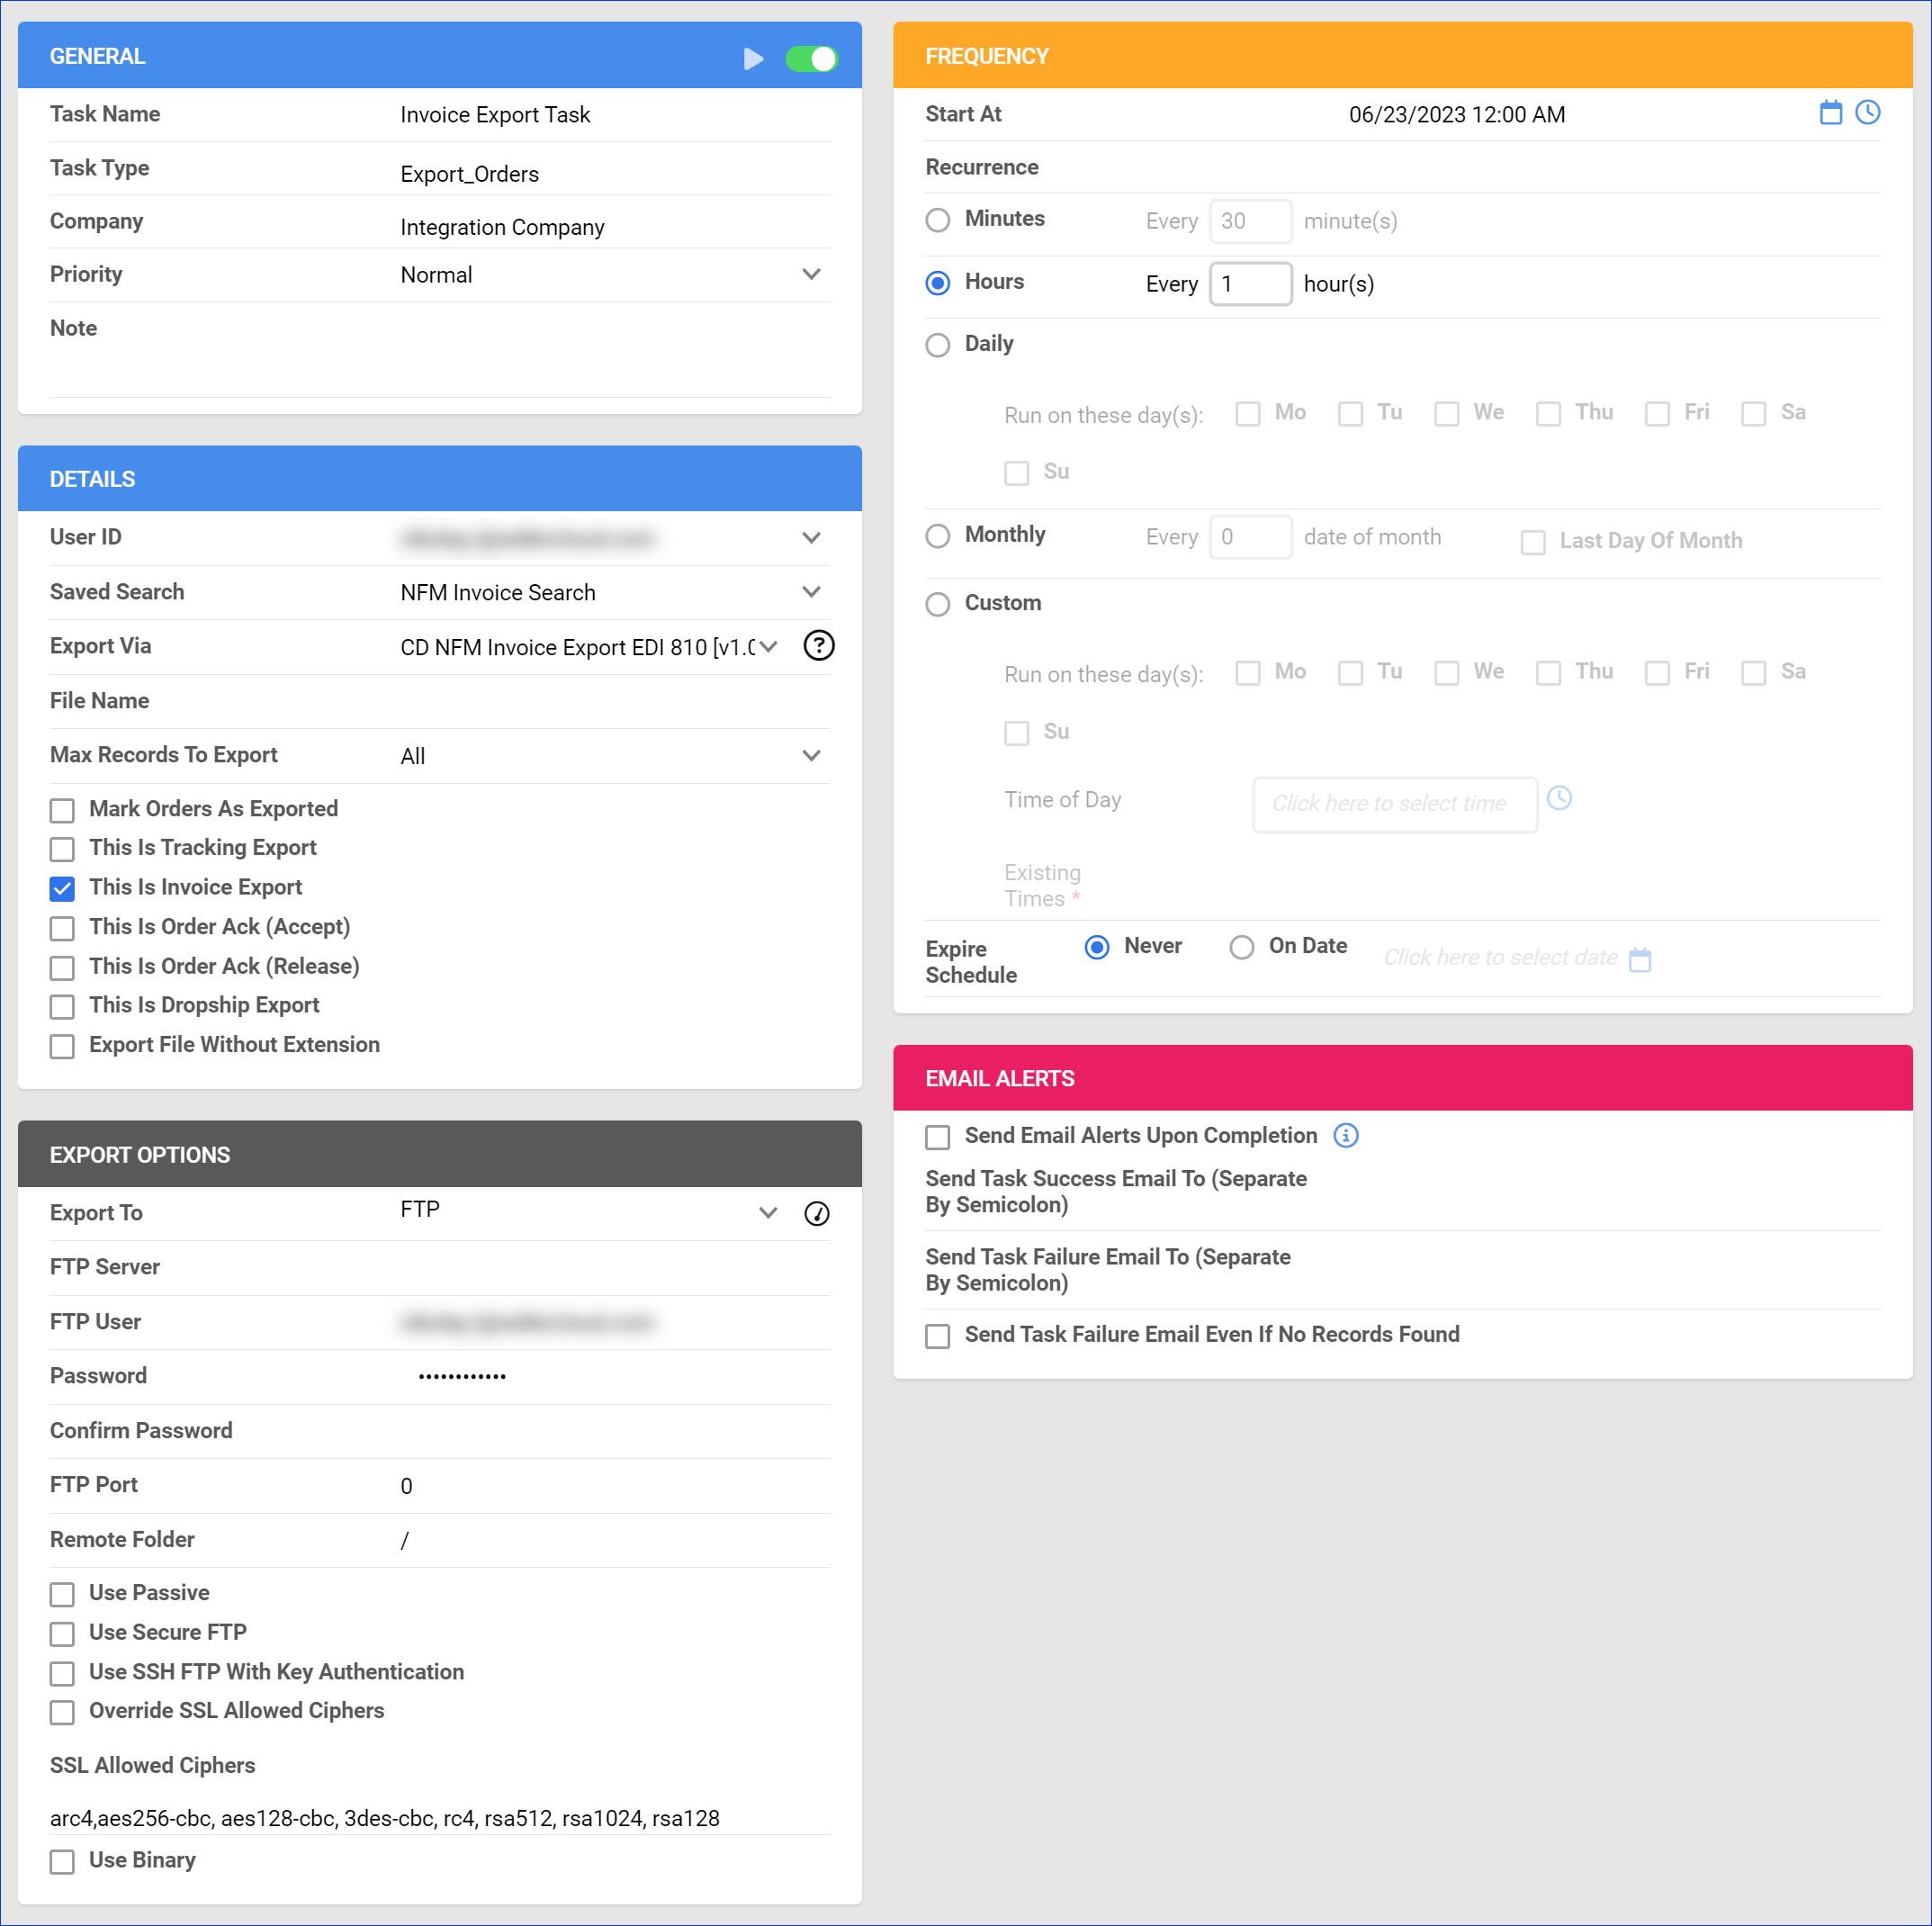
- Click Save.
Inventory Export
This plugin exports inventory from Sellercloud to NFM in EDI 846 format.
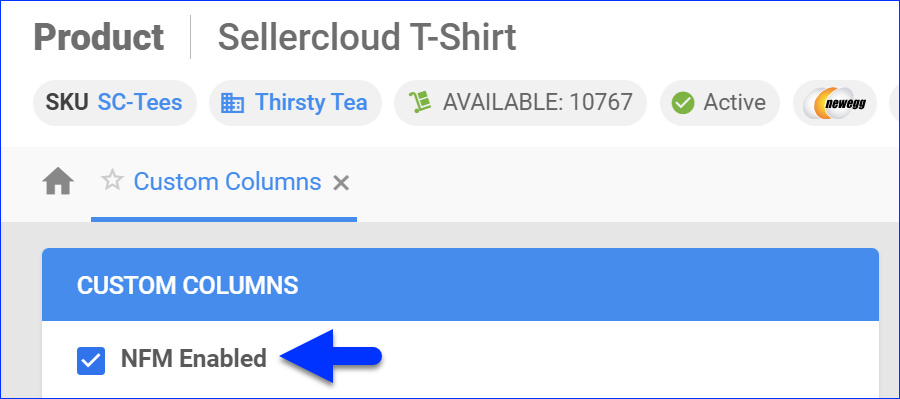
Optionally, you can enable only specific products for NFM by setting their NFM_Enabled Custom Products Column to True:
- For one product at a time: go to the Product Details Page > click Toolbox and select Custom Columns > click Edit, update the NFM_Enabled column, and Save.
- For multiple products in bulk: follow the steps to Bulk Update Products and use the NFM_Enabled column – set it to True for all products you want to enable.
Unlike core integrations, plugin integrations don’t require products to be in the company where the scheduled tasks are created. The export will include the products you select with your Saved Search.
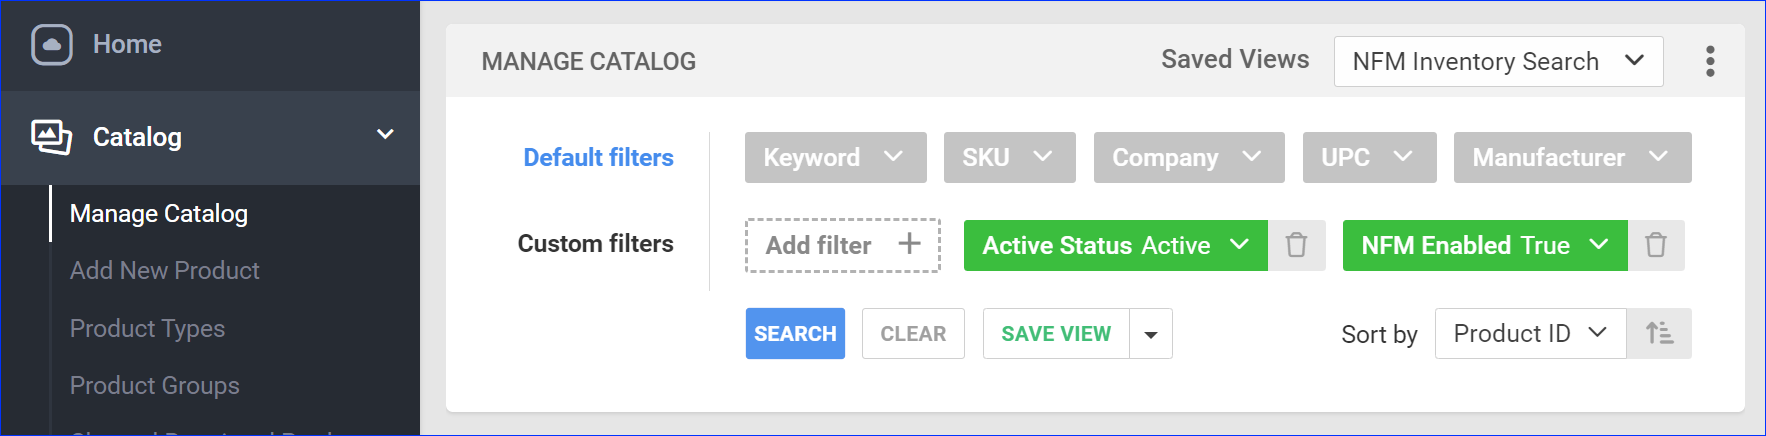
Next, create a Saved Search for products filtered by NFM_Enabled – True. Optionally, you can add more filters to the search to narrow down the export further.
Automate Inventory Export
To create a Scheduled Task that exports inventory:
- Navigate to Settings > Scheduled Tasks > Manage Scheduled Tasks.
- Click the green + icon: Create New Scheduled Task.
- Complete as follows:
- Click Task Type and select Export Products.
- Set the Task Name.
- Select the Company.
- Select the Start Time.
- Click CREATE.
- On the Scheduled Task page, click the Edit button at the top right corner.
- In the Details panel:
- Click the User ID menu and select your email.
- Click the Saved Search menu and select the saved search you created earlier.
- Click the Export Via menu and select NFM Inventory Export EDI 846.
- In the Export Options panel, set Export To to FTP and fill out the FTP fields.
- In the Frequency panel, specify the task frequency. For optimal performance, select a range between thirty minutes and one hour.
- In the General panel, click the Enable toggle button.
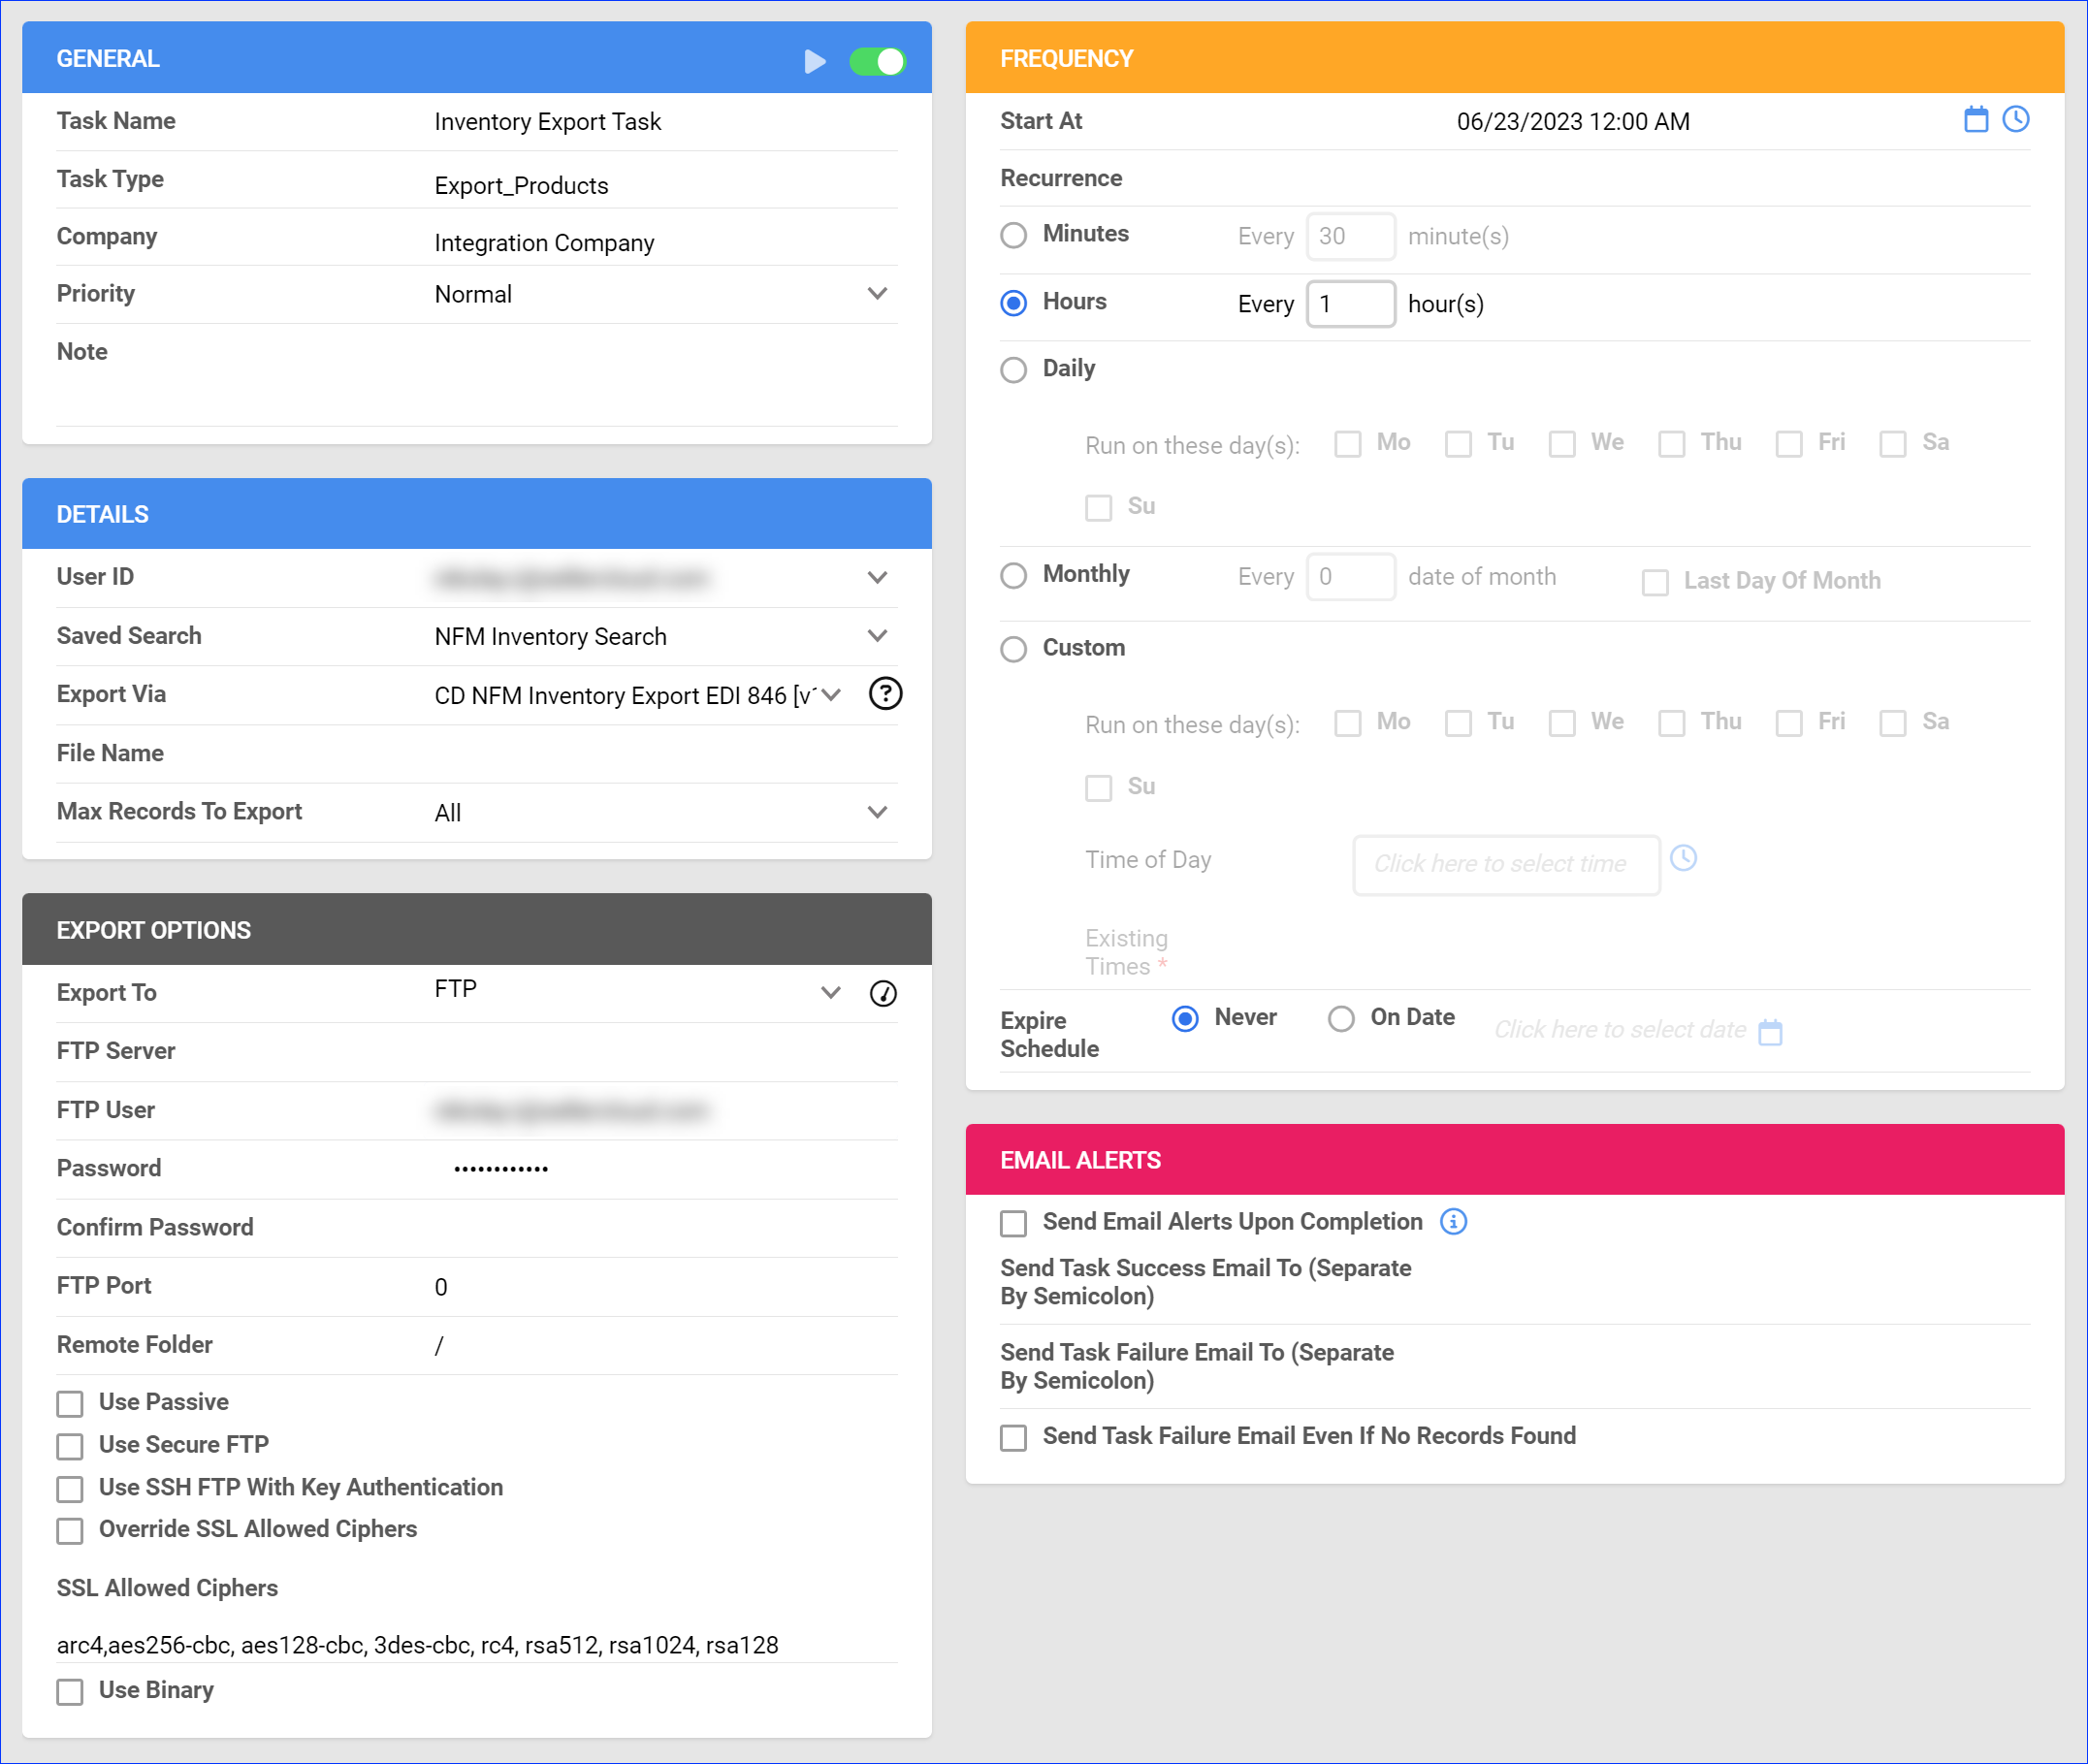
- Click Save.