Overview
In this article, you will learn how to use Sellercloud’s Plugin Wizard. This new workflow streamlines the setup of Channel Plug-in Integrations Through Scheduled Tasks. It helps you complete the required steps by setting up:
- A dedicated Company.
- Custom Company Settings.
- Saved Views to target specific products and orders.
- Scheduled Tasks to run the plugins periodically.
Prerequisites
A few prerequisites must be met before using the Plugin Wizard to integrate a sales channel into Sellercloud.
To find out what prerequisites there are for your specific channel, type the channel’s name in the search here on Sellercloud Help. Find the article that describes how to integrate the channel – usually called Channel Account Integration. For example, for Tractor Supply, you can type Tractor Supply in the search, and you will find the Tractor Supply Account Integration article. Open the article and check its Prerequisites section for the following:
- Whether you need to request an FTP or VAN From Sellercloud Support or the channel’s support team before you can start using the Plugin Wizard.
- Most of the required Custom Product and Order Columns can be created directly through the Plugin Wizard, which will notify you if any are missing during the setup. The only column that must be created in advance is the CHANNEL_Enabled Product Column. To create this column, follow the instructions here, replace CHANNEL with the integration name and set its Data Type to Boolean.
- The values of the Custom Company Settings, such as the Channel_ISAID and Channel_Qualifier (where Channel will be replaced with the name of your channel). You will create these settings and enter the values while using the Plugin Wizard.
- Any other less common prerequisites not covered by the three bullet points above.
Start the Plugin Wizard
To access the Plugin Wizard, go to Settings > Scheduled Tasks > Launch Plugin Wizard.
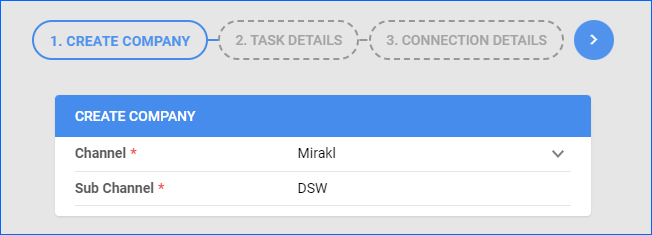
Create Company
Create Company is step 1 of the Plugin Wizard. Here, you select the Channel for this integration and create a Company for it. The new company will be named after your default company, with the channel name appended after it and a dash in between. For example, MainCompany-Channel.
This step displays a drop-down menu called Channel.
- If you select Other, a field called Other Channel appears, where you can enter the channel’s name.
- If you select Mirakl or DSCO, a text field called Sub Channel displays because these platforms allow you to integrate multiple channels.
Select your channel and click Next Step.
Task Details
Task Details is step 2 of the Plugin Wizard. In this step, you set up the Saved Views and Scheduled Tasks for the integration.
Next, in the Saved View Details panel:
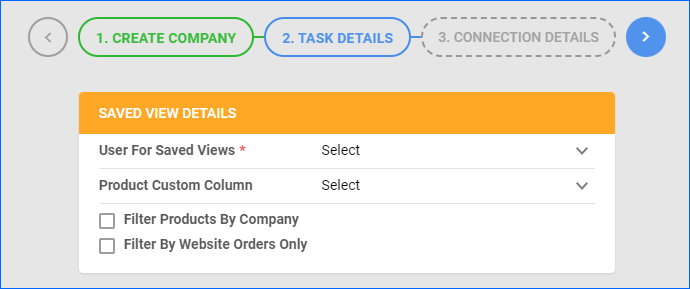
- Select the User For Saved Views. The Saved Views for the Scheduled Tasks will be automatically created under the user you select.
- Optionally, select the integration-specific Product Custom Column. Use this option, if you want to enable only certain products for the channel. If selected, you must enable products for the channel as follows:
- For one product at a time: go to the Product Details Page > click Toolbox and select Custom Columns > click Edit, update the Channel_Enabled column, and Save.
- For multiple products in bulk: follow the steps to Bulk Update Products and use the Channel_Enabled column – set it to True for all products you want to enable.
- Optionally, you can check Filter Products By Company to only send products from a specific company to the channel.
- Optionally, you can check Filter By Website Orders Only to integrate only orders from the Website channel. This is useful if you also plan to set up core integrations under the same company.
Next, in the Task Details panel:
- if you chose a channel from the Channel list in step 1:
- The Scheduled Tasks and Plugins are locked in.
- If you chose Channel: Other in step 1:
- Select the task type for which you want to create a Scheduled Task.
- Select whether to Export / Import Via a plugin or a profile.
- Select the actual Plugin / Profile.
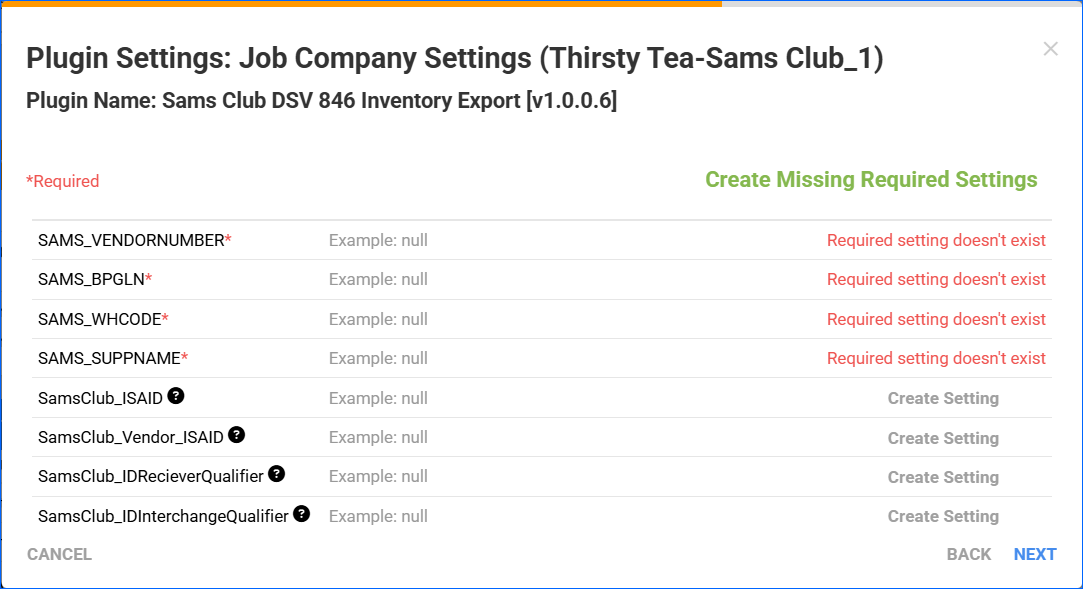
- If the plugin is configurable, click the gear icon to Configure Plugin Settings.
Client Setting Enable Plugin Configurations must be enabled for this workflow!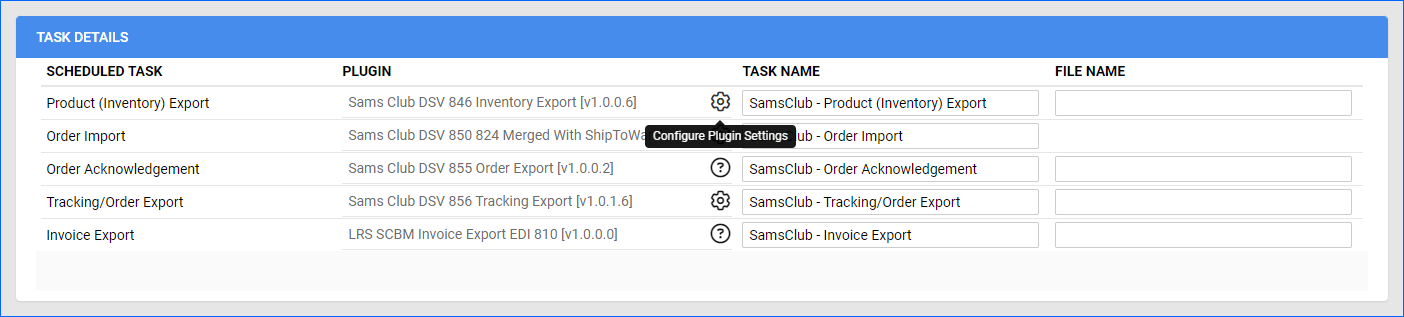
- The wizard will list the integration’s Custom Company Settings, including those that are currently missing. To add them, click Create Missing Required Settings and enter their values. Once done, click Next.
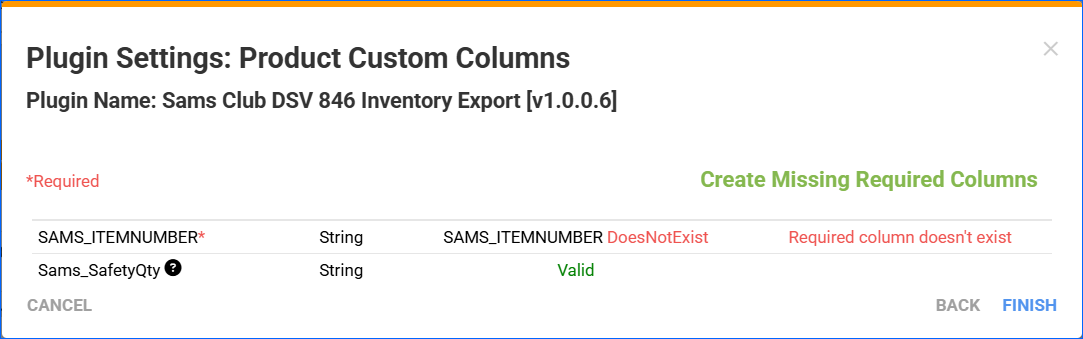
- The wizard will list the integration’s Custom Product and Order Columns, including those that are currently missing. To add them, click Create Missing Required Columns.
- Click Finish.
- The wizard will list the integration’s Custom Company Settings, including those that are currently missing. To add them, click Create Missing Required Settings and enter their values. Once done, click Next.
- You also have the ability to download a missing plugin or update it to its latest available version without any assistance from Sellercloud Support:
- If there is a blue icon in place of the plugin name, click on it to download and install the necessary plugin.
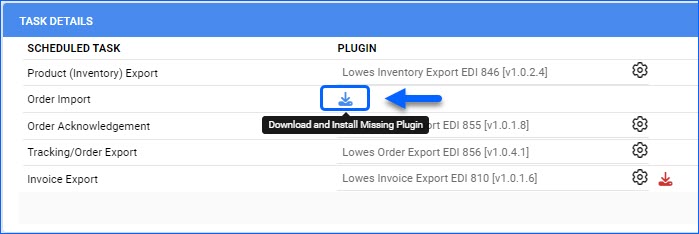
- If you see a red icon next to one of the plugins, this means that a newer version of that plugin has been released. Click on the icon to download the update.

- If there is a blue icon in place of the plugin name, click on it to download and install the necessary plugin.
- Optionally, you can change the Task Name for each task.
- Enter a File Name for the files from each task. You can use the placeholder {yyyy}{MM}{dd}{HH}{mm} – it populates the file name with the file creation date.
Connection Details
Connection Details is step 3 of the Plugin Wizard. In this step, you fill out any required information to connect to the channel.
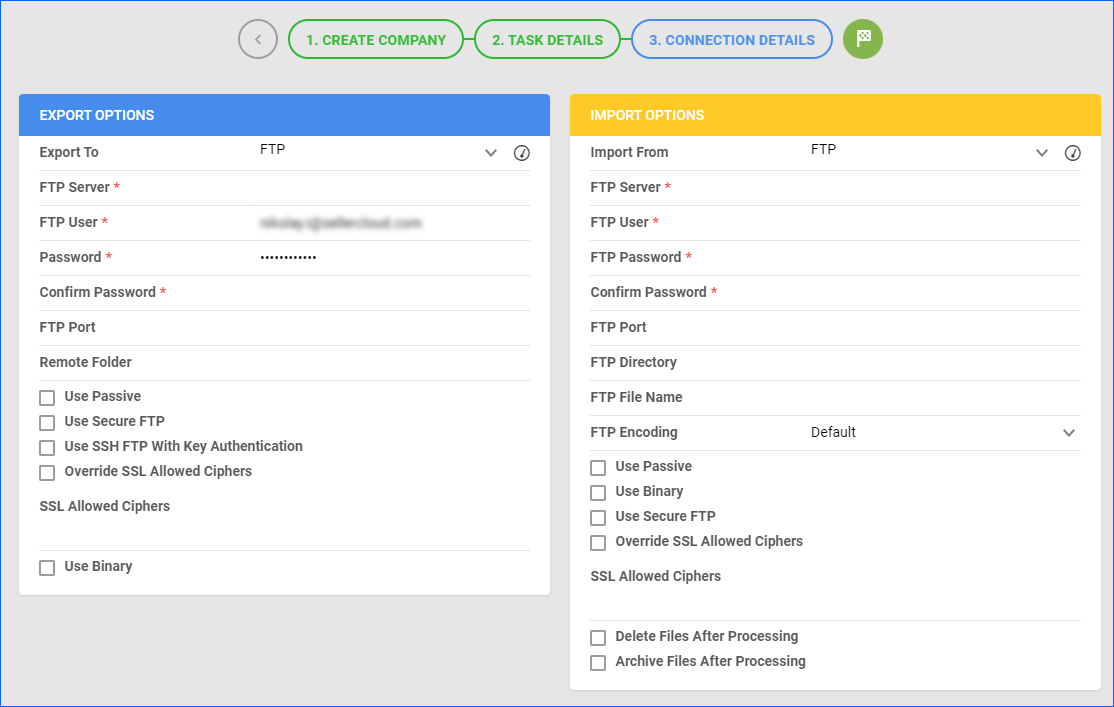
Based on the channel you’re setting up, select your Export / Import Options. If you’re setting up an integration via API, set both to None and click the Finish button.
If you’re setting up an integration via EDI, it works over FTP or VAN – in this case, select FTP and enter your Server, User, and Password. Also, check Use Passive and Use Secure FTP. Click on the icon in the Export Options panel header to Copy FTP Information to Import Options.
Optionally, depending on the channel, you can set up the rest of the options on the page.
Click the Finish icon, and you will see a congratulations message with links to the Company, Tasks, and a reminder to set up any necessary Custom Settings the plugins require.
Final Steps
To enable the Scheduled Tasks:
- Go to Settings > Scheduled Tasks > Manage Scheduled Tasks.
- Set the Company filter to search for the company created with the Plugin Wizard, and then click Search.
- Check the boxes to the left of the scheduled tasks.
- Click the Actions icon on the bottom right and select Enable Tasks.

- Your integration is up and running.