Overview
Scheduled Tasks in Sellercloud allow you to automate routine e-commerce processes for execution at custom intervals. Depending on your business needs, you can create a variety of Schedule Task Types:
- Import Tasks – You can use these tasks to automatically import data into Sellercloud.
- Export Tasks – These allow you to schedule regular exports of data from Sellercloud.
- Execute Order Rules – This task type allows you to schedule several Order Rules to run at selected times.
- Picklist Generation Tasks – With these tasks, you can schedule the automatic generation of Picklists.
- Predictive Purchasing and Restocking – Used to schedule the utilization of Sellercloud’s Predictive Tools.
- Other Tasks – Tasks for additional e-commerce processes that don’t belong to the above categories, such as Purchase Order Reminder tasks.
Import Tasks
Routine import operations can be scheduled and streamlined with different Import Task Types. With them, you can regularly import channel orders and vendors’ data into Sellercloud without any additional effort. You can also utilize Scheduled Import Tasks to update your products’ information, such as Alias, Images, and Reserves.
Import Task Types
The available Import Task Types are:
- Import Bulk Update
- Import General – This task requires a Job Subtype to specify its scope. The available Subtypes are:
-
- Product Alias
-
- Product Image Info
-
- Product Manual Reserves
- Import Orders
- Import Order Tracking
- Import Products
- Import Product Inventory
- Import Vendor Product
- Import Vendor Invoices
- Purchase Order Import
- Import RMA
- Import Shipping Cost
Create Import Tasks
To schedule a new import task:
- Navigate to Settings > Schedule Tasks and click on the plus sign to create the appropriate Import Task type.
- Open the task and click Edit.
- Set the desired Frequency and Email Alerts.
- In the Details panel, select the appropriate Plugin, or Profile from the dropdown menu and configure any other applicable task settings.
- From the Import from dropdown in the Import Options panel, indicate the method that you intend to use – either from an FTP, HTTP, or email. Based on the chosen method, proceed to the following section for further information.
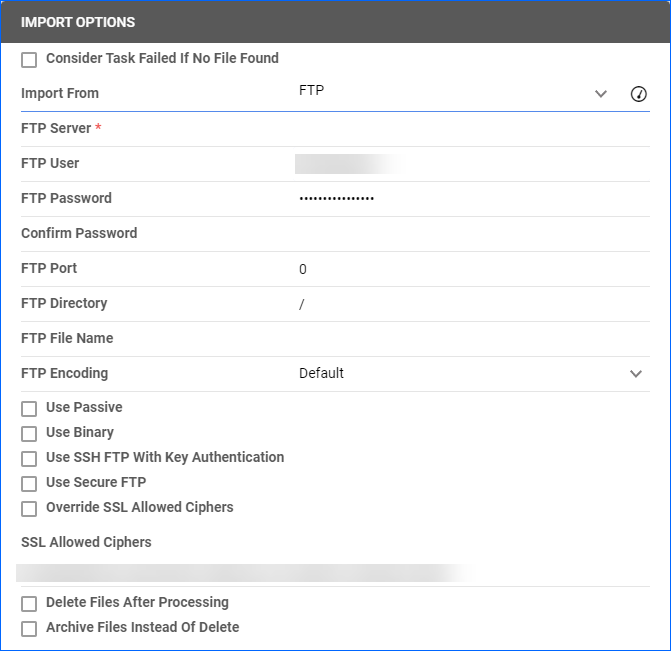
- All Import task types have an additional option in this panel: Consider Task Failed If No File Found. When enabled, Queued Jobs that run upon task executions and do not find a file to process will be considered Failed, and you will receive notifications accordingly.
Via FTP
To import via FTP:
- Choose FTP from the Import From dropdown.
- Enter the FTP Server and the following credentials:
- FTP User
- FTP Password
- Reconfirm Password
- FTP Port
- Add an FTP Directory – When there are multiple directories (folders) on the FTP, enter the correct directory. Typically, you must enter a / (forward slash) before the directory name.
- Select the FTP FileName – When multiple files are in the specified directory, enter the file name. Typically, you do not need a / (forward slash) before the directory name.
If you want the task to load multiple files into one folder, enter a * (asterisk) in the file name. This will grab all the files in that directory.
- Enter the FTP Encoding information from the FTP provider and enable the appropriate configurational details:
- Use Passive – Enable this setting to use passive mode for data transfer. This can be helpful in bypassing firewalls filtering the data port connection from the server.
- Use Binary – Enable this setting for the data to be transferred in binary mode.
- Use SSH FTP With Key Authentication – Enable this setting if the FTP connection is encrypted using SSH.
- Use Secure FTP – Enable this setting if you are using a Secure File Transfer Protocol connection (SFTP).
- You can configure the task to delete the file from the FTP by choosing Delete Files after Processing. If incoming files are not cleared on the FTP server, retrieval timeouts may occur. Enabling this option helps avoid FTP clutter. It is strongly recommended to enable this if:
- File dropped onto the directory is always renamed.
- File is not set to overwrite an existing file.
- Alternatively, you can choose to archive the file after processing by enabling the option Archive files after Processing. Set up a sub-directory within the specified directory for archiving. When this option is enabled, the processed file will be transferred to the sub-directory.
- Make sure that you are still in Edit mode. Click the Test FTP icon to verify the connection.
- Click Save.
Via VAN
In case your connection requires a VAN, set the Import From dropdown to FTP and populate the fields with your VAN details. Example:
FTP Server (Liaison’s VAN): 63.78.198.2
FTP User: Mailbox+MailSlot (with the “+”)
FTP Password: Password; FADA (with the “;FADA”)
FTP Port: 821
Remote Folder: /
Use Passive: True
Use Secure FTP: True
Secure FTP Type: Explicit FTP Over TLS
Override SSL Allowed ciphers: True
Via HTTP
To import via HTTP:
- Choose HTTP from the Import From dropdown.
- Enter the HTTP URL.
- Click Save.
Via Email
When scheduling an import from an email, you may want to create a dedicated email for this task for the following reasons:
- The task will search every email ever received, which may take a long time.
- The FromAddress (Sender email), if provided, has to exactly match. Otherwise, you can leave it blank to process from all senders.
- An app-specific password must be generated from your Google account.
To schedule an import from an email:
- Optionally create a new email account.
- For Gmail users: Generate an app-specific password from your Gmail account. You can get an app password here. Note that two-step verification must be enabled. Learn more about app passwords here.
- If you are using a new Gmail account: Follow the link above to enable the app-specific setting. You may be asked to enable two-step verification.
- If you are using a new non-Gmail account: You may want to check your email settings for any settings that may prevent downloads.
- Log in to the email account that will receive the file.
- For Gmail users: In Gmail, go to Settings > See all settings > Forwarding and POP/IMAP > Select Enable IMAP (if not already selected) > Save Changes.
- If you are not using Gmail: Navigate to your email settings to make sure IMAP is enabled.
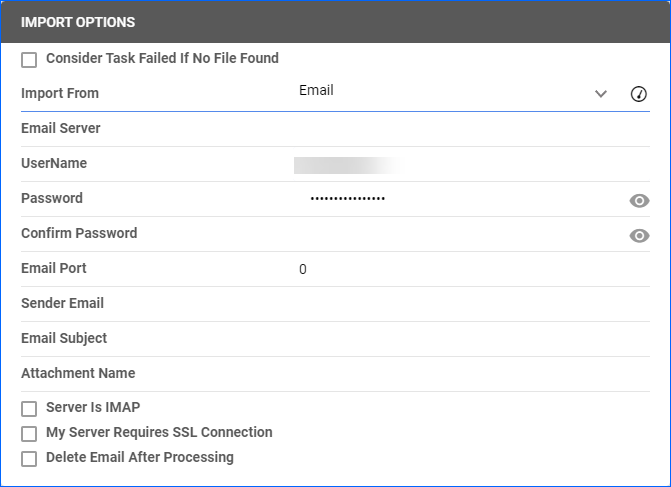
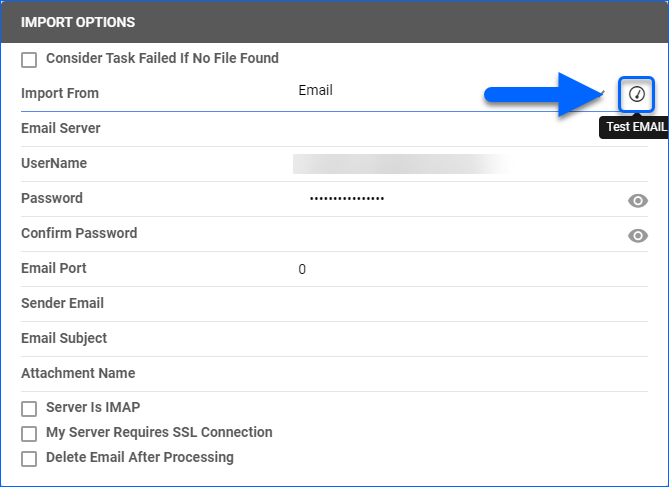
- Navigate to the Scheduled Task you created. From the Import From dropdown, select Email. Fill out your Credentials and configure the Email Server and Port. Detailed information on the appropriate server/port based on your email provider can be found here.
- Check Server is IMAP and My Server requires SSL connection, if applicable.
- Optionally, check Delete Email After Processing if you want Sellercloud to delete the email after the task completion. If left unchecked, the task will automatically mark the email as Read.
The task can import data only from Unread emails. - Make sure that you are still in Edit mode. Click the Test EMAIL icon to verify the connection.
- Click Save.
Export Tasks
Regular exports of Sellercloud data can also be automated with Schedule Tasks for various purposes, such as order tracking, analysis or sharing information with partners.
Export Task Types
The following Export Tasks types are available:
- Export FBA Shipments
- Export General – This export task type requires a Job Subtype to specify its scope. The available Subtypes are:
-
- Customer
-
- Listed On Channel
-
- Product Alias
-
- Product Image Info
-
- Product Manual Reserves
-
- Shipping Containers With Items
-
- Shipping Containers Without Items
-
- Warehouse Inventory Transfer
- Export Inventory Per Parent SKU
- Export Kit Assembly Work Orders
- Export Orders
- Export Products
- Purchase Order Export
- Export RMA
- Export Vendor Invoices
- Export Warehouse Bin Movement
- Export WFS Shipments
Create Export Tasks
To schedule a new Export task:
- Navigate to Settings > Schedule Tasks and click on the plus sign to create the appropriate Export Task type.
- Open the task and click Edit.
- Set the desired Frequency and Email Alerts.
- In the Details panel, select the appropriate:
- User ID and Saved Search from the dropdown menus.
- Choose the correct export Plugin from the Export Via dropdown. Alternatively, you can select from an export mapping tool profile.
- Configure any other applicable task details.
- From the Export To dropdown in the Export Options panel, indicate the method that you use – either from an FTP, HTTP, or email. Based on the chosen method, proceed to the following section for further information.
To FTP
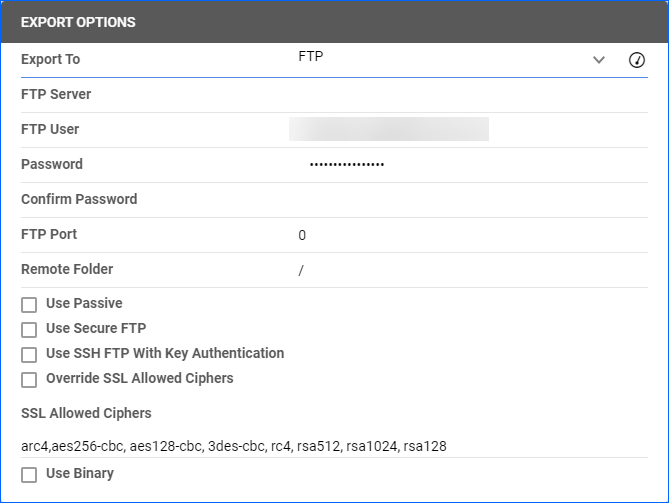
- Choose to export to FTP and enter the required FTP credentials:
- FTP Server
- FTP User
- FTP Password
- Confirm Password
- FTP Port
- If there are multiple folders/directories, enter the Remote folder into which the file will be exported, with a forward slash / before the folder name:
- Entering the placeholder #?QueuedJobID?# populates the filename with the queued job ID.
- Use {yyyy}{MM}{dd} to populate the filename with the date of file creation.
For example, enter the filename as follows: PHI_ONHAND_{yyyy}{MM}{dd} - Use {MM}{dd}{yyyy}{HH}{mm}{ss} – where HH = hours, dd = day, mm = minutes, and ss = seconds – to populate the filename with the current date and time.
For example, enter the filename as follows: PHI_ONHAND_{MM}{dd}{yyyy}{HH}{mm}{ss}
- Enable Passive Mode to bypass firewall filtering.
- Make sure that you are still in Edit mode. Click the Test FTP icon to verify the connection.
- Click Save.
If the file does not export, one of the following error messages will notify you:
- There is no file on FTP matching criteria to process – Add the forward slash before the directory name and retry.
- File name _____________________ doesn’t match file name __________________ – Add the forward slash before the file name and retry.
- Can’t log in – Check that the FTP credentials are correct.
To VAN
In case your connection requires a VAN, set the Export To dropdown to FTP and populate the fields with your VAN details. Example:
FTP Server (Liaison’s VAN): 63.78.198.2
FTP User: Mailbox+MailSlot (with the “+”)
FTP Password: Password; FADA (with the “;FADA”)
FTP Port: 821
Remote Folder: /
Use Passive: True
Use Secure FTP: True
Secure FTP Type: Explicit FTP Over TLS
Override SSL Allowed ciphers: True
To Email
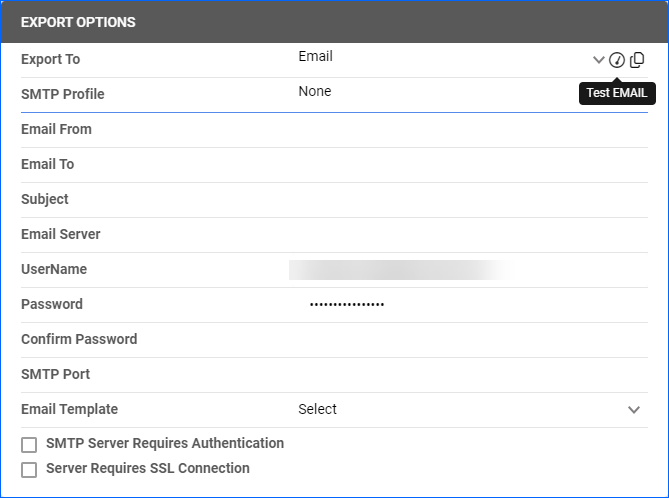
- Choose Email from the Export To dropdown.
- Enter your SMTP profile and the applicable SMTP settings.
- Populate the Email From which you would like to send the export file and the Email To receive it.
- Choose an Email Template.
- Make sure that you are still in Edit mode. Click the Test EMAIL icon to verify the connection.
- Click Save.
Execute Order Rules
The Order Rule Engine lets you create automations that apply changes to your orders. Typically, the rules are executed on each order as soon as it is created. However, this task type allows you to schedule the rules to run at specific times or days. Additionally, you can configure otherwise disabled order rules, ensuring the automation only works when intended.
Create Execute Order Rules Tasks
To schedule an Order Rules Execute:
- Create an Execute Order Rules as a Task Type and fill in the appropriate information.
- Open to edit the new task and select a User ID and a Saved Search, generated only for the desired orders (e.g., unshipped).
- Select Rules to Execute:
- All – schedules all existing rules.
- Custom – allows you to pick specific rules to execute (step 4).
- Enabled Only – run all existing enabled rules.
- If you selected Rules to Execute: Custom, you will see an additional field for Custom Rules. Select existing rules from the dropdown.
Picklist Generation
Picklists are generated to manage specific orders, such as current orders that have not been shipped. Scheduling a picklist export for those orders is done by linking a Saved Search to this picklist generation.
Create Picklist Generate Tasks
To schedule a Picklist generation:
- Create a PickList Generate as a Task Type and fill in the appropriate information.
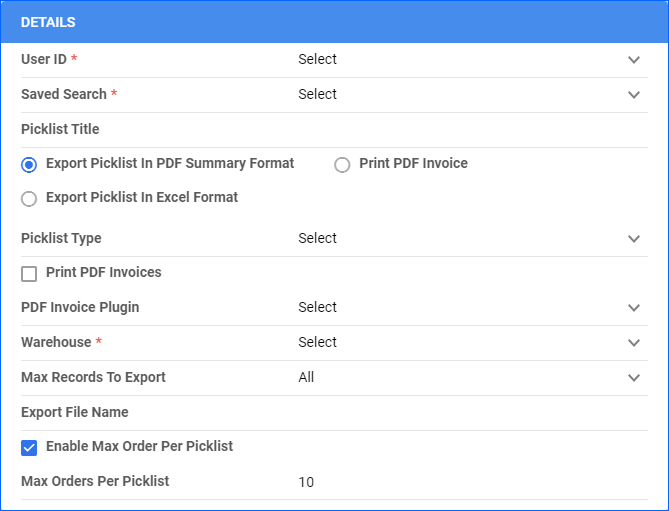
- Open to edit the new task and select a User ID and a Saved Search, generated only for the desired orders (e.g., unshipped).
- Select to either:
- Export Picklist In PDF Summary Format – Select to export in a specific PDF format.
- Export Picklist In Excel Format – The picklist will be exported as an Excel file.
- Print PDF Invoice – Select the Invoices Filter details to export.
- If you are using an invoice plugin, choose the appropriate one from the PDF Invoice Plugin dropdown.
- When you enable the Enable Max Order Per Picklist checkbox and a value is entered for Max Orders Per Picklist, executing the scheduled task generates a queued job that creates a picklist with child picklists based on the specified limit. If you haven’t entered a Max Orders Per Picklist on the Scheduled Task’s page, a default value from the client setting Default Max. Number of Orders/Shipper determines how many orders can be added to the picklist.
- Select for which Warehouse the picklist applies.
- Choose the number of Max Records To Export and the Export File Name.
- From the Export To dropdown, select either FTP or Email.
Reports Generation
Sellercloud Reports and data summaries, such as Inventory Arrivals and Inventory Snapshots, can also be regularly generated and exported to FTP or email with Scheduled tasks.
Reports Task Types
The following Task Types are available:
- Reports
- Inventory Snapshot
- Inventory Arrival
- Supports two formats: Simple and Default. The Default format matches the format you see when you do a manual export from the Inventory Arrivals page.
- Amazon Reports
- Unfillable products
- eBay Listing Failure Report
Create Report Task Type
To schedule a Report Task:
- Create a Report as the Task Type. Fill in the appropriate information and open to edit the new task.
- Set the desired Frequency, Email Alerts and populate any related schedule fields.
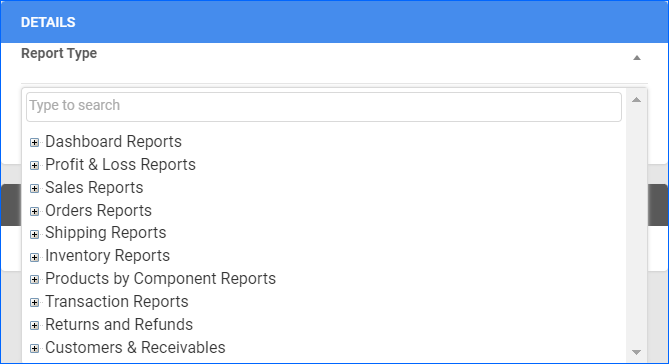
- Select your desired Report Type from the dropdown. Alternatively, populate the required information in the Details panel.
- Choose the Company and Channel for which the report is.
- Enter the Output File Name.
- Choose the desired export method in the Export To field – either FTP or Email.
Amazon Report
To schedule an Amazon Report task:
- Select Amazon Reports as the Task Type and fill in the appropriate information outlined above.
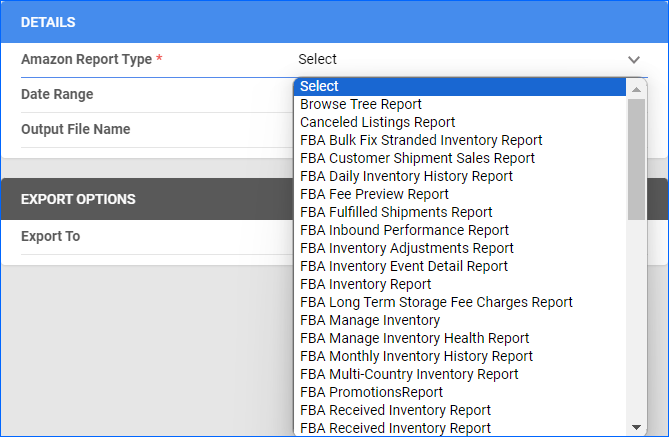
- Set your start time, recurrence, and related fields. Choose the required Amazon Report Type, for example:
- Inventory Health Report – This contains detailed information about your FBA inventory. This report type requires selecting Enable Inventory Health Report in your company’s Amazon settings.
- FBA Fee Preview Report – This contains detailed information about shipping specifics, such as dimensions and pricing on your FBA inventory
- Select the Date Range, for which the report applies.
- Choose an Output File Name.
- Set the Export To field to either FTP or Email.
Predictive Purchasing and Restocking Tasks
You can also utilize Scheduled Tasks to automate Sellercloud’s Predictive Tools processes, such as Predictive Purchasing and Restocking activities.
Predictive Purchasing
To generate a regular Predictive Purchasing export:
- Create a new Schedule task of type Predictive Purchase Order.
- Edit the newly created task and customize its recurrence.
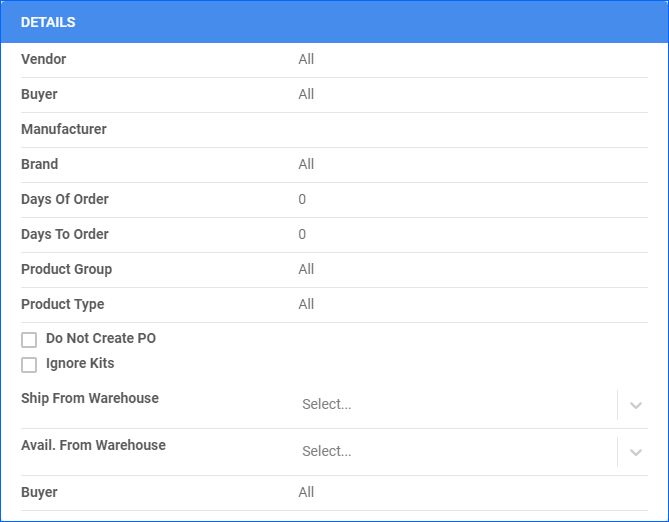
- Populate the following fields:
- Vendor – Select to filter only products from specific vendors.
- Buyer – Select to show only products bought by a specific purchaser.
- Manufacturer – To filter products from specific manufacturers.
- Brand – To show only products from a specific brand.
- Days Of Order – Days of past sales on which you are basing the prediction. This generates a daily velocity.
- Days To Order – Days to which you are multiplying the daily velocity to generate a purchasing quantity.
- Product Group – Show only products from specific product groups.
- Product Type – Show only products from specific product types.
- If required, enable Do Not Create PO and Ignore Kits checkboxes.
- Ship From Warehouse – Show only products in specific Ship From Warehouses.
- Avail. From Warehouse – Show only products available in specific warehouses.
- Set the Export To field to either FTP or Email and populate the respective credentials as per the instructions in the previous sections.
- Click Save.
Predictive Restocking
Predictive Restocking for FBA and Predictive Restocking for WFS can also be scheduled with a task:
- Create a new Schedule task of type Predictive Restocking.
- Edit the newly created task and customize its recurrence.
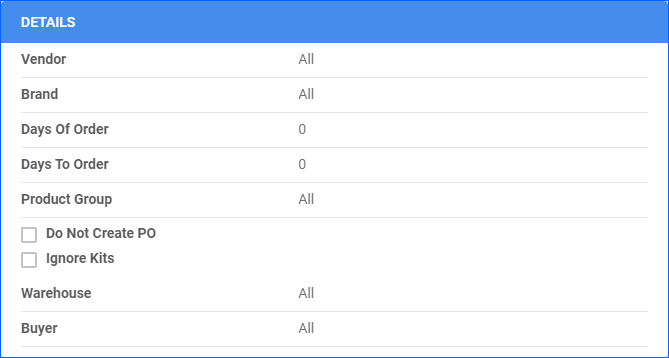
- Populate the following fields:
- Vendor – Select to filter only products from specific vendors.
- Brand – To show only products from a specific brand.
- Days Of Order – The prediction is based on the number of sales in this time range.
- Days To Order – The time range for calculating your product quantity Deficit.
- Product Group – Show only products from specific product groups.
- If required, enable Do Not Create PO and Ignore Kits checkboxes.
- Select the Warehouse and the Buyer for which the restocking applies.
- Set the Export To field to either FTP or Email and populate the respective credentials as per the instructions in the previous sections.
- Click Save.
Other Task Types
Additionally, Sellercloud enables you to schedule recurring tasks for the following activities:
- Run Select Query
- Channel Invoice
- Open Purchase Order Reminder
- Hazmat Preview
- FBA Reconciliation
PO Reminder Task
The Open Purchase Order Reminder task will take unreceived items/units from purchase orders and generate an Excel file with those items and quantities. It will only check POs that are in Saved, Ordered, or Pending statuses. POs will automatically be emailed to the vendor for clarification.
To create such tasks:
- Select Open Purchase Orders Reminder as the New Task Type and fill in the appropriate information outlined above.
- Open to edit the new task and choose a Vendor. The task is vendor-specific, so it needs a separate task for each vendor.
- Enter an Older than Days value. The task will only look at POs older than this value.
- Create a template for Open PO Reminders and set it to the Purchase Order Reminder template assignment. The generated Excel file will be attached to the email and sent to the email address on the vendor profile.
- Click Save.

