Overview
SellerApp is a platform for Amazon sellers that offers PPC automation, keyword research and tracking tools, listing optimization, and more. Sellercloud integrates with SellerApp via FTP, allowing you to reprice your products automatically. Learn more about SellerApp.
Prerequisites
If you don’t have a SellerApp account, you can sign up here. If you have an account, contact SellerApp’s support team and request the mapping profile template – a spreadsheet with column headers that contain the fields to map.
Next, contact Sellercloud Support:
- Request an FTP for the integration.
- Request the following Custom Product Columns:
- Repricing Active – Type Boolean. Set to True to enable repricing for a product.
- Strategy – Type String. This is where you enter your strategy from SellerApp.
- Auto Apply Strategy – Type Boolean. Set to True to enable the strategy.
- Integration – Type String.
Set Up the Integration
Follow the next steps to set up the integration in Sellercloud.
Create a Mapping Profile
Create a profile using the Export Mapping Tool:
- In Sellercloud, click Settings.
- Select Mapping Tools > Manage Export Mapping Profiles.
- Click the blue Actions icon on the bottom right and select Create.
- Enter the following:
- Profile Name – SellerApp Mapping Profile
- Profile Type – Product
- Export File Type – Excel
- Check Export File With Headers (CSV/TXT Only)
- Click Template File. Find and select the template from your device.
- Click Add.

- On the profile page, click Edit.
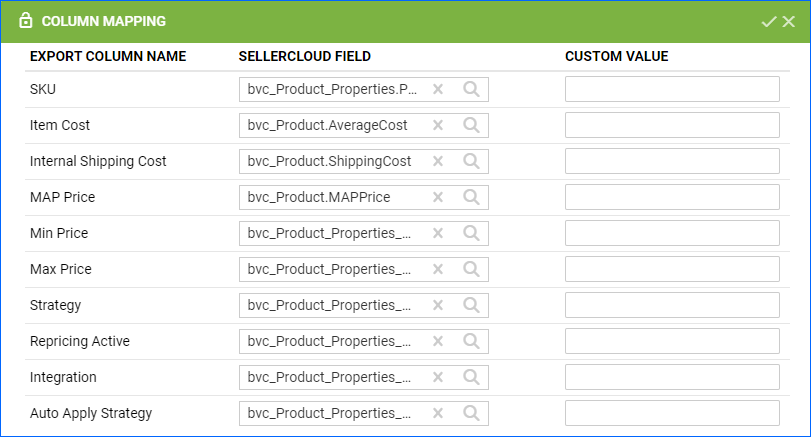
- Map the fields in the Column Mapping panel:
- SKU – bvc_Product_Properties.ProductID (maps the Sellercloud SKU)
- Item Cost – bvc_Product.SiteCost OR bvc_Product.AverageCost (maps the Average Cost or Site Cost on products’ Purchasing panel)
- Internal Shipping Cost – bvc_Product.ShippingCost (maps the Normal shipping cost on products’ Domestic Shipping Costs panel)
- MAP Price – bvc_Product.MAPPrice (maps the Map Price on products’ Pricing panel)
- Min Price – bvc_Product_Properties_Amazon.StopLossPrice (maps the Stop Loss Price on products’ Amazon Properties)
- Max Price – bvc_Product_Properties_Amazon.MaxSellingPriceForAmazon (maps the Max Selling Price on products’ Amazon Properties)
- Strategy – bvc_Product_Properties_UserDefined.STRATEGY (maps the custom column)
- Repricing Active – bvc_Product_Properties_UserDefined.REPRICING_ACTIVE (maps the custom column)
- Integration – bvc_Product_Properties_UserDefined.INTEGRATION (maps the custom column)
- Auto Apply Strategy – bvc_Product_Properties_UserDefined.AUTO_APPLY_STRATEGY (maps the custom column)
- Click Save.
Enable Products
First, follow the steps in the Product Custom Columns section of the Custom Columns article to enable the Custom Columns created by Sellercloud Support.
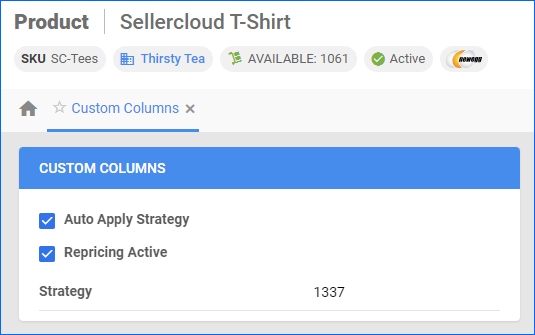
Next, enable your products for SellerApp by updating their Custom Columns:
- For one product at a time: go to the Product Details Page > click Toolbox and select Custom Columns > click Edit, update the Repricing Active, Strategy, and Auto Apply Strategy columns, and Save.
- For multiple products in bulk: follow the steps to Bulk Update Products and set the Repricing Active and Auto Apply Strategy columns to True for all products you want to enable. Make sure to also use the Strategy column to enter the repricing strategy to apply.
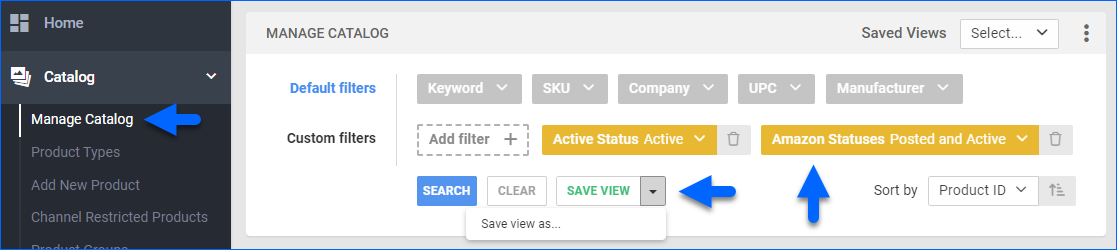
Create a Saved View
To create a saved view that targets products that are posted and active on Amazon:
- Go to Catalog > Manage Catalog.
- Click Add filter and add Amazon Statuses.
- Click Amazon Statuses and select Posted and Active.
- Optionally, you can select a specific company with the Company filter or add other filters per your preference.
- Click the arrow icon next to Save view and select Save view as… then enter a name and save it.
Automate Product Export
To create a Scheduled Task that regularly exports your Sellercloud products to SellerApp:
- Navigate to Settings > Scheduled Tasks > Manage Scheduled Tasks.
- Click the green + icon: Create New Scheduled Task.
- Complete as follows:
- Click Task Type and select Export Products.
- Set the Task Name to SellerApp Repricer Feed.
- Select the Company.
- Select the Start Time.
- Click CREATE.
- The following message appears at the bottom of your screen: “Scheduled task created successfully. Click Here to configure the task details.” – click the link.
- Click the Edit button on the top right.
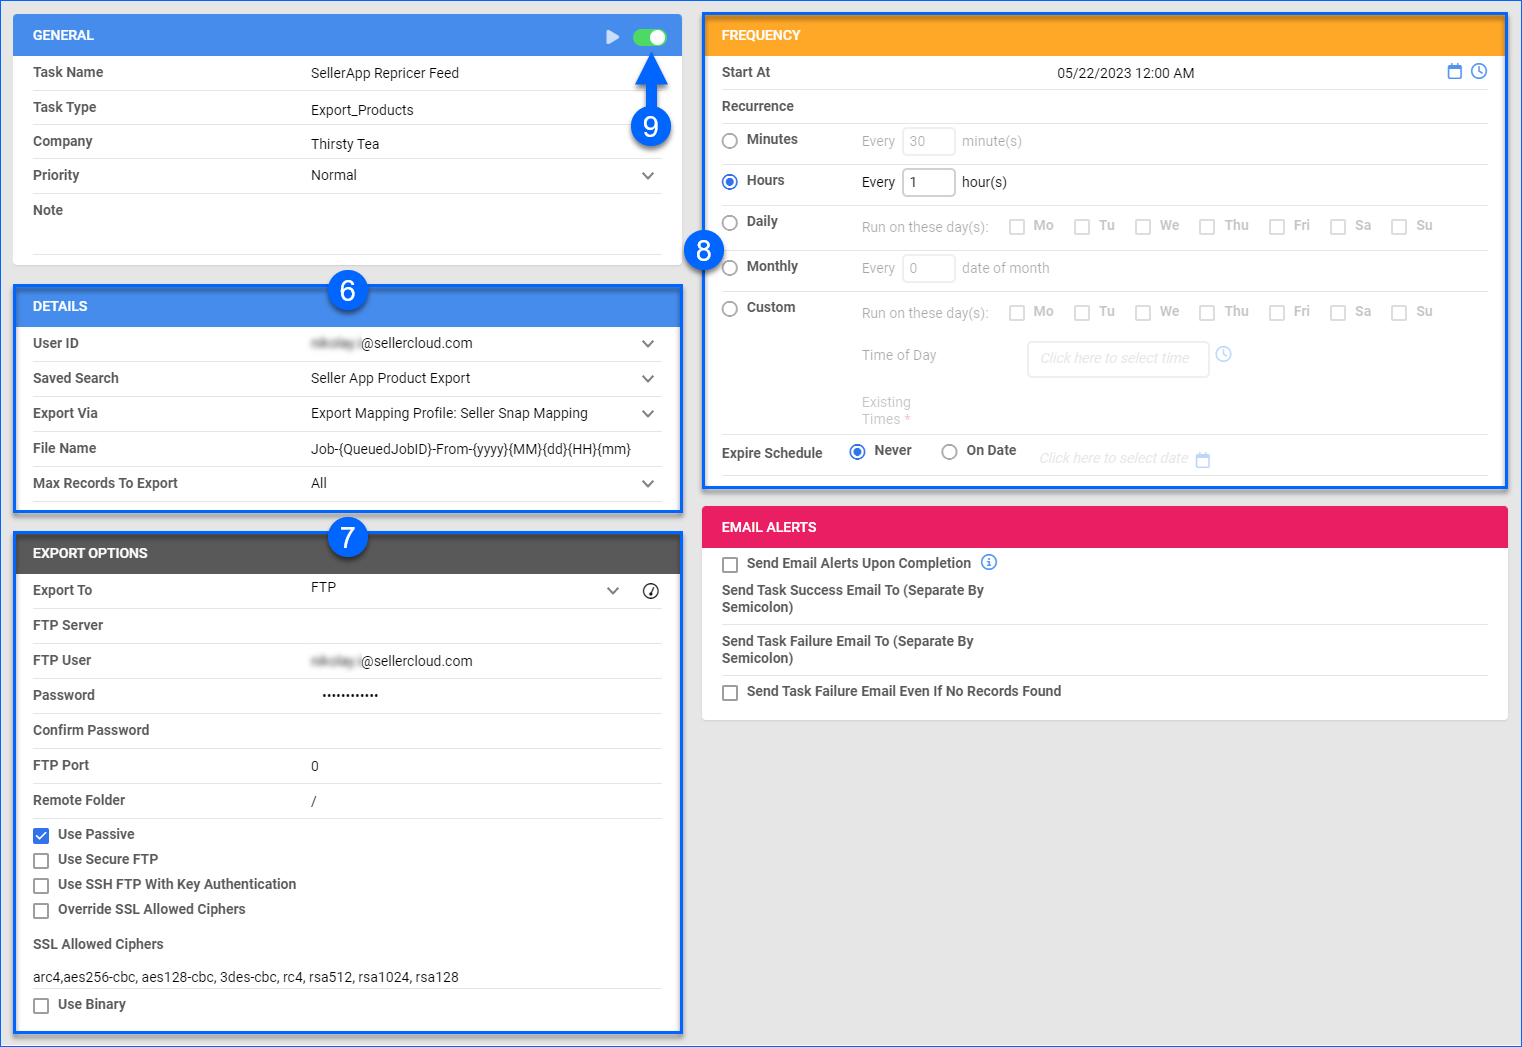
- In the Details section:
- Click the User ID menu and select your ID.
- Click the Saved Search menu and select the saved view you created earlier.
- Click the Export Via menu and select the mapping created earlier. In this menu, it’s called Export Mapping Profile: SellerApp Mapping Profile.
- Set the File Name per your preference. You can use the following placeholders: {QueuedJobID} – populates the file name with the queued job ID. {yyyy}{MM}{dd}{HH}{mm} – populates the file name with the file creation date.
- In the Export Options section, set Export To to:
- FTP and enter your FTP credentials into the fields below. Enable Passive Mode if the connection cannot be made due to firewalls on your server. If there are multiple folders/directories, enter the Remote Folder where the file will be exported with a forward slash “/” before the folder name.
- Alternatively, you can set it to Email. In this case, enter the SMTP credentials or click Copy From Company Settings to use those.
- In the Frequency section, specify the task frequency. For optimal performance, select a range between thirty minutes and one hour.
- In the General section, click the Enable button.
- Click Save on the top right.
If the file doesn’t import or export and shows one of these error messages:
- There is no file on FTP matching criteria to process – Add the forward slash before the directory name and retry.
- File name ___ doesn’t match file name ___ – Add the forward slash before the file name and retry.
- Can’t log in – Verify that the FTP credentials are correct.