Overview
Storis is a platform designed specifically for the furniture, bedding, and appliance retail industry. It provides comprehensive software solutions and supports both in-store and online operations, making it a robust solution for modern retail challenges.
Storis distinguishes between two order types: Pickup for in-store retrieval and Delivery, where they ship the order to the customer. Integrating Storis allows you to synchronize their platform with Sellercloud. The integration works through API, transmitting information between the two services via plugins and Scheduled Tasks.
If necessary, you can open a ticket with Sellercloud Support to request additional customizations or other plugins for this integration. Any such modifications will be billable.
Prerequisites
Before integrating Storis into Sellercloud, you must complete the following requirements.
Sellercloud Support
Open a ticket with Sellercloud Support and request the following plugins to be installed on your server:
- Storis API Order Export – Exports orders from Sellercloud to Storis.
- Storis API Update Picking Status Order Export – Imports order status updates from Storis to Sellercloud.
- Storis API Product Inventory Update – Imports inventory from Storis to Sellercloud.
Custom Company Settings
Create the following Custom Company Settings on the company created for the integration:
- StorisAPI_Username – Enter your Storis username.
- StorisAPI_ClientSecret – Enter your Storis client secret for API authentication. You can contact their support team for assistance with obtaining it.
- StorisAPI_UseTestAPI – Enter True to use a testing environment or False for production.
- StorisAPI_LastDateRan – The Order Export plugin updates this column automatically.
- StorisAPI_WHMapping – Map Sellercloud Warehouses to Storis Inventory Codes. The expected format is SCWHID_StorisCode,SCWHID_StorisCode. For example, if you have warehouses with IDs 123 and 234, and the corresponding Storis Inventory Codes are code1 and code2, you must enter 123_code1,234_code2.
- (Optional) StorisAPI_DefaultSellLocationID – If this setting is populated, Sellercloud will send its value as the Sell Location ID if that field is blank.
Custom Product Columns
Create the following Custom Product Columns:
- (Optional) Storis_Enabled – Use this column to enable only specific products for Storis. Set to True for any products you want to update with the Inventory Update plugin.
Order Export
The Storis API Order Export plugin exports orders to Storis. When the plugin exports an order successfully, it also sets the Order Subtype to InStorePickUp to indicate that it is a Buy Online, Pick Up in Store type of order.
Before you move on, create a Saved Search for orders filtered by:
- Company – The company you created for the integration
- Order Status – InProcess Or Completed
- Payment Status – Charged
- Exported – Not Exported
Automate Order Export
To create a Scheduled Task that sends order acknowledgment:
- Navigate to Settings > Scheduled Tasks > Manage Scheduled Tasks.
- Click the green + icon: Create New Scheduled Task.
- Complete as follows:
- Click Task Type and select Export Orders.
- Set the Task Name.
- Select the Company.
- Select the Start Time.
- Click CREATE.
- On the Scheduled Task page, click the Edit button at the top right corner.
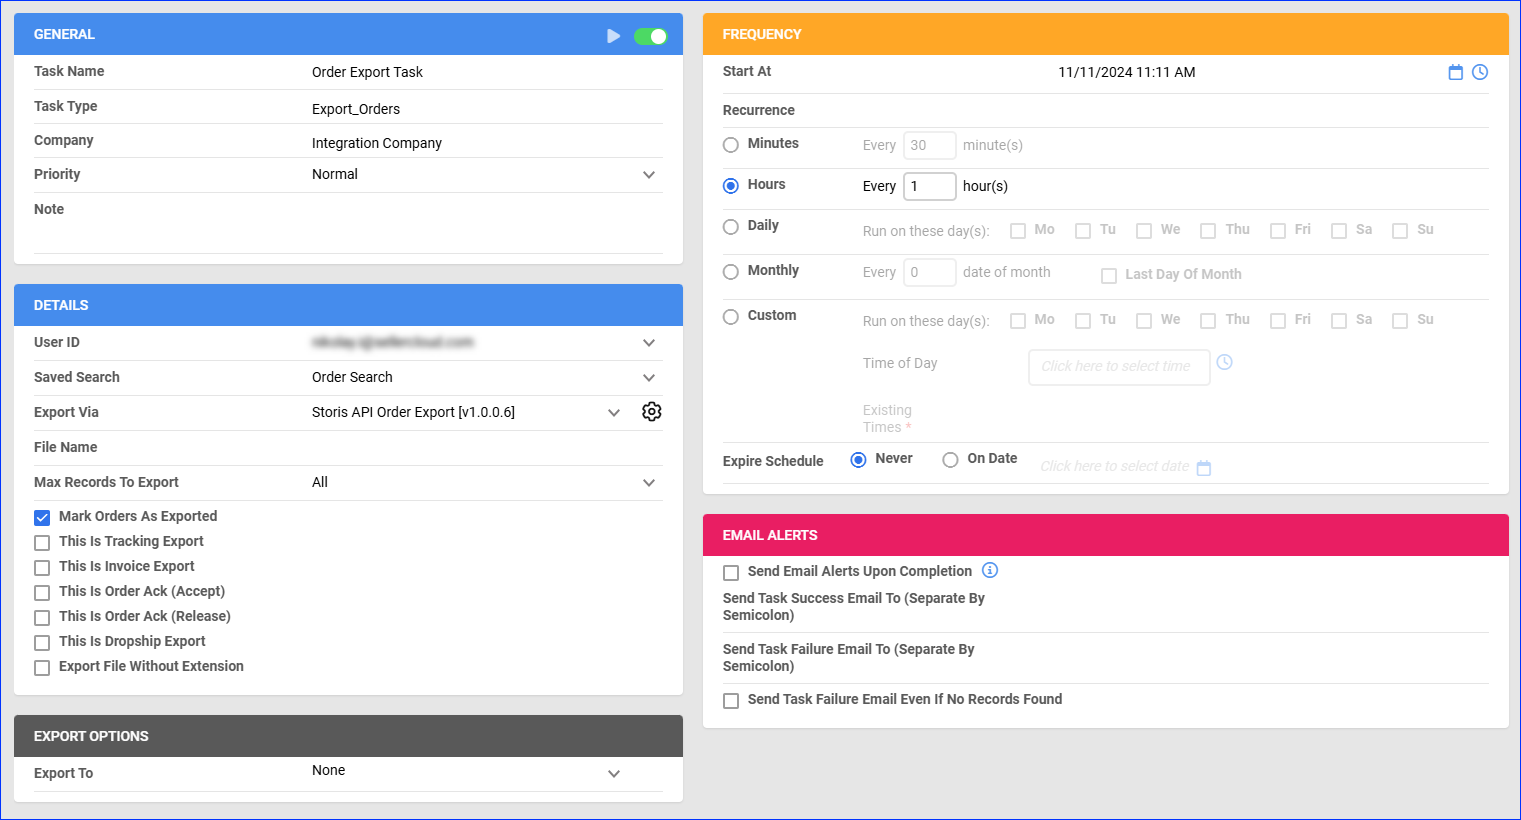
- In the Details panel:
- Click the User ID menu and select your email.
- Click the Saved Search menu and select the saved search you created earlier.
- Click the Export Via menu and select Storis API Order Export.
- Check Mark Orders As Exported.
- In the Export Options panel, set Export To to None.
- In the Frequency panel, specify the task frequency. For optimal performance, select a range between thirty minutes and one hour.
- In the General panel, click the Enable toggle button.
- Click Save.
Update Order Status
The Storis API Update Picking Status Order Export plugin imports order status updates from Storis to Sellercloud:
- Orders that are Ready For Pickup or Picked Up on Storis will have their Shipping Status set to Ready For Pickup in Sellercloud.
- Orders that require Delivery and are shipped by Storis will have their Shipping Status set to Fully Shipped and their tracking information updated in Sellercloud.
Before you move on, create a Saved Search for orders filtered by:
- Company – The company you created for the integration
- Order Status – InProcess Or Completed
- Payment Status – Charged
- Exported – Exported
Automate Order Status Updates
To create a Scheduled Task for order status updates:
- Navigate to Settings > Scheduled Tasks > Manage Scheduled Tasks.
- Click the green + icon: Create New Scheduled Task.
- Complete as follows:
- Click Task Type and select Export Orders.
- Set the Task Name.
- Select the Company.
- Select the Start Time.
- Click CREATE.
- On the Scheduled Task page, click the Edit button at the top right corner.
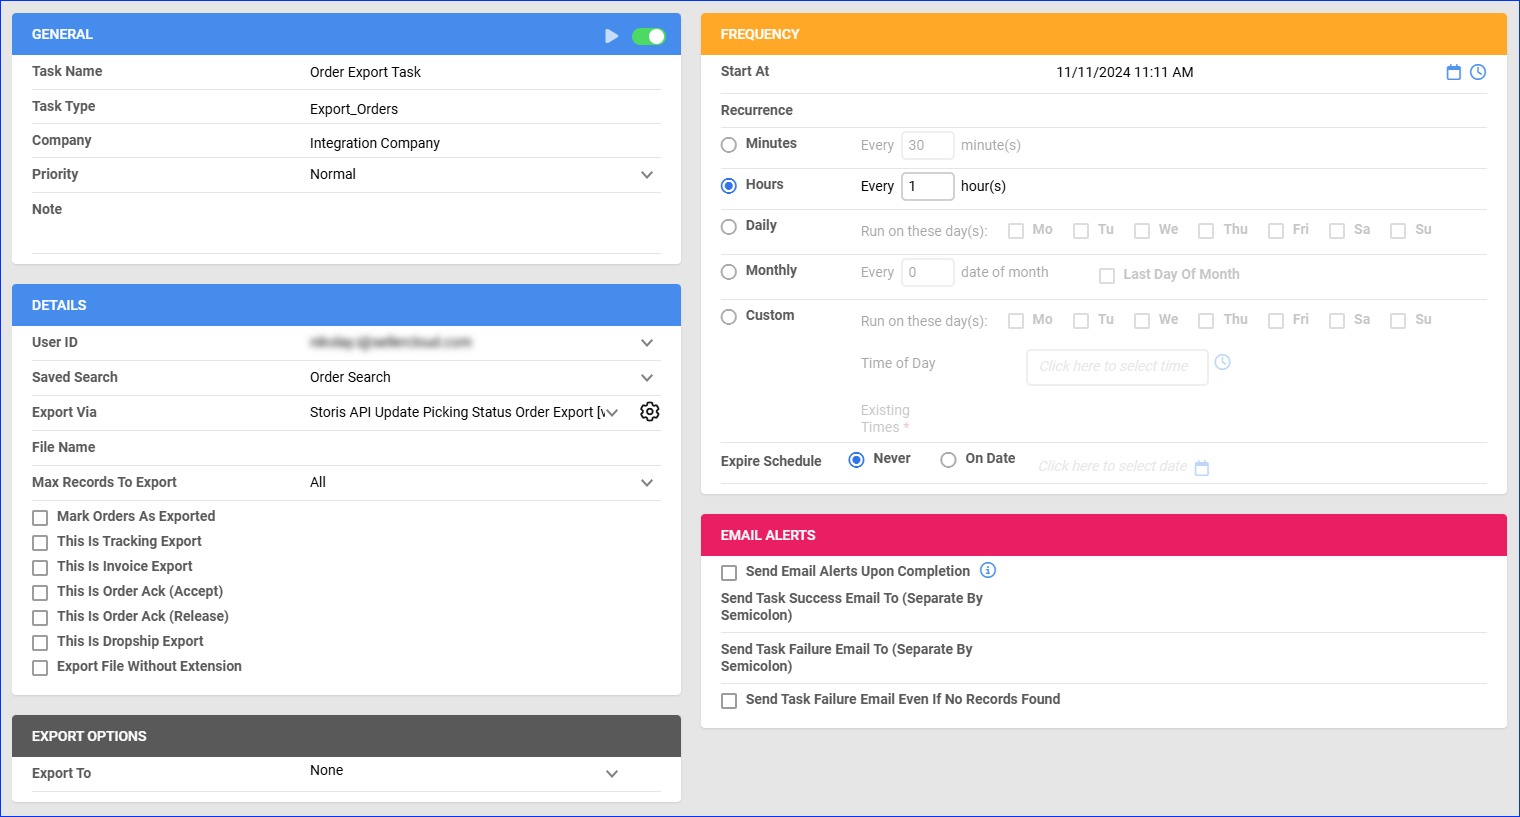
- In the Details panel:
- Click the User ID menu and select your email.
- Click the Saved Search menu and select the saved search you created earlier.
- Click the Export Via menu and select Storis API Update Picking Status Order Export.
- In the Export Options panel, set Export To to None.
- In the Frequency panel, specify the task frequency. For optimal performance, select a range between thirty minutes and one hour.
- In the General panel, click the Enable toggle button.
- Click Save.
Update Inventory
The Storis API Product Inventory Update plugin imports inventory updates from Storis to the corresponding warehouses in Sellercloud.
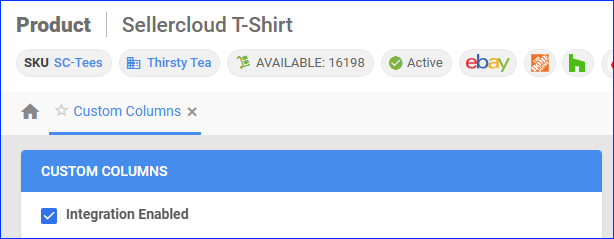
Optionally, you can enable only specific products for Storis by setting their Storis_Enabled Custom Column for Products to True:
- For one product at a time: go to the Product Details Page > click Toolbox and select Custom Columns > click Edit, update the Storis_Enabled column, and Save.
- For multiple products in bulk: follow the steps to Bulk Update Products and use the Storis_Enabled column – set it to True for all products you want to enable.
Unlike core integrations, plugin integrations don’t require products to be in the company with the scheduled tasks. The export will include the products you select with your Saved Search.
Next, create a Saved Search for products filtered by Storis_Enabled – True. Optionally, you can add more filters to the search to narrow down the export further.
Automate Inventory Updates
To create a Scheduled Task that exports inventory:
- Navigate to Settings > Scheduled Tasks > Manage Scheduled Tasks.
- Click the green + icon: Create New Scheduled Task.
- Complete as follows:
- Click Task Type and select Export Products.
- Set the Task Name.
- Select the Company.
- Select the Start Time.
- Click CREATE.
- On the Scheduled Task page, click the Edit button at the top right corner.
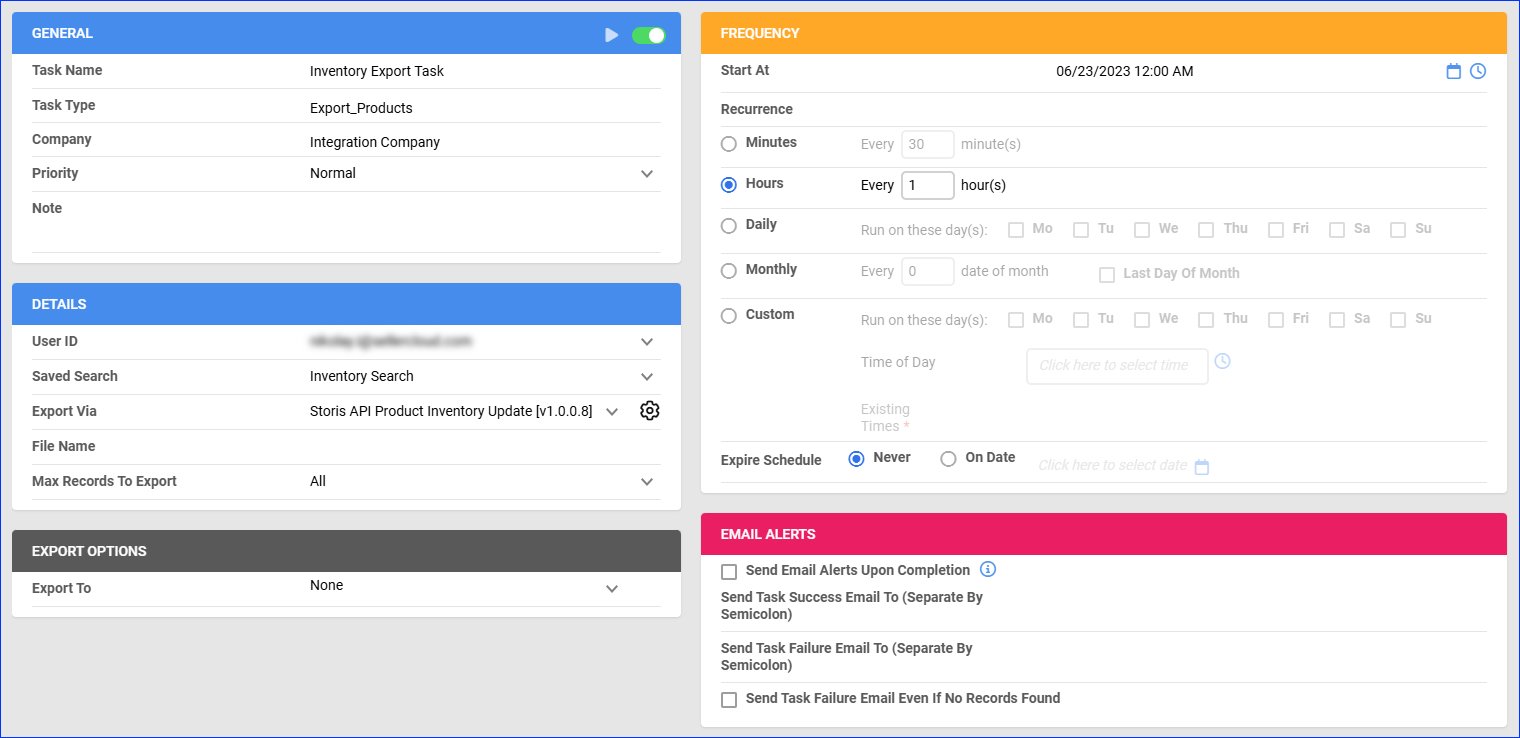
- In the Details panel:
- Click the User ID menu and select your email.
- Click the Saved Search menu and select the saved search you created earlier.
- Click the Export Via menu and select Storis API Product Inventory Update.
- In the Export Options panel, set Export To to None.
- In the Frequency panel, specify the task frequency. For optimal performance, select a range between thirty minutes and one hour.
- In the General panel, click the Enable toggle button.
- Click Save.


