Overview
Tractor Supply is a retail chain that focuses on a wide range of products for various needs, including agriculture, pet care, home improvement, lawn and garden maintenance, and livestock care.
Integrating Tractor Supply into your Sellercloud account allows you to seamlessly import orders, upload tracking information, and ensure your Tractor Supply store is always up-to-date with the latest inventory data. This integration works through EDI documents, transmitting information between the two services via plugins and Scheduled Tasks.
If necessary, you can contact Sellercloud Support to request additional customizations or other plugins for this integration. Any such modifications will be billable.
Prerequisites
Before you can integrate Tractor Supply into Sellercloud, complete the following requirements.
First, contact Tractor Supply’s support team:
- Request an EDI Vendor Profile Form, then fill it out and send it to the designated contact.
- Request the value of their ISA ID for the exchange of EDI documents.
Sellercloud Support
Open a ticket with Sellercloud Support to request a VAN for the integration, as well as the following plugins be installed on your server:
- Tractor Supply EDIs 850, 860 and 180 Order Import Plugin – Imports orders from Tractor Supply to Sellercloud in EDI 850, 860, and 810 formats and returns a combined EDI 997 for order acknowledgement.
- Tractor Supply Order Acknowledgement Export EDI 855 – Sends order acknowledgment to Tractor Supply in EDI 855 format. Includes cancellation logic support.
- Tractor Supply EDI856 Order Export – Exports tracking information to Tractor Supply in EDI 856 format.
- Tractor Supply EDI810 Order Invoice Export –Exports invoices to Tractor Supply in EDI 810 format.
- Tractor Supply EDI846 Inventory Export – Exports inventory to Tractor Supply in EDI 846 format.
- Tractor Supply EDI 180 RMA Export – Exports RMAs to Tractor Supply in EDI 180 format.
Custom Company Settings
Next, create the following Custom Company Settings.
On your default company:
- STControlNumber
- GSControlNumber
- ISAControlNumber
- TSC_InternalVendorNumber_CompanySetting
- TSC_InventoryReferenceNumber – A counter that ensures a unique control number in each exported file. Set to 1 for new setups.
On the company created for the integration:
- Tractor_CustomerISAID – Enter a phone number that you don’t use for another integration.
- Tractor_CustomerQualifier – Set to ZZ.
- Tractor_ISAID – Tractor Supply’s unique identifier used for EDI document exchange.
- Tractor_Qualifier – Set to 08.
- Tractor_UseProductionMode – Enter False while testing the integration and True when ready to go live.
- TS_SkipKitItemPackages – Defaults to False. When True, the Tracking Export plugin will ignore packages assigned to Kit Components. When kit items are shipped in multiple packages, Sellercloud will only send a single tracking number to Tractor Supply.
- TSC_VendorName – The Vendor Name to be sent in the REF segment by the Inventory Export plugin.
- (Optional) Tractor_997UploadFolder – Enter the path to the folder where the EDI 997 from the Order Import plugin will be saved. The default is /out.
Custom Product Columns
Create the following Custom Product Columns:
- TSC_ProductItemNumber – The product’s Tractor Supply SKU.
- TractorSupplySafetyQty – A Safety Quantity for products on Tractor Supply.
- (Optional) TS_Enabled – Enable only specific products for Tractor Supply. Set to True for any products you want to send with the Inventory Export plugin.
Custom Order Columns
Create the following Custom Order Columns:
- TSC_CustomerOrderNumber
- TSC_InternalVendorNumber
Order Import
The Tractor Supply EDIs 850, 860 and 180 Order Import Plugin imports the following from Tractor Supply:
- Orders in EDI 850 format. It sets the values of the TSC_CustomerOrderNumber and TSC_InternalVendorNumber Custom Order Columns and the TSC_ProductItemNumber Custom Product Column. It tries to match the imported product info by SKU or UPC.
- Order Changes in EDI 860 format. It either voids orders or adds/alters/removes their items.
- RMAs in EDI 180 format.
Finally, it produces a combined EDI 997 for all the imported files, including order acknowledgment.
Automate Order Import
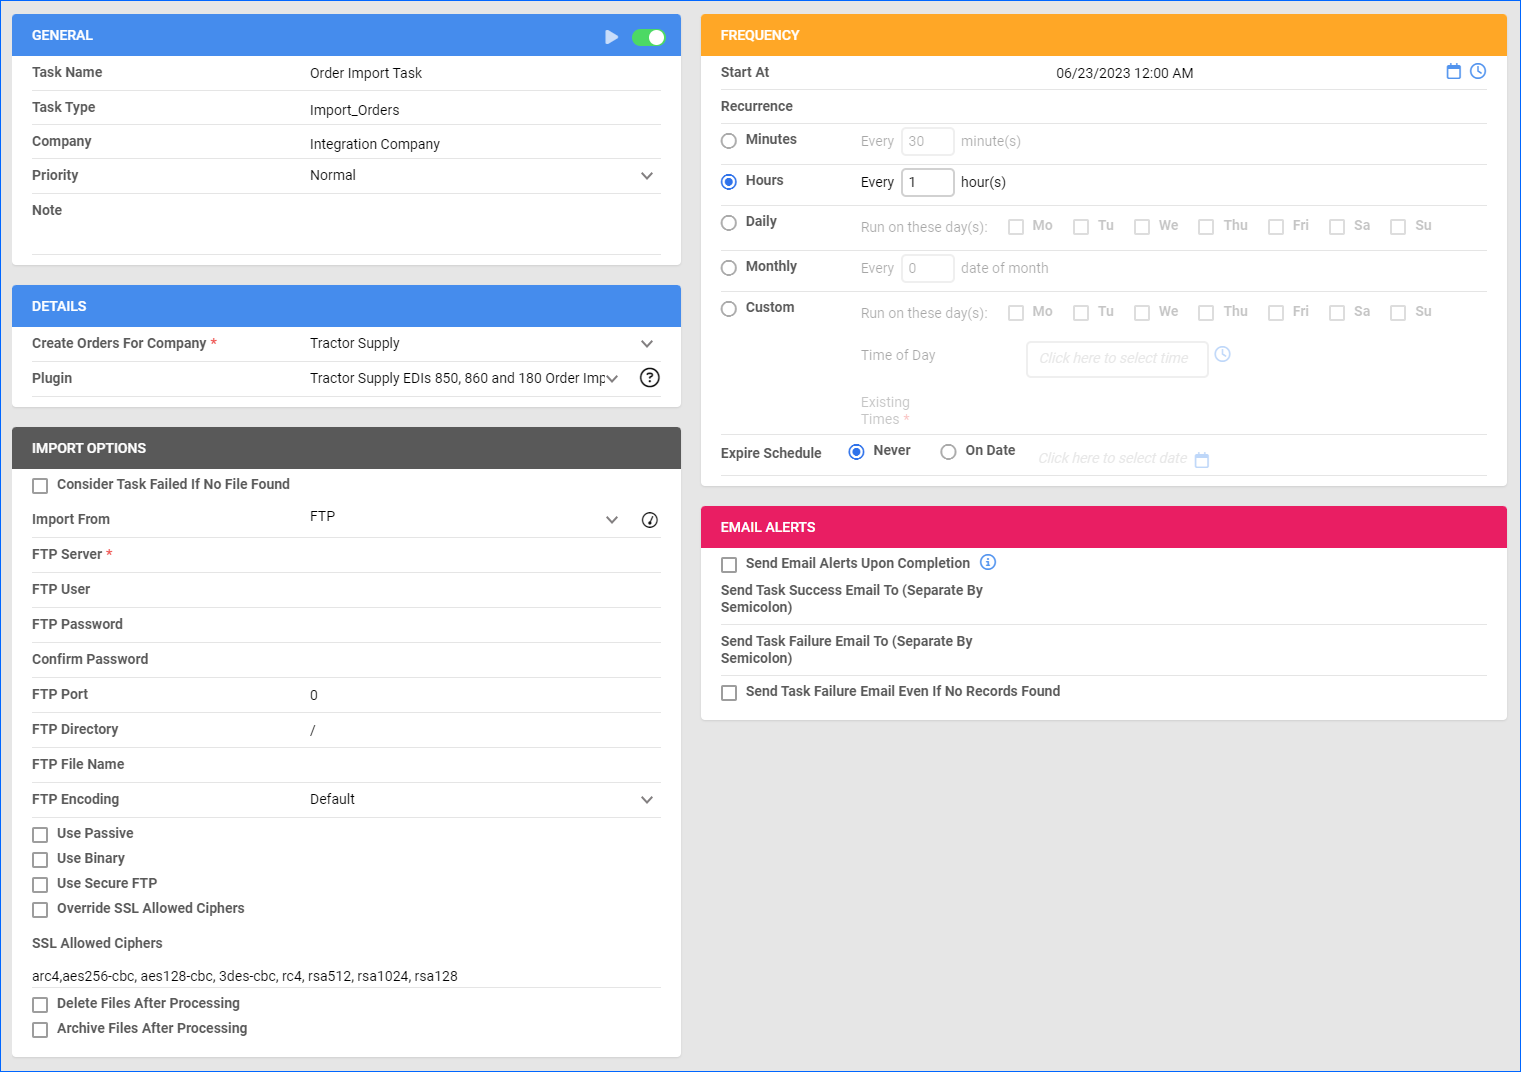
To create a Scheduled Task that regularly imports orders:
- Navigate to Settings > Scheduled Tasks > Manage Scheduled Tasks.
- Click the green + icon: Create New Scheduled Task.
- Complete as follows:
- Click Task Type and select Import Orders.
- Set the Task Name.
- Select the Company.
- Select the Start Time.
- Click CREATE.
- On the Scheduled Task page, click the Edit button at the top right corner.
- In the Details panel:
- Click the Create Orders For Company menu and select the company you designated for this integration.
- Click the Plugin menu and select Tractor Supply EDIs 850, 860, and 180 Order Import.
- In the Import Options panel, set Import From to FTP and enter your VAN credentials.
- In the Frequency panel, specify the task frequency. For optimal performance, select a range between thirty minutes and one hour.
- In the General panel, click the Enable button.
- Click Save.
Order Acknowledgment
The Tractor Supply Order Acknowledgement Export EDI 855 plugin sends order acknowledgment to Tractor Supply and exports order cancellations from Sellercloud in EDI 855 format.
Your orders must have an internal vendor number in the Custom Order Column TSC_InternalVendorNumber, and order items must have their Tractor Supply SKU in the Custom Product Column TSC_ProductItemNumber. The Order Import plugin populates these columns automatically.
To partially cancel an order:
- Split Off the items you want to cancel.
- Set the split order’s status to Cancelled.
- Export the split order with this plugin.
Before you move on, create a Saved Search for orders filtered by:
- Company – The company you created for the integration
- Order Status – InProcess Or Completed
- Payment Status – Charged
- Exported – Not Exported
- Order Ack (Accept) – No
Automate Order Acknowledgment
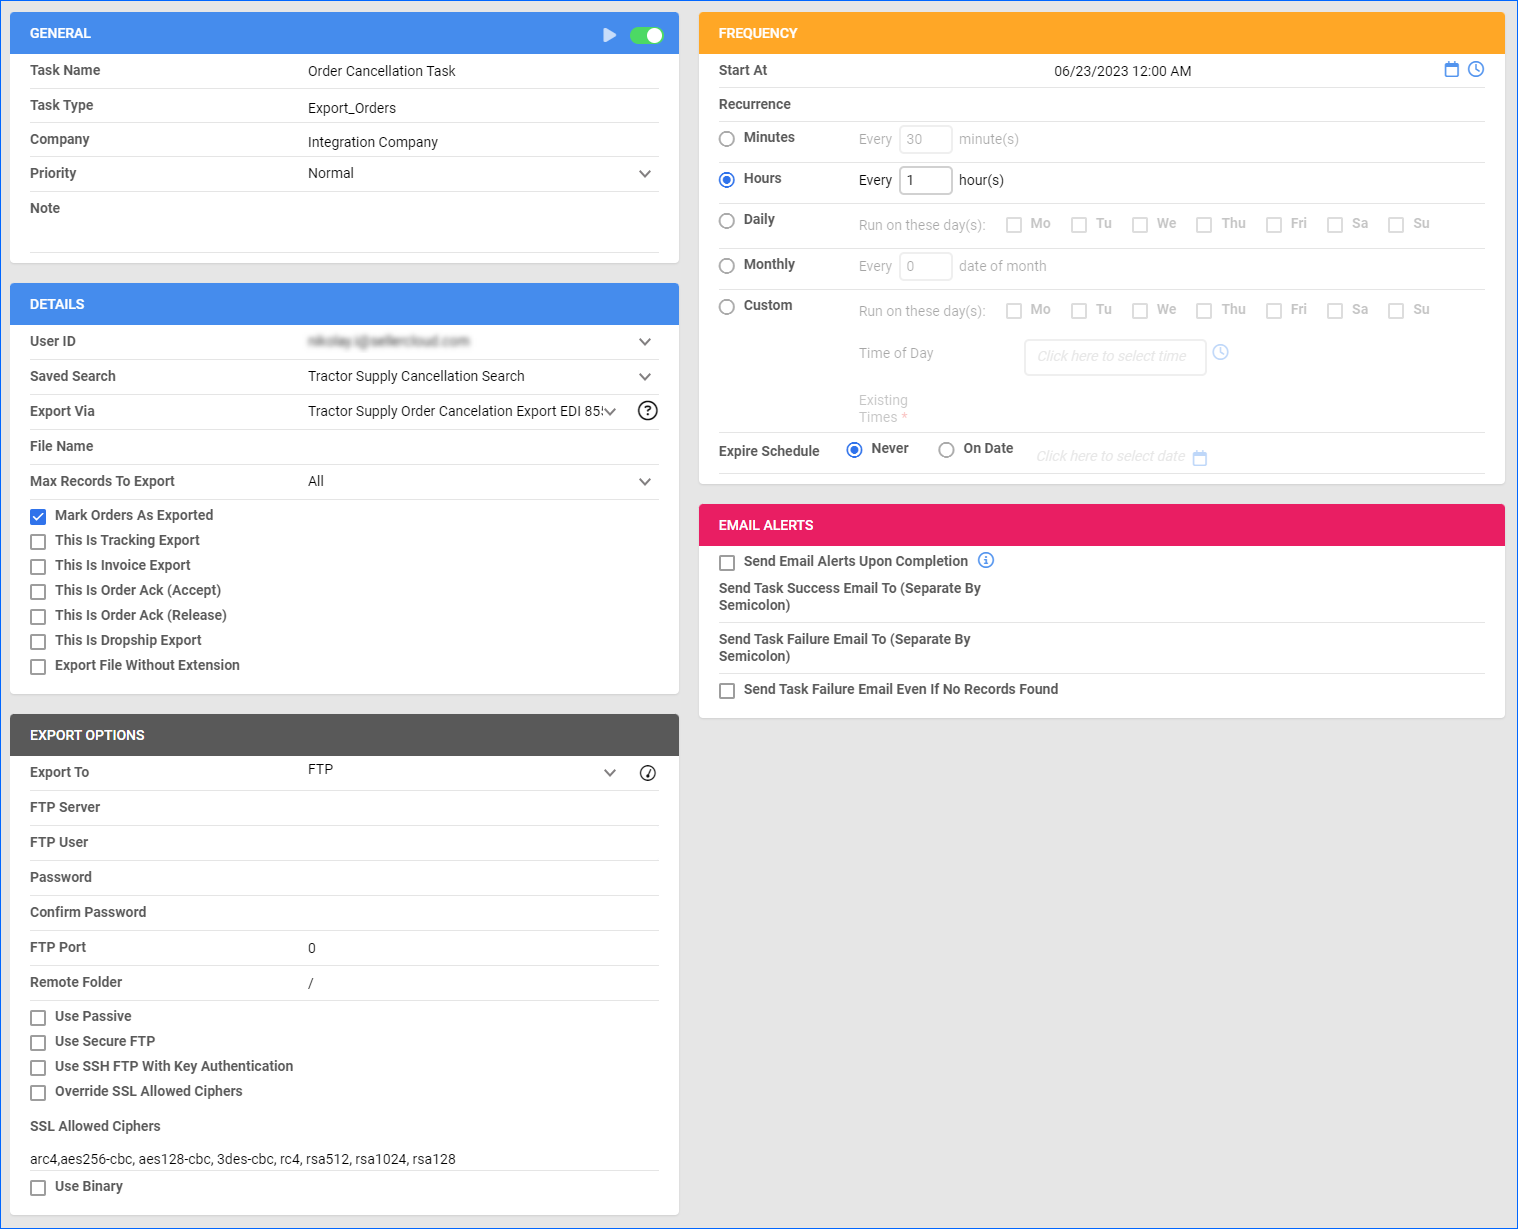
To create a Scheduled Task that regularly exports order cancellations:
- Navigate to Settings > Scheduled Tasks > Manage Scheduled Tasks.
- Click the green + icon: Create New Scheduled Task.
- Complete as follows:
- Click Task Type and select Export Orders.
- Set the Task Name.
- Select the Company.
- Select the Start Time.
- Click CREATE.
- On the Scheduled Task page, click the Edit button at the top right corner.
- In the Details panel:
- Click the User ID menu and select your ID.
- Click the Saved Search menu and select the saved search you created earlier.
- Click the Export Via menu and select Tractor Supply Order Acknowledgement Export EDI 855.
- Check Mark Orders As Exported.
- In the Export Options panel, set Export To to FTP and enter your VAN credentials.
- In the Frequency panel, specify the task frequency. For optimal performance, select a range between thirty minutes and one hour.
- In the General panel, click the Enable toggle button.
- Click Save.
Tracking Export
The Tractor Supply EDI856 Order Export plugin exports tracking from Sellercloud to Tractor Supply following the 856 EDI format. Orders must be Fully Shipped; otherwise, the plugin won’t export them.
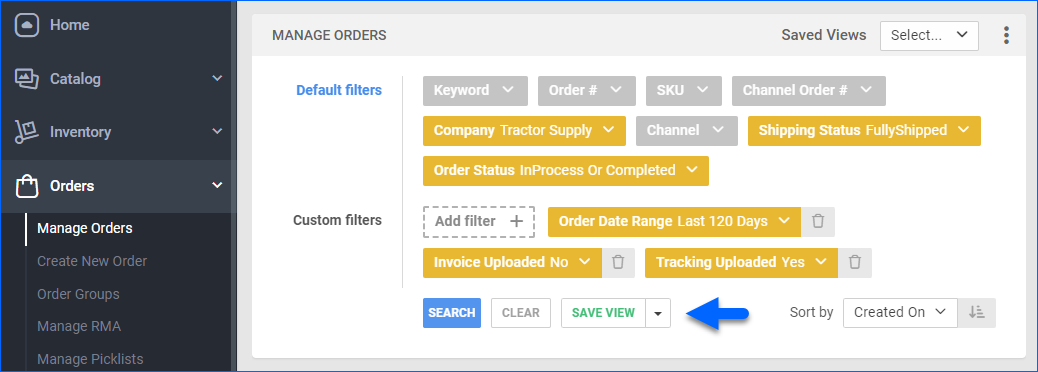
Before you move on, create a Saved Search for orders filtered by:
- Company – The company you created for the integration
- Order Status – InProcess Or Completed
- Shipping Status – FullyShipped
- Payment Status – Charged
- Tracking Uploaded – No
Automate Tracking Export
To create a Scheduled Task that regularly exports tracking information:
- Navigate to Settings > Scheduled Tasks > Manage Scheduled Tasks.
- Click the green + icon: Create New Scheduled Task.
- Complete as follows:
- Click Task Type and select Export Orders.
- Set the Task Name.
- Select the Company.
- Select the Start Time.
- Click CREATE.
- On the Scheduled Task page, click the Edit button at the top right corner.
- In the Details panel:
- Click the User ID menu and select your ID.
- Click the Saved Search menu and select the saved search you created earlier.
- Click the Export Via menu and select Tractor Supply EDI856 Order Export.
- Check This Is Tracking Export.
- In the Export Options panel, set Export To to FTP and enter your VAN credentials.
- In the Frequency panel, specify the task frequency. For optimal performance, select a range between thirty minutes and one hour.
- In the General panel, click the Enable toggle button.
- Click Save.
Invoice Export
The Tractor Supply EDI810 Order Invoice Export plugin exports invoices from Sellercloud to Tractor Supply in EDI 810 format.
Your orders must have an internal vendor number in the Custom Order Column TSC_InternalVendorNumber. The Order Import plugin does this automatically.
Before you move on, create a Saved Search for orders filtered by:
- Company – The company you created for the integration
- Order Status – InProcess Or Completed
- Shipping Status – Fully Shipped
- Invoice Uploaded – No
- Tracking Uploaded – Yes
Automate Invoice Export
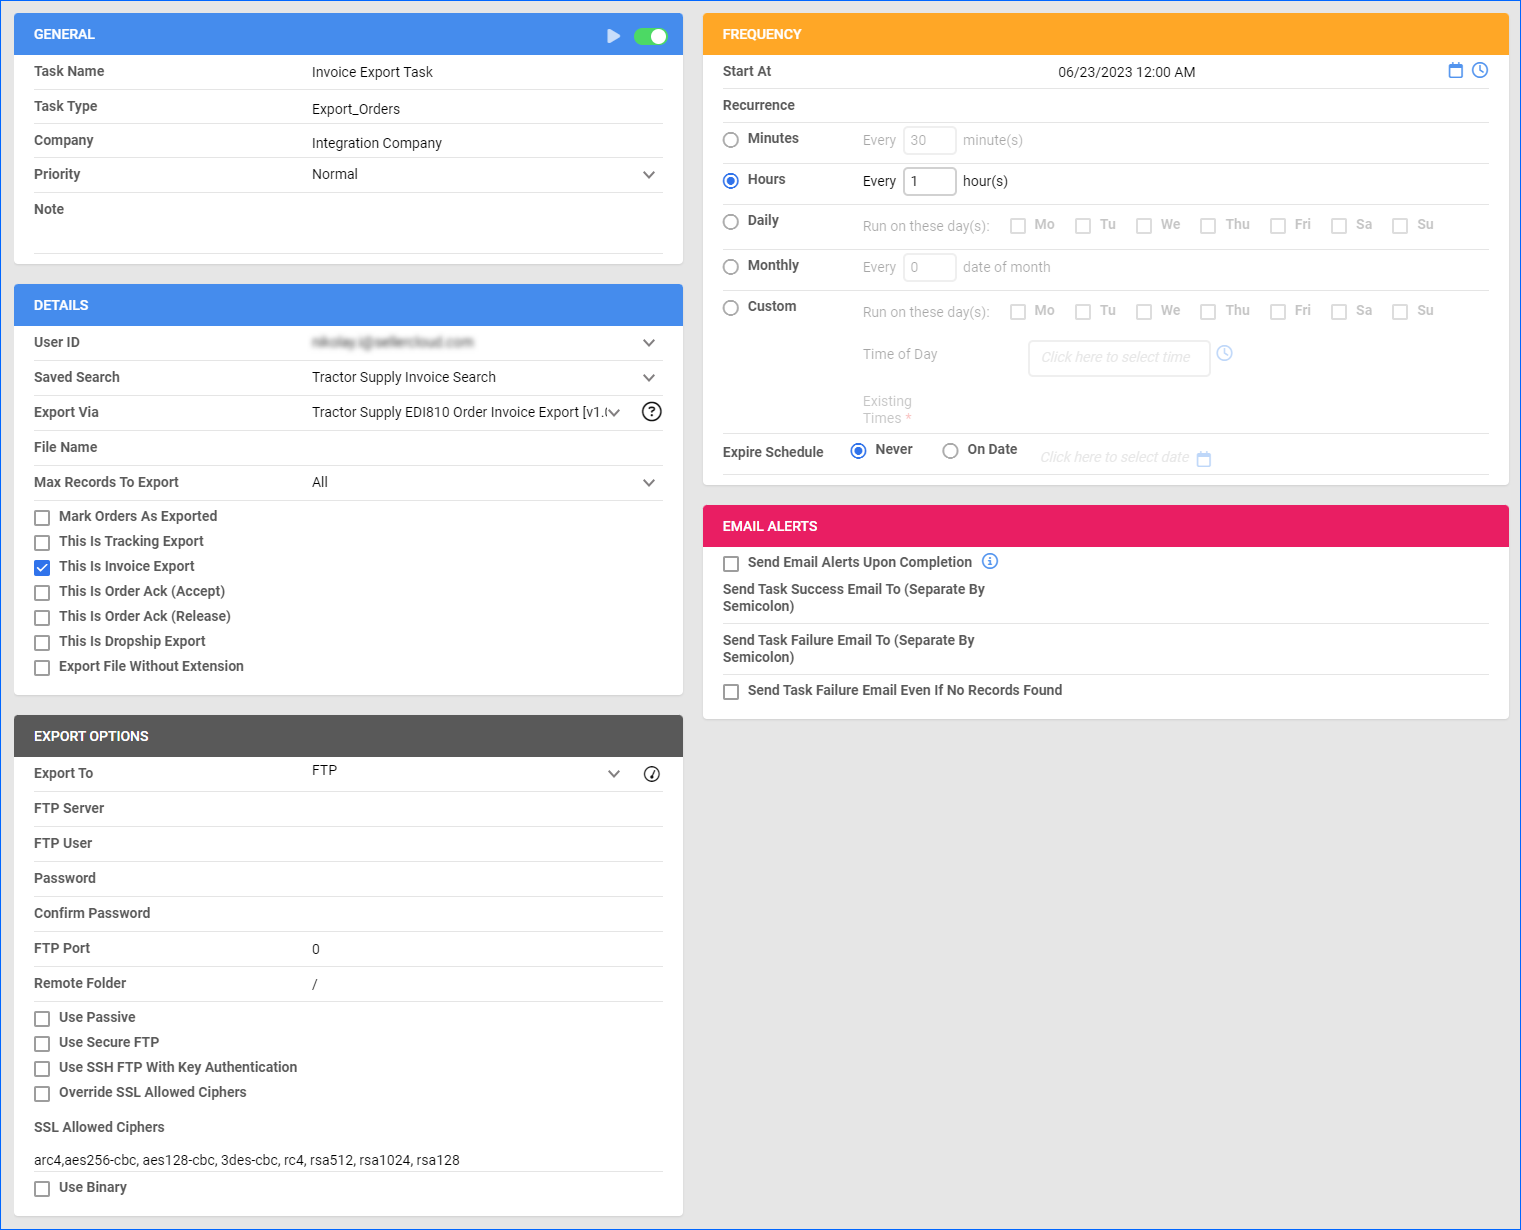
To create a Scheduled Task that regularly exports invoices:
- Navigate to Settings > Scheduled Tasks > Manage Scheduled Tasks.
- Click the green + icon: Create New Scheduled Task.
- Complete as follows:
- Click Task Type and select Export Orders.
- Set the Task Name.
- Select the Company.
- Select the Start Time.
- Click CREATE.
- On the Scheduled Task page, click the Edit button at the top right corner.
- In the Details panel:
- Click the User ID menu and select your ID.
- Click the Saved Search menu and select the saved search you created earlier.
- Click the Export Via menu and select Tractor Supply EDI810 Order Invoice Export.
- Check This Is Invoice Export.
- In the Export Options panel, set Export To to FTP and enter your VAN credentials.
- In the Frequency panel, specify the task frequency. For optimal performance, select a range between thirty minutes and one hour.
- In the General panel, click the Enable toggle button.
- Click Save.
Inventory Export
The Tractor Supply EDI846 Inventory Export plugin exports product information like product numbers and inventory quantities from Sellercloud to Tractor Supply in EDI 846 format.
Optionally, you can enable only specific products for Tractor Supply by setting their Custom Product Column TS_Enabled to True:
- For one product at a time: go to the Product Details Page > click Toolbox and select Custom Columns > click Edit, update the TS_Enabled column, and Save.
- For multiple products in bulk: follow the steps to Bulk Update Products and use the TS_Enabled column – set it to True for all products you want to enable.
Next, create a Saved Search for products filtered by TS_Enabled – True. Optionally, you can add more filters to the search.
Unlike core integrations, plugin integrations don’t require products to be in the company with the scheduled tasks. The export will only include the products you select with your Saved Search.
Automate Inventory Export
To create a Scheduled Task that regularly exports inventory:
- Navigate to Settings > Scheduled Tasks > Manage Scheduled Tasks.
- Click the green + icon: Create New Scheduled Task.
- Complete as follows:
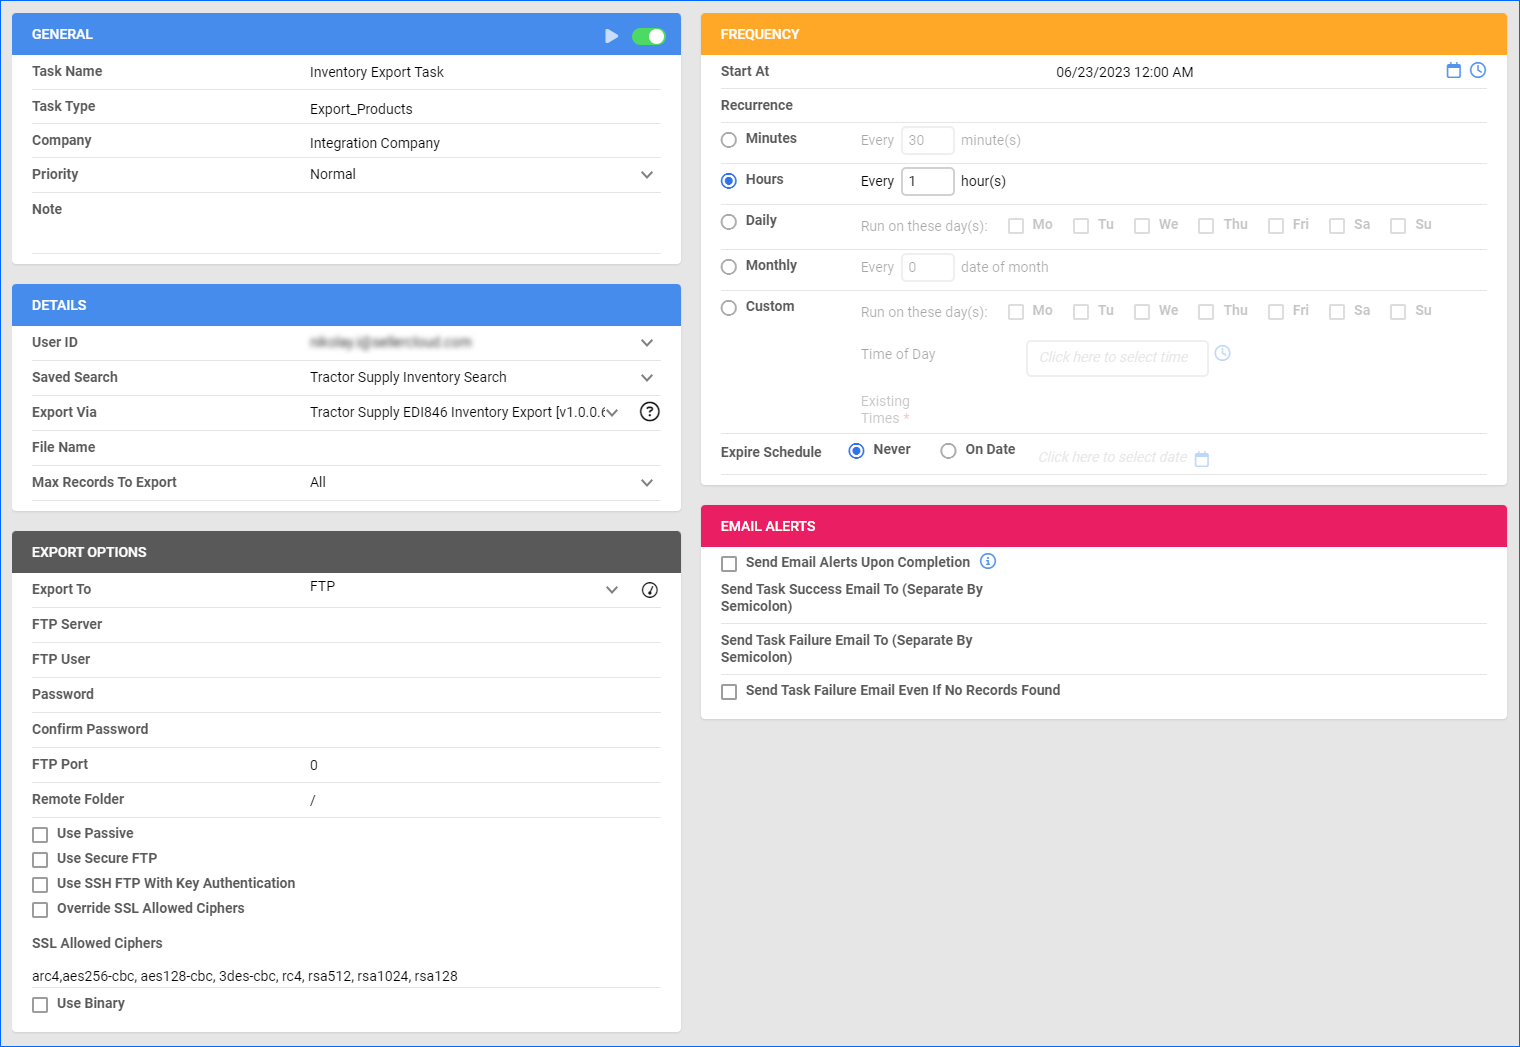
- Click Task Type and select Export Products.
- Set the Task Name.
- Select the Company.
- Select the Start Time.
- Click CREATE.
- On the Scheduled Task page, click the Edit button at the top right corner.
- In the Details panel:
- Click the User ID menu and select your ID.
- Click the Saved Search menu and select the saved search you created earlier.
- Click the Export Via menu and select Tractor Supply EDI846 Inventory Export.
- In the Export Options panel, set Export To to FTP and enter your VAN credentials.
- In the Frequency panel, specify the task frequency. For optimal performance, select a range between thirty minutes and one hour.
- In the General panel, click the Enable toggle button.
- Click Save.
RMA Export
The Tractor Supply EDI 180 RMA Export plugin exports RMAs from Sellercloud to Tractor Supply in EDI 180 format.
Before you move on, create a Saved Search for orders filtered by:
- Company – The company you created for the integration
- Exported – Not Exported
- Tracking Uploaded – Yes
- Has RMA – Yes
Automate RMA Export
To create a Scheduled Task that regularly exports RMAs:
- Navigate to Settings > Scheduled Tasks > Manage Scheduled Tasks.
- Click the green + icon: Create New Scheduled Task.
- Complete as follows:
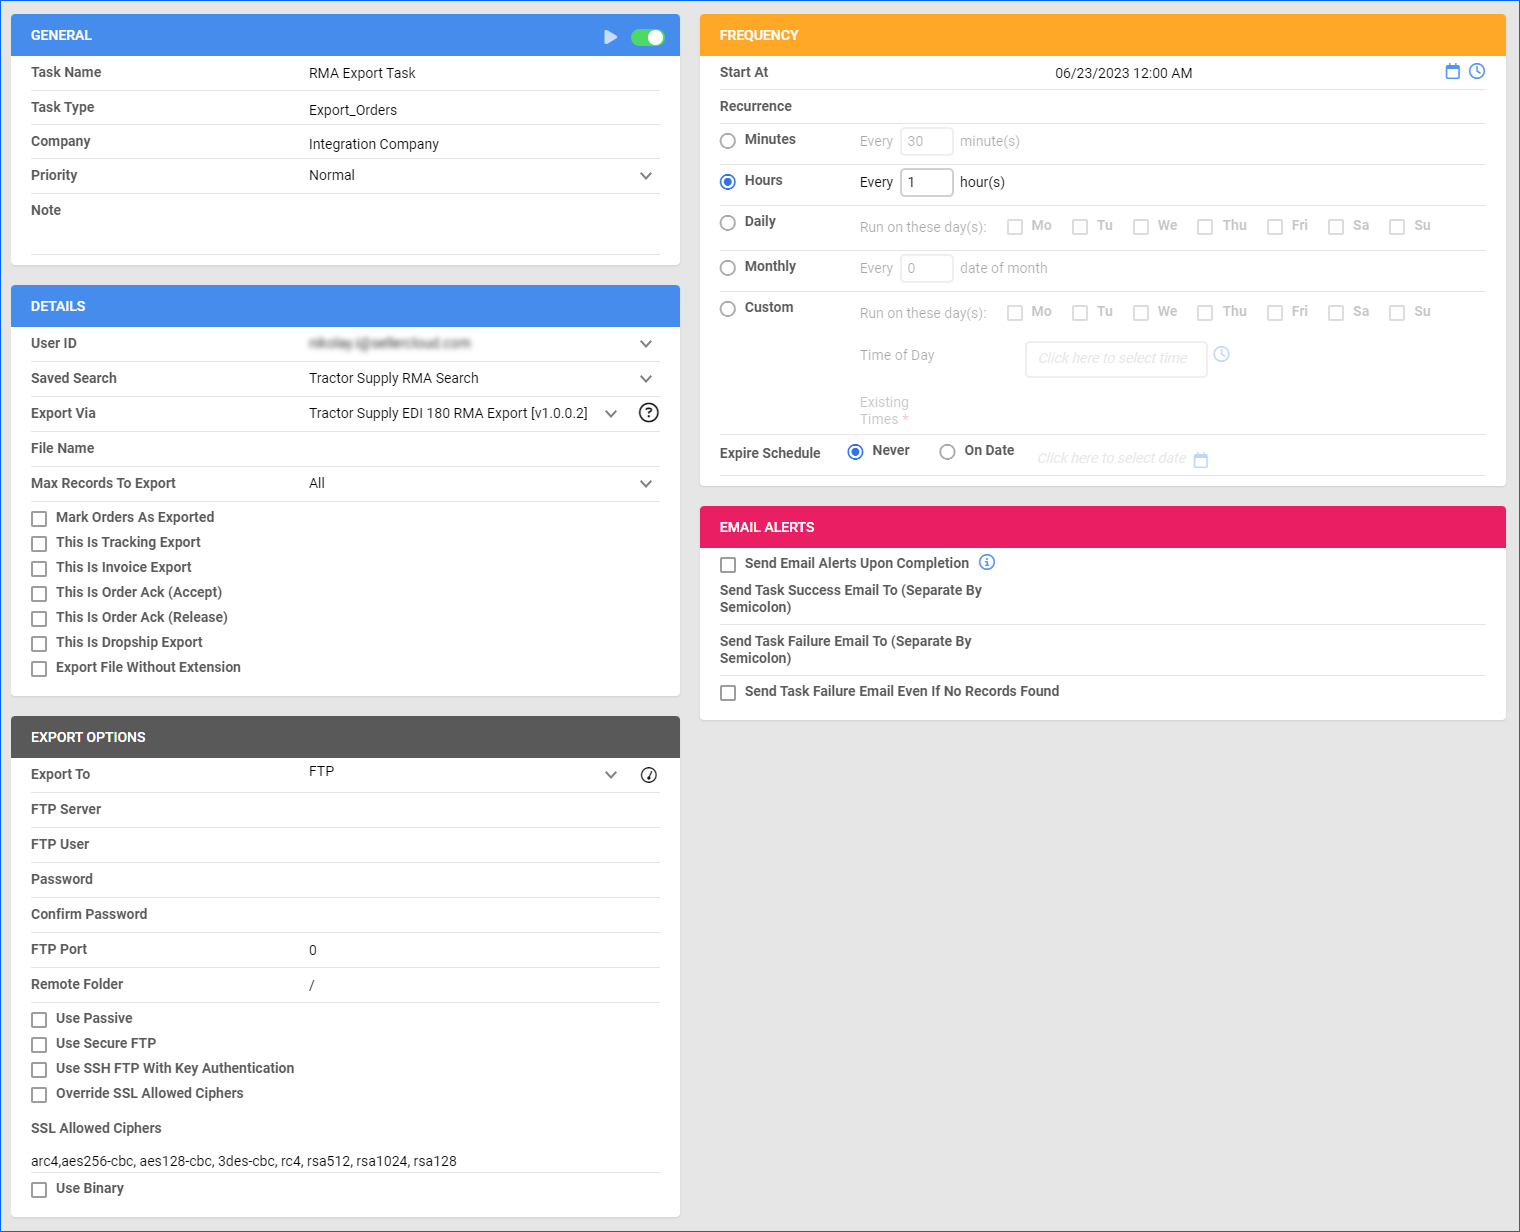
- Click Task Type and select Export Orders.
- Set the Task Name.
- Select the Company.
- Select the Start Time.
- Click CREATE.
- On the Scheduled Task page, click the Edit button at the top right corner.
- In the Details panel:
- Click the User ID menu and select your ID.
- Click the Saved Search menu and select the saved search you created earlier.
- Click the Export Via menu and select Tractor Supply EDI 180 RMA Export.
- In the Export Options panel, set Export To to FTP and enter your VAN credentials.
- In the Frequency panel, specify the task frequency. For optimal performance, select a range between thirty minutes and one hour.
- In the General panel, click the Enable toggle button.
- Click Save.
