Overview
Ace Hardware operates on a franchise model with individual store owners and offers a comprehensive selection of products, including tools, hardware, paint, plumbing supplies, electrical equipment, gardening supplies, and more.
Integrating Ace Hardware into your Sellercloud account allows you to seamlessly import orders, upload tracking information, and ensure your Ace Hardware store is always up-to-date with the latest inventory data. The integration works through EDI documents, transmitting information between the two services via plugins and Scheduled Tasks.
If necessary, you can contact Sellercloud Support to request additional customizations or other plugins for this integration. Any such modifications will be billable.
Prerequisites
Before you can integrate Ace Hardware with Sellecloud, complete the following requirements.
Sellercloud Support
Open a ticket with Sellercloud Support and request a VAN for Ace Hardware and the following plugins to be installed on your server:
- Ace Hardware Order Import 850 with 997 EDI – Imports orders from Ace Hardware to Sellercloud in EDI 850 format and sends back acknowledgement via EDI 997.
- Ace Hardware TrackingExport 856 EDI – Exports tracking information to Ace Hardware in EDI 856 format.
- Ace Hardware Invoice Export 810 EDI – Exports invoices to Ace Hardware in EDI 810 format.
- Ace Hardware Inventory Export 852 EDI – Exports inventory to Ace Hardware in EDI 852 format.
- Ace Hardware GS1-128 Label – Generates printable PDF product labels that include Code 128 barcodes in a format that complies with Ace Hardware’s requirements.
Custom Company Settings
Create the following Custom Company Settings.
On your default company:
- STControlNumber
- GSControlNumber
- ISAControlNumber
- AceHardwareIsInProduction – The value should be set to False during the EDI testing process. Once you have completed it, set it to True to move into production. Set the Data Type to Boolean.
On the company created for the integration:
- AceHardware_CustomerISAID – Your ISA ID. Enter a unique phone number that you don’t use for any other EDI integration.
- AceHardware_CustomerQualifier – Your Qualifier. Set to ZZ.
- AceHardware_ISAID – Ace Hardware’s ISA ID. Contact Ace Hardware for the value of this setting.
- AceHardware_Qualifier – Ace Hardware’s Qualifier. Contact Ace Hardware for the value of this setting.
- AceVendorNumber – Vendor number assigned by Ace Hardware.
- AceHW_GS1PrefixForSSCC – This will be the GS1 Company prefix on Ace Hardware website. It should be between 7 and 10 digits inclusive.
Custom Product Columns
Create the following Custom Product Columns:
- ACEHARDWARE_SKU – The product’s SKU at Ace Hardware. Set the Data Type to String.
- (Optional) AceHardware_Enabled – Enable only specific products for Ace Hardware. Set to True for any products you want to send with the Inventory Export plugin. Set the Data Type to Boolean.
Custom Order Columns
Create the following Custom Order Columns:
- LOCATIONID_ACEHARDWARE – The unique Location identifier of the Ace Hardware distribution center used by the Order Import, Tracking, and Invoice Export plugins.
- AceHD_SSCCProcessed – Used by Ace Hardware GS1-128 Label plugin. Defaults to False. Once the plugin is used, the column value will be set to True. Set the Data Type to Boolean.
- ACE_BOL_NUMBER – Used by Ace Hardware TrackingExport 856 EDI. Enter the Bill of Lading number here, if applicable. Set the Data Type to String.
- LOADID – Used by Ace Hardware TrackingExport 856 EDI and Ace Hardware GS1-128 Label plugins. You need to enter the Load ID manually on each order. Set the Data Type to String.
Order Import
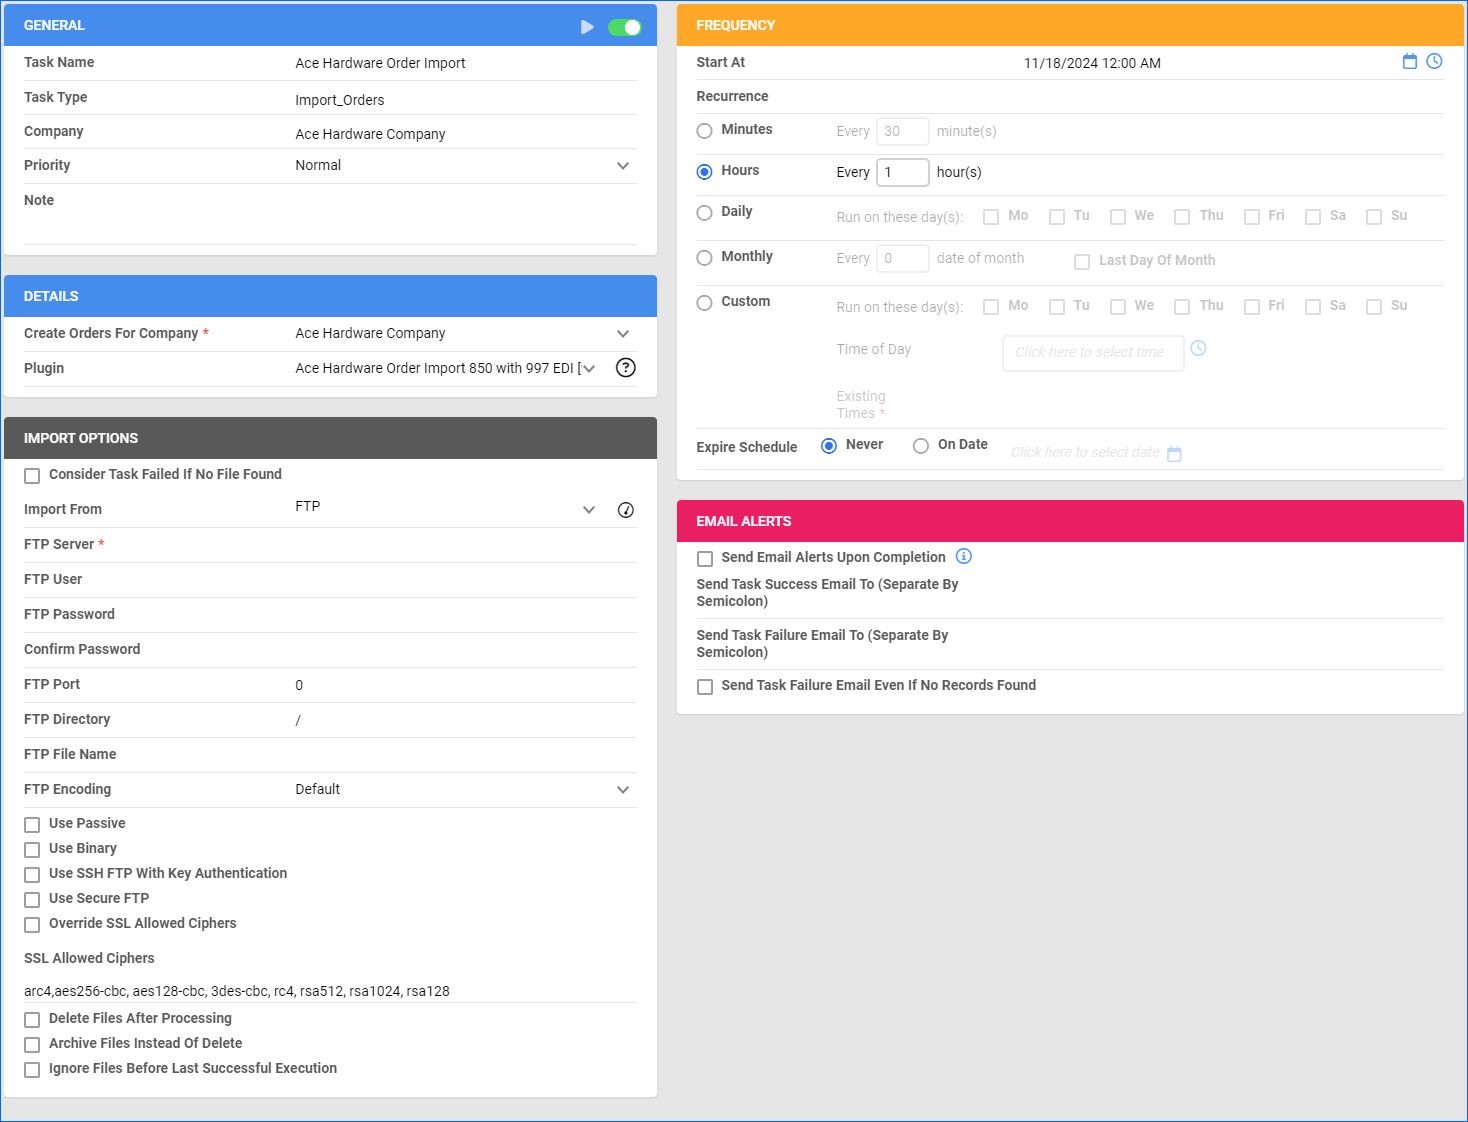
The Ace Hardware Order Import 850 with 997 EDI plugin imports order data from Ace Hardware to Sellercloud in EDI 850 format and exports functional acknowledgment in EDI 997 format. Orders will be created with the username AceHardware_[CompanyID]@SellerCloud.com.
Automate Order Import
To create a Scheduled Task that imports orders:
- Navigate to Settings > Scheduled Tasks > Manage Scheduled Tasks.
- Click the green + icon: Create New Scheduled Task.
- Complete as follows:
- Click Task Type and select Import Orders.
- Set the Task Name.
- Select the Company.
- Select the Start Time.
- Click CREATE.
- On the Scheduled Task page, click the Edit button at the top right corner.
- In the Details panel:
- Click the Create Orders For Company menu and select the company designated for this integration.
- Click the Plugin menu and select Ace Hardware Order Import EDI 850 with 997.
- In the Import Options panel, set Import From to FTP and enter your VAN credentials.
- In the Frequency panel, specify the task frequency. For optimal performance, select a range between thirty minutes and one hour.
- In the General panel, click the Enable button.
- Click Save.
Tracking Export
The Ace Hardware TrackingExport 856 EDI plugin exports tracking information from Sellercloud to Ace Hardware in EDI 856 format.
Before you move on, create a Saved Search for orders filtered by:
- Company – The company you created for the integration
- Order Status – InProcess Or Completed
- Shipping Status – FullyShipped
- Payment Status – Charged
- Tracking Uploaded – No
- AceHD_SSCCProcessed – True
Automate Tracking Export
To create a Scheduled Task that exports order tracking:
- Navigate to Settings > Scheduled Tasks > Manage Scheduled Tasks.
- Click the green + icon: Create New Scheduled Task.
- Complete as follows:
- Click Task Type and select Export Orders.
- Set the Task Name.
- Select the Company.
- Select the Start Time.
- Click CREATE.
- On the Scheduled Task page, click the Edit button at the top right corner.
- In the Details panel:
- Click the User ID menu and select your email.
- Click the Saved Search menu and select the saved search you created earlier.
- Click the Export Via menu and select AceHardware TrackingExport EDI 856.
- Check This Is Tracking Export.
- In the Export Options panel, set Export To to FTP and enter your VAN credentials.
- In the Frequency panel, specify the task frequency. For optimal performance, select a range between thirty minutes and one hour.
- In the General panel, click the Enable toggle button.
- Click Save.
Invoice Export
The Ace Hardware Invoice Export 810 EDI plugin exports invoices from Sellercloud to Ace Hardware in EDI 810 format.
If the invoice item does not have UPC, ProductID, ACEHARDWARE_SKU, the invoice export will not be generated successfully.
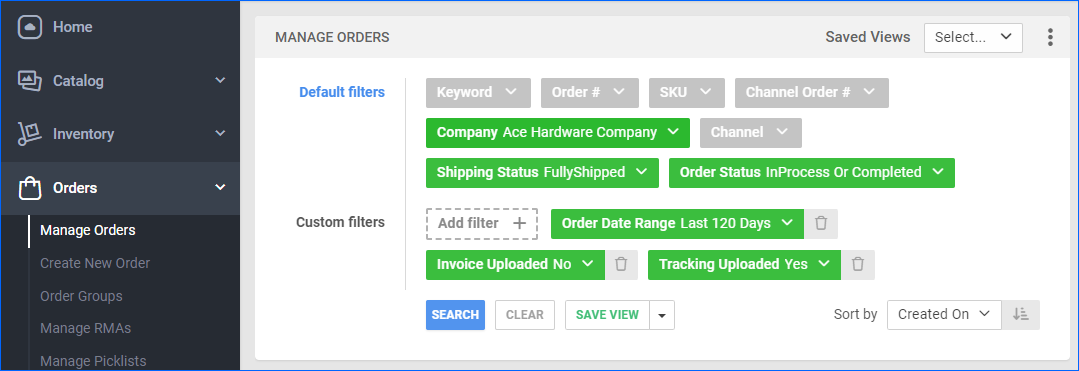
Before you move on, create a Saved Search for orders filtered by:
- Company – The company you created for the integration.
- Shipping Status – Fully Shipped
- Order Status – InProcess Or Completed
- Invoice Uploaded – No
- Tracking Uploaded – Yes
Automate Invoice Export
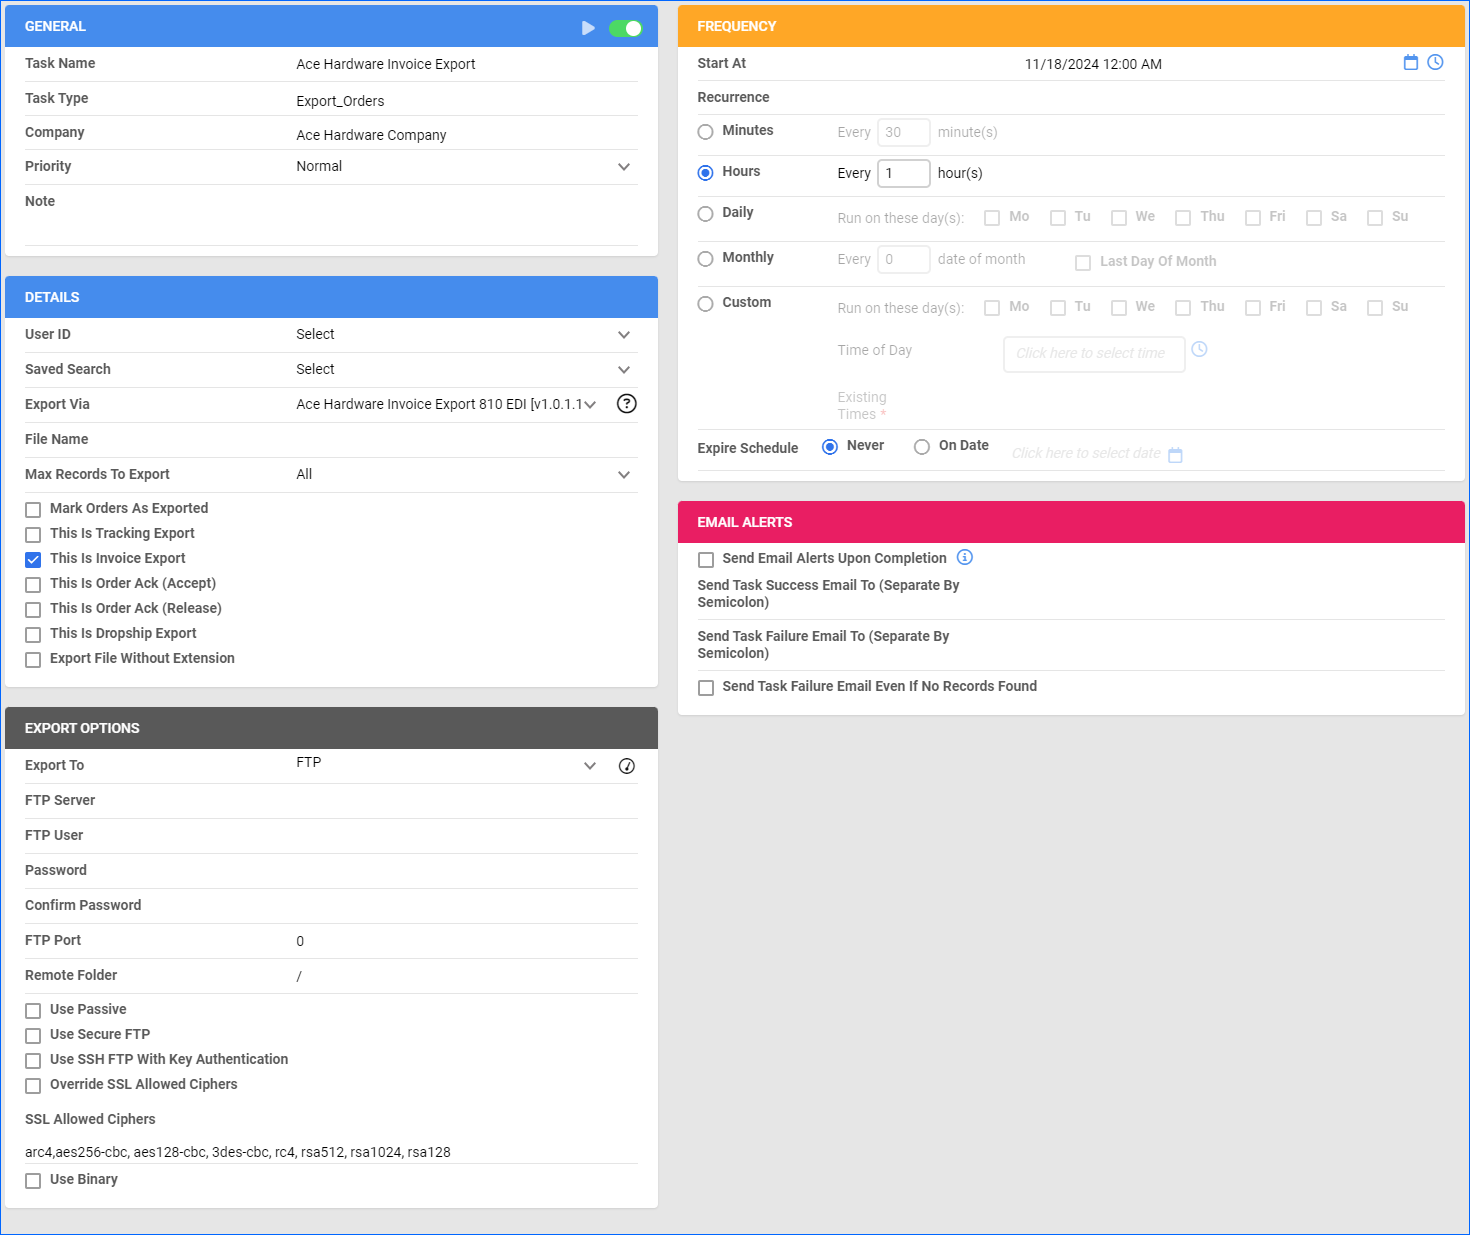
To create a Scheduled Task that exports invoices:
- Navigate to Settings > Scheduled Tasks > Manage Scheduled Tasks.
- Click the green + icon: Create New Scheduled Task.
- Complete as follows:
- Click Task Type and select Export Orders.
- Set the Task Name.
- Select the Company.
- Select the Start Time.
- Click CREATE.
- On the Scheduled Task page, click the Edit button at the top right corner.
- In the Details panel:
- Click the User ID menu and select your email.
- Click the Saved Search menu and select the saved search you created earlier.
- Click the Export Via menu and select Ace Hardware Invoice Export EDI 810.
- Check This Is Invoice Export.
- In the Export Options panel, set Export To to FTP and enter your VAN credentials.
- In the Frequency panel, specify the task frequency. For optimal performance, select a range between thirty minutes and one hour.
- In the General panel, click the Enable toggle button.
- Click Save.
Inventory Export
The Ace Hardware Inventory Export EDI 852 plugin exports inventory from Sellercloud to Ace Hardware in EDI 852 format.
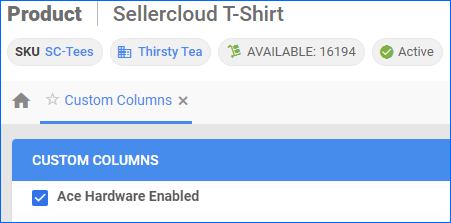
Optionally, you can enable only specific products for Ace Hardware by setting their AceHardware_Enabled Custom Product Column to True:
- For one product at a time: go to the Product Details Page > click Toolbox and select Custom Columns > click Edit, update the AceHardware_Enabled column, and Save.
- For multiple products in bulk: follow the steps to Bulk Update Products and use the AceHardware_Enabled column – set it to True for all products you want to enable.
Unlike core integrations, plugin integrations don’t require products to be in the company with the scheduled tasks. The export will include the products you select with your Saved Search.
Next, create a Saved Search for products filtered by AceHardware_Enabled – True. Optionally, you can add more filters to the search to narrow down the export further.
Automate Inventory Export
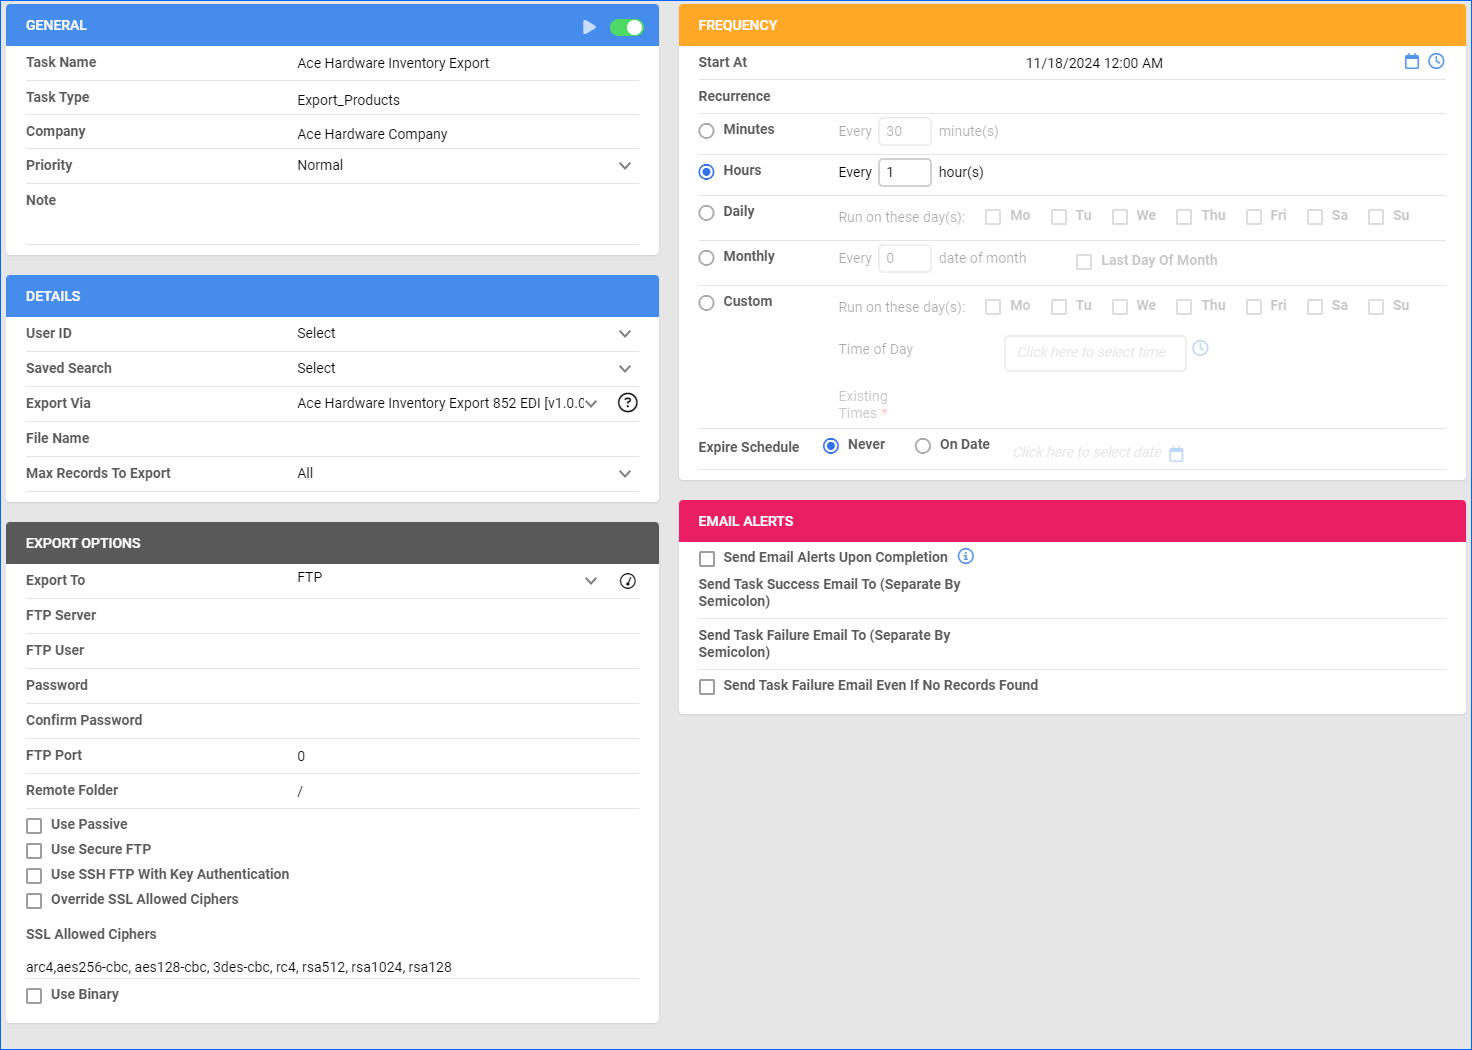
To create a Scheduled Task that regularly exports inventory from Sellercloud to Ace Hardware:
- Navigate to Settings > Scheduled Tasks > Manage Scheduled Tasks.
- Click the green + icon: Create New Scheduled Task.
- Complete as follows:
- Click Task Type and select Export Products.
- Set the Task Name.
- Select the Company.
- Select the Start Time.
- Click CREATE.
- On the Scheduled Task page, click the Edit button at the top right corner.
- In the Details panel:
- Click the User ID menu and select your email.
- Click the Saved Search menu and select the saved search you created earlier.
- Click the Export Via menu and select Ace Hardware Inventory Export EDI 852.
- In the Export Options panel, set Export To to FTP and enter your VAN credentials.
- In the Frequency panel, specify the task frequency. For optimal performance, select a range between thirty minutes and one hour.
- In the General panel, click the Enable toggle button.
- Click Save.
Configure GS1-128 Labels
With the Ace Hardware GS1-128 Label plugin set up under your designated company, you can print PDF product labels that include Code 128 barcodes for your orders and the products they include through Sellercloud or Shipbridge. Any orders processed by the label plugin will have the AceHD_SSCCProcessed custom column value set to True.
To set up theGS1-128 Label plugin:
- Go to the Company Settings of the company you created for the integration.
- Click Toolbox and select Invoice Settings.
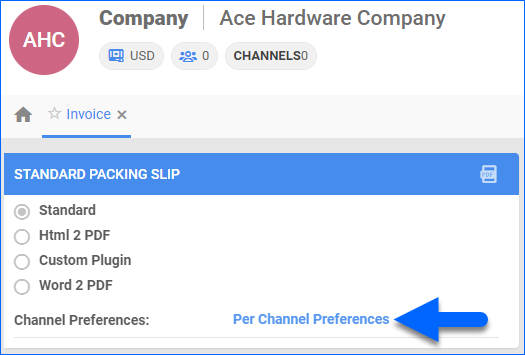
- Click Per Channel Preferences.
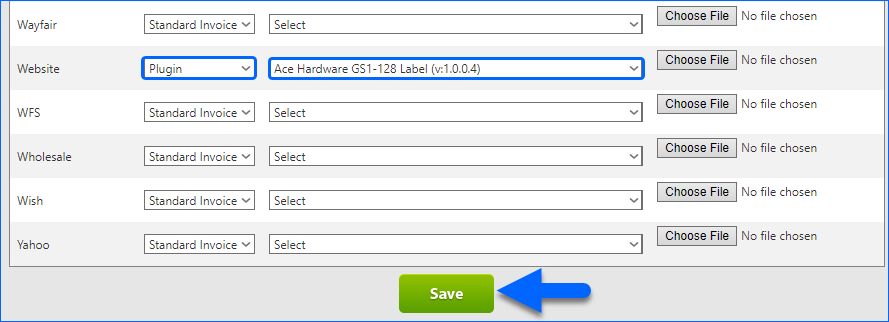
- For Website, select Plugin > Ace Hardware GS1-128 Label.
- Click Save.
