Overview
Amazon’s Ship By Region templates let you tailor shipping options for different regions, including service levels, transit times, and shipping rates. For example, you can set up specific rules to offer One-Day Delivery and Two-Day Delivery for your own state and customers close to your warehouse locations while excluding this option for states farther away.
Once you’ve created your shipping templates in Seller Central, you can import them into Sellercloud as Ship By Region templates and assign them to your products.
Enable Ship By Region Templates
To enable Ship By Region templates:
- Go to your Company Settings.
- Click Toolbox and select Amazon Settings > General Settings.
- Click Edit.
- Check the Enable Ship By Region Templates box.
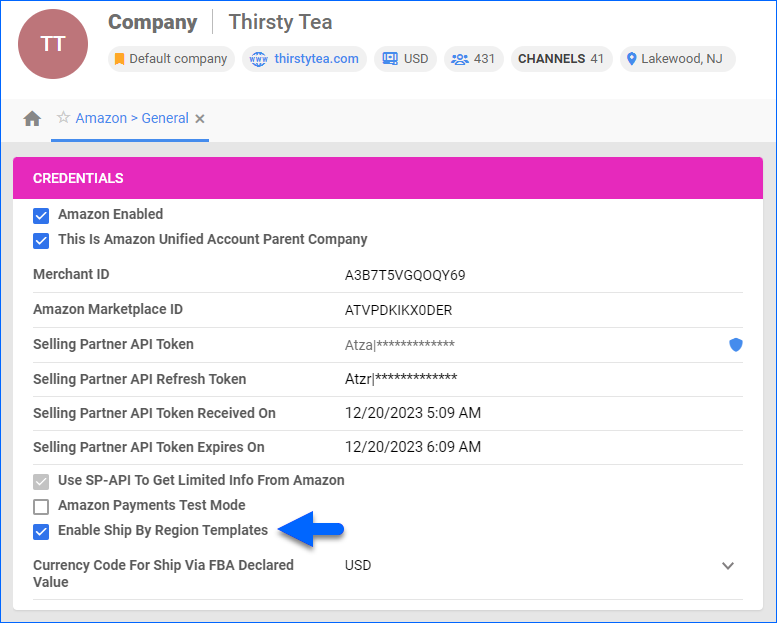 Gift Wrap options will not be sent to Amazon when the option is enabled. The service will update changes to the shipping templates to Seller Central.
 - Click Save.
Import Templates
To sync your Amazon shipping templates to Sellercloud:
- Create Shipping Templates on Seller Central.
- In Sellercloud, go to your Company Settings.
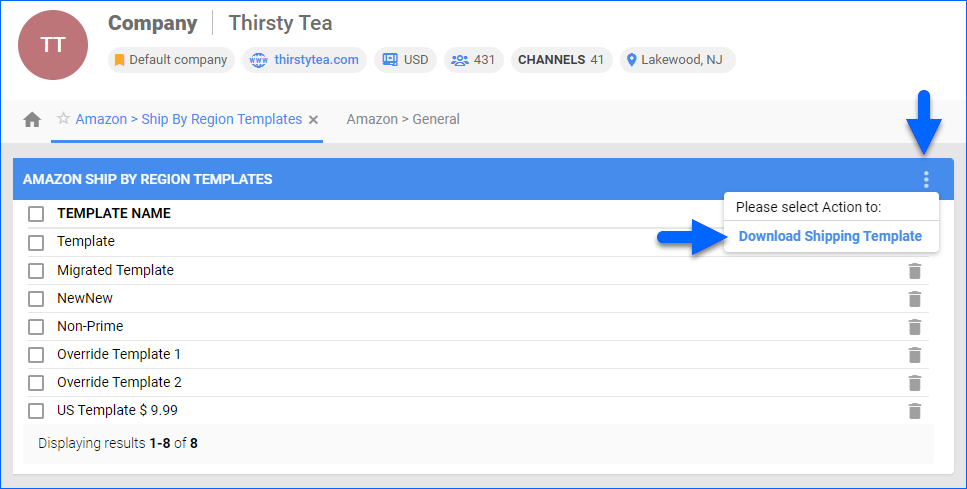
- Click Toolbox and select Amazon Settings > Ship by Region Templates.
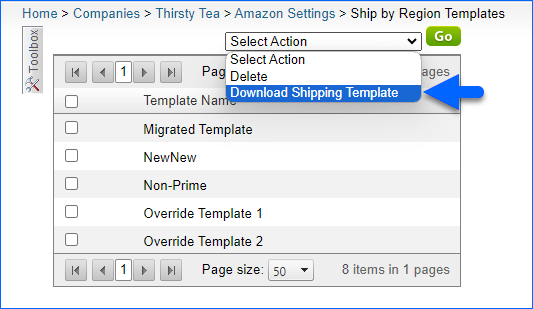
- Click the three dots icon and select Download Shipping Template to import your templates from Amazon.
Assign Templates Manually
You can assign shipping templates to products manually, either individually per product or in bulk, by uploading a file. To update the Ship by Region Template of your listing on Amazon, you must perform one of the following actions on the Amazon product Properties page:
- Post Product on Amazon
- Post Product on Amazon (Existing Catalog)
- Post Product to Amazon (Partial Update)
Individually
To assign a template to a single product:
- Go to the Product Details Page.
- Click Toolbox and select Amazon Properties.
- Click Edit.
- In the Shipping panel, check Enable Shipping Override.
- Select a Shipping Template. The selected template will be the only one taken into account, regardless of all other shipping rules and templates applied.
If you don’t see your Ship By Region templates as available options, go to Company Settings > Amazon Settings > General Settings and check the Enable Ship By Region Templates box. - Click Save.
In Bulk
To assign templates to multiple products:
- Follow the steps to Bulk Update Products.
- Generate a template file with the column headers AmazonEnableShippingOverride and AmazonShippingTemplate. Then enter True below the AmazonEnableShippingOverride header and enter the shipping template names under AmazonShippingTemplate.
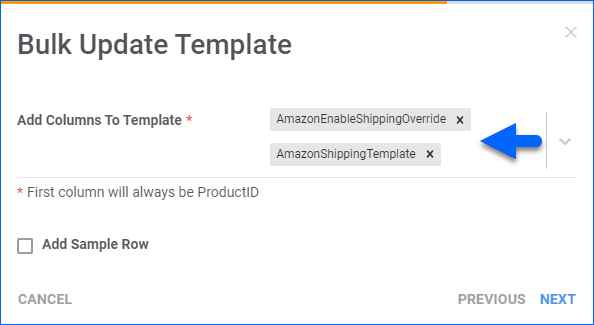
- Fill out the file, save it, and upload it.
Assign Templates Automatically
When shipping from multiple warehouses, you must know where each product’s inventory is located and apply the correct shipping template. Managing shipping templates based on warehouse location and inventory availability is crucial, especially when offering Prime Delivery. For example:
- An item in a New York warehouse might use a shipping template that includes nearby states like New Jersey, Connecticut, and Pennsylvania for Prime delivery.
- An item in California would require a different template, as delivering to these states within two days is not feasible.
Since inventory availability often changes, manually managing these templates can be time-consuming and prone to errors. By automating this process, you can ensure that customers receive accurate shipping options while simplifying your logistics workflow.
The Update Shipping Template Amazon plugin lets you do this by mapping* warehouses to specific shipping templates. When it runs, the plugin checks your mappings one by one in the order you input them. Once it finds the first mapping where all warehouses have available inventory, it assigns the corresponding shipping template to the product and updates Amazon.
Workflow Details
Create and configure the following Custom Company Settings:
- AmazonShippingTemplates – Enter mappings between warehouses and shipping templates for products shipped with Prime. See the Workflow Details section to learn how to format the mappings. These mappings only apply to products whose Custom Product Column IsPrime is True.
- AmazonNonPrimeShippingTemplates – Enter mappings between warehouses and shipping templates for products shipped without Prime. See the Workflow Details section to learn how to format the mappings. These mappings only apply to products whose Custom Product Column IsPrime is False.
- ShippingTemplateUnavailableInventory – Enter a shipping template name. This shipping template will serve as a backup. The plugin will assign it if it can’t assign one based on the mappings in the AmazonShippingTemplates and AmazonNonPrimeShippingTemplates settings above or if the product has no inventory in any warehouse.
- SafetyQtyPerWarehouse – Enter mappings between warehouses and Safety Quantities. If a warehouse has less than or equal to the quantity in this setting, the plugin will consider it to have 0 available inventory.
- Each mapping pairs a warehouse ID to a Safety Quantity amount. Use a hyphen to separate the warehouse ID from the Safety Quantity and a semicolon to separate multiple mappings. This is the format with standard placeholders: WarehouseID-SafetyQty;WarehouseID-SafetyQty
- For example, the setting’s value may be 118-3;124-0;120-2, where 118, 124, and 120 are warehouse IDs and 3, 0, and 2 are the corresponding Safety Quantities for these warehouses.
In addition, create the following Custom Product Column:
- IsPrime – This column determines which of the two Custom Company Settings AmazonShippingTemplates and AmazonNonPrimeShippingTemplates will apply to a specific product. Set the Data Type to Boolean. Set to True for Prime and False for non-Prime products. To configure this faster, Bulk Update multiple products at once.
In this workflow, the plugin assigns different shipping templates to your products based on whether you want to offer Prime shipping with the Custom Product Column IsPrime:
- When you set IsPrime to True, the plugin applies mappings from the Custom Company Setting AmazonShippingTemplates.
- When you set IsPrime to False, the plugin applies mappings from the Custom Company Setting AmazonNonPrimeShippingTemplates.
Each mapping can include one or more warehouse IDs separated by commas, paired with a single shipping template, and closed with square brackets. Use a semicolon to separate warehouses from their corresponding shipping template. This is the format with standard placeholders:
[WarehouseID1,WarehouseID2; Shipping Template Name] [WarehouseID3; Shipping Template Name 2] [WarehouseID4; Shipping Template Name 3]
For example, the setting’s value could be [292,124; Prime East] [123,152; Prime West], where 292, 214, 123, and 152 are Warehouse IDs, and Prime East and Prime West are shipping template names.
You must enter the mappings in descending order based on the number of warehouses in each mapping. For example, if you have three warehouses, to cover every scenario, you would first map a template to all three, then map templates to the various pairs of two warehouses, and finally, map templates to individual warehouses. The following is an example of the order in which you would list these mappings:
- [WarehouseID1,WarehouseID2,WarehouseID3; Template1]
- [WarehouseID1,WarehouseID2; Template2]
- [WarehouseID1,WarehouseID3; Template3]
- [WarehouseID2,WarehouseID3; Template4]
- [WarehouseID1; Template5]
- [WarehouseID2; Template6]
- [WarehouseID3; Template7]
With the Custom Company Setting SafetyQtyPerWarehouse, you can set a Safety Quantity per warehouse for the plugin to consider when calculating inventory availability. If a warehouse has less inventory than or equal to the Safety Quantity, the plugin will consider it to have 0 available inventory.
Automate Assignment
Before you move on, create a Saved Search that targets all products you want to update with the plugin. For example, you can filter by:
- Company – Select one or more companies
- Amazon Statuses – Posted and Active
To automate the plugin with a Scheduled Task:
- Navigate to Settings > Scheduled Tasks > Manage Scheduled Tasks.
- Click the green + icon: Create New Scheduled Task.
- Complete as follows:
- Click Task Type and select Export Products.
- Set the Task Name.
- Select the Company.
- Select the Start Time.
- Click CREATE.
- On the Scheduled Task page, click the Edit button at the top right corner.
- In the Details panel:
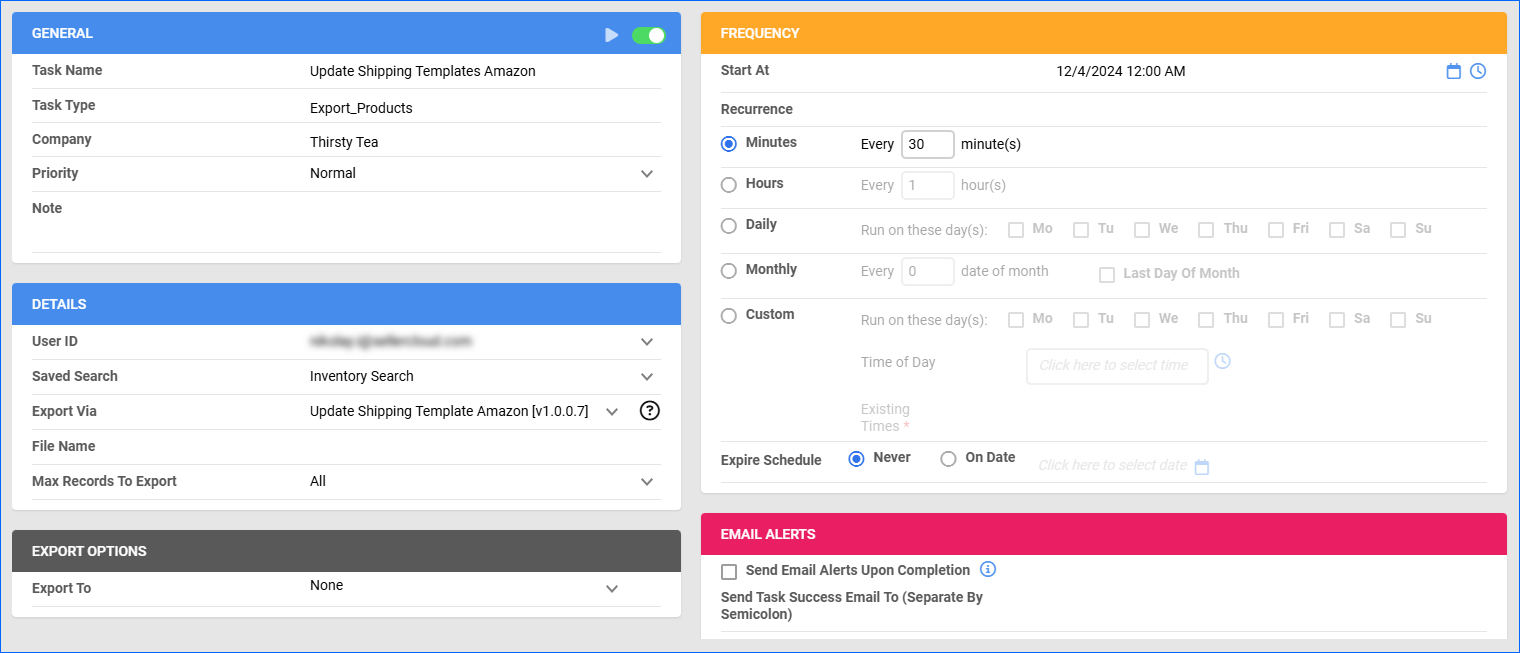
- Click the User ID menu and select your email.
- Click the Saved Search menu and select the saved search you created earlier.
- Click the Export Via menu and select Update Shipping Template Amazon.
- In the Export Options panel, set Export To to None.
- In the Frequency panel, specify the task frequency. For optimal performance, set it to 30 minutes.
- In the General panel, click the Enable toggle button.
- Click Save.
Overview
Amazon’s Ship By Region templates let you tailor shipping options for different regions, including service levels, transit times, and shipping rates. For example, you can set up specific rules to offer One-Day Delivery and Two-Day Delivery for your own state and customers close to your warehouse locations while excluding this option for states farther away.
Once you’ve created your shipping templates in Seller Central, you can import them into Sellercloud as Ship By Region templates and assign them to your products.
Enable Ship By Region Templates
To enable Ship By Region templates:
- Go to your Company Settings.
- Click Toolbox and select Amazon Settings > General Settings.
- Check the Enable Ship By Region Templates box.
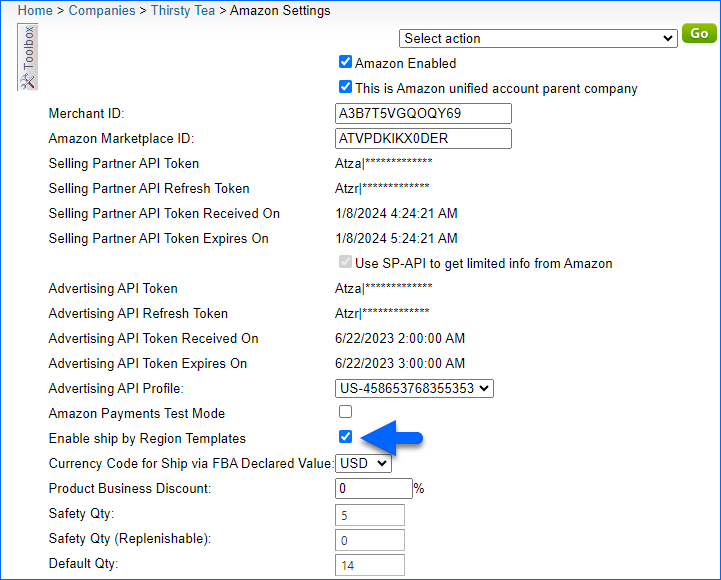 Gift Wrap options will not be sent to Amazon when the option is enabled. The service will update changes to the shipping templates to Seller Central.
 - Click Save.
Import Templates
To sync your Amazon shipping templates to Sellercloud:
- Create Shipping Templates on Seller Central.
- In Sellercloud, go to your Company Settings.
- Click Toolbox and select Amazon Settings > Ship by Region Templates.
- Click Select Action and select Download Shipping Template to import your templates from Amazon.
Assign Templates
You can assign templates to products individually per product or in bulk by uploading a file.
Individually
To assign a template to a single product:
- Go to the Product Details Page.
- Click Toolbox and select Amazon Properties.
- Check Enable Shipping Override.
- Select a Ship by Region Template. The selected template will be the only one taken into account, regardless of all other shipping rules and templates applied.
If you don’t see your Ship By Region templates as available options, go to Company Settings > Amazon Settings > General Settings and check the Enable Ship By Region Templates box. - Click Save.
In Bulk
To assign templates to multiple products:
- Follow the steps to Bulk Update Products.
- Generate a template file with the column headers AmazonEnableShippingOverride and AmazonShippingTemplate. Then enter True below the AmazonEnableShippingOverride header and enter the shipping template names under AmazonShippingTemplate.
- Fill out the file, save it, and upload it.

