Overview
Darty is a French retailer specializing in electronics, appliances, and home goods. It offers a wide range of products, including televisions, smartphones, kitchen appliances, and home entertainment systems, with a strong emphasis on customer service and after-sales support. Darty is well-known for its “Contrat de Confiance” (Contract of Confidence), which guarantees reliable service and satisfaction.
Integrating Darty into your Sellercloud account allows you to seamlessly import orders and RMAs, upload tracking information, and ensure your listings are always up-to-date with the latest inventory data. This integration works through API, transmitting information between the two services via plugins and Scheduled Tasks. The communication is facilitated through Mirakl, a third-party platform.
If necessary, open a ticket with Sellercloud Support to request additional customizations or other plugins for this integration. Note that these customizations are billable, and you will be provided a quote.
Prerequisites
Before you can integrate Darty into Sellercloud, complete the following requirements.
- A dedicated Company.
- Custom Company Settings.
- Saved Views to target specific products and orders.
- Scheduled Tasks to run the plugins automatically.
Once configured, you can manage all integrations created through the wizard on the Manage Plugin Channels page. The workflow outlined below describes the manual configuration process, which does not create a plugin channel on the Manage Plugin Channels page.
Mirakl API Key
To obtain your Mirakl API key and access the integration details:
- Log into your Mirakl account using your Master credentials. Only the Master Account has permission to generate an API key.
- Click on your username at the top right corner of the dashboard.
- Navigate to My User Settings → API Key. If no key is present, click Generate.
Sellercloud Support
Open a ticket with Sellercloud Support and request that the following plugins be installed on your server:
- Mirakl Order Import – Imports orders from Mirakl to Sellercloud.
- Mirakl Tracking Export – Exports tracking information from Sellercloud to Mirakl.
- Mirakl Inventory Export – Exports inventory updates from Sellercloud to Mirakl.
- Mirakl RMA Import – Imports RMAs from Mirakl to Sellercloud.
Custom Company Settings
Create the following Custom Company Settings:
Integration and API Configuration
- Mirakl_Integration_Name – Enter Darty.com to specify the Mirakl channel from which orders are coming in. This setting’s value gets added to the Custom Order Column MIRAKL_CHANNEL.
- Mirakl_API_URL – Darty’s URL.
- Mirakl_API_Key – Your Mirakl authentication key. On Mirakl, you can find it by clicking your email address in the top right corner and selecting API Key.
- MiraklOAuthTokenId – An alternative authentication instead of the Mirakl_API_Key. Create it as an empty company setting and get a token from the Scheduled Task.
- MiraklEnableExportOfferStateNew – Enable the use of the Custom Product Column MIRAKL_EXPORT_OFFER_STATE_NEW. Defaults to False.
Order Management
- Mirakl_Always_Accept_Orders – This setting is optional and can be True or False. It determines whether orders with pending acceptance will be accepted even if there’s not enough inventory on hand to fulfill them. If the setting is missing, the plugin considers it False.
- Mirakl_Get_Only_Recent_Orders – This setting can be True or False. It determines if the plugin will only import orders modified in the past 10 days. Skip creating this setting or set it to False for the initial order import. Then, set it to True to speed up the plugin and avoid reaching API limits.
- Mirakl_DaysToLookBack – Optional setting, which allows you to set the number of days to look back for orders in Mirakl API. If empty, it defaults to 10 days. The data type is integer and must be between 1 and 10.
- Mirakl_Shop_IDs – This is an optional setting. A comma-separated list of Mirakl shop IDs (i.e., ‘2000,2774‘). If missing, the plugin will only import orders from the first shop associated with the Mirakl user. You can only have one Mirakl channel integration per company in Sellercloud. This setting should not exceed two IDs.
- Mirakl_Order_Statuses – This is an optional setting that specifies which order statuses will be imported. If missing, orders with a status of WAITING_ACCEPTANCE, PAYMENT_COLLECTED, SHIPPING, SHIPPED, RECEIVED, and CLOSED will be imported.
- Mirakl_Shipping_Method – Sets the Shipping Method for all imported orders.
- RunPostOrderPluginAfterOrderCreation – Optional but recommended setting that runs post-order actions once an order is created or updated. These include post-order plugins, shipping weight calculation, and the Order Rule Engine. Defaults to False.
- Mirakl_DontRunPostOrderOnWaitingAcceptanceOrders – With this setting enabled, post order actions will not run on orders created with the WAITING_ACCEPTANCE status from Mirakl or ones where the Shipping Address is missing or the Payment Status is not Charged. This setting can be True or False.
- Mirakl_ExcludeNonPayableToShopTaxes – Determine whether to exclude taxes when importing orders. This setting can be True or False.
Inventory Management
- Mirakl_Warehouse_IDs – A comma-separated list of warehouse IDs to export inventory from. Works with both the Basic and Advanced Safety Quantity Workflow.
- Mirakl_Enable_Advanced_Safety_Qty – Enable the Advanced Safety Quantity Workflow. Defaults to False.
- MiraklDefaultMaxQty – Enter a default Maximum Inventory Quantity that applies to products whose MiraklMaxQtyUseDefault Custom Product Column is set to True.
- Mirakl_Inventory_Percent – Specify the percentage of inventory to be exported as a decimal value (e.g., “80”, meaning 80%). This setting is used with the Advanced Safety Quantity Workflow.
- MIRAKL_UseAdvancedKitProjecting – Enable an estimated sellable quantity for Independent Kit Products if no items are assembled. All Component kits get quantities from Independent kits. Defaults to False.
- MiraklDefaultReplenishableQty – Apply a default inventory quantity for Replenishable Products whose MiraklUseDefaultReplenishableQty Custom Product Column is set to True.
- Mirakl_ProductIDType – Enter the exact value of the product-id-type (the type of product identifier) the Inventory Export plugin sends to match the Mirakl product_id as a backup if it fails to match by the Custom Product Column MIRAKL_PRODUCT_ID. The value can be SHOP_SKU, UPC, EAN, ISBN, or any other product ID type Mirakl can use to identify products. See the Inventory Export section for more information on how the plugin matches products.
Additional Settings
- Mirakl_Manufacturer_Warranty – Apply a default manufacturer warranty period to products whose MIRAKL_MANUFACTURER_WARRANTY_USE_DEFAULT Custom Product Column is set to True. Defaults to 0.
- Mirakl_Offer_TaxCode – This is an optional setting that sets a default tax code for all offers. If present, then the plugin will export each offer with the relevant product-tax-code. Example value: P0000000.
Custom Order Columns
Create the following Custom Order Columns:
- MIRAKL_CHANNEL – Used by the Order Import plugin to save the relevant order channel based on the Mirakl_Integration_Name Custom Company Setting. Allows searching for orders from each channel. The data type is String.
- MIRAKL_SHOP_ID – Populates the Mirakl Shop ID if the custom company setting Mirakl_Shop_IDs is not empty or missing. The data type is Integer.
Custom Product Columns
Create the following Custom Product Columns:
Listing Management
- Darty_Enabled – Set to True to enable a product for Darty. The data type is Boolean.
- MIRAKL_SHOP_IDS – A comma-separated list of Mirakl shop IDs for which product price, inventory, and availability dates should be updated, e.g., ‘2000,2774’. This setting works only if you have populated the Custom Company Setting Mirakl_Shop_IDs. The data type is String.
- MIRAKL_SKU – Enter the Mirakl product ID here if it’s different from the Sellercloud SKU. The data type is String.
- MIRAKL_AVAILABLE_STARTED – The start date of the active offer. The data type is DateTime.
- MIRAKL_AVAILABLE_ENDED – The end date of the active offer. The data type is DateTime.
- MIRAKL_MANUFACTURER_WARRANTY – Enter the manufacturer warranty period. The data type is Integer.
- MIRAKL_MANUFACTURER_WARRANTY_USE_DEFAULT – Apply the default manufacturer warranty period from the custom company setting Mirakl_Manufacturer_Warranty. The data type is Boolean, and it defaults to False.
Inventory Management
- MIRAKL_SAFETY_QTY – The product’s Safety Quantity is subtracted from the available quantity to prevent overselling. The data type is Integer.
- MiraklMaxQtyEnabled – Use this option to limit the Maximum Inventory Quantity and have it appear on Darty even if you actually have more than the set limit in stock. The data type is Boolean.
- MiraklMaxQty – Enter the Maximum Quantity. The data type is Integer.
- MiraklMaxQtyUseDefault – Apply the Maximum Quantity set on the Custom Company Setting instead of the product-level MiraklMaxQty value. The data type is Boolean.
- Mirakl_MinQtyAlert – An optional minimum quantity alert that defaults to 1. The data type is Integer.
- MiraklReplenishableQtyToSend – Enter a replenishable quantity for the product. This setting applies if you have enabled Replenishable on the Product Details Page. The data type is Integer.
- MiraklUseDefaultReplenishableQty – Apply the default replenishable quantity set in the Custom Company Setting MiraklDefaultReplenishableQty instead of using the product-level setting. The data type is Boolean.
Pricing
- MIRAKL_PRICE – The product price included in the Inventory Export to Mirakl. The data type is Decimal.
- MIRAKL_PRICE_ADDITIONAL_INFO – Optional additional price information. The data type is String.
- MIRAKL_DISCOUNT_PRICE – A discount price for the product. The data type is Decimal.
- MIRAKL_DISCOUNT_AVAILABLE_STARTED – The start date for the discount. The data type is DateTime.
- MIRAKL_DISCOUNT_AVAILABLE_ENDED – The end date for the discount. The data type is DateTime.
MIRAKL_AVAILABLE_STARTED and MIRAKL_AVAILABLE_ENDED can be in the past as long as the start date is before the end date. Otherwise, Mirakl will reject the inventory and price update for the relevant product.
Offer State and Tax
- MIRAKL_OFFER_STATE – Defaults to 11 (NEW) when missing or has an invalid Mirakl_Integration_Name. You can also set it to 1 (Used – Very Good Condition), 2 (Used – Perfect Condition), 3 (Used – Correct Condition), or 10 (Used – Good Condition). This is a type String dropdown.
- MIRAKL_OFFER_TAXCODE – This is an optional setting that sets a tax code for the offer. If this setting is missing, the tax code will come from the Custom Company Setting Mirakl_Offer_TaxCode. The data type is String.
- MIRAKL_EXPORT_OFFER_STATE_NEW – This setting is required and used only when the Custom Company Setting MiraklEnableExportOfferStateNew is enabled. Then, the plugin will export the default offer state code (NEW) instead of the selected MIRAKL_OFFER_STATE. The data type is Boolean, and it defaults to False.
Logistic and Description
- MIRAKL_LOGISTIC_CLASS – If in use, add a dropdown with no multiple selections, with values: Fam A – Fam U, Fam Z, Fam 001 – Fam 051, Fam A052 – Fam A066, Fam J1, AVDJ, Luisiana. The data type is String, with an optional selected value.
- MIRAKL_DESCRIPTION – An optional description. The data type is String.
- MIRAKL_INTERNAL_DESCRIPTION – An optional internal description. The data type is String.
Order Import
This plugin downloads Darty orders through the API and imports them as Website orders in Sellercloud. Orders will be created with the email [email protected].
The plugin will send order acceptance to Mirakl if all your ordered items have enough inventory to fulfill the order. If an item has insufficient inventory, orders will be canceled on Sellercloud and Mirakl.
Note the following important details describing how the plugin interacts with orders with different statuses:
- Only orders with Mirakl status WAITING_ACCEPTANCE, SHIPPING, PAYMENT_COLLECTED, SHIPPED, RECEIVED, and CLOSED are imported, and others are skipped.
- Orders with the status SHIPPED, RECEIVED, and CLOSED are imported as completed.
- Orders with the status SHIPPED and RECEIVED are marked as fully shipped, while CLOSED ones are marked as shipped only if they have a tracking number or a carrier name.
- Orders with the status WAITING_ACCEPTANCE are downloaded with empty addresses. After acceptance, Mirakl sends them again with the status SHIPPING, and addresses are added to the relevant orders by the plugin.
- After an order that’s pending acceptance is created in Sellercloud, the plugin checks the custom company setting Mirakl_Always_Accept_Orders. If True, the order is automatically accepted. If False, an acceptance is sent to Mirakl only if there’s sufficient product inventory to fulfill the whole order. Otherwise, it is rejected, and the Sellercloud status is changed to Cancelled.
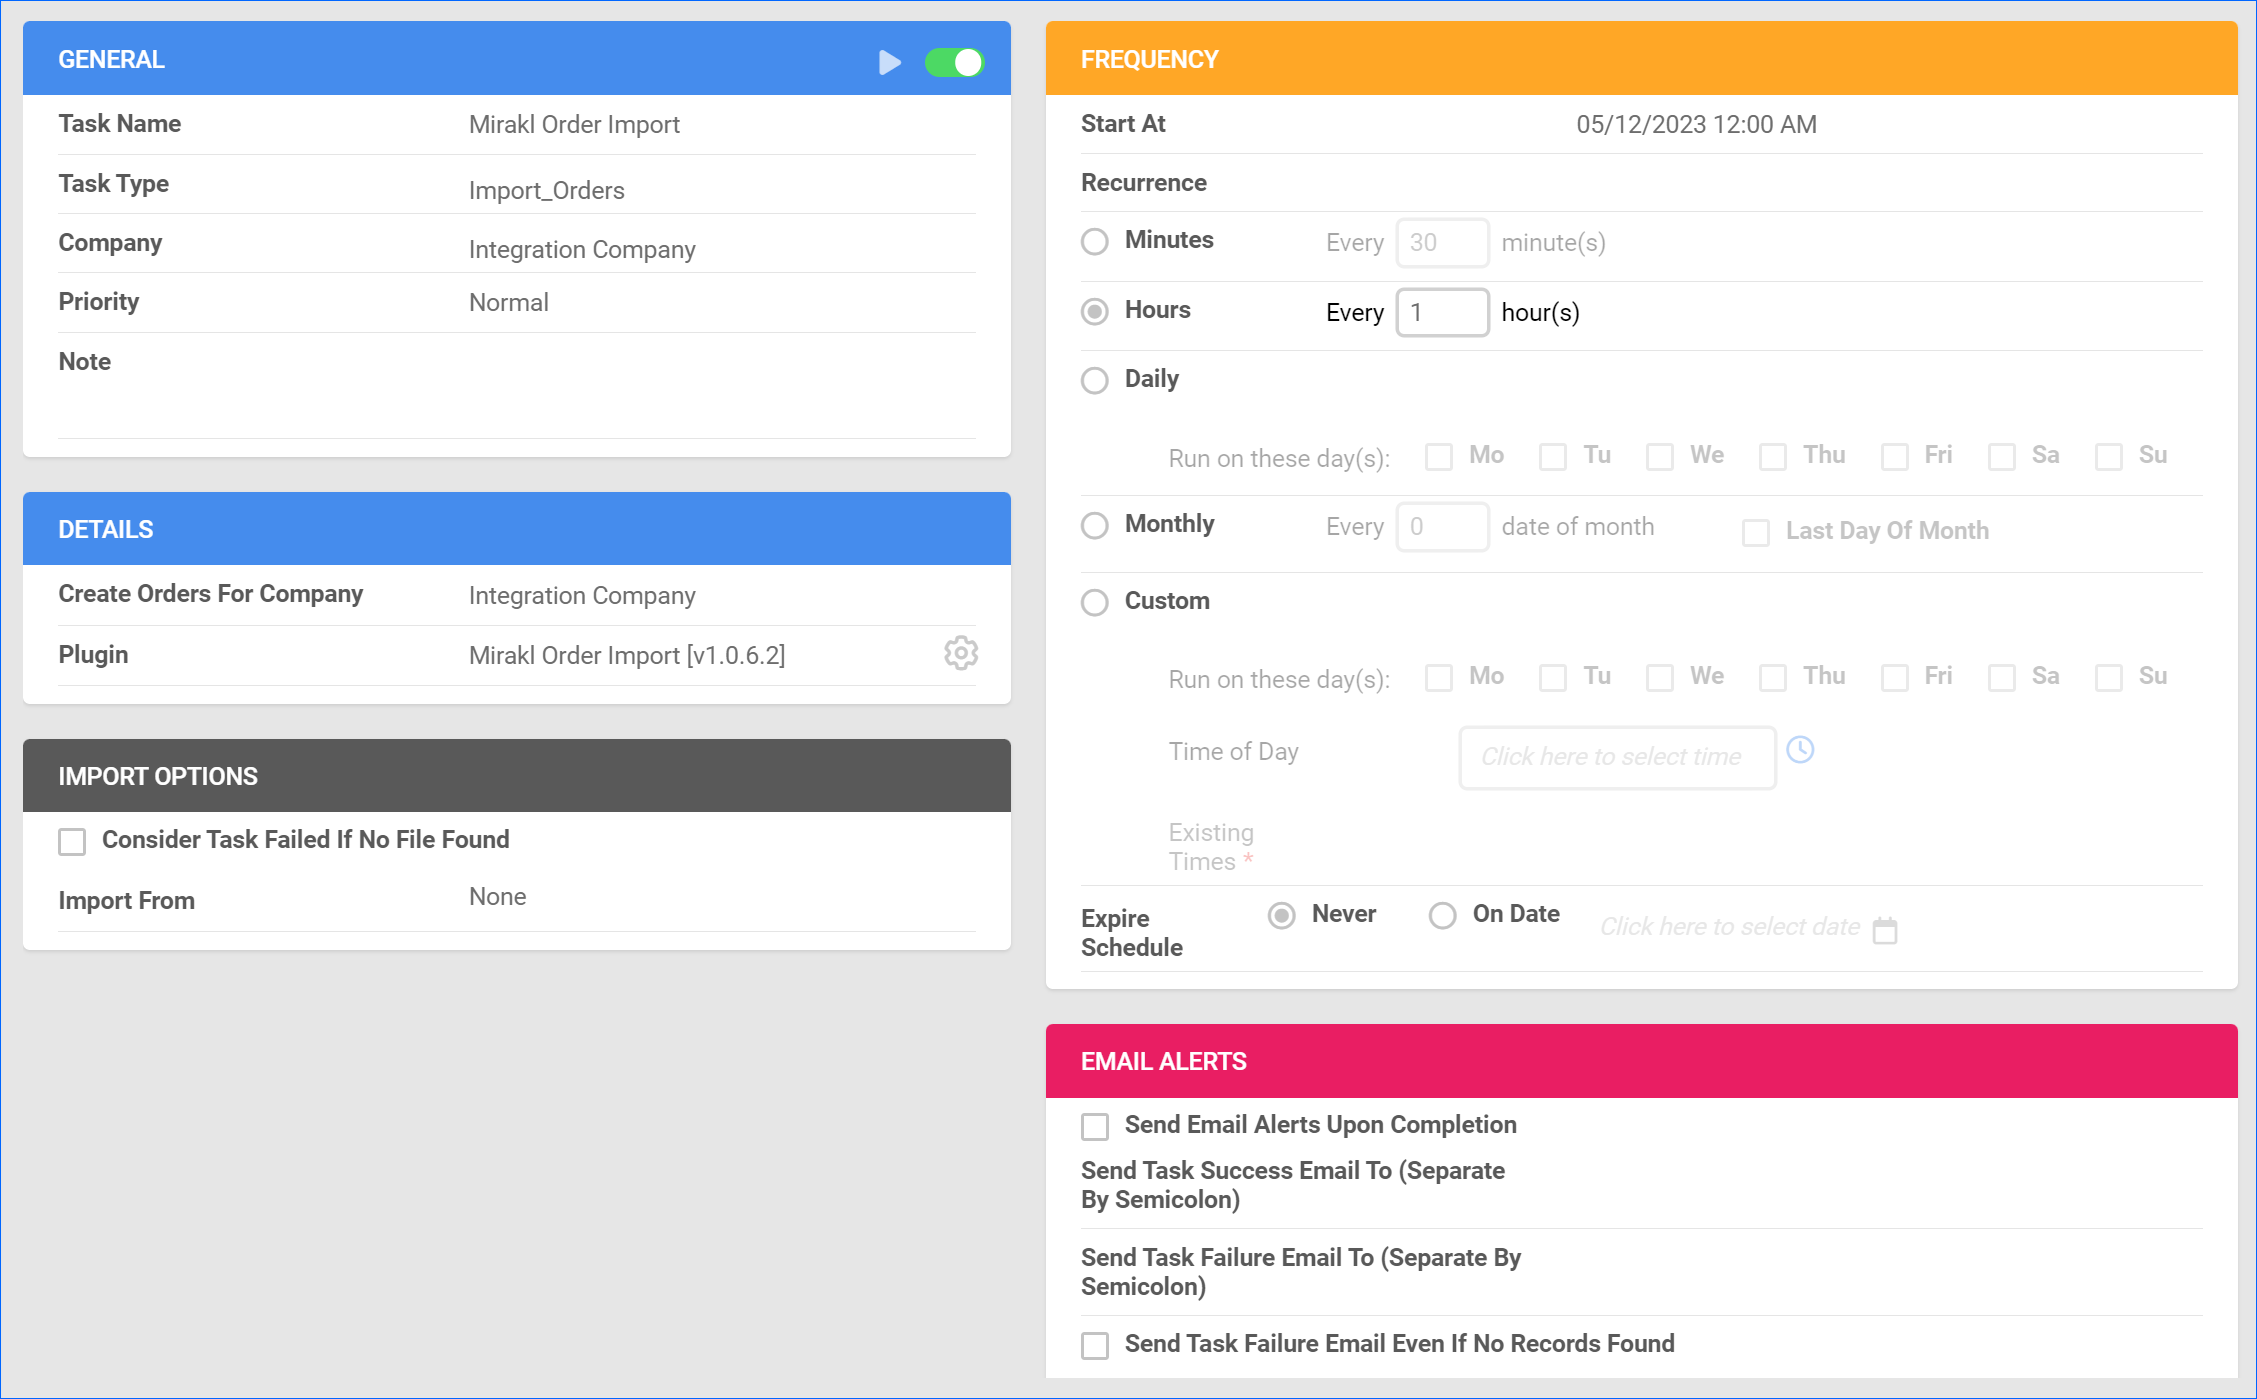
Automate Order Import
To create a Scheduled Task that regularly imports orders from Darty to Sellercloud:
- Go to Settings > Scheduled Tasks > Manage Scheduled Tasks.
- Click the green + icon: Create New Scheduled Task.
- Complete as follows:
- Click Task Type and select Import Orders.
- Set the Task Name.
- Select the Company.
- Select the Start Time.
- Click Create, and the new Scheduled Task page will load on your screen.
- Click the Edit button on the top right.
- In the Details panel:
- Click the Create Orders For Company menu and select the company you designated for this integration.
- Click the Plugin menu and select Mirakl Order Import.
- In the Import Options panel, set Import From to None.
- In the Frequency panel, specify the task frequency. For optimal performance, select a range between thirty minutes and one hour.
- In the General panel, click the Enable toggle button.
- Click Save on the top right.
Tracking Export
This plugin exports the shipping carrier and tracking number and then marks the order as shipped on Mirakl.
The tracking confirmation is saved to the order action documents as a TrackingUpload_PreShip. If it’s successful, the plugin will skip tracking updates for this order and try sending a shipping confirmation.
The shipping confirmation is saved to the order action documents as a TrackingUpload. If it’s successful, the plugin will skip sending it again. Before you move on, create a Saved Search for orders filtered by:
- Company – Choose the integration company
- Order Status – InProcess Or Completed
- Shipping Status – FullyShipped
- Payment Status – Charged
- Tracking Uploaded – No
![]()
Automate Tracking Export
To create a Scheduled Task that regularly exports order tracking from Sellercloud to Darty:
- Go to Settings > Scheduled Tasks > Manage Scheduled Tasks.
- Click the green + icon: Create New Scheduled Task.
- Complete as follows:
- Click Task Type and select Export Orders.
- Set the Task Name.
- Select the Company.
- Select the Start Time.
- Click Create, and the new Scheduled Task page will load on your screen.
- Click the Edit button on the top right.
- In the Details panel:
- Click the User ID menu and select your ID.
- Click the Saved Search menu and select the saved search you created earlier.
- Click the Export Via menu and select Mirakl Order Tracking Export.
- Check Mark Orders As Exported.
- Check This Is Tracking Export.
- In the Export Options panel, set Export To to None.
- In the Frequency panel, specify the task frequency. For optimal performance, select a range between thirty minutes and one hour.
- In the General panel, click the Enable toggle button.
- Click Save on the top right.
![]()
Inventory Export
This plugin exports available inventory, prices, and offer start and end dates from Sellercloud to Darty.
It matches products by Mirakl SKU (the Sellercloud product ID is used if Mirakl_SKU is missing). Here are some key details:
- You set the product price in the custom column MIRAKL_PRICE.
- The description is the product’s name in Sellercloud.
- You set the offer start and end dates in the custom columns MIRAKL_AVAILABLE_STARTED and MIRAKL_AVAILABLE_ENDED.
- Do not update more than 60,000 products per hour, or you will reach the limit of 60 API calls per hour.
Safety Quantity Workflows
There are two Safety Quantity workflows that function as follows:
- The Basic Safety Qty workflow, when Mirakl_Enable_Advanced_Safety_Qty is missing or False.
- Aggregate inventory from all sellable warehouses or from the specified ones (if Mirakl_Warehouse_IDs is not empty) – MIRAKL_SAFETY_QTY custom column.
- The Advanced Safety Qty workflow, when Mirakl_Enable_Advanced_Safety_Qty is True.
- Quantity to Export = (Total Available Quantity * Mirakl_Inventory_Percent) – Amazon Safety Qty
- Quantity = Aggregate inventory from all sellable warehouses or from the specified ones (if Mirakl_Warehouse_IDs is not empty)
- Amazon Safety Qty = Amazon safety quantity, either on the product or company level, depending on Use Company Default.
- If a product has the MiraklMaxQtyEnabled column set to True, and the exported quantity is greater than the MiraklMaxQty value, then the latter will be exported.
The Basic and Advanced Safety Qty workflows will never export negative values. In such a case, they will export 0 instead.
Prepare Products
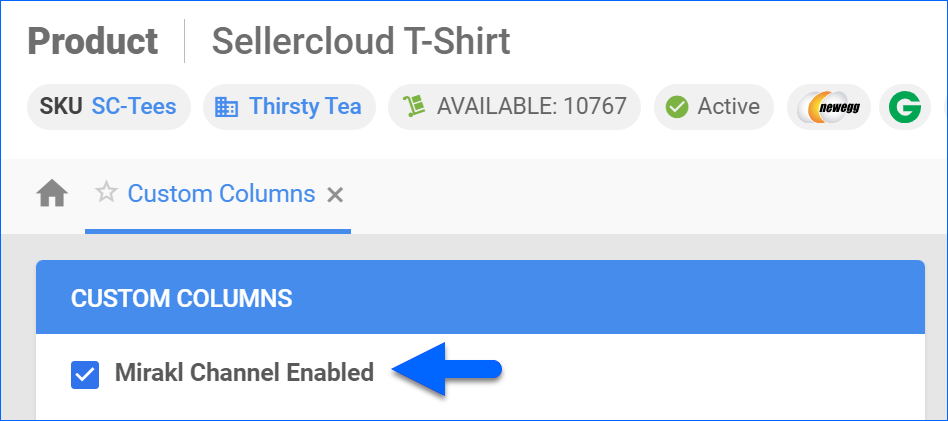
Make sure to enable your products for Darty by setting their Darty_Enabled Custom Column for Products to True:
- For one product at a time: go to the Product Details Page > click Toolbox and select Custom Columns > click Edit, update the Darty_Enabled column, and Save.
- For multiple products in bulk: follow the steps to Bulk Update Products and use the Darty_Enabled column – set it to True for all products you want to enable.
 Before you move on, create a Saved Search for products filtered by Darty_Enabled – True. Optionally, you can add more filters to the search.
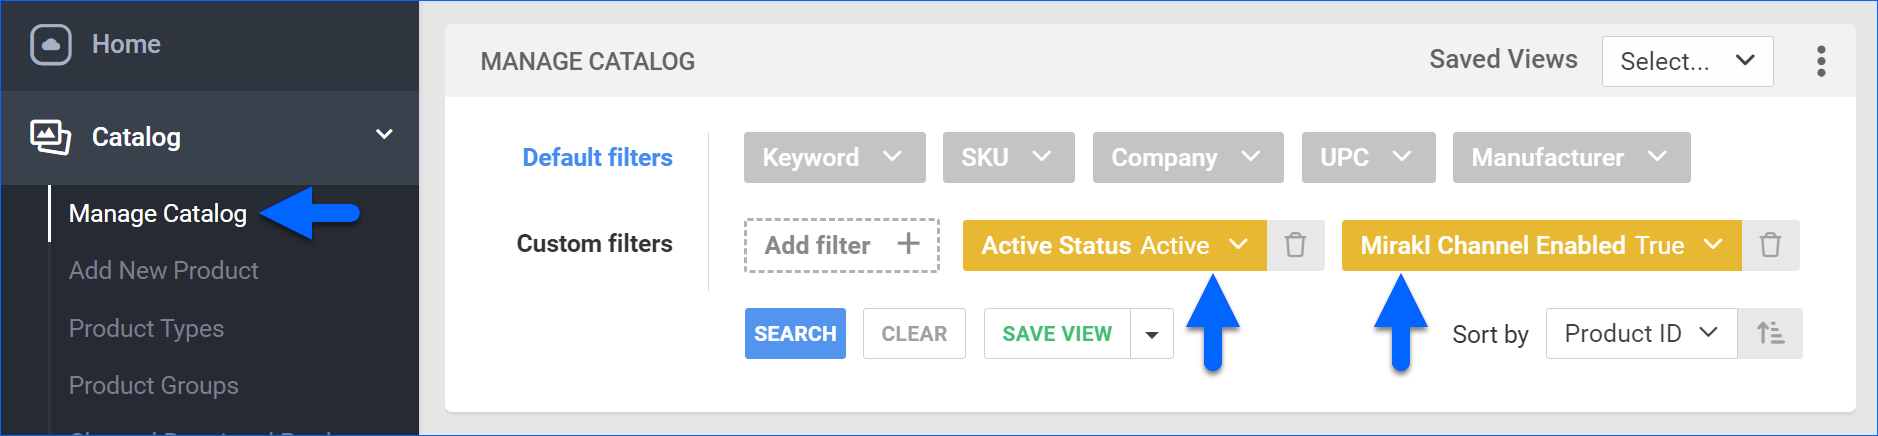
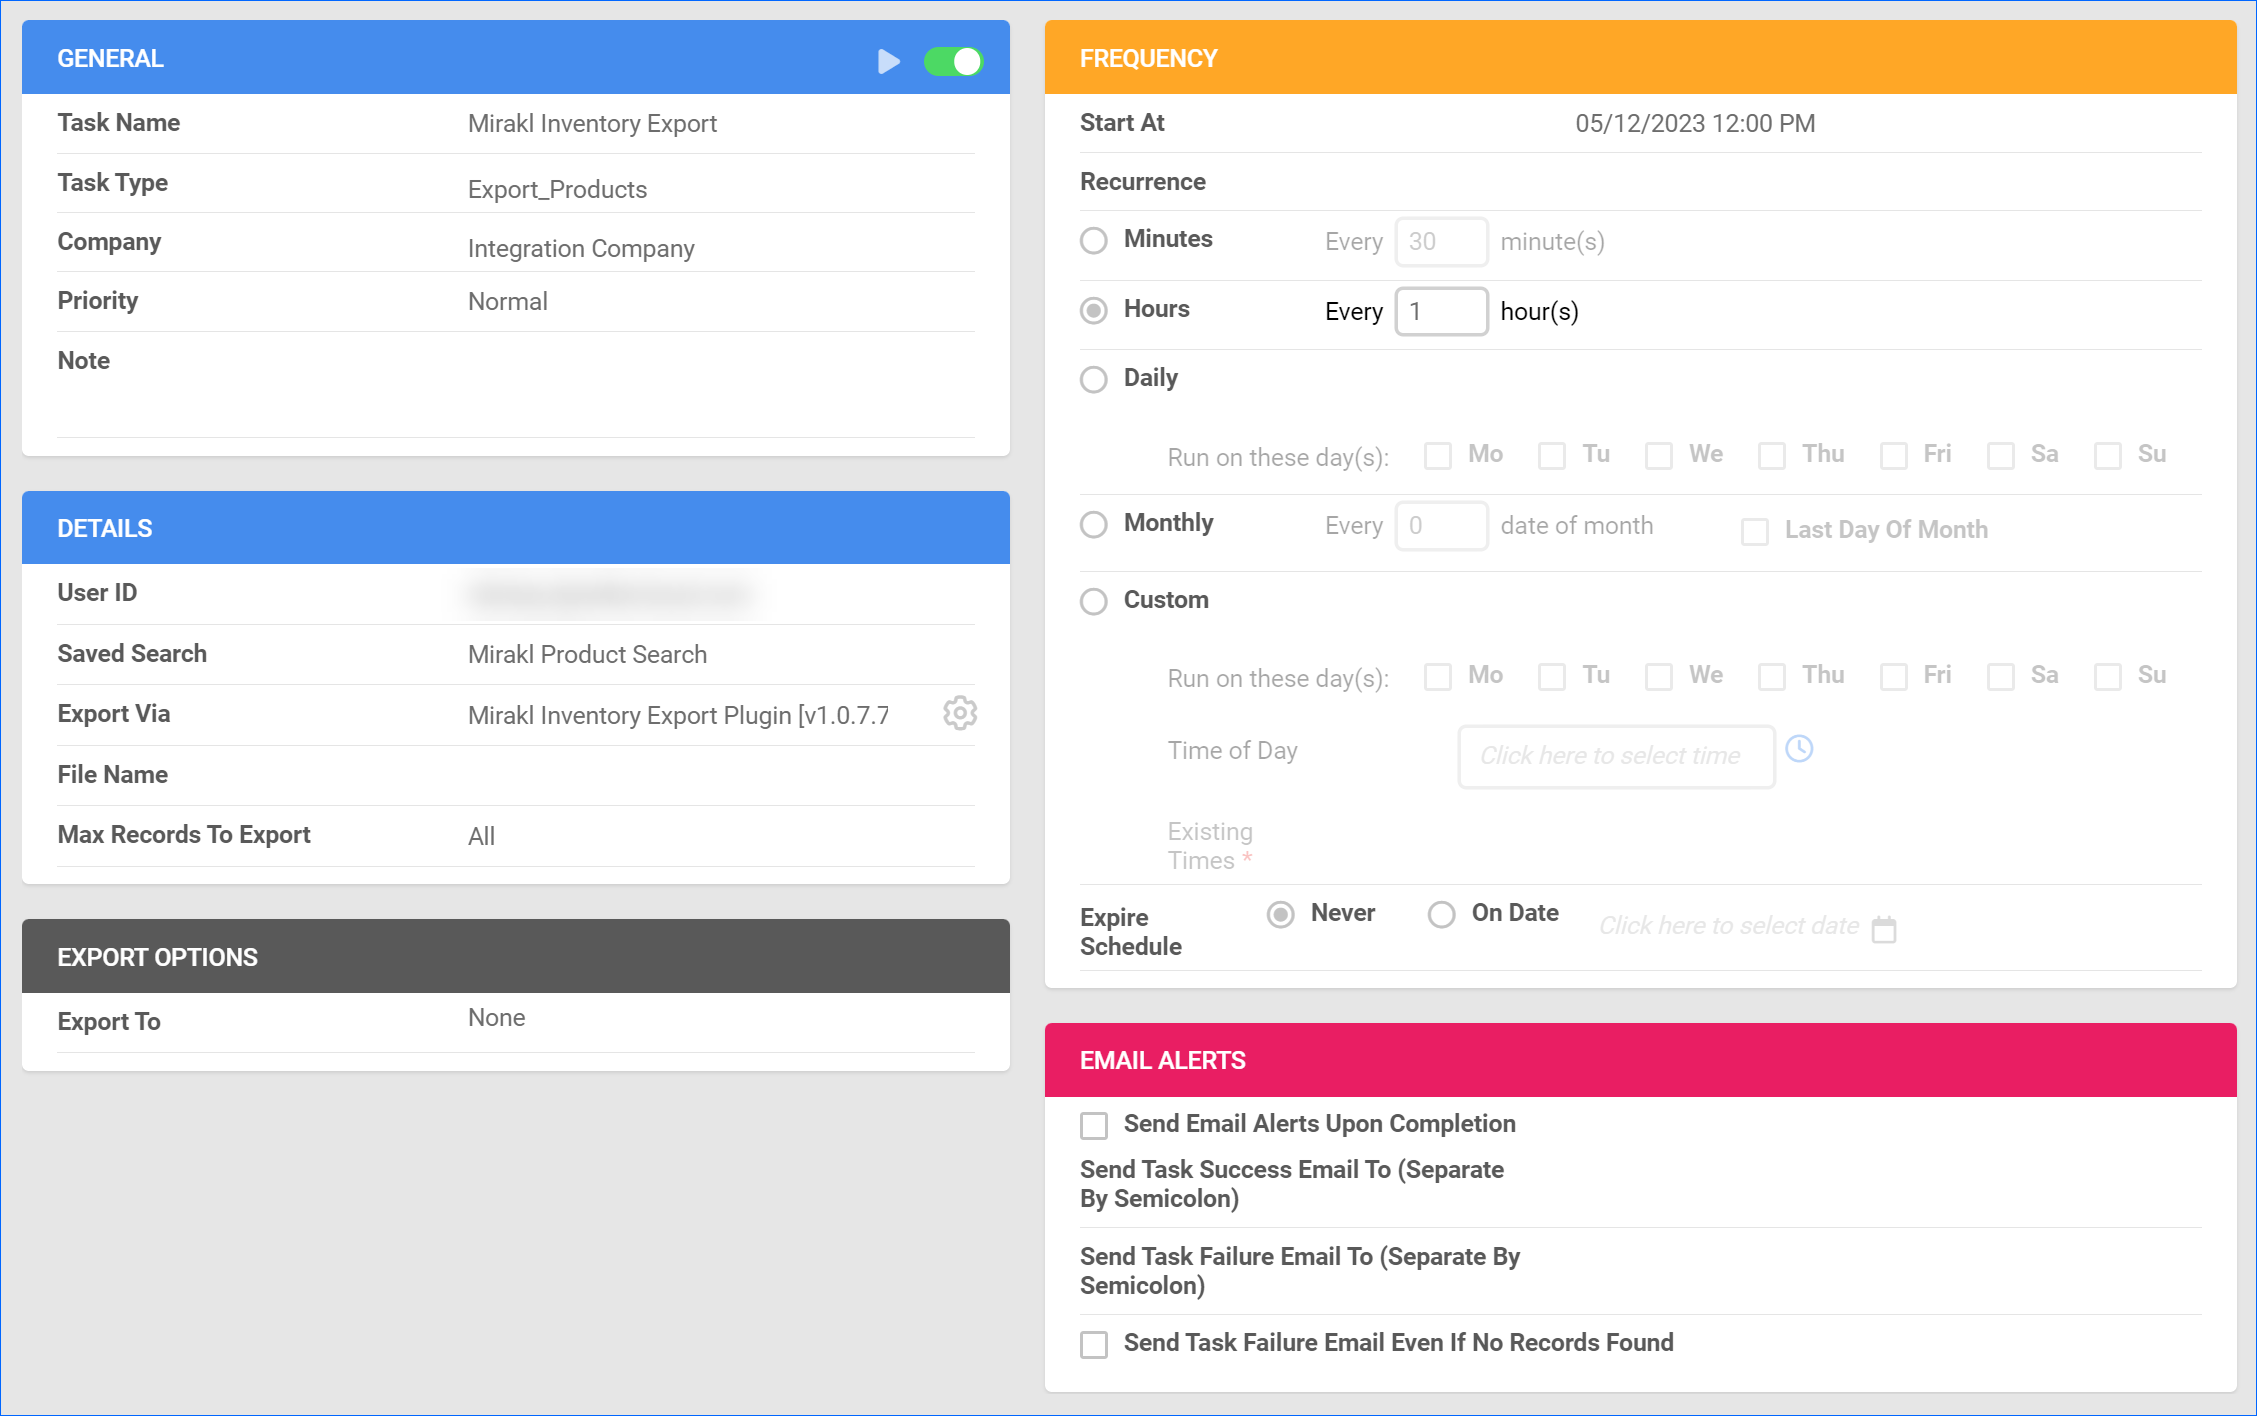
Automate Inventory Export
To create a Scheduled Task that regularly exports inventory from Sellercloud to Darty:
- Go to Settings > Scheduled Tasks > Manage Scheduled Tasks.
- Click the green + icon: Create New Scheduled Task.
- Complete as follows:
- Click Task Type and select Export Products.
- Set the Task Name.
- Select the Company.
- Select the Start Time.
- Click Create, and the new Scheduled Task page will load on your screen.
- Click the Edit button on the top right.
- In the Details panel:
- Click the User ID menu and select your ID.
- Click the Saved Search menu and select the saved search you created earlier.
- Click the Export Via menu and select Mirakl Inventory Export Plugin.
- In the Export Options panel, set Export To to None.
- In the Frequency panel, specify the task frequency. For optimal performance, select a range between thirty minutes and one hour.
- In the General panel, click the Enable toggle button.
- Click Save on the top right.
RMA Import
This plugin downloads completed refunds from Mirakl and creates them in Sellercloud. Orders that are in process and with a closed full refund will be marked as completed.
Automate RMA Import
To create a Scheduled Task that regularly imports RMAs from Darty to Sellercloud:
- Go to Settings > Scheduled Tasks > Manage Scheduled Tasks.
- Click the green + icon: Create New Scheduled Task.
- Complete as follows:
- Click Task Type and select Import RMA.
- Set the Task Name.
- Select the Company.
- Select the Start Time.
- Click Create, and the new Scheduled Task page will load on your screen.
- Click the Edit button on the top right.
- In the Details panel, click the Plugin menu and select Mirakl RMA Import.
- In the Import Options panel, set Import From to None.
- In the Frequency panel, specify the task frequency. For optimal performance, select a range between thirty minutes and one hour.
- In the General panel, click the Enable toggle button.
- Click Save on the top right.
