Overview
Magento Conduit is a configuration appropriate if you have an extension with Magento to your master system and are only using Sellercloud as a listing tool and a central repository for orders from multiple channels. With this integration:
- Products are created in Magento and imported to Sellercloud.
- Inventory and Prices can be managed from Sellercloud to update Magento.
- Inventory and Prices can also be managed and synced from Magento to Sellercloud if you are using Magento 1.
- Orders are exported from Sellercloud and imported to Magento.
- Tracking is exported from Magento and imported to Sellercloud.
- Categories and Attributes can be managed from either platform.
Prerequisites
Open a ticket with Sellercloud Support to obtain the plugins required for this integration and have them installed on your server:
- SCME SYNC For Magento 1.x – Use this plugin for Magento 1.
- Magento2 Conduit SCME SYNC Plugin – Use this plugin for Magento 2.
- Magento Inventory Import – This plugin should be placed in the Products folder on the server. A CSV generator page should exist on the site – for example, site.com/_export/_product/csv.php.
The Magento Inventory Import plugin is only compatible with Magento 1. - SCOrderSync and SCOrderSyncTrackingImport – These plugins should be placed in the Order Export folder on the server. Magento Version 1 and Version 2 use different SCOrderSync plugins, so be sure to use the correct plugin.
Create the following Custom Company Settings:
- Magento_UseMerchantSkuForProductId – Enter True if you want the Order Export plugin to use the Magento Merchant SKU instead of the main SKU. If there is no Merchant SKU, the main SKU will be used.
- Magento_SendWithoutTax_ForOrderExport (Optional) – Enter True to send 0 for tax and deduct it from the Total. If you don’t create this setting or set it to False, tax will be sent as normal.
- Magento Inventory Import Warehouse ID – Enter the ID of the Warehouse with products you want to update with the Magento Inventory Import plugin for Magento 1.
Enable the following Magento Account Settings:
- Enable Custom Plugin For Communication – Activate the custom plugins for Magento.
- Custom Plugin Base URL – The URL of the target Magento site to which orders selected by the plugin will be exported.
- Enable Plugin For Order Management – Enable Magento order management.
- Enable Plugin For Inventory Management – Enable Magento inventory management.
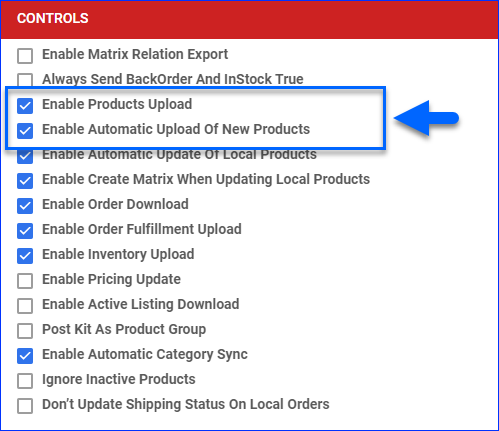
- Enable Products Upload – Enable to allow posting of new products to Magento.
- Enable Automatic Upload Of New Products – Products that have been modified within the last 24 hours in Sellercloud will be automatically updated on Magento.
- Enable Automatic Update Of Local Products – Products will be downloaded from Magento and created in Sellercloud. Images will also be downloaded and mapped to the Image Manager
- Enable Inventory Upload – Enable to start updating inventory data on Magento automatically.
- Enable Pricing Update – Enable to start updating product prices on Magento automatically.
- Don’t Update Shipping Status On Local Orders – By default, if a Sellercloud order is marked as On Hold and the order status on Magento gets changed to Closed, Complete, or Processing, Sellercloud’s Order Status will update accordingly. With this setting enabled, the On Hold status will not be changed.
Set up Magento Conduit
To set up Magento Conduit:
- Follow the steps to Integrate Magento into Sellercloud.
- Extract the scordersync folder from the SCOrderSync plugin’s zip file and upload it to your Magento FTP’s root folder.
- Go to this URL in your browser Replace yoursite.com with your site’s domain in this URL https://yoursite.com/scme_sync/install and then open it in your browser.
- Deploy the SCME SYNC plugin on your Magento FTP.
- Install the SCME SYNC and SCOrderSync plugins on Magento Admin.
If you install the SCME SYNC plugin for Magento 2, make sure to place the Sync folder under the site’s root/app/code/Sellercloud folder and run the setup:upgrade command. In addition, note that with this plugin, a Sync Orders menu will be available on Magento Admin > Content > Sellercloud Sync. - In Magento Admin, go to Systems > Magento Connect > Magento Connect Manager. Then, choose the SCME SYNC plugin’s zip file and upload the package file.
- Next, go to System > Configuration > SCME: SELLERCLOUD EXTENSION > SCME Sync Setup. Then, enable Sync On Front End.
After completing these steps, the Sales tab will have two new options: SCME Orders and SCME Job.
- SCME Order displays orders exported to Magento. It will have columns for the Sellercloud. orderID, the OrderSourceOrderID, and the Magento OrderID. You do not manage the orders on this page; they are only there so they can be linked to Sellercloud. You manage orders on the regular Magento Sales page > SCME Synced Orders.
- SCME Job displays the exported XML data and error messages.
Manage Products
With the Magento Conduit setup, you can update your Magento listings from Sellercloud. If you have integrated a Magento 1 site, you can also do the opposite and import inventory and prices from Magento to Sellercloud.
Update on Magento from Sellercloud
Products modified in the last 24 hours in Sellercloud can be automatically updated on Magento.
To enable automatic product updates:
- Go to Company Settings.
- Click Toolbox and select Magento > General Settings.
- Click Edit.
- In the Controls panel, check Enable Automatic Upload Of New Products. For this to work, you must also enable the Enable Products Upload setting.
- Click Save.
Update on Sellercloud from Magento
With the Magento Inventory Import plugin for Magento 1, you can import inventory and prices from Magento to Sellercloud.
Once the plugin is installed, create a Saved Search for products filtered by:
- Company – The company used for the integration
- Optionally, you can add more filters to update only specific products.
Then, to create a Scheduled Task for the import:
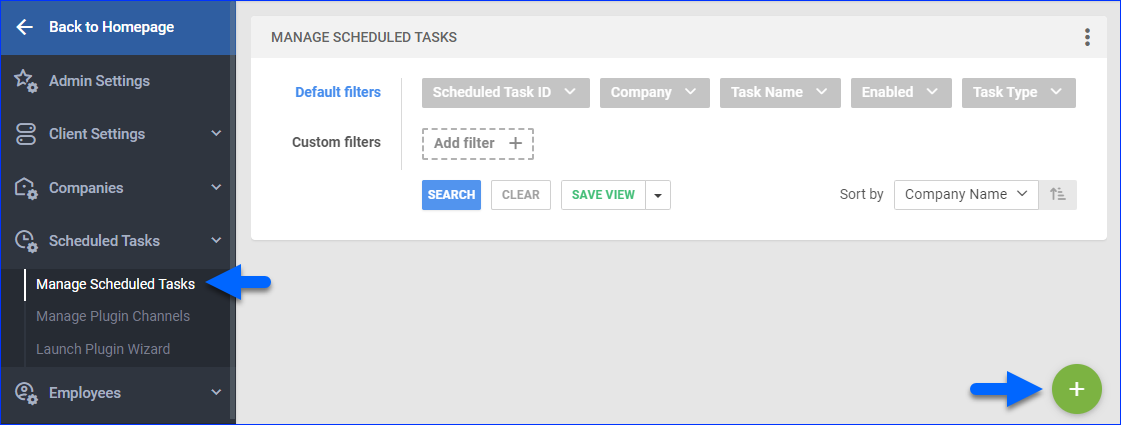
- Go to Settings > Scheduled Tasks > Manage Scheduled Tasks.
- Click the green + icon: Create New Scheduled Task.
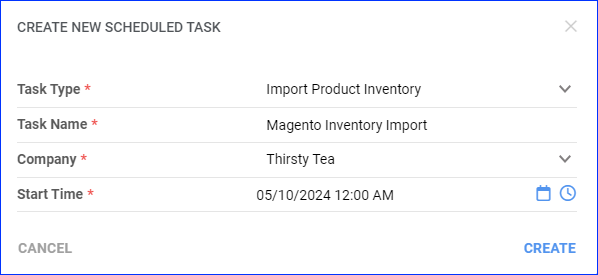
- Complete as follows:
- Set the Task Type to Import Products.
- Set the Task Name.
- Select the Company.
- Select the Start Time.
- Click CREATE.
- The following message appears at the bottom of your screen: “Scheduled task created successfully. Click Here to configure the task details.” – click the link.

- Click the Edit button in the top right.
- In the Details section:
- Click the Create Products For Company menu and select the company.
- Click the Plugin menu and select Magento V1 Inventory Import.
- In the Export Options section, Export To must be None, as it is by default.
- In the Frequency section, specify the task frequency. For optimal performance, select a range between thirty minutes and one hour.
- In the General section, click the Enable toggle button.
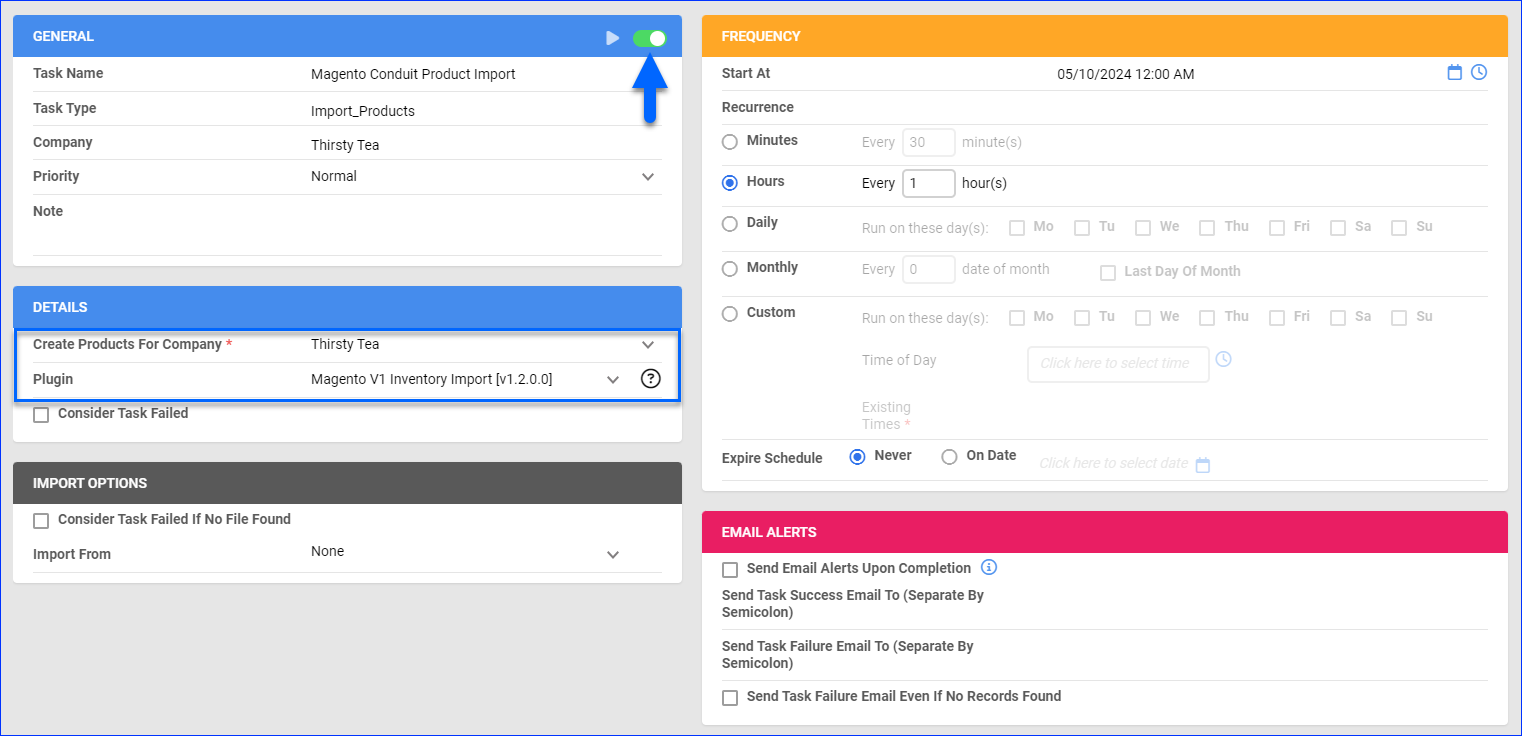
- Click Save in the top right.
Export Orders
The Custom Plugin Base URL specified in your Magento Account Settings is the URL of the target Magento site where the orders selected by the plugin will be exported.
Note the following details:
- The same orders will not be exported more than once.
- Items in exported orders must be present in Magento.
- Order items must have available inventory and their stock status set to in-stock.
- If an order item is a Variation Product, the dimension values in Sellercloud must match the variation in Magento exactly. For example, “Medium” and “MED” are not an exact match and, therefore, would cause an order export to fail.
- While generating an XML file to export, the order payment method will be set to ccsave(credit card save), VISA, 4111 1111 1111 1111. The expiration month and year are dynamic now. This is done because channel payment methods are often invalid payment methods on Magento.
- The orders’ Shipping Carrier and Shipping Method will be sent to Magento. The Shipping Method Mapping will be considered first; if not mapped, the shipping service will be sent as originally selected on the order.
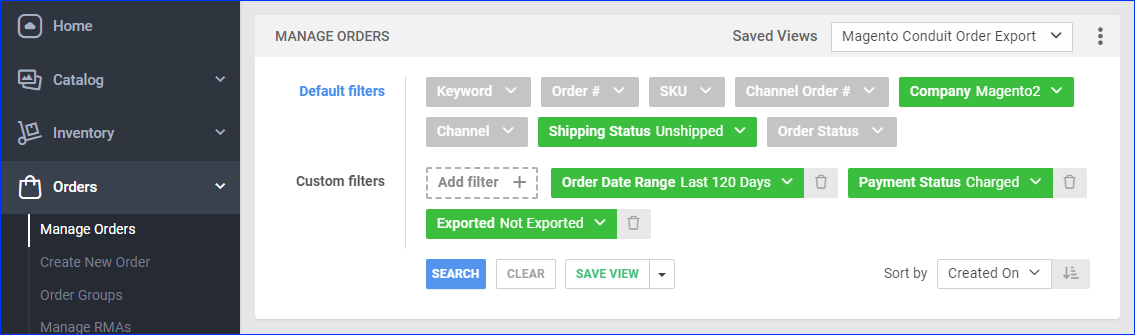
Before you move on, create a Saved Search for orders filtered by:
- Company – The company used for the integration
- Payment Status – Charged
- Shipping Status – Unshipped
- Exported – Not Exported
Automate Order Export
To create a Scheduled Task that sends orders to Magento:
- Go to Settings > Scheduled Tasks > Manage Scheduled Tasks.
- Click the green + icon: Create New Scheduled Task.
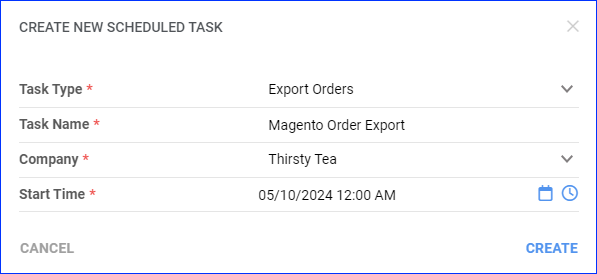
- Complete as follows:
- Set the Task Type to Export Orders.
- Set the Task Name.
- Select the Company.
- Select the Start Time.
- Click CREATE.
- The following message appears at the bottom of your screen: “Scheduled task created successfully. Click Here to configure the task details.” – click the link.
- Click the Edit button in the top right.
- In the Details section:
- Click the User ID menu and select your username.
- Click the Saved Search menu and select the saved search you created earlier.
- Click the Export Via menu and select OrderSync Sellercloud To Magento Order Export.
- Check Mark Orders As Exported.
- In the Export Options section, Export To must be None, as it is by default.
- In the Frequency section, specify the task frequency. For optimal performance, select a range between thirty minutes and one hour.
- In the General section, click the Enable toggle button.
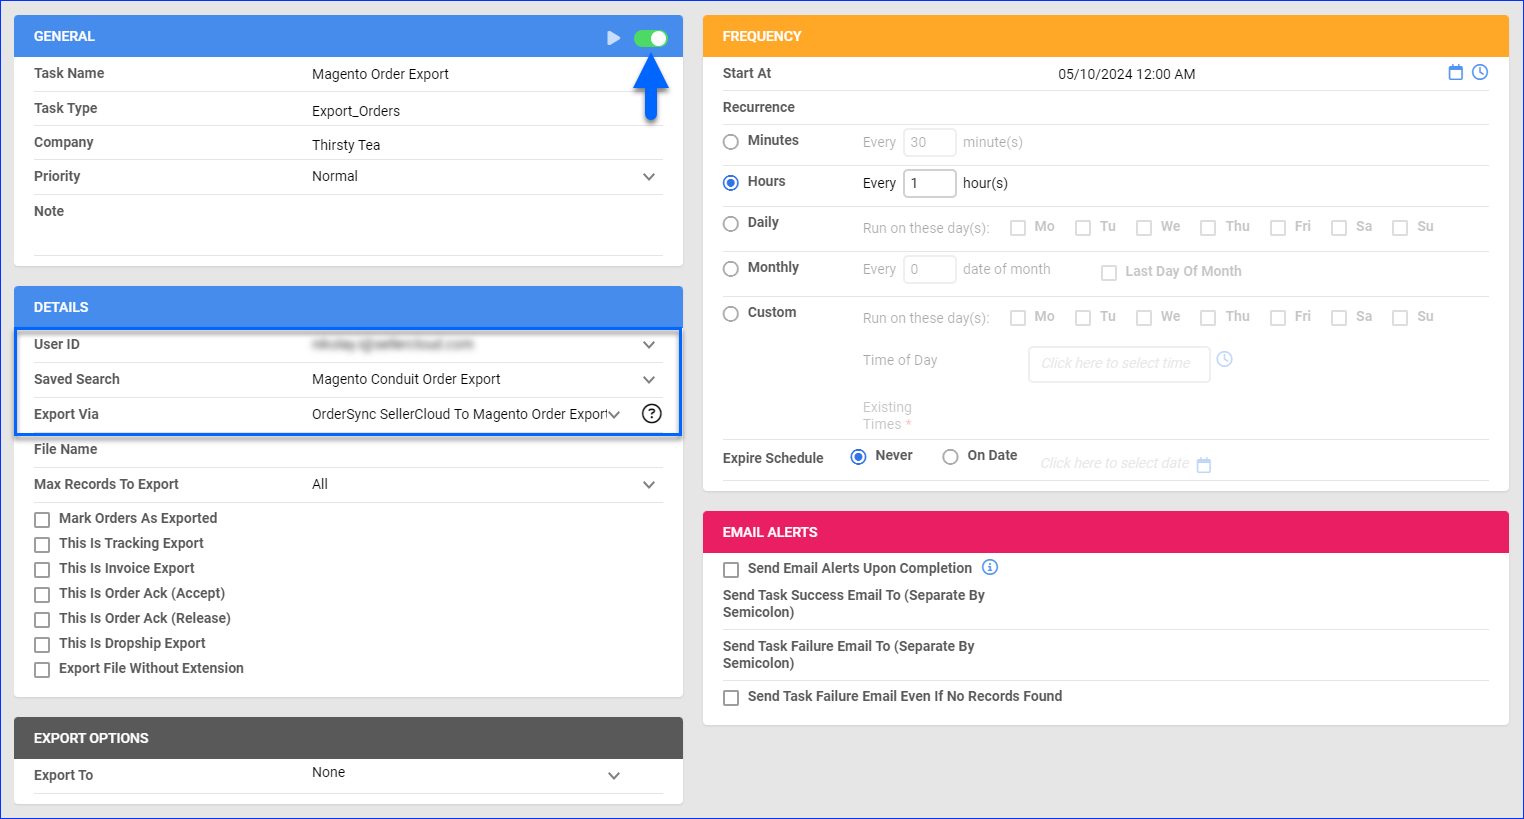
- Click Save in the top right.
Import Tracking
Before you move on, create a Saved Search for orders filtered by:
- Company – The company used for the integration
- Payment Status – Charged
- Shipping Status – Unshipped
- Exported – Exported
![]()
Automate Tracking Import
To create a Scheduled Task that exports order tracking:
- Go to Settings > Scheduled Tasks > Manage Scheduled Tasks.
- Click the green + icon: Create New Scheduled Task.
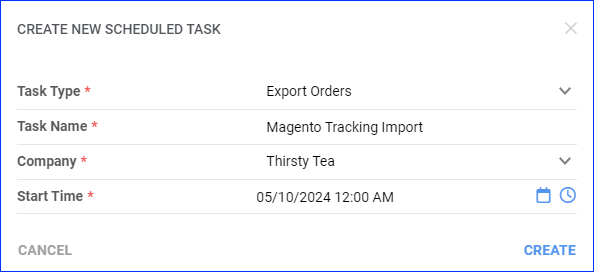
- Complete as follows:
- Set the Task Type to Export Orders.
- Set the Task Name.
- Select the Company.
- Select the Start Time.
- Click CREATE.
- The following message appears at the bottom of your screen: “Scheduled task created successfully. Click Here to configure the task details.” – click the link.
- Click the Edit button in the top right.
- In the Details section:
- Click the User ID menu and select your username.
- Click the Saved Search menu and select the saved search you created earlier.
- Click the Export Via menu and select OrderSync Magento To Sellercloud Tracking Import.
- In the Export Options section, Export To must be None, as it is by default.
- In the Frequency section, specify the task frequency. For optimal performance, select a range between thirty minutes and one hour.
- In the General section, click the Enable toggle button.

- Click Save in the top right.