Overview
WooCommerce is a customizable, open-source eCommerce plugin for WordPress designed to help businesses create and manage online stores. It offers features like product management, payment integration, and shipping options, making it ideal for both small and large-scale online retail.
You can integrate your WooCommerce website into Sellercloud via API, allowing you to manage your listings and inventory, download orders, and send tracking. This article covers the initial setup and general configuration of the integration. For details about product management, see WooCommerce Product Features.
If necessary, you can open a ticket with Sellercloud Support to request additional customizations or other plugins for this integration. Any such modifications will be billable.
Prerequisites
Open a ticket with Sellercloud Support to request the plugins for this integration:
- WooCommerce DLL – To be installed on your Sellercloud server.
- WooCommerce PHP – To be installed on your WordPress website. Sellercloud Support will attach it to the ticket in a .ZIP format.
- Download the .ZIP file and extract it. Upload the scwoo folder from the archive to the root directory of your website (where your WordPress files like wp-config.php are located). This step requires access to your website hosting account, either through an FTP client (like FileZilla) or your hosting provider’s file manager (such as cPanel or Plesk).
- Ensure that the scwoo folder has execution permissions set to 775 or 777. Then, install the .ZIP file by going to https://www.{website.com}/scwoo/install. For example, if the website is https://www.site.com/ you would go to https://www.site.com/scwoo/install to run the plugin installation. If it doesn’t work, try to change the file permissions to 644 while leaving the folder permissions as 755.
Integrate WooCommerce
To integrate WooCommerce into Sellercloud, first, you must first obtain your Consumer Key and Consumer Secret:
- Go to WordPress Admin > WooCommerce > Settings.
- Go to Advanced > REST API.
- Click Add Key.
- Enter a Description.
- Select your admin user.
- Enable Read and Write permissions.
- Click Generate API Key, and you will see a Consumer Key and Consumer Secret. You’ll need them in the following steps.
Next, to set up and test the connection in Sellercloud:
- Go to Company Settings.
- Click Toolbox and select Website > General.
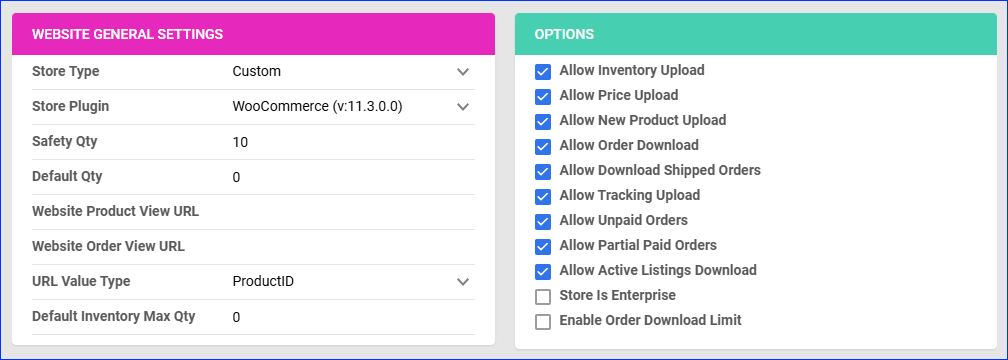
- Set the Store Type to Custom.
- Set the Store Plugin to WooCommerce.
- Click Save and refresh the page to ensure the changes have been applied. Optionally, you can also configure the remaining Website General settings and Options, or come back and do it later.
- Click Toolbox and select Website > Sellercloud Plug-In Website > Cart General. The WooCommerce plugin should be selected in the Select Plugin setting.
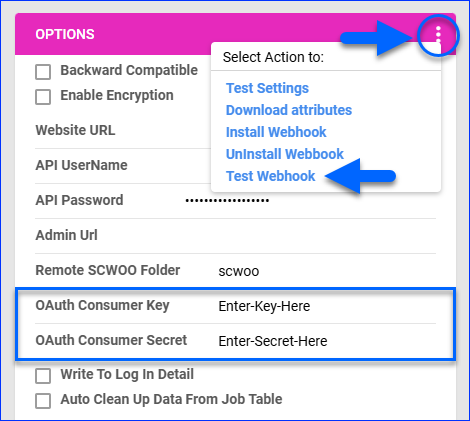
- Click Edit. In the Options panel to the right, enter your Website URL.
- Enter the Consumer Key into the OAuth Consumer Key field and the Consumer Secret into the OAuth Consumer Secret field.
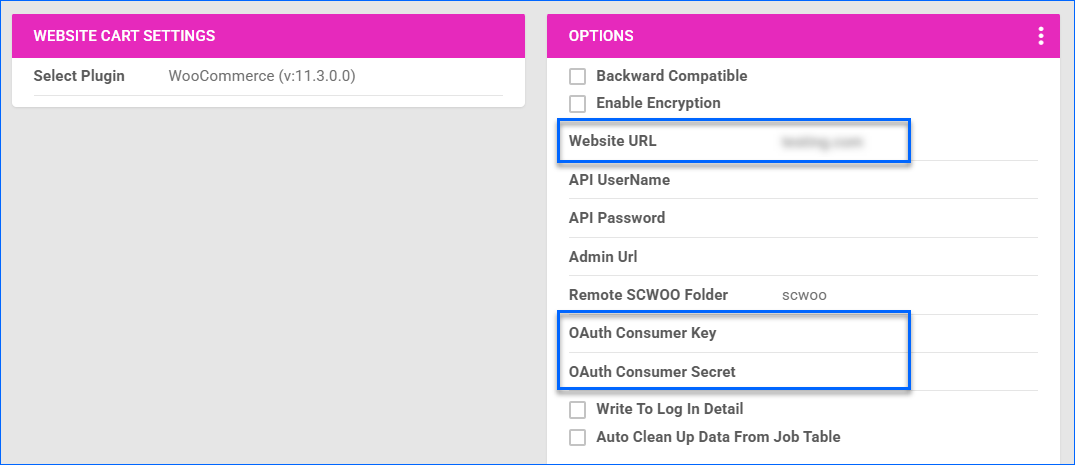 Alternatively, you can switch to a username and password-based authentication by enabling the Backward Compatible Cart General setting. This method uses the WooCommerce Admin username and password, and you must enter your credentials in the API UserName and API Password fields instead.
 - Configure the remaining Cart Settings per your preference and click Save. For example, by default, only orders with a Complete status will be downloaded. You may wish to enable Download Orders with Processing Status and Download Orders with On-Hold Status to import such orders as well.
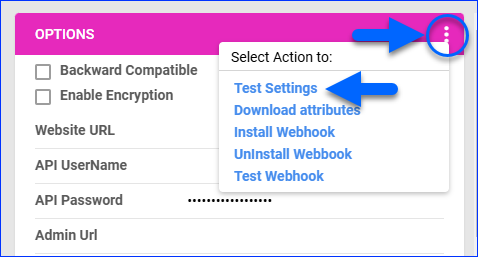
- Click the Three dots menu in the Options panel and select Test Settings to create the database scripts automatically.
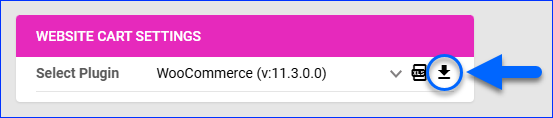
- Click Toolbox and select Website > Sellercloud Plug-In Website > Cart Categories. The WooCommerce plugin should be selected in the Select Plugin setting.
- Click the Re-Download Categories icon, and the categories will appear on the page and on each product’s Website Properties page. For more information, see Website Categories.
WooCommerce General Settings
By automating key processes and customizing your workflow, you can save valuable time and enhance overall efficiency. To open the WooCommerce General Settings, go to Company Settings, then click Toolbox and select Website > General.
The table below lists and defines all Website General settings available for WooCommerce:
Website General
| Setting | Description |
| Store Type | Choose a core-integrated or plugin website from the dropdown. In this case, select Custom and then set the Store Plugin to WooCommerce. |
| Safety Qty | A buffer between the amount of inventory you have and the amount Sellercloud is sending to WooCommerce to prevent overselling of items in high demand. This will be the Safety Quantity used for your products where Use Default is checked on their Website properties. |
| Default Qty | This only applies to Replenishable Products. For these products, the Default quantity is the amount that will always be sent to WooCommerce in inventory updates regardless of the actual available inventory. This will be the Default quantity used for your products where Use Default is checked on their Website properties. |
| Website Product View URL | The link to your website’s products page. |
| Website Order View URL | The link to your website’s orders page. |
| URL Value Type | Select the product identifier for the preview links:
|
| Default Inventory Max Qty | A default Maximum Inventory Quantity. Limits the inventory available for WooCommerce. |
Options
| Setting | Description |
| Allow Inventory Upload | Enable Sellercloud to send automatic inventory updates to WooCommerce regularly. Only enable this setting once you are ready to have Sellercloud control your inventory on WooCommerce.
Products that are not Website Enabled will be updated with a quantity of zero. To Bulk Update them, use the column header WebEnabled and set it to True.
|
| Allow Price Upload | Enable Sellercloud to send automatic price updates for Website Enabled products to WooCommerce regularly. |
| Allow New Product Upload | Allow new products to be posted on WooCommerce from Sellercloud. This action is available both individually and In Bulk. |
| Allow Order Download |
Enable automatic order download from WooCommerce to your Sellercloud account. |
| Allow Download Shipped Orders | Allows orders marked as shipped to be automatically downloaded from WooCommerce to your Sellercloud account. |
| Allow Tracking Upload |
Enable Sellercloud to upload fulfillment information for orders placed on WooCommerce automatically.
The WooCommerce Shipment Tracking plugin is required for this workflow. Refer to the Tracking section for more details.
|
| Allow Unpaid Orders | Enable Sellercloud to download Unpaid Orders from WooCommerce to your Sellercloud account automatically. |
| Allow Partial Paid Orders |
Enable Sellercloud to download partially paid orders from WooCommerce to your Sellercloud account automatically. |
| Allow Active Listings Download | Allows product listing reports for active products to be automatically downloaded from WooCommerce to your Sellercloud account. |
| Store Is Enterprise | Not applicable to WooCommerce. |
| Enable Order Download Limit | Enable this setting to prevent orders created prior to a specified date from being downloaded into Sellercloud. You must also select an Order Download Limit Date. |
| Order Download Limit Date | Set the date in the calendar pop-up. |
WooCommerce Cart Settings
To open the Cart General Settings, go to Company Settings, then click Toolbox and select Website > Sellercloud Plug-In Website > Cart General
The table below lists and defines all Cart General settings available for WooCommerce:
| Setting | Description |
| Backward Compatible | Switch to username and password-based authentication instead of using the OAuth consumer key and secret. This method uses the WooCommerce Admin username and password instead. |
| Enable Encryption | With this setting enabled, Sellercloud will send the WooCommerce Admin username and password encrypted. |
| Website URL | Enter the URL of your website, including the HTTP or HTTPS protocol. For example: https://site.com. |
| API UserName | Enter the admin username for your WordPress site. |
| API Password | Enter the admin password for your WordPress site. |
| Admin Url | Enter the WordPress admin URL. |
| Remote SCWOO folder | Enter the name of the folder. Set it to scwoo. |
| OAuth Consumer Key | Your WooCommerce API consumer key. |
| OAuth Consumer Secret | Your WooCommerce API consumer key. |
| Write To Log In Detail | Record additional information like tracking docs and trace logs when logging WooCommerce-related details. May slow down performance. |
| Auto Clean Up Data from Job Table | To automatically delete historical and unwanted job data from the remote system, enable this setting and configure the php script at /scwoo/import/cleanjobs.php to run once daily using CRON. |
| Auto Clean Up Last Updated On | Store the last date and time that the Auto Clean Up Data from Job Table process ran. |
| Download Orders with Processing Status | Choose whether to import orders with a Processing status or not. |
| Download Orders with On-Hold Status | Choose whether to import orders with an On-Hold status or not. |
| Do Not Download Orders with Pre-Order Status | Choose whether to import orders with a Pre-Order status or not. |
| Order Import: Statuses To Ignore | Enter a comma-separated list of order statuses, and Sellercloud will skip importing such orders. |
| Order Import Mark All Orders Unpaid | Choose whether to mark all imported orders as Unpaid or not. |
| Post-tracking Order Status | An order status to set on WooCommerce after Sellercloud sends the tracking. The default status is Completed. |
| Post-tracking Order Note | An order note to post on WooCommerce after Sellercloud sends the tracking. |
| Tracking: Allow Update For All Order Statuses | By default, the order status on WooCommerce must be Processing for the order to be updated with tracking. With this setting enabled, Sellercloud will update tracking irrespective of the order’s current status. |
| Use Product Long Description In Export | Export your products’ Long Description to WooCommerce. If this setting is disabled, but the products have a Description Template, it will be sent instead. If a Description Template is not available, but the product has a Description Template ID, the ID will be sent. If neither is available, the products’ Long Descriptions will be sent even if this setting is disabled. |
| Product Addl Info Custom-Column/Plugin/Target-Field | Specify the Custom Column, plugin, and target field to send Additional Product Information to WooCommerce. This setting uses the Advanced Custom Fields (ACF) WordPress plugin. Enter this value into the setting: ADDITIONAL_INFO, advanced custom fields, additional_info. |
| Product Specs Custom-Column/Plugin/Target-Field | Specify the Custom Column, plugin, and target field to send Product Specifications to WooCommerce. Enter this value into the setting: SPECS, advanced custom fields, specs. |
| Product Export- Send Related Products To Linked Products | Send Related Products to the Linked Products tab on WooCommerce. |
| Use CSV to Download Active Listing | Downloads a remote product list with inventory and price details. Sellercloud uses this for active listing downloads. |
| Threshold for Product Export | Set a limit on how many products can be created or updated with a single Job. |
| Threshold for InvPrice Export | Set a limit on how many products can have their inventory and/or price updated with a single job. |
| Threshold for Order Download | Set a limit on how many orders can be downloaded with a single job. |
| Product Export- Send Item Includes To Yikes Tab Title | Show your products’ Item Includes descriptions in Sellercloud under a specific custom tab on WooCommerce. See Yikes Tab for more information. |
| ProdExp: SC-CustomCol-1/Plugin/Target-Field | Specify the Custom Column, plugin, and target field to send a Freight Shipping Cost to WooCommerce. This setting uses the Advanced Custom Fields (ACF) WordPress plugin. Enter this value into the setting: FREIGHT_SHIPPING_COST, advanced custom fields, freight_shipping_cost. |
| ProdExp: SC-CustomCol-2/Plugin/Target-Field | Specify the Custom Column, plugin, and target field to update any target field on WooCommerce using a Custom Column. This setting uses the Advanced Custom Fields (ACF) WordPress plugin. Follow the format CUSTOM_FIELD, advanced custom fields, custom_field. |
| Reserve Days For Unpaid Orders | Enter the number of days for which product inventory will be Reserved for Unpaid Orders. This is also the number of days during which Sellercloud will check and try to update payment data on orders that have been initially imported as unpaid or authorized. The default is 15. |
| InvPrice Export: Send Variant As Normal | With this setting, Sellercloud will treat Variation Products as if they are regular products when updating inventory. |
| Enable Matrix Option Image | With this setting, Sellercloud will upload Variation Images per variation. You can upload one image per dimension combination, e.g., Color = Red, Size = XL. |
Webhooks
The WooCommerce integration supports webhooks. It uses the same Consumer Key and Consumer Secret credentials obtained in the steps above.
To test the webhook connection in Sellercloud:
- Go to Company Settings.
- Click Toolbox and select Website > Sellercloud Plug-In Website > Cart General.
- Click Edit.
- Enter the Key into the OAuth Consumer Key field and the Secret into the OAuth Consumer Secret field if you have not done so already.
- Click Save.
- Click Actions and select Test Webhook.
To create Webhooks, go to WordPress Admin > WooCommerce > Settings > Advanced > Webhooks.
Orders
With the Cart General Settings, you can choose whether to import orders with Processing, On-Hold, and Pre-Order statuses. You can also select statuses to skip importing with the Order Import: Statuses To Ignore setting. These statuses will be skipped by default: pending, wc-pending, cancelled, wc-cancelled, refunded, wc-refunded, failed, wc-failed, trash, wc-trash.
WooCommerce allows you to authorize payments and capture them later. While an Authorized order downloads to Sellercloud as Authorized, you can refresh the order to refresh the Payment Status when it updates on WooCommerce. Go to the Order Details Page, click Actions, and select Refresh Order From Website. Customer notes will be imported and placed in the Customer Instructions area. This action only checks for updates within the number of days on the Reserve Days For Unpaid Orders setting, which defaults to 15.
To import Store Credits to Sellercloud, you must have the Woocommerce Smart Coupon and Woocommerce Store Credit plugins installed on your website.
Tracking
By default, the order status on WooCommerce must be Processing for an order to be updated with tracking. However, With the Tracking: Allow Update For All Order Statuses setting, Sellercloud will update tracking irrespective of the order’s current status.
You can use the Post-Tracking Order Status setting to select an order status to automatically set on WooCommerce after Sellercloud sends the tracking. The default status is Completed. To set a default order note to post after the tracking is sent, use the Post-tracking Order Note setting.