Overview
The Wish Account Integration allows you to manage your Wish listings directly from the Sellercloud interface. You can seamlessly post products, update listing details, and ensure your Wish store is always up-to-date with the latest inventory and pricing data. Wish listings can be updated both automatically and manually.
To explore other related topics, refer to our Wish Category.
Prepare Products for Wish
Products must meet certain minimum configuration requirements to be posted on Wish. You can prepare products for Wish individually or in bulk.
Individually
To prepare a single product for Wish:
- Go to the Product Details page.
- Click Toolbox and select Channels > Wish Properties.
- Click Edit.
- Check the Ready To Post field in the General panel:
- A red No message means the product is not ready. Hover over it to see what you must do to prepare the product for posting.
- After making changes, click the Refresh Ready To Post Status
- A green Yes message means the product is ready for posting.
- If the product is not ready yet, update all required information.
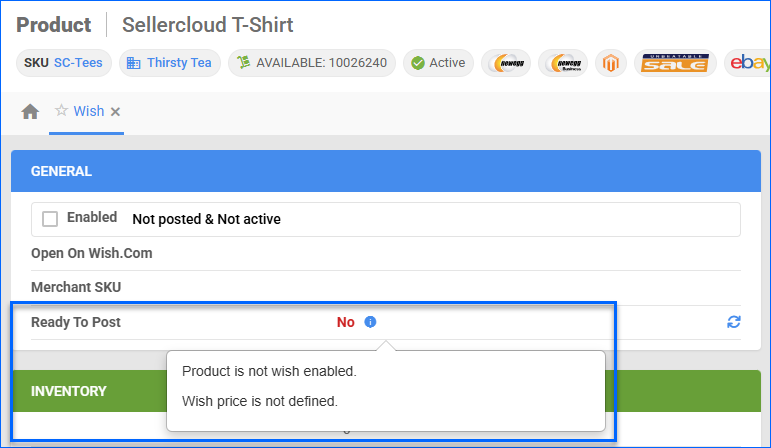
- Once the product is ready to post, check the Enabled
- Click Save.
In Bulk
With a Bulk Product Update that includes the column headers listed below, you can prepare multiple products for Wish simultaneously.
| Product Field | Bulk Update Column | Description |
| Enabled | WishEnabled | Enable Sellercloud to send inventory and price updates for the product to Wish. |
| Gallery Default Image | GalleryImageURL | The Gallery Default Product Image. Enter a public URL to an image when doing a bulk update. |
| Long Description | LongDescription | A detailed description of the product. |
| Wish Price | WishPrice | The product’s price on Wish. |
| Wish Title | WishProductTitle | The product’s title on Wish. This field is automatically generated from the Product Name at first, but you can update it as preferred. |
| Wish Tags | WishProductTags | Keywords or phrases assigned to enhance discoverability. Wish allows a maximum of 10 tags per product. This field is automatically generated from the Product Name at first, but you can update it as preferred. In addition, you can enable the setting Enable Auto Update Local Product Tags From Active Listings on the Wish General Settings page to automatically import tags from Wish. |

Post Products on Wish
You can post products on Wish individually or in bulk.
Individually
To post a single product on Wish:
- Go to the Product Details page.
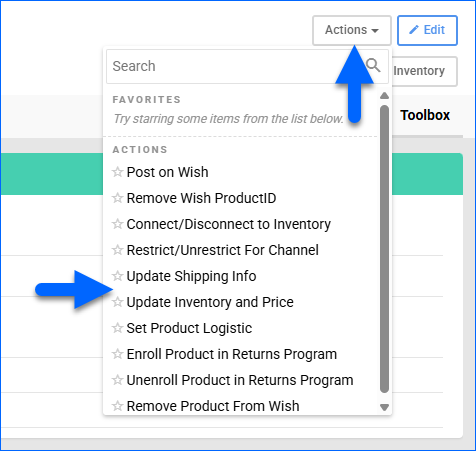
- Click Toolbox and select Channels > Wish Properties.
- Click Actions, and select Post on Wish.

In Bulk
To post multiple products on Wish:
- Go to Catalog > Manage Catalog.
- Select the products you want to update.
- Click the Actions icon in the bottom-right corner, and select Launch on Channel.

- Select Wish and click Launch.
- The task will be linked to a Queued Job. Once it finishes, you will receive a Notification, and the update will be sent to Wish.
Update Wish Listings
You can set up Sellercloud to automatically update the inventory and prices of your Wish-enabled products regularly to help keep your Wish store up-to-date. You can also update listing details manually, either individually or in bulk.
Automatically
To initiate regular automatic Wish listing updates:
- Go to Company Settings.
- Click Toolbox and select Channels > Wish > General Settings.
- Click Edit.
- In the Options panel, check Enable Inventory Update and Enable Price Update.

- Click Save.
Manually
To update Wish listings individually:
- Go to the Product Details page.
- Click Toolbox and select Channels > Wish Properties.
- Click Actions, and select:
- Update Inventory and Price – Update both the available quantity and the price on Wish.
- Update Shipping Info – Update the product’s lead time, dimensions (length, width, height), and weight to Wish.
To update Wish listings in bulk:
- Go to Catalog > Manage Catalog.
- Select the products you want to update.
- Click the Actions icon in the bottom-right corner, and select:
- Update Inventory on Channel – Adjust the product’s stock levels on Wish based on the inventory available in Sellercloud.
- Update Prices on Channel – Update the product’s prices on Wish based on the prices set in Sellercloud.