Overview
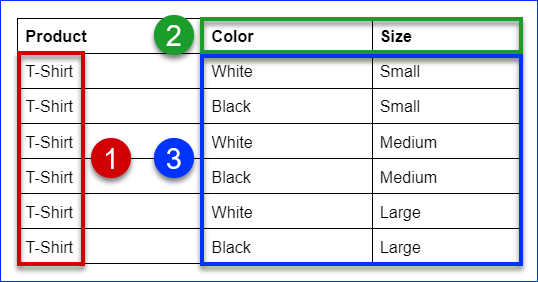
Variation Products are a classification method that involves grouping different variants of the same product under a single listing. For example, consider a T-shirt available in different sizes and colors. Instead of creating separate listings for each size and color combination, you group them under one listing. This grouping simplifies the shopping experience for customers and helps you manage inventory, pricing, and product information more efficiently.
Variation products are a common feature on various e-commerce platforms. Sellercloud allows you to set up variation products for perfect synchronization with your connected sales channels. When talking about such products, Sellercloud uses the terms Variations, Dimensions, and Values:
- Variations are products available in different types. One variation can have multiple dimensions.
- Dimensions are the general properties of the variation, such as color or size. One dimension can have multiple values. See Variation Dimensions for more information.
- Values are the features of each dimension. If the dimension is color, the value could be white or blue. If the dimension is size, the value could be small, medium, or large.
Create Variations
You can create variations manually one at a time, or in bulk.
Manually
To create a single variation:
- Go to a Product Details Page.
- Click Toolbox and select Variations.
- This page lets you create, update, and select Variation Dimensions:
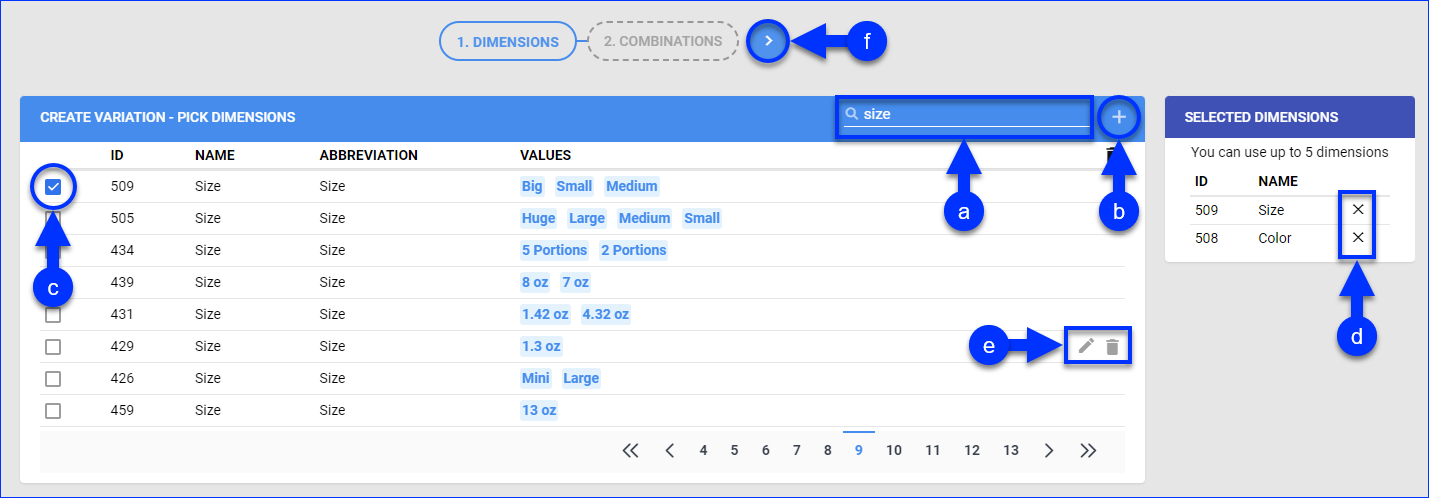
- Use the search bar to search for dimensions by name.
- Click the + icon to create a new dimension.
- Check the box next to a dimension to add it to the Selected Dimensions on the right. Your product variations will be created from these dimensions and the combinations of their different values.
- Click the X icon under the Selected Dimensions panel to remove a dimension.
- To modify a variation, hover it and click the Update variation pencil icon or the Delete variation trash icon.
- Once you have selected dimensions, click the Next step arrow icon on top.
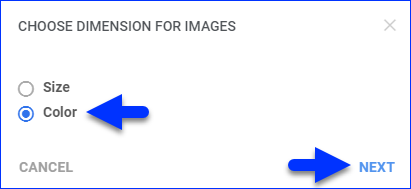
- Choose a dimension for Variation Images and click Next.
- This page lets you configure your variation combination SKUs:
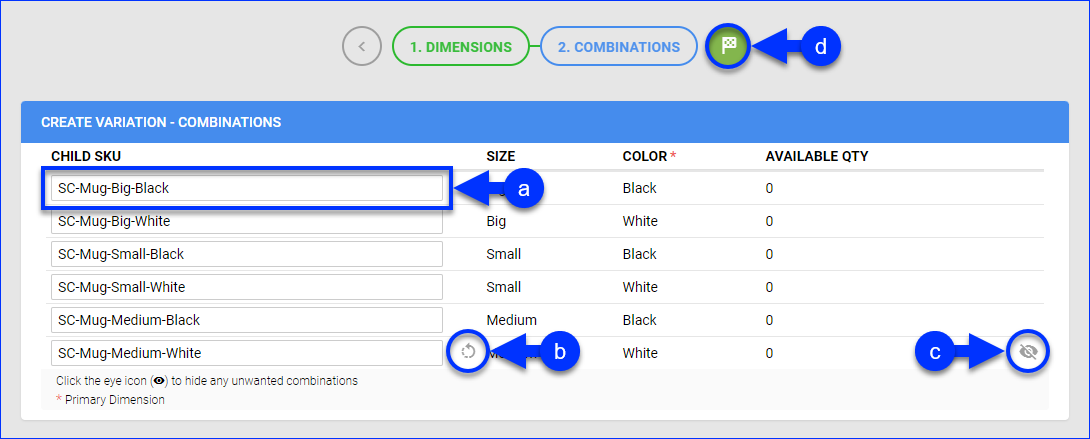
- You can change each variation’s SKU under the Child SKU column.
- Hover over a variation and click the Generate SKU icon to generate a new SKU name.
- Hover over a variation and click the Hide combination icon to prevent it from being added.
- When you are ready to finish the setup, click the Finish icon.
- Next, you can add Variation Images.
In Bulk
To create multiple variations at once:
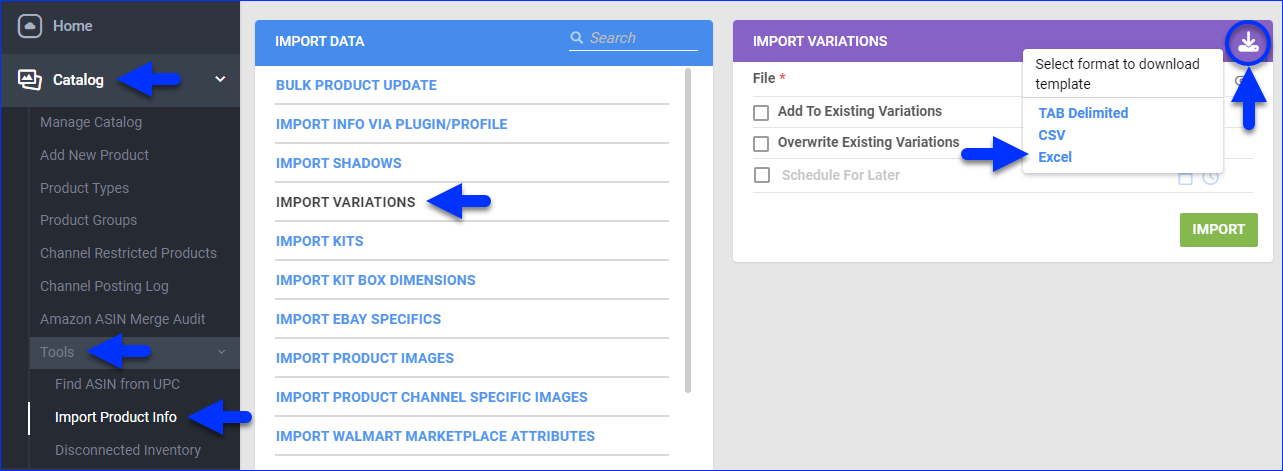
- Go to Catalog > Tools > Import Product Info > Import Variations.
- Click the Download icon on the top right of the Import Variations header and then select the file type of your template.
- Open the template file and populate the columns.
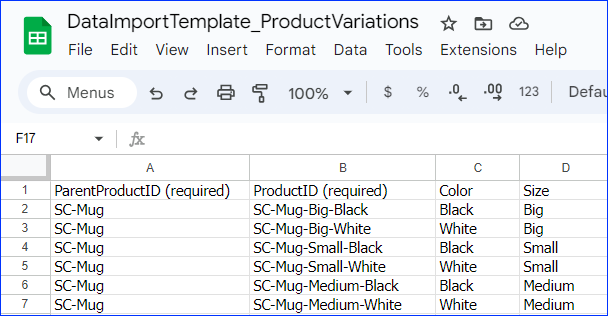
- ParentProductID – The parent variation SKU. Enter it on every row with a child variation of that parent.
The variation parent must already exist in your Sellercloud catalog. - ProductID – The child variation SKU. If the SKU does not exist, it will be created as a variation child.
- Remaining columns – The dimension values. If any dimensions or values don’t exist in Sellercloud, they will be created.
You can add more columns with dimension names in the header to create new dimensions.
- ParentProductID – The parent variation SKU. Enter it on every row with a child variation of that parent.
- Save the file and return to Sellercloud.
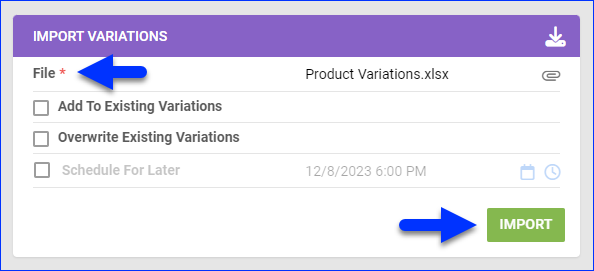
- Click File and select the updated template.
- Use the Add To Existing Variations and Overwrite Existing Variations settings to control the import:
-
- To update the existing variations and add new ones, check both Add To Existing Variations and Overwrite Existing Variations.
- To add new variations without updating existing ones, check only Add To Existing Variations.
- To update existing variations without adding new ones, check only Overwrite Existing Variations. Be careful with this option, as it will delete any currently existing variations that are not in your file.
If you don’t check either box, updates will apply if your file contains only new variations or only changes to existing ones. If it contains both, nothing will update. -
- Optionally, you can check Schedule For Later to import the file at a later time.
- Click Import. A Queued Job will be created.
- Next, you can add Variation Images.
Manage Variations
To manage a variation product:
- Go to a Product Details Page.
- Click Toolbox and select Variations.
- Click Edit.
- Use the following options:
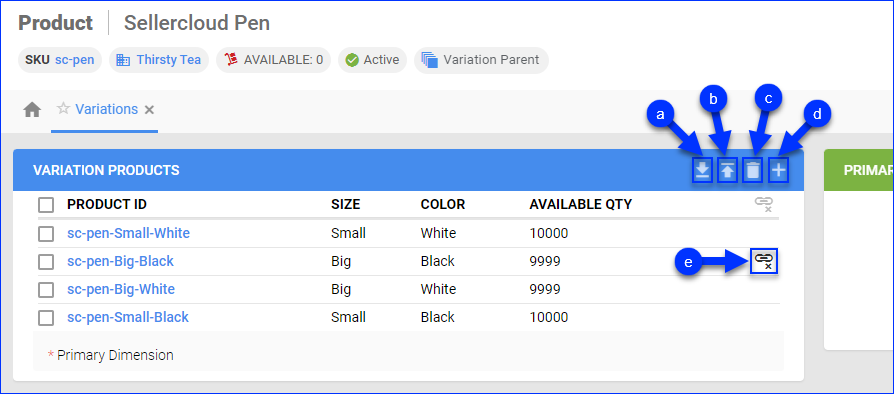
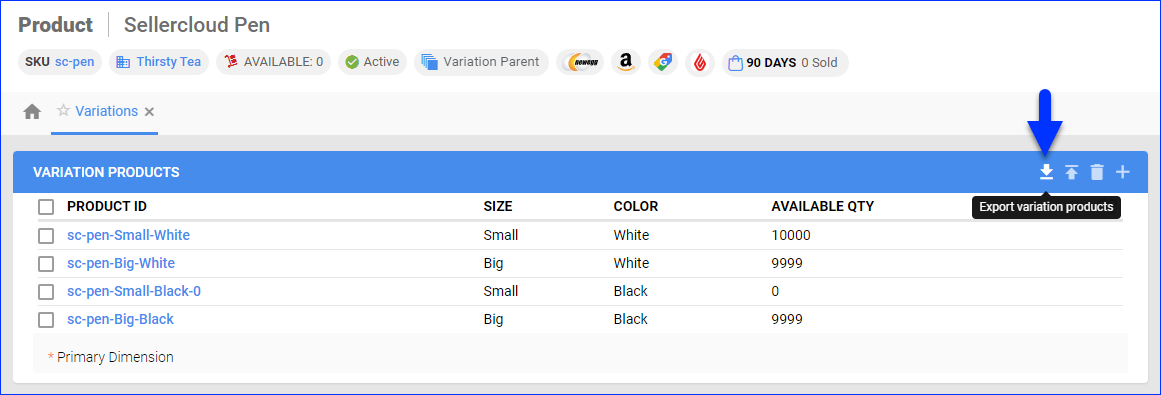
- Export variation products – Export all variations on the page to a .csv file.
- Import variation – Import new variations from a .csv or Excel file.
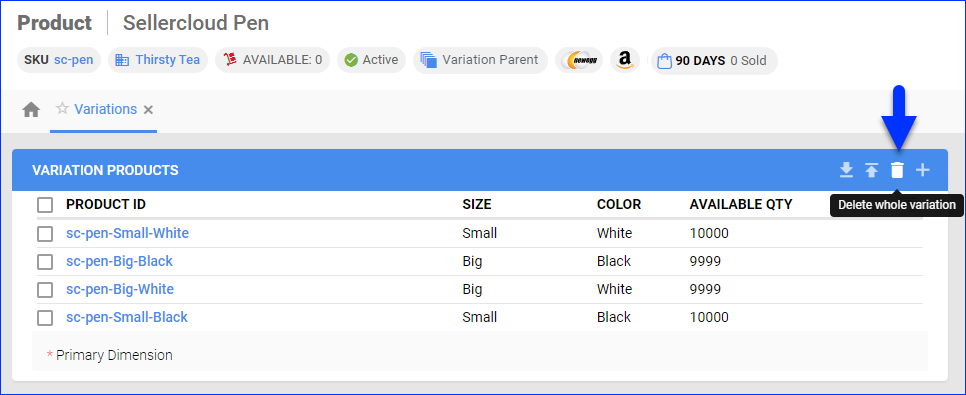
- Delete whole variation – Delete the variation relationship between the parent SKU and all child SKUs. Optionally, you can also delete the child SKUs.
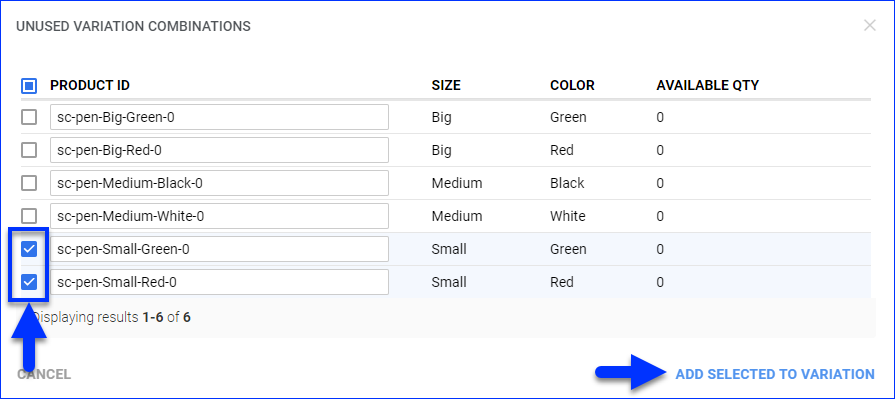
- Add unused variation products – Select unused variations and add them to the product.
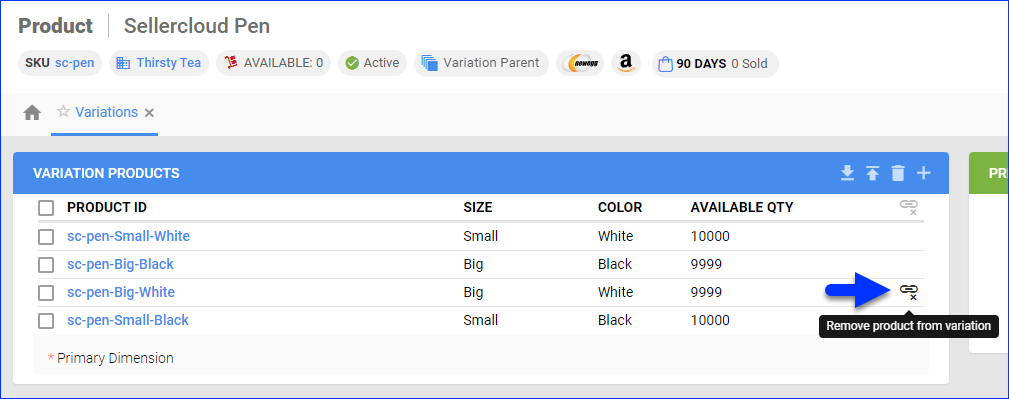
- Remove product from variation – Remove a child SKU from the variations list and add it to the list of unused variations. This action doesn’t delete the child SKU – it just turns it into a regular SKU. You can re-add it as a variation with the Add unused variation products option.
Channel Variations
Most channels don’t require variation SKUs to be configured as such on Sellercloud. However, for some channels, it’s required for the synchronizaton to work properly. For details on syncing variation items between specific channels and Sellercloud, see:
- BigCommerce V2
- BigCommerce V3
- eBay
- Houzz
- NewEgg.com
- Sears
- Shift4Shop (Previously 3D Cart)
- Shopify
- Tanga
- TikTok Shop
- Walmart Marketplace
- Wayfair
- Wish
- WooCommerce
You can also configure Variation Name Mapping, which lets you map Sellercloud variation names to channel-specific variation names. This way, you ensure you won’t use the same variation name on another channel.
Delete Variations
You can remove child SKUs from a variation manually or in bulk with a file import. You can also delete an entire variation.
Manually
This action doesn’t delete the child SKUs. It just turns them into regular SKUs and adds them to the list of unused variations. You can re-add them as variations with the Add unused variation products option.
To remove a single child SKU from a variation:
- Go to a Product Details Page.
- Click Toolbox and select Variations.
- Click Edit.
- To remove a single child SKU, hover over it and click Remove product from variation.
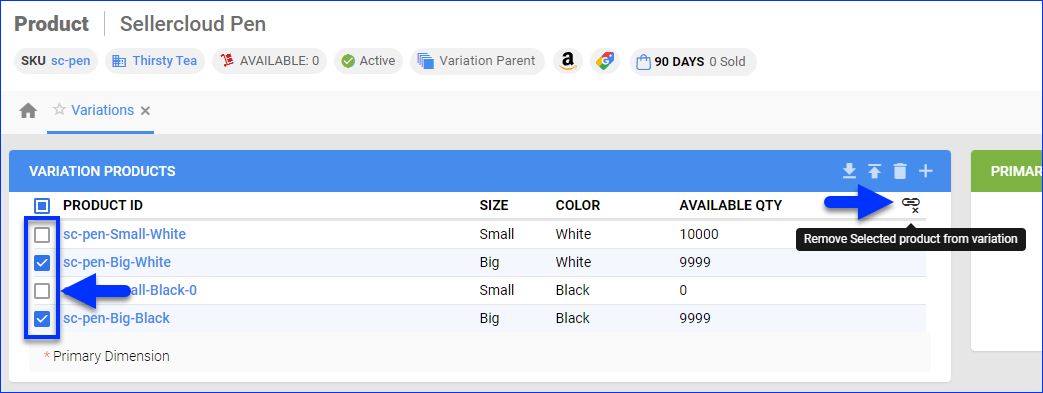
- To remove multiple child SKUs, check the boxes on their left to select them, then click the Remove selected product from variation icon above the list of child SKUs.
With a File Import
This action doesn’t delete the child SKUs, it just turns them into regular SKUs. However, they won’t be added to the list of unused variations, so you won’t be able to re-add them with the Add unused variation products option.
To remove multiple child SKUs from a variation:
- Go to a Product Details Page.
- Click Toolbox and select Variations.
- Click Edit.
- Click Export variation products.
- Open the exported file and remove any unwanted variations.
- Save the file and return to Sellercloud.
- Go to Catalog > Tools > Import Product Info > Import Variations.
- Click File and select the updated file.
- Check Overwrite Existing Variations.

- Click Import. A Queued Job will be created.
Delete an Entire Variation
To delete the variation relationship between the parent SKU and all child SKUs:
- Go to a Product Details Page.
- Click Toolbox and select Variations.
- Click Edit.
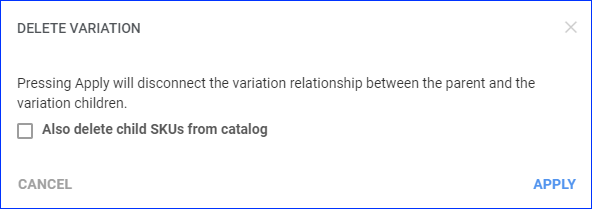
- Click Delete whole variation.
- Optionally, you can check Also delete child SKUs from catalog.

- Click Apply.
Overview
Variation Products are a classification method that involves grouping different variants of the same product under a single listing. For example, consider a T-shirt available in different sizes and colors. Instead of creating separate listings for each size and color combination, you group them under one listing. This grouping simplifies the shopping experience for customers and helps you manage inventory, pricing, and product information more efficiently.
Variation products are a common feature on various e-commerce platforms. Sellercloud allows you to set up variation products for perfect synchronization with your connected sales channels. When talking about such products, Sellercloud uses the terms Variations, Dimensions, and Values:
- Variations are products available in different types. One variation can have multiple dimensions.
- Dimensions are the general properties of the variation, such as color or size. One dimension can have multiple values. See Variation Dimensions for more information.
- Values are the features of each dimension. If the dimension is color, the value could be white or blue. If the dimension is size, the value could be small, medium, or large.
Create Variations
To create a variation listing, also known as an N-Matrix, in Sellercloud’s original interface, select Enable Product N-Matrix in the Client Settings. 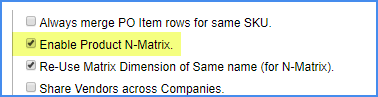
- Go to Settings > N Matrix.
- Press Add New Dimension.

- Complete and save the following fields:
- Unique Name – Name of a particular dimension to be associated with the intended products
- Display Name – Name as it appears on the channel
- Abbreviation – An abbreviated form
- Manufacturer – For reference (not required)
- Product Type – For reference (not required)

- Click on Manage Values to edit values (such as colors, sizes, flavors, etc.).

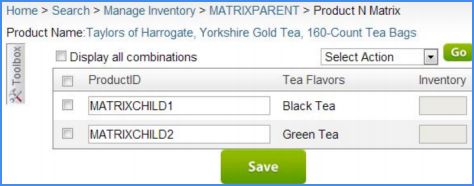
- Add a new product to your catalog with a name that reflects that it is a parent product of the variations. (In this example, “MatrixParent,” as shown below in Step #7.)
- On the parent product’s Product Summary, click Toolbox > N-Matrix > Matrix General.
- Choose the dimensions to add to this product (if necessary, add a new dimension) > Continue (at bottom of page).

- Copy and paste a product SKU into its corresponding Product ID to build it on a parent and child scheme.
- Learn how to set images on variations.
Bulk Create Variations
You can create variation dimensions in bulk by downloading an Excel template with pre-defined column headers and then populating the file and importing it:
- Click Settings > N Matrix.

- Click Download Template.

- Open the downloaded template and enter the desired values. Note: The Manufacturer and Product Type columns are not required.

- Save the template file with a unique name.
- On the N Matrix Dimensions page, click Choose File > find the file and click Open.
- Click Import dimensions. Your new dimensions will appear in the grid.

Split a Variation
A variation that has multiple dimensions can be split into many new variations by removing one of the dimensions. This is important when taking items from eBay where many dimensions are supported and publishing them to sites like Amazon, where only size and color are supported. For example, an eBay listing for a baseball cap might have variations by team, color, and size and the team dimension would need to be removed before it can be published onto Amazon. You can split a variation from the ProductDetail page. ‘Split n-Matrix’ is an item on the n-Matrix submenu. Once the original n-matrix has been split, the child SKUs will be members of more than one parent n-matrix. If you click n-Matrix from the child SKU it will then give you the option to navigate to either of the parents.
Import Variations
You can create new variations in bulk using a file import, or add products to an existing variation using the same file import.To import a new variation configuration, do the following:
- Click Inventory > Import Product Info > Import Product N-Matrix.
- Select a File Type from the dropdown > click Download Template.
- In the ParentProductID column, enter the variation Parent SKU. You must enter the parent SKU in every row that has a variation child of that parent. Important! The variation Parent must exist in your SellerCloud catalog before importing.
- In the ProductID column, enter the product ID of the variation product. If the Product ID matches an existing SKU in your catalog, that SKU will be configured as a variation child. If the SKU does not exist, the import will create it and configure it as a variation child.
- In the remaining columns, enter the values of the dimensions associated with that variation. In the image below, there are two dimensions – Color and Size – and on the product rows are Red, Green, Small, and Large, respectively.
- If you have more dimensions for this variation, add more columns with that dimension name as the header. If dimensions or values entered do not exist in SellerCloud, they will be created with this file import.

- Save the file with a unique name.
- On the Import Product N-Matrix page, find and select the file.
- Click Import Products Info. The import creates a queued job to create the variation configuration.
Add Products to a Variation
The easiest way to add products to an existing variation is to export the existing variation, and then import it with the updated products:
- Open the Manage Inventory page and search for the variation.
- Select the variation Parent > Action Menu > Export N Matrix > Go.
- Add the products to the file as instructed above, then save the file.
- Click Inventory > Import Product Info > Import N Matrix (neither checkbox is required).
- Choose File > and then click Import Matrix.
Products can be added on the interface as well on the variation properties page. Check the “Show All” checkbox to reveal all available options. You can add more dimensions and values there as well.
Manage Variations on Marketplaces
- Most channels don’t require variation SKUs to be configured as such on Sellercloud. However, for some channels, it’s required for the synchronizaton to work properly. For details on syncing variation items between specific channels and Sellercloud, see:
- BigCommerce V2
- BigCommerce V3
- eBay
- Houzz
- NewEgg.com
- Sears
- Shift4Shop (Previously 3D Cart)
- Shopify
- Tanga
- TikTok Shop
- Walmart Marketplace
- Wayfair
- Wish
- WooCommerce
You can also configure Variation Name Mapping, which lets you map Sellercloud variation names to channel-specific variation names. This way, you ensure you won’t use the same variation name on another channel.