Overview
Certain sales channels enforce specific guidelines about the products permitted for sale. In Sellercloud, you can use the Restrict Products for Channel feature to prevent such SKUs from being posted on a specific marketplace. Once marked as Restricted, the SKUs will not be posted via automated or manual actions, minimizing the possibility of errors.
This article provides detailed information about this functionality and the different options for configuring your products.
Restrict Products for Channel
Restricting a product for channels works differently based on whether it is already listed:
- Currently Posted – Restricting a product that is already posted on a channel does not completely exclude it from inventory feeds. Instead, it sets the quantity on that channel to zero and prevents further manual updates from going through.
- Currently Not Posted – Restricting such SKUs will prevent all posting and updating actions, and they will be excluded from any automatic feeds to the selected channel.
There are several ways to restrict a product for channels within Sellercloud. Refer to the section below for more information.
Via the Channel Details Page
To restrict a product for a channel:
- Navigate to Catalog > Manage Catalog > Search.
- Open the Product Details Page of a SKU.
- Go to Toolbox > Select a Channel.
- Select Actions > Restrict/Unrestrict For Channel.

Via the Manage Catalog Page
To restrict multiple products for a channel(s):
- Navigate to Catalog > Manage Catalog > Search.
- Select Products from the grid.
- Open the Action Menu > Restrict/Unrestrict For Channel.
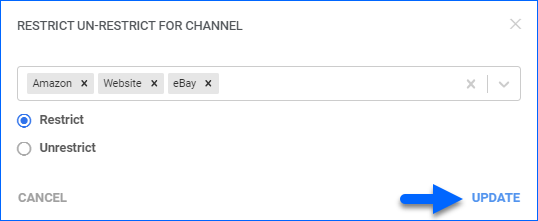
- In the pop-up modal:
- Select the Channels for which you are performing the action.
- Select whether you are Restricting the SKUs or removing a restriction.
- Click Update.
Via the Channel Restricted Products Page
To restrict one or several products:
- Go to the Channel Restricted Products page.
- Click the + icon in the panel header.
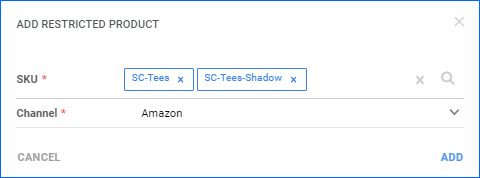
- In the pop-up modal, fill in:
- SKU – Enter a product to restrict. This field accepts multiple values, allowing you to restrict several products at once.
- Channel – Pick the specific channel for which to restrict your SKUs.
- Click Add.
Via File Import
Alternatively, you can use our Bulk Update Tool:
- Go to Catalog > Tools > Import Product Info.
- Select Bulk Product Update.
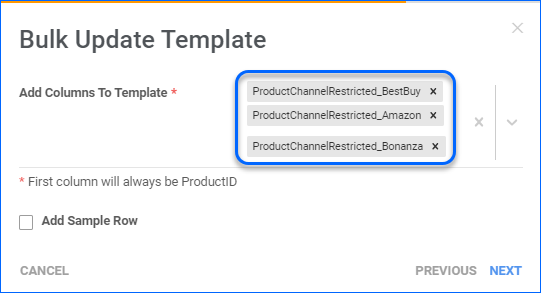
- Generate a template and add the relevant columns. For example:
- Return to the Bulk Product Update page and upload your file.
Channel Restricted Products Page
The Channel Restricted Products page consolidates all restricted SKUs, allowing you to view and manage all of them from one place.
See the sections below for a breakdown of the available search filters, grid data, and actions.
Filters
The Channel Restricted Products page automatically loads all currently restricted SKUs once you open it. You can then use the available filters to pull up specific results:
- Channel – Filter the grid data by the channels for which your products are already restricted.
- SKU – Search by the Product ID of SKUs that are currently restricted for one or more channels. You can select multiple values in this filter.
- Kit – Filter based on whether the SKU is a Kit Parent.
- Has Available Qty – Pick Yes, No, or All. Filter based on current aggregate quantity.
- Brand – Filter by Product Brand. This also relates to the Restrict Brands functionality.
- Vendor – Search by the SKU’s selected Default Vendor.
- Manufacturer – Filter by product Manufacturer.
Columns
The grid columns provide the following information:
- SKU – The Sellercloud Product ID. It is also a hyperlink that redirects you to the relevant Product Details page.
- Product Name – The Sellercloud Product Name.
- Channel – This column displays the logos of channels the SKU is currently restricted for. Click on an icon to Remove the Restriction.
Actions
The following actions are available on the Channel Restricted Products page:
- Add Restricted Product – Click on the + icon in the panel header to open the Add Restricted Product modal that allows you to add a new channel restriction for one or several SKUs.
- Export selected to Excel – Allows you to export only the rows you previously selected from the grid. Click on the three-dots menu in the panel header to access this action.
- Export all to Excel – Allows you to export all existing restrictions. This action always exports all products, regardless of whether you have loaded a search beforehand. Click on the three-dots menu in the panel header to access it.
- Remove Restriction – Click on a channel icon within the grid to Unrestrict that SKU for this specific marketplace. You will be prompted to confirm the action.
Restrict Brands
Product Brands offer a way to ensure products are restricted for the necessary channels without manually configuring each SKU. Once you set up the brand, any product associated with it is automatically restricted as well.
To restrict brands:
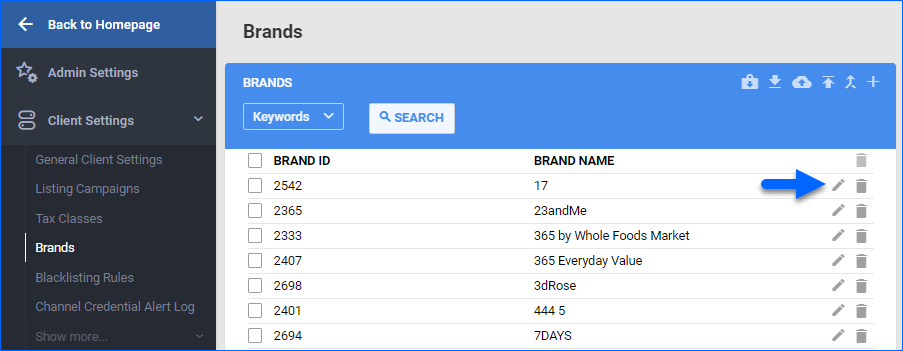
- Go to Settings > Client Settings > Brands.
- Click the Edit icon to the right of the brand.
- Check the corresponding Restricted box to the right.
- Click Save.
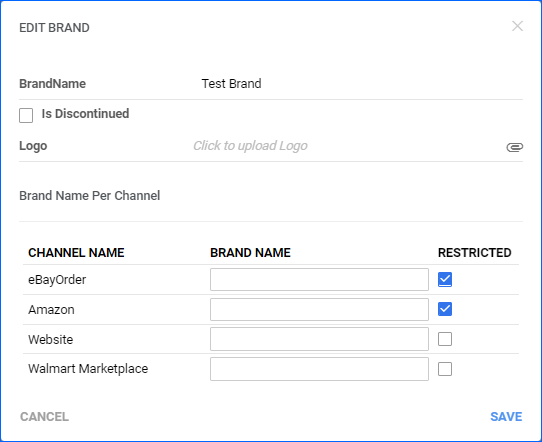
To remove the restriction, uncheck the Restricted checkbox.
Overview
Certain sales channels enforce specific guidelines about the products permitted for sale. In Sellercloud, you can use the Restrict Products for Channel feature to prevent such SKUs from being posted on a specific marketplace. Once marked as Restricted, the SKUs will not be posted via automated or manual actions, minimizing the possibility of errors.
This article provides detailed information about this functionality and the different options for configuring your products.
Restrict Products for Channel
Restricting a product for channels works differently based on whether it is already listed:
- Currently Posted – Restricting a product that is already posted on a channel does not completely exclude it from inventory feeds. Instead, it sets the quantity on that channel to zero and prevents further manual updates from going through.
- Currently Not Posted – Restricting such SKUs will prevent all posting and updating actions, and they will be excluded from any automatic feeds to the selected channel.
There are several ways to restrict a product for channels within Sellercloud. Refer to the section below for more information.
Via the Channel Properties Page
To restrict a product for a channel:
- Navigate to Inventory > Manage Inventory > Search.
- Open the Product Details Page of a SKU.
- Go to Toolbox > Select a Channel.
- Depending on the channel, the option may be a checkbox or an action
Via the Manage Inventory Page
To restrict multiple products:
- Navigate to Inventory > Manage Inventory > Search.
- Select Products from the grid.
- Click Action Menu > Restrict/Unrestrict for Channel > Go.
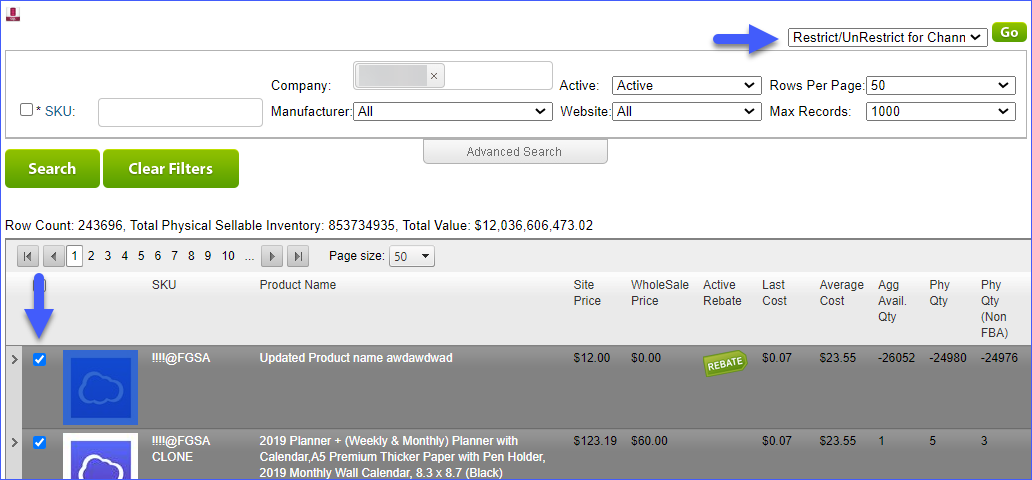
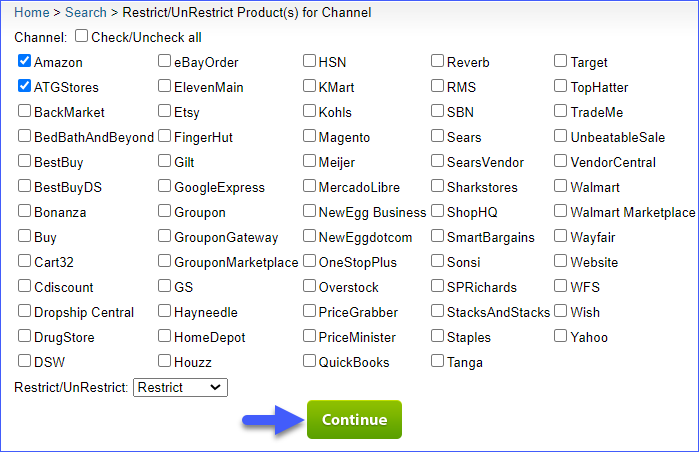
- Select Restrict or Un-Restrict from the dropdown.
- Choose the channels > Continue.
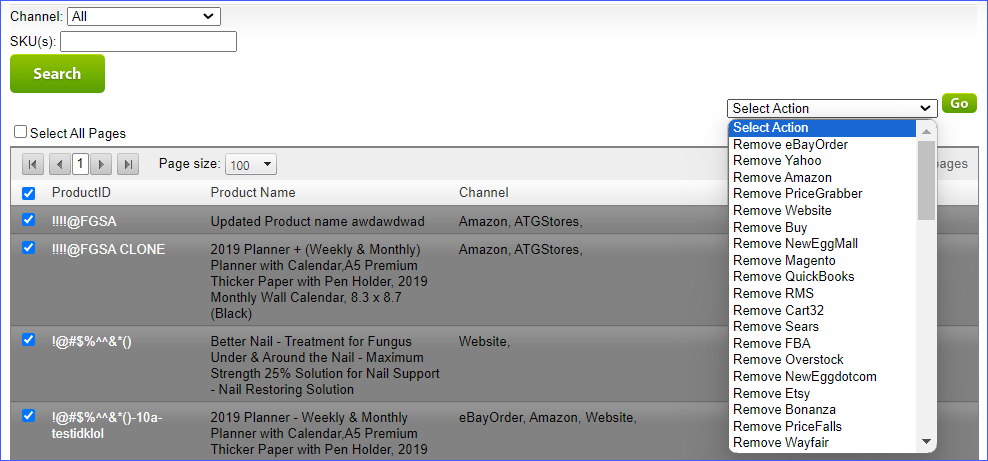
- See a list of products restricted from channels under Inventory > Channel Restricted Products.
- To remove a restriction, select the product(s) here, choose the restricted channel from the Channel dropdown, and click Select Action > Remove Restriction from specific channels or ALL at once > Go.
Channel Restricted Products Page
The Channel Restricted Products page consolidates all restricted SKUs, allowing you to view and manage all of them from one place.
See the sections below for a breakdown of the available search filters, grid data, and actions.
Filters
The Channel Restricted Products page automatically loads all currently restricted SKUs once you open it. You can then use the available filters to pull up specific results:
- Channel – Filter the grid data by the channels for which your products are already restricted.
- SKU(s) – Search by the Product ID of SKUs that are currently restricted for one or more channels. This filter accepts comma-separated values.
Columns
The grid columns provide the following information:
- Product ID– The Sellercloud Product ID. It is also a hyperlink that redirects you to the relevant Product Details page.
- Product Name – The Sellercloud Product Name.
- Channel – This column displays the names of channels for which the SKU is currently restricted.
Actions
The Actions Menu allows you to Unrestrict selected products. Each channel is a separate action. Check the boxes of your SKUs in the grid and select an action from the dropdown, for example, Remove Amazon. Then, click Go.
Restrict Brands
Product Brands offer a way to ensure products are restricted for the necessary channels without manually configuring each SKU. Once you set up the brand, any product associated with it is automatically restricted as well.
To restrict brands:
- Go to Settings > Brands > Choose a brand and press Edit.
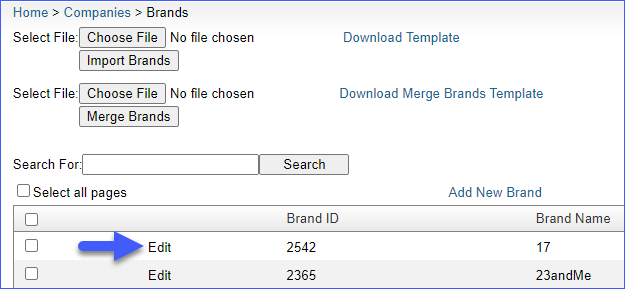
- Select the channels you want to restrict.
- Enter the Brand Name for each channel.
- Check the corresponding Restricted box to the right.
- When ready, scroll down and click Save.
